1
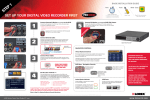
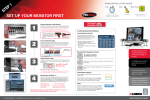
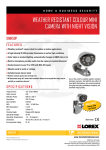
L104 Series Hand Tools Time Hardware Skill Level Hi Speed Skills - Easy Router Under 20 Minutes* * Installation time may vary based on application and camera cabling Quick Start Guide Tools PACKAGE CONTENTS & MENU CONTROLS: Hand Tools Skill Level Intermediate easy SYSTEM SET UP CONTROLS: System Contents: 1 x Compact Digital Video Recorder 1 x Power Adaptor 1 x Power Adaptor Cable 1 x USB Cable (male to male) 1 x Remote Control 1 x Hardware Manual 1 x Quick Start Guide 1 x Software CD For detailed setup information, please refer to your User’s manual. advanced MENU NAVIGATION CONTROLS: • Enter the MENU screen by pressing the MENU button (). Enter the password to display the Menu Selection Screen. The Default password is <111111> - press MENU to accept the password. • Scroll through the 7 options by pressing the UP & DOWN () buttons on the Front Panel or Remote Control. • To enter a sub-menu, navigate to the option and press the RIGHT button (). To exit a SUBMENU, press the MENU button (). • To change the options, press the RIGHT and LEFT buttons (). • Press the MENU Button () to accept the setting change, and return to the previous menu. • To exit the MAIN MENU, press the MENU button (). *Channel/ Port configuration and HDD (hard disk drive) capacity may vary by model. Check your package for specific content information. easy Plug & Play connectors, On screen set up • MENU Button () - Accesses the setup menu, and returns to previous menu options. • UP / DOWN Controls () - Move Up/Down to move through the Menu Options • LEFT / RIGHT Controls () - Move Left / Right to enter a Menu Option, and press left and right to change the Menu Settings. STEP 1 - Set up Your DIGITAL VIDEO RECORDER First 1 2 3 DVR - FRONT PANEL VGA VIDEO OUTPUT (L104V SERIES ONLY) - Video Output port to connect the unit to a Computer Monitor. BNC VIDEO OUT - Video Output port to connect the unit to a DVR or TV. DVR - REMOTE CONTROL Connect Cameras & Monitor (not included) to the DVR: Connect Power Cable to the DVR: Set the Time and Date: Connect the first camera (with BNC connection type. Requires additional power adaptor) to the CH1 input. Follow the same steps 1 to connect the additional cameras*. Connect one end of the Power cable to the DVR, the other end to an electrical outlet. This unit powers ON once it is plugged in to the power outlet. Click the MENU button from the front panel of the DVR (or the remote control) to enter DVR SETUP (default password is 111111). From the MAIN MENU select the SYSTEM SETUP by pusing the right arrow key (channel 3). Scroll down to the DATE/TIME MENU. Press the right arrow key to enter into the menu to set Time and Date. * NOTE: Test the cameras prior to selecting a permanent mounting location by temporarily connecting the Cameras and Cables to your DVR. NOTE: IN ORDER TO ACCESS THE DVR MENU WHILE THE UNIT IS RECORDING, YOU HAVE TO FIRST STOP THE RECORDING AND ACCESS THE MENU. L104 Series Quick Start Guide_R1 Page Congratulations! You have completed Step 1 successfully. You can now view (when connected to a monitor), record and playback images on your DVR. www.lorexcctv.com Intermediate under 15 minutes Time Hand Tools under 30 minutes Hardware Hardware Router Under 30 Minutes* * Installation time may vary based on application Skill Level STEP 2 - SET UP DVR PC VIEWER SOFTWARE 2 1 under 60 minutes Computer & Router* over 60 minutes Router Skills - Intermediate Skill LevelHi Speed easy advanced PlugIntermediate & Play connectors, On screen set up * Minimum System Requirement: Windows XP, Pentium IV, 256MB Ram (512MB Recommended), 200MB Storage, Internet, DSL or Cable Modem Intermediate easy 3 advanced Other end to your computer’s USB drive Computer - not included DVR PC Viewer Software: Connecting the DVR: The PC Viewer software (included with the DVR) allows the Video Data from the DVR to be viewed using a USB link to a PC. Video saved to the PC Hard Drive (from the DVR) is written as a *.MYS file format (can only be read using the PC Viewer Software) or as a *.AVI file (can be viewed on Windows Media Player - Video CODEC is not included). 1. Make sure that the power cable for the DVR is disconnected. 2. Use the provided USB Cable (Male to Male). Connect one end to the front USB Port on the DVR, and connect the other end to a PC. USB Port. 3. Connect the power cable to the DVR. The PC should automatically detect the DVR as a New USB Device and install the Hardware. 4. Launch the PC Viewer Application. The software will automatically detect the DVR, and launch the “PC Viewer Storage Device Detection” window. product support Starting the PC Viewer Application: To run the PC Viewer Application, launch the PCViewer_V3.8_EN.exe file from the included CD-ROM. The application will attempt to detect a connection to the DVR before launching the viewing window: • If the DVR is detected, the application will load and prompt the user to begin playing the most recent recorded video (Recent Position dialogue window). It’s all on the Web www.lorexcctv.com For detailed setup information, please refer to your User’s Manual. For additional information, please visit our website www.lorexcctv.com/support • If the DVR is not detected, the application will open an error dialogue window (Detection Error dialogue window) indicating the storage device is not found, and will launch the MYS Player Window. Email Support: [email protected] Toll Free Technical Support - North America: 1-888-42 LOREX (1-888-425-6739) Toll Free Technical Support - International (outside of North America): 00-800-425-6739-0 Lorex International Website - www.lorexinternational.com L104 Series Quick Start Guide_R1 Page Congratulations! You have completed Step 2 successfully. You can now view DVR images on your PC. www.lorexcctv.com