1
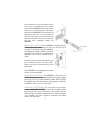
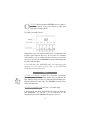
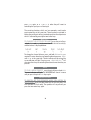
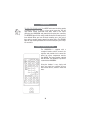
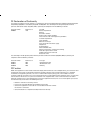
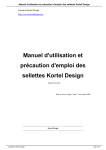
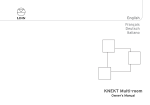
WAKONDA
OWNERS MANUAL
MAINS PLUGS
This appliance is supplied with a non-rewireable mains plug for the intended country.
Replacement mains leads can be obtained from your Linn retailer.
Should you need to change the plug please dispose of it carefully.
A plug with bared conductors is dangerous if engaged in a live socket.
The Brown wire must be connected to the Live (Line) supply pin.
The Blue wire must be connected to the Neutral supply pin.
The Green/Yellow wire must be connected to the Earth (Ground) supply pin.
Please contact your retailer or a competent electrician if you are in any doubt.
GENERAL SAFETY INSTRUCTIONS
1.
Read instructions. Read the safety and operating instructions before operating
the appliance.
2. Retain instructions. Retain the safety and operating instructions for future
reference.
3. Heed warnings. Observe all warnings on the appliance and in the operating
instructions.
4. Follow instructions. Follow all operating and use instructions.
5. Water and moisture. Do not use the appliance near water, for example near a
bathtub, washbowl, kitchen sink, laundry tub, in a wet basement, or near a
swimming pool and the like.
6. Carts and stands. Use only with a cart or stand that is recommended by the
manufacturer.
6a. An appliance and cart combination should be used with care. Quick stops,
excessive force, and uneven surfaces may cause the appliance and cart
combination to overturn.
7. Wall or ceiling mounting. Mount to a wall or ceiling only as recommended by the
manufacturer.
8. Ventilation. Site the appliance so that its location or position does not interfere
with its proper ventilation. For example, the appliance should not be situated on a
bed, sofa, rug, or similar surface that may block the ventilation openings, or
placed in a built-in installation such as a bookcase or cabinet that may impede
the flow of air through the ventilation openings.
9. Heat. Site the appliance away from heat sources such as radiators, heaters,
stoves, or other appliances (including amplifiers) that produce heat.
10. Power sources. Connect the appliance to a power supply only of the type
described in the operating instructions or marked on the appliance.
11. Grounding or polarisation. Do not defeat the safety purpose of the polarised or
grounding type plug. A polarised plug has two blades with one wider than the
other. A grounding type plug has two blades and a third grounding prong. The
wide blade or the third prong is provided for your safety. When the provided
plug does not fit into your outlet, consult an electrician for replacement of the
obsolete outlet.
ii
12. Power cord protection. Route power cords so that they are not likely to be
walked on or pinched by items placed upon or against them, paying particular
attention to cords at plugs, power sockets, and at the point where they exit from
the appliance.
13. Protective attachment plug. As a safety feature the product is equipped with an
attachment plug containing overload protection. See the instruction manual
about resetting or replacing the plug. Should the plug need replacing ensure that
a replacement is used which has the same overload protection as the original.
14.
theshould
unit from
poweronly
supply
before cleaning.byRemove
14. Cleaning.
Cleaning.Disconnect
The product
be the
cleaned
as recommended
the dust and
fingerprints
with a soft, dry cloth. Avoid using domestic cleaning products on the unit.
manufacturer.
15. Power lines. An outdoor antenna should be located away from power lines.
16. Outdoor antenna grounding. If an outdoor antenna is connected to the
tuner/receiver, ensure that the antenna system is grounded to provide some
protection against voltage surges and static build up.
In the USA see article 810 of the National Electrical Code ANSI/NFPA 70
concerning installation requirements.
17. Lightning storms. Unplug this apparatus during lightning storms or when unused
for long periods of time.
18. Objects and liquid entry. Do not let objects or liquids fall into the product. Do not
expose the product to dripping or splashing. Do not place a vessel containing
liquid on top of the product.
19. Damage requiring service. The product should be serviced by qualified
personnel if:
a) The power cord or plug has been damaged.
b) Objects or liquid have fallen into the product.
c) The product has been exposed to rain.
d) The product does not appear to operate normally or exhibits a marked
change in operation.
e) The product has been dropped or the enclosure damaged.
20. Servicing. Don’t attempt to service the product beyond that described in the
operating instructions. All other servicing should be referred to qualified service
personnel.
iii
M
USIC enriches your life. It can stimulate you, relax you,
change your mood and provide entertainment and
pleasure.
A good hi-fi plays recorded music well enough to give you these
benefits, and it will broaden and deepen your appreciation of music.
At Linn, we devote our energy to improving standards of music
reproduction and control because we know that the better and more
accessible the sound, the more you’ll enjoy music at home.
The addition of any Linn component will improve the sound quality of
your system.
We have a policy of continuously improving our products and,
wherever possible, make these improvements available as upgrades.
I
NTRODUCTION The Linn WAKONDA pre-amplifier uses
microprocessor control, Linn’s solid state input switching and
volume control technology, and the latest surface mount
manufacturing techniques to deliver unprecedented audio
performance and ease of use.
The WAKONDA accommodates six input sources, has two
line-outputs and provides outputs for two tape decks. You may record
any source while listening to the same or any other source.
Expansion options include multi-room modules and a tuner which will
simply plug into the internal expansion port.
Like any electronic product, the WAKONDA will perform at its best
when used with the highest quality source. The better the sound from
your turntable, tuner or CD player, the better the sound you will hear
from the other components in the system.
3
I
NSTALLATION Your Linn retailer will install your WAKONDA for
you if you wish and help you with any problems, or you can install
it yourself. If you are in the UK and want some advice you are
welcome to phone our Customer Services on:
FREEPHONE 0500 888 909.
If you are installing your WAKONDA yourself, proceed as follows.
Unpack the WAKONDA and retain the packing for future transportation.
Check the contents are as follows:
WAKONDA Pre-amplifier
Remote handset
Owner’s manual
Mains lead
1 spare fuse (located in the mains inlet connector).
1 pair of phono interconnect cables.
WARNING: THIS APPLIANCE MUST BE EARTHED.
WARNING: USE THE EARTHED MOULDED MAINS LEAD
SUPPLIED. NEVER USE AN UNEARTHED PLUG OR ADAPTOR.
4
IMPORTANT NOTE FOR UK USE: The wires in this mains lead
use the following colour code:
Green-and-yellow:
Blue:
Brown:
Earth
Neutral
Live
As the colours of the wires in the mains lead of this appliance may not
correspond with the coloured markings identifying the terminals in
your plug, proceed as follows:
The wire which is coloured green-and-yellow must be connected to
the terminal in the plug which is marked with the letter E, or by the
earth symbol or coloured green or green-and-yellow.
The wire which is coloured blue must be connected to the terminal
which is marked with the letter N or coloured black.
The wire which is coloured brown must be connected to the terminal
which is marked with the letter L or coloured red.
POSITIONING
You can put your WAKONDA more or less anywhere you find
convenient, but there are a few considerations which may affect your
choice. Turntables have short signal leads, so the WAKONDA will
need to be close to your turntable. However, if they are too close
together the cartridge may pick up hum from the amplifier, especially
if it is a moving coil cartridge. 30cms between the amplifier and the
cartridge is usually enough to avoid such problems. Some cassette
decks may also pick up hum if they are too close to the WAKONDA.
5
The Linn remote control system is exceptionally sensitive - you should
be able to put your WAKONDA almost anywhere in a room. Keep it out
of direct sunlight, and don’t obscure the control window. Smoked
glass cupboard doors usually present no problems.
CONNECTIONS
Connect your WAKONDA to a mains supply using the supplied mains
cord. Turn it on to see it light up!
Now you know it works, you have to connect it up to everything else,
so turn it off again. All the connections (except headphones) are
made at the rear panel, as illustrated above.
WARNING: THE WAKONDA MUST BE SWITCHED OFF BEFORE
CONNECTING OR DISCONNECTING ANY OF THE PLUGS ON
THE REAR PANEL.
CONNECTING THE SOURCES Your WAKONDA has six inputs and we
would like to encourage you to use as many as possible. So don’t just
connect up your CD player, record player and tuner, but also connect
your television, video recorder and satellite receiver. The difference
this will make to your enjoyment of TV is fantastic. Your Linn retailer
will provide all the necessary leads.
All the input connections on the Linn WAKONDA are RCA phono,
except for the multi-room options.
6
For all connections, ensure that the left channel
of the source is connected to the left (upper)
channel of the WAKONDA and the right channel
of the source is connected to the right (lower)
channel of the WAKONDA. We recommend using
high-quality leads such as Linn interconnect
cable. Linn interconnect cable is directional and
should be connected such that the arrow points
from the source component towards the
WAKONDA.
CONNECTING A TURNTABLE If your WAKONDA is equipped with the
optional phono stage, your retailer will have set it for your type of
cartridge. The back panel will be marked MM for
moving magnet cartridges, or MC for moving coil
cartridges. If you change your cartridge type the
WAKONDA can be easily modified by your
retailer.
Attach the earth connection of the tonearm lead
to the binding post above the phono inputs.
Connect the tonearm lead phono plugs to the
phono inputs.
If your WAKONDA is not equipped with a phono
stage, it will be marked AUX2.
CONNECTING OTHER SOURCES The WAKONDA has either five or six
identical line-level inputs, depending on whether the optional phono
stage is present. They are marked TUNER, CD, AUX1, TAPE1 IN, TAPE2
IN and AUX2 (if present). Connect them up appropriately, using AUX1
and AUX2 for sources such as TV and video.
CONNECTING TAPE RECORDERS You can connect up to two tape
decks to a WAKONDA. The TAPE1 IN sockets on the amplifier should
be connected to the output of tape deck 1 (for playback) and the
TAPE1 OUT socket should be connected to the line input of tape deck
1 (for recording). Tape deck 2 should be connected to the TAPE2
sockets in the same way.
7
OUTPUT CONNECTIONS
LINE OUTPUTS The WAKONDA has two
identical stereo line-outputs to enable the
connection of up to two power amplifiers in your
hi-fi system, thereby avoiding the need for
adaptor cables.
Select a line-output and, using the interconnect
leads provided, connect the left output of the
pre-amplifier to the left input of the power
amplifier, and the right output of the preamplifier to the right input of the power amplifier. Additional power
amplifiers should be connected the same way using the other line
outputs.
CONNECTING HEADPHONES The headphone socket on the front
panel is fed from a dedicated headphone amplifier. The line outputs
to the power-amplifier may be muted when you just want to listen to
headphones. To do this, press the two centre keys.
CONNECTING POWER Connect the mains lead to the WAKONDA
and plug it into a suitable power outlet.
MULTI-ROOM CONNECTIONS
If you have a multi-room system based on the WAKONDA amplifier,
please refer to the Linn KNEKT multi-room system manual. With the
multi-room option fitted, some details of the operation of the
WAKONDA are different from those described in this manual. Where
such difference arise, they are indicated by this symbol
in the margin. Refer to the Linn KNEKT manual for more infromation.
8
O
PERATION We designed the WAKONDA to be as simple as
possible to operate. It has a clear display, a simple front
panel and full remote control.
The control area looks like this:
Although there are many sophisticated features, all commonly used
functions require only one key press. To access the less commonly
used functions, such as balance, two keys must be pressed at the
same time. The status of the WAKONDA is always indicated through
the row of indicator lights.
If you find that your WAKONDA does not respond to the
controls as you expect, please refer to the GETTING
UNSTUCK section on page 15.
POWER
TO TURN THE WAKONDA ON press the POWER button. A green light
will appear next to it. In about three seconds, the LISTEN indicator will
light, and the display will show “Cd”. (When distributed audio input is
fitted the display will show “dA”). The WAKONDA selects the input
shown and volume 30.
TO TURN THE WAKONDA OFF press the POWER button again.
If you get lost in some of the advanced features while learning to use
your WAKONDA, just turn the POWER off and back on. We
recommend you turn the WAKONDA off when it is not in use.
9
▼
INPUT INPUT
▼
Notice that whenever you don’t do anything to your WAKONDA for
about 30 seconds, the display will turn off to save power, showing
only two dashes.
▼
▼
TO SELECT AN INPUT to listen to press the INPUT OR INPUT keys
to step through the inputs, or hold the key down to step through
several.
If your WAKONDA has a phono input, these are the inputs available:
Cd
CD player input
Au
Aux input
t1
Tape deck 1
t2
Tape deck 2
dA
distributed audio (when multi-room option is fitted)
Ph
Phono input
tu
Tuner input
Alternatively, if your WAKONDA is not fitted with a phono input, these
are the inputs that will be available:
Cd
CD player input
A1
Aux input 1
A2
Aux input 2
t1
Tape deck 1
t2
Tape deck 2
dA
distributed audio (when multi-room option is fitted)
tu
Tuner input
10
The display will show the input you have selected and the LISTEN
indicator will light. There is a short delay as you step through inputs
while the volume fades down and then up again between inputs.
While the volume is fading, the LISTEN indicator dims. The lower the
volume control setting the shorter this delay will be.
▼
VOL ▼ VOL
▼
TO CHANGE THE VOLUME press and hold the VOL or VOL ▼ Keys until
the desired volume level is reached. The VOLUME indicator will light,
and the volume will be displayed as a number from 0 to 60. Above step
4, each volume step is 1 dB.
MUTE
TO MUTE the WAKONDA press the MUTE key. The music will fade out
and the MUTE indicator will light.
TO UNMUTE the WAKONDA press the MUTE key again. The previous
volume setting will be displayed, the music will fade up and the MUTE
indicator will go out. Pressing either of the VOL or VOL ▼ keys will
also unmute the WAKONDA.
▼
LISTEN
▼
▼
TO DISPLAY THE CURRENT INPUT when the display is asleep or is
showing the volume, press the LISTEN key once. The LISTEN
indicator will light and the current input will be displayed. Pressing
INPUT or INPUT will also display the current input, if it is not already
displayed.
RECORD
▼
▼
▼
▼
TO SELECT AN INPUT TO RECORD press the RECORD key. If the
LISTEN indicator lights, press RECORD again. The RECORD indicator will
light, and the display will show the input currently selected for
recording. Select the input you want to record by using the INPUT or
INPUT
keys. The selected input is now fed out of both tape
outputs. You can listen to one source while you record another.
INPUT and INPUT
will continue to control the input you are
recording until you
11
press LISTEN again, or ▲ VOL or VOL ▼, when they will revert to
controlling the input you are listening to
▲
▲
The remaining functions, which are less commonly used, involve
pressing two keys at the same time. These functions are printed in
darker grey on the pairs of keys involved, apart from line output mute
which is activated by pressing the two centre keys.
BAL BAL
▲
▲
TO CHANGE THE LEFT/RIGHT BALANCE press the pair of keys
marked BAL and BAL at the same time. The BAL indicator will light,
and the balance is displayed below.
▲
▲
▲
To change the channel balance, press and hold BAL or BAL as
required. To return these keys to controlling the volume press BAL
and BAL at the same time. The BAL indicator will go out and the
VOLUME indicator will light. Pressing LISTEN,
INPUT or INPUT will
also return these keys to controlling the volume the next time they are
pressed.
▲
▲
▲
MONO
TO PLAY A MONO SOURCE press the pair of keys marked MONO
The MONO indicator will light. The WAKONDA will remain in mono
until you press the pair of MONO keys again.
LINE OUTPUT MUTE
TO SWITCH OFF THE SPEAKERS WHILE YOU LISTEN TO
HEADPHONES press the two centre keys at the same time. The
MUTE indicator will flash softly. The speakers will stay off until you
press the two centre keys again.
12
RECORD LOCK
▲
TO LOCK THE RECORD INPUT if a KNEKT multi-room line driver option
is fitted press the INPUT and RECORD keys at the same time. This will
stop remote control commands from other rooms in the house
affecting your WAKONDA and potentially disrupting the recording.
The RECORD light will flash softly to indicate that the record input has
been locked. When you have finished recording, press this pair of
keys again to enable remote control from other rooms. The RECORD
light will stop flashing. Without the line-driver fitted, this pair of keys
has no effect.
USING THE REMOTE CONTROL
The WAKONDA is supplied with a
standard handset which controls the
amplifier and provides basic control for
other Linn source components and the
Linn KAIRN. The larger handset supplied
with the other Linn products may also be
used with the WAKONDA.
Using the handset is very simple and
gives you single key selection of listen
and record sources, balance mono and
mute.
13
GETTING UNSTUCK
Occasionally you may find that your WAKONDA fails to respond the
way you expect when you press a key. This will often be because you
have pressed a key you didn’t intend to which makes your WAKONDA
behave in an unfamiliar or unexpected way. You can, of course, just
turn it off and start again but, as so often, a little patience, some
intuition and, when all else fails, real understanding, will be amply
rewarded.
The WAKONDA can be in one of four control modes - VOLUME,
BALANCE, LISTEN or RECORD. In any of these modes it can be fully
MUTED or speaker MUTED. It can also be in MONO or not. All you
have to do to understand the current control mode of the WAKONDA
is check the row of indicator lights.
MUTE
If this indicator is on, the WAKONDA is fully muted. No
sound will come from the speakers or the headphones.
To unmute the WAKONDA, press the MUTE key.
If the MUTE indicator is flashing, the line outputs are
muted (although the headphone socket is not). You can
unmute the line outputs by pressing the two centre
keys.
VOLUME
When this indicator is lit the WAKONDA is in VOLUME
control mode, and pressing the ▲ VOL or VOL keys
will display and control the volume. If the WAKONDA is
muted, pressing either of these keys will cause it to
unmute and return to the previously set volume.
BAL
When this indicator is lit, the WAKONDA is in BALANCE
control mode and pressing BAL or BAL will control
and display the left/right channel balance. If the
WAKONDA is muted, pressing either of these keys will
cause it to unmute.
▲
▲
▲
14
▲
▲
▲
▲
To get out of BALANCE mode press BAL and BAL at
the same time, and the WAKONDA will revert to
VOLUME mode. Or to get to LISTEN mode, press LISTEN,
INPUT or INPUT
When this indicator is lit, the WAKONDA is in LISTEN
control mode, and pressing INPUT or INPUT will
change the input that you are listening to. If you press
RECORD while already in LISTEN control mode the
WAKONDA will enter RECORD control mode.
RECORD
When this indicator is lit, the WAKONDA is in RECORD
control mode and INPUT or INPUT will display and
control the input that is being sent out of the TAPEOUT sockets.
▲
▲
▲
▲
LISTEN
▲
If the RECORD light is flashing, this means the WAKONDA
is in RECORD-LOCK mode and will not respond to
remote control commands from other rooms. To cancel
RECORD-LOCK mode, press INPUT and RECORD
simultaneously.
MONO
When this indicator is lit the WAKONDA is operating in
MONO. To get back to stereo, press the pair of keys
marked MONO
-- --
When no keys have been pressed for around 30
seconds, the WAKONDA will go to standby and the
display will show two dashes. To awake up the
WAKONDA the best thing to do is press either ▲ VOL or
LISTEN and then check the display to see what state the
WAKONDA is in.
15
USEFUL INFORMATION
CUSTOMISING YOUR WAKONDA There are two ways your retailer
can vary the behaviour of your WAKONDA from standard:
-the display can be set to remain on all the time
-the start-up volume can be set to 15 instead of 30
Please contact your Linn retailer for any of these simple internal
modifications.
PHASE The WAKONDA preamplifier preserves the phase of the signal
to the power amplifier. Therefore the wiring from the power amplifier
to the speakers does not need its polarity inverted.
EXPANSION We designed your WAKONDA to last you for many years
and to give you unique opportunities to extend its capabilities as your
needs evolve and your resources allow. At the rear of the WAKONDA,
there is an expansion slot into which one of a range of SNEAKY
add-on modules may be fitted. So, you could add a SNEAKY KUDOS
tuner module for a high-quality radio reception. Or you could add a
SNEAKY KNEKT Line Driver module to expand your WAKONDA into the
heart of a multi-room system feeding other rooms in your house. Or
you could fit a Local Receiver module so that the WAKONDA can
integrate with a Linn multi-room system elsewhere in your house. Your
Linn retailer will be happy to demonstrate the possibilities.
PROBLEMS Rarely, some kinds of computer monitors and highfrequency or low-energy fluorescent lights can effect the infra-red
control range of the WAKONDA, or make it behave erratically. Such
problems are very rare and your retailer will advise on a solution.
16
CE Declaration of Conformity
Linn Products Ltd declare that this product is in conformance with the Low Voltage Directive 73/23/EEC and Electromagnetic
Compatibility 89/336/EEC as amended by 92/31/EEC and 93/68/EEC. The conformity of the designated product with the
provisions of Directive number 73/23/EEC (LVD) is proved by full compliance with the following standards:
Standard number
EN60065
Date of issue
1998
Test type
General requirements
Marking
Hazardous radiation
Heating under normal conditions
Shock hazards under normal operating conditions
Insulation requirements
Fault conditions
Mechanical strength
Parts connected to the mains supply
Components
Terminal devices
External flexible cords
Electrical connections and mechanical fixings
Protection against electric shock
Stability and mechanical hazards
Resistance to fire
The conformity of the designated product with the provisions of Directive number 89/336/EEC (EMC) is proved by full
compliance with the following standards:
Standard number
EN55013
EN55013
EN55020
Date of issue
2001
2001
2002
Test type
Conducted emissions
Absorbed emissions
Immunity
FCC notice
NOTE: This equipment has been tested and found to comply with the limits for a Class B digital device, pursuant to Part 15 of
the FCC Rules. These limits are designed to provide reasonable protection against harmful interference in a residential
installation. This equipment generates, uses and can radiate radio frequency energy and, if not installed and used in
accordance with the instructions, may cause harmful interference to radio communications. However, there is no guarantee
that interference will not occur in a particular installation. If this equipment does cause harmful interference to radio or
television reception, which can be determined by turning the equipment off and on, the user is encouraged to try to correct
the interference by one or more of the following measures:
• Reorient or relocate the receiving antenna.
• Increase the separation between the equipment and receiver.
• Connect the equipment into an outlet on a circuit different from that to which
the receiver is connected.
• Consult the dealer or an experienced radio/TV technician for help.
WAKONDA
PACK 136/2