1
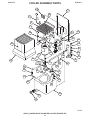
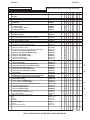
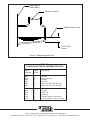
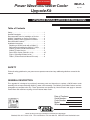
RETURN TO MAIN MENU
Power Wave 450 Water Cooler
Upgrade Kit
IM645-A
May, 2000
UPGRADE INSTALLATION INSTRUCTIONS
Table of Contents
Safety . . . . . . . . . . . . . . . . . . . . . . . . . . . . . . . . . . . . . .1
General Description . . . . . . . . . . . . . . . . . . . . . . . . . . . .1
Recommended Tools for Installation or Service . . . . . .2
G3503-[ ] Installation or Service Tool Usage . . . . . . . . .2
G3503-[ ] Water Cooler Upgrade Kit Contents . . . . . . .2
Recommended Coolants . . . . . . . . . . . . . . . . . . . . . . . .2
Installation Instructions . . . . . . . . . . . . . . . . . . . . . . . . .3
Replacing a G2725 Cooler with a G3503-[ ] . . . . . . . .3
Removing and Installing the G3503-[ ] Cooler . . . . . .4
G3503-[ ] Cooler Periodic Maintenance . . . . . . . . . . .5
G3503-[ ] Cooler Service . . . . . . . . . . . . . . . . . . . . . .5
Parts List for Cooler (P261-K.2, -K.3) . . . . . . . . . . . . .6,7
Figure 1 (Specified Coolant Level) . . . . . . . . . . . . . . .8
Table 1 (Cooler Electrical Harness Pin-outs) . . . . . . .8
SAFETY
Follow all safety guidelines in your power source operator manual and any additional guidelines covered in this
manual.
GENERAL DESCRIPTION
This upgrade kit is designed to provide all necessary parts and instruction to replace a G2725 water cooler
assembly with an improved design G3503-[ ] water cooler assembly. The G3503-1 and G3503 Coolers are interchangeable as complete units only. These procedures are specified by Lincoln Electric and apply to domestic
Power Wave 450 machines requiring a Lincoln internal water cooler.
Date of Purchase:
Serial Number:
Code Number:
Model:
Where Purchased:
• Sales and Service through Subsidiaries and Distributors Worldwide •
Cleveland, Ohio 44117-1199 U.S.A. TEL: 216.481.8100 FAX: 216.486.1751 WEB SITE: www.lincolnelectric.com
RECOMMENDED TOOLS
INSTALLATION OR SERVICE:
FOR
S24505 WATER COOLER UPGRADE KIT
CONTENTS:
• absorbent towels
• alcohol wipe
• 3 mm allen wrench (G3503 only)
• socket wrench
• 4 inch long minimum socket extension
• 1/4, 5/16, and 3/8 hex standard depth sockets
• 5/32 allen socket
• medium blade slotted screwdriver
• large blade slotted screwdriver, 8 inches long
minimum
• two 7/16 open or box end wrenches
• one 7/8 open or box end wrench
• needlenose pliers
• two 10 inch long adjustable wrenches
• wire cutter
• molex pin removal tools
• tape measure
• small mechanic’s mirror
• flashlight
• dental pick
• digital multimeter (DMM)
1 Cooler assembly, G3503-[ ]
• Empty Weight: 36 lbs.
• Overall Size: 22.38x14.00x12.50, LxWxH
• Electrical Input: 230VAC, 2.8A max. steady state
• Coolant Connections:
Welding Industry Standard Quick-Disconnect
(QD) female fittings. Top: Coolant In,
Bottom: Coolant Out
1 Cooler access panel, L9387-2
1 “P4” Electrical power harness (long), S14165-467
1 “P3” Electrical extension harness (short), S14165-466
1 Circuit breaker, T12287-14, spare replacement
2 fasteners, S9225-8, (1/4-20 thread, spares for
cooler mounting)
4 fasteners, S8025-91, (spares for cooler access
panel mounting)
2 Hole plugs, T10397-11
1 Ground Decal, T13260-4
8 cable ties, T13770-2
1 Electrical sleeving, E1159/B-1.00-7.00
1 “B” Stencil, S21212
1 Power Wave machine label: S24503-1
2 Mounting Brackets, S10040-93
2 Fasteners, T9447-42, (#10-24 UNC-3A)
2 Plain washers, S9262-77 (Socket head- cap
screws)
G3503-[ ] INSTALLATION OR SERVICE TOOL USAGE
Fastener Usage
Qty.
Tool
Shroud to cooler base
Quick Disconnect (QD) bracket
Heat exchanger to cooler base
Relay to cooler base
4
2
2
2
all use 5/16 hex screw and 3/8 hex
nut. Relay may require large blade
slotted screwdriver 8 in. long min.
Screw to
fasten reservoir to cooler base
4
3 mm allen wrench (G3503 only)
5/16 Hex Socket (G3503-1 only)
Hose Clamp
10
1/4 hex or medium slotted screwdriver
Fan set screw
1
5/32 allen socket with wrench and 4
in. min. extension
Pump carbonator clamp screw
1
5/16 hex socket with ratchet wrench
Motor mounting bolts
4
two 7/16 open or box end wrenches
Motor access door
2
1/4 hex socket with wrench
Motor harness ground at motor
terminals
1
2
1/4 hex socket with wrench
needlenose pliers
relay terminals 1 and 2
2
large blade slotted screwdriver 8 in.
minimum long.
relay terminals 3 and 4
2
medium slotted screwdriver
All plumbing components
N/R
RECOMMENDED COOLANTS
1. The following coolants have been determined to be
compatible with the wetted materials used in the
G3503-[ ] cooler assembly:
• Distilled or deionized water
• Potable tap water
• Sediment-free mixtures containing a maximum of 50% ethylene glycol or automotivegrade antifreeze and the balance of distilled
or deionized water.
2. Ethylene glycol mixtures should be selected if the
cooler may be exposed to a temperature below the
freezing point of water.
3. Consult gun, torch, and wire feeder manuals for
coolant recommendations and select one from the
above list.
4. Pure solutions and mixtures of, or materials (i.e.
towels) wetted with ethylene glycol are toxic to
humans and animals. They must not be haphazardly discarded, especially by pouring liquids down
the drain. Contact the local EPA office for responsible disposal methods or for recycling information.
two 10 inch adjustable wrenches
5. The cooler’s reservoir has a nominal liquid capacity
of 1.6 gallons.
G3503-[ ] POWER WAVE 450 WATER COOLER UPGRADE KIT
2
i. Peal off "coolant in / coolant out" decal from
machine’s case back and discard. Remove
residual adhesive from case back with an alcohol wipe.
j. Remove auxiliary transformer #2 (mounted to
Power Wave base, ahead of G2725 cooler) and
set aside. It is no longer needed.
3. Slide electrical sleeving over the non-P4 connector
in the Power Wave’s harness that runs from its terminal strip.
• Fold sleeving over itself and firmly secure it to
the harness with a cable tie.
INSTALLATION INSTRUCTIONS
WARNING
ELECTRIC SHOCK Can Kill
• Only qualified persons should perform this installation.
HOT COOLANT CAN BURN SKIN
• Always be sure coolant is not hot before doing any
work on cooler parts.
ROTATING FAN BLADES ARE HAZARDOUS
• Do not put your hands near an operating fan.
4. Install cooler G3503-[ ]:
a. Install plugs into case back to fill coolant hose
holes. Bend tabs as required to secure plugs in
place.
b. Install new circuit breaker into case back if
replacing the old part.
c. Install new P4 electrical harness into Power
Wave:
• Mate together the labeled P4 connectors.
• Note: H[X]A lead in new harness carries 230
VAC cooler power: (See Table for [X] valve).
• Keep all equipment safety guards, covers and devices in position
and in good repair.Keep hands, hair, clothing and tools away from
fans and all other moving parts when starting, operating or repairing equipment.
• In some cases it may be necessary to remove safety guards to
perform required maintenance. Remove guards only when necessary and replace them when the maintenance requiring their
removal is complete. Always use the greatest care when working
near moving parts.
------------------------------------------------------------------------
REPLACING A G2725 COOLER WITH A
G3503-[ ] COOLER
1. Preparation:
• Always switch off the Power Wave machine
power.
• Always disconnect the Power Wave machine
from service input power.
2. Remove the G2725 cooler assembly:
a. Remove gas cylinder(s) from machine’s rear
tray.
b. Remove cooler access panel P/N L9387-1 and
set aside. It is no longer needed.
c. Remove machine’s left side panel (adjacent to
power input cord).
d. Disconnect coolant hoses’ mounting bracket
from machine’s case back.
e. Disconnect all of the coolant hoses’ tie-down
points. These plastic clips may be removed and
discarded if desired.
f. Remove and save both fasteners from Power
Wave base holding cooler in place. Carefully
pull cooler rearward, partially out of the Power
Wave.
g. Disconnect Molex in-line connectors P4 or P5
(cooler power) and P3 (cooler relay and pressure switch) and slide cooler completely from
machine.
h. Optionally remove circuit breaker from case
back and install replacement.
[X]
Power Wave
Code Numbers
Wiring
Diagram
2
2
2
3
3
3
3
3
3
10406
10431
10433
10106, 10195, 10366
10197, SPLC14895
10345, 10347
10512
10514, 10516
10520
G2153-5
G2153-4
G2153-6
G2153-1
G2153-2
G2153-3
G2153-7
G2153-8
G3177-1
• Connect insulated terminals to circuit breaker
(order is unimportant).
d. Connect P3 electrical extension harness to the
machine.
e. Apply ground decal to cooler’s base:
• Apply next to mounting screw hole nearest to
circuit breaker.
f. Mate cooler’s connector to the P3 extension
harness.
g. Mate cooler’s power connector to the P4 electrical harness.
h. Carefully slide retrofit cooler G3503-[ ] forward
into Power Wave. Verify that front tabs on cooler base are properly guided into slots in base of
Power Wave (base’s underside may be examined with a mirror and flashlight).
i. Attach ground lead in P4 harness to top of cooler’s base or top of mounting bracket, ( if brackets are necessary). Secure cooler to Power
Wave base by installing both fasteners.
j. Install Power Wave machine’s left side panel.
G3503-[ ] POWER WAVE 450 WATER COOLER UPGRADE KIT
3
l. Attach Power Wave machine label from retrofit
kit to its case back.
m. Stamp or etch "B" as the suffix of Power
Wave’s code number located on its rating
plate. Include this suffix for all future parts
orders.
n. Install gas cylinder(s) onto tray.
4. Reinstall cooler by reversing tasks in step 2. Be
sure to reattach ground lead, if previously removed.
5. If necessary, fill cooler with selected coolant to
specified level (see Fig. 1).
6. Attach desired water-cooled accessory (gun and
wire feeder or TIG torch) to cooler’s QDs.
5. Select a recommended coolant and fill cooler to
specified level (see Figure 1).
7. Reconnect service input power to the Power Wave:
• verify that the reconnect panel setting and lead
placement match the service voltage.
6. Attach desired water-cooled accessory (gun and
wire feeder or TIG torch) to cooler’s QDs.
7. Reconnect service input power to the Power Wave:
• Verify that the reconnect panel setting and
lead placement match the service voltage.
8. Prime the cooler:
a. Install the Set-up overlay.
b. Keep accessories’ hose lengths horizontal,
either coiled or straight, and no higher than 4
feet of the specified coolant level (Fig. 1).
c. Switch on the Power Wave machine.
d. Press the "WATER COOLER ENABLE" button
so that the "WATER COOLER ENABLED" light
is illuminated .
e. Press the "PRIME WATER COOLER" button
until the "WATER COOLER PRESSURE" light
is steadily illuminated.
8. Prime the cooler:
a. Install the Set-up overlay.
b. Keep accessories’ hose lengths horizontal,
either coiled or straight, and no higher than 4
feet of the specified coolant level (Fig. 1).
c. Switch on the Power Wave machine.
d. Press the "WATER COOLER ENABLE" button
so that the "WATER COOLER ENABLED" light
is illuminated.
e. Press the "PRIME WATER COOLER" button
until the "WATER COOLER PRESSURE" light
is steadily illuminated.
9. Check coolant level. Add more if required.
9. Check coolant level. Add more if required.
REMOVING AND INSTALLING THE G3503-[ ]
COOLER
1. Preparation:
• Always switch off the Power Wave machine
power.
• Always disconnect the Power Wave machine
from service input power.
2. Remove cooler assembly G3503-[ ]:
a. remove gas cylinder(s) from tray.
b. remove cooler access panel.
c. Remove both fasteners from base that hold
cooler and mounting brackets (if equipped) in
place. Remove ground lead, if present.
Carefully pull cooler assembly rearward, until
cooler’s Molex connectors are visible.
d. disconnect cooler’s connectors from the P3 and
P4 harnesses. Continue pulling the cooler out
of the Power Wave.
3. If necessary, perform periodic maintenance or service on the cooler.
G3503-[ ] POWER WAVE 450 WATER COOLER UPGRADE KIT
4
G3503-[ ] COOLER PERIODIC MAINTENANCE
G3503-[ ] COOLER SERVICE
1. Preparation:
• Always switch off the Power Wave machine power.
• Always disconnect the Power Wave machine from
service input power.
• Do not remove the pump relief valve’s 3/4 in. acorn
hex nut or attempt to adjust the relief valve setting.
1. Preparation:
• Always switch off the Power Wave machine power.
• Always disconnect the Power Wave machine from
service input power.
• Do not remove the pump relief valve’s 3/4 in. acorn
hex nut or attempt to adjust the relief valve setting.
2. Remove the G3503-[ ] cooler from the Power Wave
machine.
2. Remove the G3503-[ ] cooler from the Power Wave
machine whenever:
• replacing major cooler components (i.e. pump,
motor, heat exchanger, etc.).
• replacing hoses and electrical harnesses that are
kinked or damaged (cut, abraded, deteriorated or
swollen, etc.).
• investigating suspect coolant leakage.
3. Clean, or replace the pump’s inlet strainer: Clogged or
partially blocked strainer is the most common cause for
unacceptal coolant flow.
• Drain the reservoir of coolant and dispose of it in an
environmentally responsible manner (see
Recommended Coolants).
• Place absorbent towels underneath pump head.
• Hold pump head to apply countertorque when loosening strainer’s 7/8 acorn nut. Do not confuse with
3/4 acorn nut. Remove nut and slide inlet strainer
down and out from pump head.
• Replace or gently rinse strainer under running water
to thouroughly clean it.
• Use the mirror to inspect inside of pump for contamination. Carefully remove hardened debris with dental pick if necessary, without scratching inside of the
pump.
• Reinstall strainer and acorn nut, tightening with
75±15 in.-lbs. of torque. Wipe dry all areas wetted
by coolant. Dispose of towels in an environmentally
responsible manner (see Recommended Coolants).
3. Pump replacement:
a. Drain the reservoir of coolant and dispose of it in an
environmentally responsible manner (see
Recommended Coolants).
b. Remove fan shroud.
c. Place absorbent towels underneath pump head and
wherever coolant system is opened.
d. Carefully pull pump inlet hose and its elbow from
reservoir (bottom).
e. Loosen pump outlet hose clamp at QD then carefully
remove from fitting.
f. Disconnect v-band clamp from motor and remove
pump:
• Do not drop or lose drive coupling between pump
and motor.
• Do not discard old pump. Remove both fittings,
Keep v-clamp, Seal old pump in a waterproof bag,
Package into protective container, and Return to
nearest Lincoln Electric FSS center.
g. Install new pump and v-band clamp:
• Do not apply any lubricant to pump’s drive coupling.
• Pump body is properly oriented with its strainer at
the 6:00 position.
• Tighten v-clamp with 15 to 30 in-lbs. of torque.
h. Attach coolant lines to QD and reservoir.
i. Wipe dry all areas wetted by coolant. Dispose of towels in an environmentally responsible manner (see
Recommended Coolants).
j. Reinstall cooler into machine.
4. Remove fan shroud and inspect hoses and electrical harnesses for kinking or damage (cut, abrasion, swelling,
etc.). Replace if necessary.
5. Remove accumulated dust from cooler, especially from
the motor and heat exchanger, by blowing it off with shop
air or vacuuming it out.
• The heat exchanger fins are sharp but can be easily
bent. Treat them with care to avoid personal injury
and damaging them.
• Remove the cooler from the machine for a more
thorough cleaning job.
6. Motor lubrication is recommended once a year:
• Remove plug over lube port at top of motor near fan
end.
• Add 20 drops of electric motor or SAE 10 oil then
reinstall plug.
4. Motor removal or replacement:
• Do not reuse the 4 internal-tooth star washers.
Replace with new parts..
5. Installing the fan:
• Slide onto motor shaft until the fan is located
between 0.25 to 0.50 inches from the heat exchanger.
• Tighten set screw with 65 to 75 in-lbs of torque
against motor shaft’s flat.
• Fan rotation is counterclockwise, as viewed from
fan-end of motor’s shaft.
• Fan pulls air through the heat exchanger, blows it
over the motor, then exhausts it through the reservoir.
7. Flush coolant from the system and replace with fresh,
recommended coolant at least once a year. More frequent flushing may be necessary, depending upon a
user’s particular system or its usage.
NOTE: Never run the pump dry. Always use a recommended coolant, otherwise pump damage may result.
8. Reinstall the G3503-[ ] cooler into the Power Wave
machine.
G3503-[ ] POWER WAVE 450 WATER COOLER UPGRADE KIT
5
P-261-K.2
P-261-K.2
COOLER ASSEMBLY PARTS
10
1
36
12
8
11
31
37
35
23
22
3
34
26
24
26
29
15
13
26
27
6
9
5
7
25
26
28
14
2
22
26
26
25
21
26
4
30
19
19
20
20
16
17
18
10-2-98
G3503-[ ] POWER WAVE 450 WATER COOLER UPGRADE KIT
6
P-261-K.3
P-261-K.3
# Indicates a change this printing.
Use only the parts marked “x” in the column under the
heading number called for in the model index page.
Recommended Spare Parts are Highlighted in Bold
ITEM DESCRIPTION
PART NO.
QTY.
1 2 3 4 5 6 7 8 9
Powerwave 450 Water Cooler Upgrade Assembly,
Includes:
1
Base Assembly (G3503 Only)
1
Base Assembly (G3503-1 Only)
2
Motor
3
Fan Blade
4
Pump with Torque Coupling
5
V-Clamp, Pump
6
Torque Coupling, Pump
7
Pump Inlet Strainer
8
Heat Exchanger
9
Pressure Switch
10
Solid-State Relay
11
Electrical Harness, Motor
12
Electrical Harness, Pressure Switch & Relay
13
Fan Shroud (G3503 Only)
13
Fan Shroud (G3503-1 Only)
14
Quick Disconnect Fitting
15
Quick Disconnect Bracket with Label
16
Reservoir (G3503 Only)
16
Reservoir (G3503-1 Only)
16
Replacement Reservoir & Fan Shroud (G3503 Only)
17
Reservoir Inlet Strainer (G3503 Only)
17
Reservoir Inlet Strainer (G3503-1 Only)
18
Reservoir Cap (G3503 Only)
18
Reservoir Cap (G3503-1 Only)
19
Reservoir Elbow Fitting
20
Reservoir Sealing Bushing
21
Hose, Pump Inlet
22
Hose, Pump Outlet
23
Hose, Heat Exchanger Inlet (G3503 Only)
23
Hose, Heat Exchanger Inlet (G3503-1 Only)
24
Hose, Heat Exchanger Outlet
25
Hose, Reservoir Inlet (G3503 Only)
25
Hose, Reservoir Inlet (G3503-1 Only)
26
Hose Clamp
27
Hydraulic Manifold
28
Manifold Inlet Fitting, 1/4 NPT to 3/8 ID Hose Barb
29
Orifice Fitting, 1/89 NPT to 3/8 ID Hose Barb
30
Pump Elbow Fitting
31
Screw, Reservoir (G3503 Only)
31
Screw, Reservoir (G3503-1 Only)
32
Internal-tooth Star Washer, Motor (Not Shown)
33
Warranty Label (Not Shown)
34
Data Plate (G3503 Only)
34
Data Plate (G3503-1 Only)
35
Cable Holder, Push Mount
36
Grommet Edging, Heat Exchanger
37
Trim, Motor Mount
39 Platform (Not used on 450 w/stand)
40 Axle
41 Wheel
42 Push Nut
43 Base Assembly
44 Caster
44A Thread Forming Screw
G3503 & -1
1
X
S24504-1
S24504-36
S24504-2
S24504-3
S24504-4
S24504-5
S24504-6
S24504-7
S24504-8
S24504-9
S24504-10
S24504-11
S24504-12
S24504-13
S24504-37
S24504-14
S24504-15
S24504-16
S24504-38
S24504-39
S22067-3
S24504-40
S22067-2
S24504-41
S24504-34
S24504-35
S24504-17
S24504-18
S24504-19
S24504-42
S24504-20
S24504-21
S24504-43
S24504-22
S24504-23
S24504-24
S24504-25
S24504-26
S24504-27
S24504-45
S24504-28
S24504-29
S24504-30
S24504-44
S24504-31
S24504-32
S24504-33
G2391
M8809-129
S13127-3
T12570-2
L8860
S11124-4
S9225-28
1
1
1
1
1
1
1
1
1
1
1
1
1
1
X
X
X
X
X
X
X
X
X
X
X
X
X
X
2
1
1
1
1
1
1
1
1
2
2
1
1
1
1
1
1
1
10
1
1
1
2
4
1
4
2
1
1
2
1.75in.
1.5in.
1
1
2
2
1
2
8
X
X
X
X
X
X
X
X
X
X
X
X
X
X
X
X
X
X
X
X
X
X
X
X
X
X
X
X
X
X
X
X
X
X
X
X
X
X
X
#
#
#
#
7-26-99
G3503-[ ] POWER WAVE 450 WATER COOLER UPGRADE KIT
7
Rear Panel of
Power Wave
Reservoir Screen
Visible Coolant Level
0.25 to 0.50
inches
Figure 1. Specified coolant level.
TABLE 1
COOLER ELECTRICAL HARNESS PIN-OUTS
Molex
Connector
Molex
Pin No.
Description
large
large
large
large
large
large
1
2
3
4
5
6
Ground
Motor Common
Unused
Unused
Motor 230 VAC (PW 450 only)
Motor 230 Vac (PW 455 only)
small
small
small
small
small
small
1
2
3
4
5
6
Unused
Unused
Relay coil
Relay coil
Pressure Switch - NO contact
Pressure Switch - common contact
• Sales and Service through Subsidiaries and Distributors Worldwide •
Cleveland, Ohio 44117-1199 U.S.A. TEL: 216.481.8100 FAX: 216.486.1751 WEB SITE: www.lincolnelectric.com