1
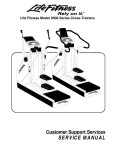
X30 & X35 Cross-Trainer
Hardware List
Item
Qty
1
2
3
4
5
6
7
8
9
10
11
12
13
14
15
4
7
2
21
12
2
2
2
2
2
1
6
2
2
4
Description
67 mm Hex Head Bolt
Hex Head Nut
30 mm Hex Head Bolt
16 mm Phillips Screw
8.6 mm Lock Washer
Large Flat Washer
Large Wave Washer
Flat Washer
18.1 mm Lock Washer
20 mm Hex Head Bolt
74 mm Hex Head Bolt
8 mm Phillips Screw
81.5 mm Hex Head Bolt
8 mm Large Phillips Screw
12 mm Phillips Screw
Assembly Guide:
1)
6. Lift the front end of the USER RIGHT PEDAL LEVER (K) to meet the USER RIGHT ROCKER ARM CLEVIS (U). Secure the PEDAL LEVER to the ROCKER ARM
CLEVIS using one 81.5 mm HEX HEAD BOLT (13) and one NUT (2). Tighten the BOLT and NUT securely. Repeat the procedure for the USER LEFT PEDAL
LEVER and ROCKER ARM CLEVIS.
2)
Position the front and back ROCKER ARM CLEVIS COVERS (S & T) over the USER RIGHT ROCKER ARM CLEVIS (U). Secure the CLEVIS COVERS using two
8 mm SCREWS (12). Tighten the SCREWS securely. Repeat the procedure for the USER LEFT ROCKER ARM CLEVIS (V).
3)
7. Position the ACCESSORY TRAY (W) over the DISPLAY CONSOLE MOUNTING PLATE (B) located at the top of the UPRIGHT TUBE ASSEMBLY (C) as shown.
Route the CONNECTOR (X) leading from the DISPLAY CONSOLE MOUNTING PLATE through the large hole in the ACCESSORY TRAY BRACKET (Y). Secure
the ACCESSORY TRAY using two 8 mm SCREWS (14). Tighten the SCREWS securely.
4)
Position the DISPLAY CONSOLE (Z) over the DISPLAY CONSOLE MOUNTING PLATE (B) located at the top of the UPRIGHT TUBE ASSEMBLY (C). Plug the
CONNECTOR (X) leading from the DISPLAY CONSOLE MOUNTING PLATE into the corresponding CONNECTOR in the back of the DISPLAY CONSOLE. Make
sure the CONNECTOR snaps into place. Push excess wire harness into the opening of the DISPLAY CONSOLE MOUNTING PLATE.
4)
Plug the HEART RATE CONNECTOR (AA) leading from the ACCESSORY TRAY (W) into the corresponding CONNECTOR in the back of the DISPLAY
CONSOLE. Make sure the CONNECTOR snaps into place.
5)
X3-5 Only: Plug the LOWER CONSOLE CONNECTOR (BB) leading from the ACCESSORY TRAY (W) into the corresponding CONNECTOR in the back of the
DISPLAY CONSOLE. Make sure the CONNECTOR snaps into place.
Secure the DISPLAY CONSOLE to the DISPLAY CONSOLE MOUNTING PLATE (B) using four 12 mm SCREWS (15). Tighten the SCREWS securely.
6)
7)
CAUTION: Be careful not to pinch the wire harnesses when assembling the DISPLAY CONSOLE (Z) to the DISPLAY CONSOLE MOUNTING PLATE (B).
8)
8. Refer to the "Getting Started" section of the User Manual for proper location, stabilizing, and POWER ADAPTER instructions.
Look for the number coded
hardware bags that match
the assembly sequence.
6.
Pedal Lever &
Rocker Arm Assembly
1. & 2.
Levelers & Monocolumn
4
9)
H
C
10)
T
F
E
G
2
2
1
U
J
V
12)
11)
12
4
S
3
13)
10
A
2)
14)
3.
Pedals
15)
20
30
40
50
60
70
80
90
100
110
120
130
13
12
140
150
7.
5.
Pedals & Right Rear
Pedal Lever
2
160
K
Accessory Tray &
Console
V
Z
L
Assembly Sequence
Tools required: Metric Socket set, Phillips Screwdriver, Metric Wrench set
14
M
1. Position the base unit near the desired location for use (Refer to the "Getting Started" section of the User Manual for proper location). Locate and install the
two LEVELER FEET (A) into the front stabilizer as shown.
Using two 30 mm HEX HEAD BOLTS (3), secure the UPRIGHT TUBE ASSEMBLY (C) to the backside of the SUPPORT PLATE on the BASE FRAME (D).
Tighten the BOLTS securely. Tighten the previous four HEX HEAD BOLTS (1) securely.
Position the right and left FRONT SHROUDS (H & J) over the FRONT FRAME PLATES (G). Secure the FRONT SHROUDS using nine 16 mm SCREWS
(4). Tighten the SCREWS securely.
BB X35 Only
4
2. With the DISPLAY CONSOLE MOUNTING PLATE (B) facing upward, lay the UPRIGHT TUBE ASSEMBLY (C) on floor in front of BASE FRAME (D). Cut
the wire tie securing the LOWER WIRE HARNESS (E) to the front of the BASE FRAME. Connect the UPPER WIRE HARNESS (F) to the LOWER WIRE
HARNESS.
Position the UPRIGHT TUBE ASSEMBLY (C) between the FRONT FRAME PLATES (G) on the BASE FRAME (D). Feed any excess wire harness into the
BASE FRAME. Tilt the UPRIGHT TUBE ASSEMBLY into an upright position. Align the holes on the plates with the holes on the UPRIGHT TUBE
ASSEMBLY. Secure the UPRIGHT TUBE ASSEMBLY to the BASE FRAME using four 67 mm HEX HEAD BOLTS (1) and four NUTS (2). Leave BOLTS
loose at this time.
AA
K
12
Y
W
11
X
S
4.
Rocker Arms
Q
15
R
T
B
3. Locate the USER RIGHT PEDAL LEVER (K) and PEDAL (L) (marked with an “R”). Position the PEDAL above the PEDAL MOUNTING PLATE (M) and
secure the PEDAL using six 16 mm SCREWS (4) and six LOCK WASHERS (5). Tighten the SCREWS securely. Repeat for the USER LEFT PEDAL and
PEDAL LEVER.
4. Slide one LARGE FLAT WASHER (6) and one LARGE WAVE WASHER (7) onto the USER RIGHT PIVOT SHAFT (N). Slide the WASHERS fully over the
PIVOT SHAFT until seated against the pre-installed stop ring.
Locate the USER RIGHT ROCKER ARM ASSEMBLY (O) (Marked with an “R”). With the top handgrip facing the front of the unit (as shown), slide the
USER RIGHT ROCKER ARM ASSEMBLY onto the USER RIGHT PIVOT SHAFT (N) until seated against the WASHERS (6 & 7). Secure the ROCKER
ARM ASSEMBLY to the PIVOT SHAFT using one FLAT WASHER (8), LOCK WASHER (9), and 20 mm HEX HEAD BOLT (10). Tighten the BOLT securely.
Insert one ROCKER ARM END CAP (P) into the end of the ROCKER ARM SHAFT. Repeat the procedure for the USER LEFT ROCKER ARM ASSEMBLY
(Q).
5. Position the rear end of the USER RIGHT PEDAL LEVER (K) near the USER RIGHT REAR CLEVIS (R). Position the end of the PEDAL LEVER between
the clevis flanges. Align the holes and secure as shown using one 74 mm HEX HEAD BOLT (11) and one NUT (2). Tighten the BOLT and NUT securely.
Position one front and back CLEVIS COVER (S & T) over the USER RIGHT REAR CLEVIS (R). Secure the CLEVIS COVERS using two 8 mm SCREWS
(12). Tighten the SCREWS securely.
O
8
N
6
7
9
B
10
P
X
BB
AA
A S S E M B LY
INSTRUCTIONS
X3 0 & X3 5 C r o s s - T r a i n e r
Life Fitness offers a full line of premier fitness equipment for the home.
®
TOTA L - B O D Y E L L I P T I C A L C R O S S -T R A I N E R S | T R E A D M I L L S | L I F E C Y C L E E X E R C I S E B I K E S
S TA I R C L I M B E R S | G Y M S Y S T E M S
5 1 0 0 N. R I V E R R O A D, S C H I L L E R PA R K , I L L I N O I S 6 0 1 7 6
LIFEFITNESS.COM
© 2005 Life Fitness, a division of Brunswick Corporation. All rights reserved. Life Fitness is a registered trademarks of Brunswick
Corporation. Any use of this trademark, without the express written consent of Life Fitness is forbidden. 7954201 Rev A (06/05)