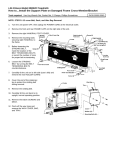
1
Life Fitness Model 9500 Series Cross-Trainers
Customer Support Services
SERVICE MANUAL
Life Fitness Model 9500 Series Cross-Trainers
INTRODUCTION
HOW TO USE THIS SERVICE MANUAL AND CONTACT CUSTOMER SUPPORT SERVICES
Note: This service manual is applicable to Life Fitness model 9500 Lower Body and 9500HR Total Body Cross-Trainers.
The Service Manual provides instruction, guidance and recommendations on safe and efficient approaches to repair and
adjustment situations. The Manual is separated into six sections.
INTRODUCTION
THEORY OF OPERATION
TABLE OF CONTENTS
Section I
q TROUBLESHOOTING GUIDES
Section II
q DIAGNOSTIC TESTS
Section III
q "How To..." SERVICE AND REPAIR GUIDES
Section IV
q ELECTRONICS OVERVIEW
q WIRING BLOCK DIAGRAMS
Section V
q PARTS IDENTIFICATION
Section VI
q MISCELLANEOUS INFORMATION
When an operating problem occurs, refer to troubleshooting guides and diagnostic tests in an attempt to isolate the cause.
When applicable, guides and tests are listed by symptom followed with suggestions of probable cause(s).
Once you have pinpointed the source of the problem, refer to "How To..." guides for recommended repair procedures. "How
To..." sub-sections are organized by replaceable part or assembly name. For convenience, sub-section lists recommended
“Tools Required” to complete each specific function.
Refer to the PARTS IDENTIFICATION section to identify proper name and number of part to order for repair of equipment.
A reproducible telefacsimile order claim form is provided in COMMUNICATING BY TELEFACSIMILE for convenient ordering
of service parts.
To order, contact Life Fitness Customer Support Services.
Via telefacsimile - 24 hrs. /day, 7 days/week.
Via telephone - Monday through Friday from 8:00 AM to 6:00 PM ( C.S.T.).
To speed Life Fitness Customer Support Services response to your needs, please be prepared to provide the following
information to the phone technician.
1. Model number
2. Serial number
3. Symptom of problem
4. Part name and number to order (if known)
CUSTOMER SUPPORT SERVICES
10601 Belmont Avenue; Franklin Park, IL 60131; U.S.A.
T
Telephone: 847.451.0036 or Toll Free 800.351.3737
M
Telefacsimile: 847.288.3702 or Toll Free 800.216.8893
Life Fitness Model 9500 Series Cross-Trainers
THEORY OF OPERATION
The electronics system of the CT-9500 Series Cross-Trainers, is made up of three distinct modules, the Power
Entry Module, the Display Console, and the Power Control Board.
120 volts AC enters the Power Entry Module. It passes through a transformer and is converted to 14 volts AC.
The 14 volts AC is applied to the Power Control Board at connector J4, pins 1 and 2. The voltage passes through a
bridge rectifier, BR1 and is converted to an unregulated positive DC voltage. This unregulated voltage will vary
from 11 volts DC to 18 volts DC depending on the wall supply and load. This voltage can be measured by placing
the positive probe of your DVM on Positive Test Point at BR1 and the negative probe on the negative Test Point at
BR1.
The other voltage developed on the Power Control Board is a regulated positive 8 volts DC. The regulated 8 volts
DC is developed by transistor (Q2) . This voltage can be measured by placing the positive probe of your DVM on
the collector(case) of Q2 and the negative probe on the anode of D1.
This 8 volts DC is supplied to the Console at connector J1, pin 4 and is used to power the LED’s. The 8 volts DC is
also used as a supply voltage for the positive 5 volt DC regulator (U1) on the Console board, which is VCC for the
Microprocessor. The Keypad entry (user’s input), Life Pulse (9500HR only), Telemetry, and the Stop Switch
functions are all processed by the Microprocessor.
The Console, by pulse width modulating the field control line, sends a signal to the Power Control Board at J1, pin
1. The Power Control Board switches the field current to the Alternator, through Q1. This field current along with
the energy supplied by the user is sent to the Load Resistors. This places resistance on the rotation, thus providing
the load sensation felt by the user.
The Alternator also provides the source for the RPM sensor circuit. The AC tap output on the Alternator enters the
Power Control Board at J2, pin 3. This AC voltage is wave conditioned and outputted at connector J1, pin 2 to the
Console connector P2, pin 6. Where it is processed and displayed by the Console.
PIN
_P
AD
STA
CK
WARNING:
U3
STA
CK
8
AM
P
S.B
.
25
0V
C5
PIN
_P
AD
STA
CK
FU
SE
1
J4
14 VAC
RISK OF FIRE,REPLACE FUSE AS
LIFE FITNESS
A080-92167MARKED.
Q1
A000
HS4
PIN
C9_P
AD
PIN
_P
AD
STA
CK
PIN
_P
AD PIN
STA _P
CK
PIN AD
_P STA
AD CK
STA
CK
J4
1
PIN
_P
AD PIN
STA _P
CK AD
STA
CK
PIN_PADSTA
CK
C
O
MP
O
NE
NT
R9
PIN
_P
AD
STA
CK
C11
C6
R7
R3
R14
R18
PIN
_P
PIN AD
_P STA
AD CK
PINSTA
_PCK
AD
PIN STA
_P CK
AD
STA
CK
PIN
_P
AD
PIN
STA
_P
CK
AD
STA
CK
R5
R4
R6
C14
D6
D7
R15
C7
R17
+ Q2
R2
R1
PIN
_P
AD
STA
CK
Q2
HS3
PIN_PADSTA
CK
AC
Pos
PIN
_P
PIN
AD
STA
_P
PIN
CK
AD
_P
STA
PIN
AD
CK
_P
STA
AD
CK
STA
PIN
CK
_P
PIN
AD
_P
STA
AD
CK
STA
CK
BR1
PIN
_P
AD
STA
CK
PIN_PADSTA
CK
PIN
_P
AD
STA
CK
PIN
PIN
_P
_P
AD
AD
STA
STA
CK
CK
PIN
_P
AD
STA
CK
PIN
_P
AD
STA
CK
R8
C12
R16
C8
PIN_PADSTA
CK
U1
PIN_PADSTA
CK
PIN
_P
AD
STA
CK
1997
PIN_PADSTA
CK
HS1
C13
C
PIN
_P
AD
STA
CK
J1
_ D1
Neg
8 VDC
+
POS
PIN_PADSTA
CK
Neg
_
AC
PIN_PADSTA
CK
PIN_PADSTA
CK
J2
PIN
_P
AD
STA
CK
Pin 3
RPM
Pin 4
8VDC
CONSOLE
See Wiring Diagram for more detailed
information
ALTERNATOR
BR 1
18 VDC
Life Fitness Model 9500 Series Cross-Trainers
TABLE OF CONTENTS
SECTION I
TROUBLESHOOTING GUIDES
PAGE
LOUD THUMPING NOISE ............................................................................................... 2
RUBBING AND WHINNING NOISE................................................................................. 2
METAL NOISE................................................................................................................. 2
GRINDING....................................................................................................................... 2
RUBBING AND SQUEAKING .......................................................................................... 2
KNOCKING AND THUMPING.......................................................................................... 2
DRIVE BELT SLIPPING................................................................................................... 2
UPPER ARMS LOOSE .................................................................................................... 2
END PLAY IN PEADAL ARM ........................................................................................... 3
ALTERNATOR BELT SLIPPING ...................................................................................... 3
NO POWER..................................................................................................................... 3
NOT READING HEART RATE......................................................................................... 3
ERRATIC HEART RATE.................................................................................................. 4
NO LEDS ......................................................................................................................... 4
NO RPM .......................................................................................................................... 4
ALTERNATOR BELT TENSION ...................................................................................... 5
NO LOAD......................................................................................................................... 6
SECTION II
DIAGNOSTICS
OVERVIEW ..................................................................................................................... 2
STATE 1: ALL LEDS AND KEYPAD TEST ...................................................................... 3
STATE 2: INDIVIDUAL LED TEST................................................................................... 4
STATE 3: PROGRAM VERSION NUMBER ............................................................................ 5
STATE 3: VERSION #, RPM, HR, AND LOAD TESTS (INTEGRATED PCB) .................. 6
STATE 4: HEART RATE SOFWARE (MODEL 9500HR ONLY) ....................................... 7
STATE 4: LIFEPULSE AND NETWORK STATUS TESTS (INTEGRATED PCB)............. 8
STATE 5: MAXIMUM PROGRAM DURATION................................................................. 9
STATE 6: TELEMETRY ENABLE/DISABLE..................................................................... 10
STATE 7: ENGLISH / METRIC UNITS............................................................................. 11
STATE 8: MODEL SELECTION....................................................................................... 12
STATE 9: TOTAL HOURS / STATISTICS........................................................................ 13
STATE 10: METS ENABLE / DISABLE............................................................................ 14
STATE 11: PAUSE TIME OUT ........................................................................................ 15
STATE 12: PHOTO SHOOT ............................................................................................ 16
STATE 12: LANGUAGE SELECTION (INTEGRATED PCB)............................................ 17
STATE 13: EEPROM TEST (INTEGRATED PCB)........................................................... 18
STATE 14: PHOTO SHOOT (INTEGRATED PCB) .......................................................... 19
NOTES ............................................................................................................................ 20
Life Fitness Model 9500 Series Cross-Trainers
TABLE OF CONTENTS
SECTION III
HOW T0…REPLACE:
PAGE
DISPLAY CONSOLE ASSEMBLY.................................................................................... 2
TRAY ASSEMBLY ........................................................................................................... 3
READING RACK ASSEMBLY.......................................................................................... 4
STOP SWITCH ASSEMBLY............................................................................................ 5
HOOD SHROUD ASSEMBLY.......................................................................................... 6
HEART RATE UPPER ARM ASSEMBLY......................................................................... 7
UPPER ARM ASSEMBLY................................................................................................ 8
RIGHT SIDE SHROUD FOR HEART RATE UNITS ......................................................... 9
RIGHT SIDE SHROUD FOR NON-HEART RATE UNITS ................................................ 10
IDLER PULLEY TENSION BRACKET.............................................................................. 11
DRIVE BELT .................................................................................................................... 12
POWER CONTROL BOARD BRACKET ASSEMBLY ...................................................... 14
ALTERNATOR................................................................................................................. 15
ALTERNATOR BELT ....................................................................................................... 16
PEDAL LEVER ASSEMBLY............................................................................................. 17
POWER MODULE ASSEMBLY ....................................................................................... 18
CRANK SHAFT PULLEY ASSEMBLY ............................................................................. 19
INTERMEDIATE PULLEY ASSEMBLY ............................................................................ 20
SECTION IV
ELECTRONICS OVERVIEW AND WIRING BLOCK DIAGRAMS
DISPLAY CONSOLE BOARD (DSP HEART RATE PCB) ................................................ 2
DISPLAY CONSOLE BOARD (INTEGRATED PCB) ........................................................ 4
ALTERNATOR CONTROL BOARD ................................................................................. 6
ALTERNATOR................................................................................................................. 7
WIRING BLOCK DIAGRAM FOR DSP HEART RATE BOARD........................................ 8
WIRING BLOCK DIAGRAM FOR INTEGRATED PCB..................................................... 9
NOTES ............................................................................................................................ 10
SECTION V
PARTS IDENTIFICATION
MODEL ID AND SN LOCATION ...................................................................................... 2
GK53-00012-XXXX SN 669724 - UP ................................................................................ 3
GK53-00014-XXXX SN 665000 - 669723 ......................................................................... 5
GK53-00013-XXXX SN 685000 - UP ................................................................................ 7
CT95-0XXX-18 SN 693097 - UP....................................................................................... 9
NOTES ............................................................................................................................ 11
SECTION VI
MISCELLANEOUS INFORMATION
PREVENTIVE MAINTENANCE TIPS............................................................................... 2
UNPACKING INSTRUCTIONS ........................................................................................ 3
COMMUNICATING BY FAX............................................................................................. 4
FAX FORM ...................................................................................................................... 5
NOTES ............................................................................................................................ 6
© 2000 Life Fitness, a division of Brunswick Corporation. All rights reserved. All rights reserved. Life Fitness, Lifecycle, Lifepulse and Flexdeck are registered
trademarks, and Heart Rate Zone Training, Lifespring and RELY ON IT are trademarks of Brunswick Corporation. Polar is a registered trademark of Polar. Any
use of these trademarks, without the express written consent of Life Fitness or the corresponding companies is forbidden.
M051-00K53-B011
11-2000
Section I
Life Fitness Model 9500 Series Cross-Trainers
SECTION I
TROUBLESHOOTING
GUIDES
1
Life Fitness Model 9500 Series Cross-Trainers
Malfunction
Probable Cause
Corrective Action
Loud thumping noise when
pedal levers rotate under load.
Pulleys misaligned.
Loosen the pillow block bearing, align the
pulleys and then retighten the pillow block
bearings.
Rubbing/whining noise when
pulleys are rotating.
Dirt build up in pedal rails.
Clean and remove dirt build up.
Rear roller wheels frozen.
Clean and lubricate with non detergent oil.
Link or Pedal Lever is
contacting heatshield.
Reposition heat shield or replace.
Metal noise on rotation.
Faulty intermediate shaft
assembly.
Replace intermediate shaft assembly.
Grinding.
Faulty pillow block.
Replace pilow blocks on crankshaft.
Alternator.
Relieve tension on alternator, spin flywheel for
smoothness. If thumping occurs, faulty
alternator. Replace alternator.
Rubbing/squeaking.
Bearings at pivot points out of
position or dirty.
Clean all sleeves in the linkage pivot areas and
lubricate with non detergent oil.
Knock/thumping occurs 180°
apart in rotation.
Setscrews in crank arm
assembly are loose.
Loosen setscrew and clamping screw in crank
arm assembly. Place blue Locktite® (242) on
screws. Tighten setscrew first to set keyway,
then tighten clamping screw.
Small extension arm bolt
loose.
Replace small extension arm kit.
Link or Pedal Lever is
contacting the heat shield.
Reposition or replace the heat shield.
Drive Belt slipping.
Loose or worn drive belt.
Adjust the tension on the idler pulley tension
bolt of the U-Tension Bracket (See How To...).
Rotate pulley and check the tension. Belt
tension should be 170 FT LBS for new belt and
160 FT LBS if installing existing belt. If a J10
belt gauge is not available. Adjust to a 1/4”
(7mm) deflection.
Upper Arms slip.
Bolts that connect the upper
and lower arms is loose.
Adjust and tighten to a torque of 105 FT. LBS.
2
Life Fitness Model 9500 Series Cross-Trainers
Probable Cause
Worn bearings.
Corrective Action
Check for front to back movement in bearings
that connect pedal lever and crank arm or in
the 14” link.
Section I
Malfunction
Front to back play in pedal /
arm.
Replace linkage bearing assembly.
Poly-V pulley on intermediate
shaft is loose.
Replace intermediate shaft assembly
(See How To...).
Crank Arm is loose.
Loosen set screws and clamping screw in
Crank arm Assembly. Place blue Locktite® 242
on screws. Tighten set screws first and then
tighten the clamping screw.
Alternator belt slipping.
Loose or worn alternator belt
Inspect for damage: replace alternator belt if
necessary. Adjust tension (See How To...).
No Power.
Verify unit is turned on.
Turn on at the ON/OFF switch.
Line cord damaged.
Inspect AC line cord, verify no damage.
Damaged cable.
Inspect all cables for damage.
Circuit breaker blown.
Reset circuit breakers. Replace if needed.
Fuse on control board is blown.
Replace control board.
Faulty entry module.
Using a voltmeter, verify 14 v AC is at J4 on the
power control board.
Replace entry module.
Not reading heart rate.
Faulty power control board.
Using a voltmeter, verify 8 V DC at J1 pin 4 and
7 (see wiring diagram).
Cable connection.
Disconnect and reconnect display console
cable connection
Pinched cable in RT/LT side.
Remove shroud caps and inspect cables.
Replace damaged cable.
Inspect cable to make sure the right side cable
is on the users right, and the left is on the left
side.
Not communicating with DSP
board.
Enter diagnostic, see if DSP and monitor
version are displayed. If not displayed, replace
DSP board.
3
Life Fitness Model 9500 Series Cross-Trainers
Malfunction
Erratic heart rate.
Probable Cause
User’s hands are not making
proper contact.
Corrective Action
Verify hands are contacting entire sensors.
Sweat is causing hands to slip
Wipe hands and sensors.
Bad connection.
Sensor loose or falling off. Replace Life Pulse
digital sensor with kit.
Remove handlebar shroud caps and verify cable
connection.
Cross talk from telemetry
receiver.
Verify position of Cross-Trainer is proper
distance from other telemetry equipped
equipment. See installation instructions or
operation manual.
Turn telemetry off from diagnostics and test Life
Pulse sensor separately.
Check for corrosion on connectors. Disconnect
and connect telemetry receiver.
Call Customer Support Service.
No LED.
No RPM. Unit shuts off one
minute into program.
Cable connection.
Remove display console and verify cable is
properly plugged into console.
8 vdc supply for LED.
Using a voltmeter, measure for 8 vdc at console
cable connection. See wiring diagram for pin
configuration.
8 vdc supply not present at
cable.
Using, measure for 8 vdc at power control
board connection, J1. See wiring diagram pin
configuration.
No 8 vdc at J1.
Faulty power control board. Replace power
control board.
Bad cable connection.
Verify cables connections at console to PCB
(J1), and PCB to alternator (J2). Disconnect
and re-connect cables.
Using a voltmeter, verify cable continuity on
console to PCB and PCB to alternator.
4
Life Fitness Model 9500 Series Cross-Trainers
Probable Cause
Corrective Action
Loose alternator belt.
Check tension. New belt should be tensioned
to 90 FT LBS. Existing belt at 80 FT LBS. If
gauges are not available, set to 1/4” (6mm)
deflection.
Faulty alternator.
Enter diagnostic to the field duty cycle and
increase the load. If load does not increase,
replace alternator.
Section I
Malfunction
Alternator belt tension.
5
Life Fitness Model 9500 Series Cross-Trainers
6
Life Fitness Model 9500 Series Cross-Trainers
SECTION II
DIAGNOSTIC MODES
1
Life Fitness Model 9500 Series Cross-Trainers
OVERVIEW
To access Diagnostic State 1, press and hold down
the number 5 key while pressing the CLEAR/PAUSE
key twice.
HEART RATE PROGRAM: The heart rate program
version is displayed in the ELAPSED TIME window
while the heart rate DSP version is displayed in the
SPEED window.
Press the START/ENTER key to scroll forward
through each programs. Press the CLEAR/PAUSE
key to scroll back to a previous program or to exit
when back in Diagnostic State 1.
LIFECENTER MESSAGES are visible In the
CAL/HOUR window and appear as follows:
To exit Diagnostics, press the CLEAR/PAUSE key to
return back to Diagnostic State 1, then press
CLEAR/PAUSE again to exit back to the user
display.
CAL/HOUR
NONE
NULL
ON
OFF
To verify the LifePulse ELECTRODES are
functioning, grasp each handlebar and begin to stride.
The heart-shaped LED will illuminate followed by the
heart rate reading.
FIELD DUTY CYCLE and ALTERNATOR TEST:
The FIELD DUTY CYCLE is displayed in the
CALORIES/HOUR window. The field duty cycle
ranges between 6 and 100. Adjust to the appropriate
value using the UP ARROW to increase or the
DOWN ARROW to decrease. To test the
ALTERNATOR, increase the field duty cycle to a
higher number. The tension should increase. When
testing is completed, use the DOWN ARROW to
return the field duty cycle to six.
To test the alternator, increase the field duty cycle
value using the up arrow, or down arrow to decrease
the field duty cycle value.
2
DESCRIPTION
No LIFELINK board detected
Board detected but not communicating
Linked to LIFECENTER
Linked to LIFECENTER
PROGRAM DURATION: To set the program
duration, press the START/ENTER key. Use the UP
ARROW to increase time and the DOWN ARROW
to decrease time. Times can be set from 10 to 99
minutes.
TELEMETRY: Press the UP/DOWN ARROW to
toggle telemetry ON and OFF.
ENGLISH or METRIC SYSTEMS: Use the DOWN
ARROW to select METRIC and the UP ARROW to
select ENGLISH. The factory default is English.
PROGRAM HOURS: To show cumulative hours for
each program, press the UP ARROW key to scroll
forward through each program. Use the DOWN
ARROW to scroll backwards through each program.
PAUSE TIMES: The pause time feature can be set
between 1 and 99 minutes. The default is set at one
minute. Use the UP ARROW to increase pause
times and the DOWN ARROW to decrease pause
times in 1 minute increments.
Life Fitness Model 9500 Series Cross-Trainers
Section II
DIAGNOSTIC STATE 1 - ALL LEDs AND KEYPAD TEST
To access Diagnostic State 1, press and hold down the number 5 key while pressing the CLEAR/PAUSE key twice.
All the LEDs should illuminate on the status displays. Pressing each numeric key will display its value across the
status screen. For example: press the number 8 key to display 8’s across the screen.
Pressing the DISPLAY LOCK key, the letter ‘L’ appears across the status display. Pressing the AEROBICS key
displays the letter ‘A’, pressing the REVERSE key displays the letter ‘R’, pressing the QUICK START key displays
the letter ‘Q’, pressing the UP ARROW displays the letter ‘U’, and the DOWN ARROW displays the letter ‘D’.
Press the START/ENTER key to scroll forward to the next Diagnostic State, or press the CLEAR/PAUSE key to
exit diagnostics and return back to the user display.
Proceed to Diagnostic State 2 by pressing the START/ENTER key.
NOTICE: Each time a key is pressed it sounds a beep.
KEYS
0
1
2
3
4
5
6
7
DISPLAY
0
1
2
3
4
5
6
7
KEYS
8
9
Display Lock
Aerobics Mode
Reverse Mode
Quick Start
Up
Down
DISPLAY
8
9
L
A
R
Q
U
D
3
Life Fitness Model 9500 Series Cross-Trainers
DIAGNOSTIC STATE 2 - INDIVIDUAL LED TEST
This test will show the LEDs for each display segment (Time, Speed RPM, Level, Heart Rate, Calories, Distance,
CAL/Watts, and Watts) for proper illumination.
Press the START/ENTER key to scroll forward to the next Diagnostic State or press the CLEAR/PAUSE key to
scroll backward to Diagnostic State 1.
To exit diagnostics, press the CLEAR/PAUSE key when in Diagnostic State 1 to get back to the user display.
Proceed to Diagnostic State 3 by pressing the START/ENTER key.
4
Life Fitness Model 9500 Series Cross-Trainers
DIAGNOSTIC STATE 3 - PROGRAM VERSION NUMBER
6
Section II
P 3 . 11
The current PROGRAM VERSION NUMBER (ex: P285) will be displayed in the TIME window. While striding, the
RPM will be displayed in the RPM window, and while holding the handlebar sensors or wearing an optional
telemetry heart rate chest strap, the HEART RATE will be displayed in the LEVEL window.
The FIELD DUTY CYCLE LOAD TEST/ALTERNATOR is displayed in the CAL/HOUR window. Field duty cycle
settings are set between 6 to 100. The greater the number, the greater the resistance. To adjust in increments of
‘1’ press the number 1 key to decrease resistance and the number 3 key to increase resistance. To adjust in
increments of 10, press the number 4 key to decrease resistance and the number 6 key to increase resistance.
To test the alternator, verify that when increasing the FDC, the resistance increases.
NOTE: AFTER TESTING, THE FDC MUST BE SET BACK TO THE FACTORY SETTING OF 6.
Press the START/ENTER key to scroll forward to the next Diagnostic State or press the CLEAR/PAUSE key to
scroll backward to a previous program.
To exit diagnostics, press the CLEAR/PAUSE key through the previous Diagnostic States to get back to the user
display.
Proceed to Diagnostic State 4 by pressing the START/ENTER key.
5
Life Fitness Model 9500 Series Cross-Trainers
DIAGNOSTICS STATE 3 - VERSION #: RPM, HR, and LOAD TESTS w/ Integrated PCB
P1.20
REDY
6
CT
The PROGRAM VERSION NUMBER (ex. P1.01) will be displayed in the ELAPSED TIME window.
The present RPM will be displayed in the RPM window.
The NETWORK STATUS will be displayed in the LEVEL/CALORIES window.
The present FIELD DUTY CYCLE applied to the alternator will be displayed in the CALORIES/HOUR
window. This value can be adjusted using the ‘DOWN’ and ‘UP’ keys to decrement and increment the
FIELD DUTY CYCLE. The FIELD DUTY CYCLE can also be adjusted down or up in increments of 10
using the ‘4’ and ‘6’ keys.
Pressing the ‘8’ key will toggle the display of the LIFEFITNESS PART # of the console software.
Pressing the ‘9’ key will toggle the display of the CSAFE version number.
Pressing the ‘CLEAR/PAUSE’ key will return to DIAGNOSTICS STATE 2.
Pressing the ‘START/ENTER’ key will advance to DIAGNOSTICS STATE 4.
6
Life Fitness Model 9500 Series Cross-Trainers
DIAGNOSTIC STATE 4 - HEART RATE SOFTWARE (Model 9500HR ONLY)
P4.00
NONE
Section II
P1.80
The PROGRAM VERSION NUMBER (P1.80) of the HEART RATE DSP board software is displayed in the
ELAPSED TIME window.
The PROGRAM VERSION NUMBER (P4.00) of the HEART RATE DSP board DSP software is displayed in the
SPEED window.
The display of both PROGRAM VERSION NUMBERS verifies that the HEART RATE DSP board is functioning
properly.
The status of the LIFELINK board and LIFECENTER connection are displayed in the CAL/HOUR window. The
following conditions are as follow:
CAL/HOUR
NONE
NULL
ON
OFF
DESCRIPTION
No LIFELINK board detected
Board detected but not communicating
Linked to LIFECENTER
Linked to LIFECENTER
To test the sensors, grasp the sensors making sure proper contact is maintained. The heart shaped LED will light
up and “HR” will appear when sensors are grasped. The heart rate reading will follow.
Press the START/ENTER key to scroll forward to the next Diagnostic State or press the CLEAR/PAUSE key to
scroll backward to previous programs.
To exit diagnostics, press the CLEAR/PAUSE key when in Diagnostic State 1 to get back to the user display.
Proceed to Diagnostic State 5 by pressing the START/ENTER key.
7
Life Fitness Model 9500 Series Cross-Trainers
DIAGNOSTICS STATE 4 - LIFEPULSE and NETWORK STATUS TESTS w/ Integrated
PCB
L P V E R S I ON
9.7
Upon entry to this diagnostic state, the LifePulse software version number is displayed for 2 seconds. After this,
the LP Comm Status is displayed for 2 seconds, which will either display ‘LP PC COMM ON’ or ‘LP PC COMM
OFF’. Make sure ‘LP PC COMM OFF’ appears, or CSAFE will not function correctly. The LP Comm Status can
be toggled by pressing the ‘5’ key during the 2 seconds when the LP Comm Status message is being displayed,
and does not normally need to be adjusted.
After these messages are done displaying, the LifePulse test information comes up.
A counter displaying the ELAPSED TIME since both hands were placed on the LifePulse sensors begins
counting in the TIME window. This counter will stop counting as soon as a heart rate is displayed.
The GAIN is displayed in the RPM window.
HEART RATE is displayed in the LEVEL/HEART RATE window.
The CONFIDENCE LEVEL between 0–9 is displayed in the CALORIES/HOUR window, with 0 indicating
the lowest confidence in the reported HEART RATE and 9 indicating the highest.
The profile window will display an ‘L’ when the left LifePulse sensor is being held,. An ‘R’ when the right
LifePulse sensor is being held, and ‘L’ and ‘R’ when both sensors are being held.
Pressing the ‘CLEAR/PAUSE’ key will return to DIAGNOSTICS STATE 3.
Pressing the ‘START/ENTER’ key will advance to DIAGNOSTICS STATE 5.
8
Life Fitness Model 9500 Series Cross-Trainers
DIAGNOSTIC STATE 5 - MAXIMUM PROGRAM DURATION
60
Section II
MAX DURATION
PROGRAM DURATION is used to set a length of time. Time is adjustable between 10 to 99 minutes. Press the
DOWN ARROW to decrease time in increments of 1 minute. Press the UP ARROW to increase the time in
increments of 1 minute. Holding down the arrow keys allows the operator to scroll quickly through the time settings.
The default value is set to 60 minutes. When selected, the LED for the START/ENTER key will illuminate when
this value is selected. This time will be stored in EEROM even when the unit is not in use.
Press the START/ENTER key to scroll forward to the next Diagnostic State or press the CLEAR/PAUSE key to
scroll backward to previous programs.
To exit diagnostics, press the CLEAR/PAUSE key when in Diagnostic State 1 to get back to the user display.
Proceed to Diagnostic State 6 by pressing the START/ENTER key.
9
Life Fitness Model 9500 Series Cross-Trainers
DIAGNOSTIC STATE 6 - TELEMETRY ENABLE/DISABLE
TELEMETRY
ON
TELEMETRY can be turned ON or OFF. The telemetry default is set to ON. When in the default mode the
START/ENTER key LED will illuminate. This setting is stored in EEROM even when the unit is not in use. The
heart-shaped LEDs illuminate in the program profile window.
Toggle between ON and OFF by pressing the number 5 key or the arrows keys (DOWN ARROW for OFF and UP
ARROW for ON).
Press the START/ENTER key to scroll forward to the next Diagnostic State or press the CLEAR/PAUSE key to
scroll backward to previous programs.
To test for proper operation, place a pulse simulator 2 - 3 feet from the RECEIVER located in the TRAY
ASSEMBLY. The Heartrate will display in the Heartrate section of the display.
To exit diagnostics, press the CLEAR/PAUSE key when in Diagnostic State 1 to get back to the user display.
Proceed to Diagnostic State 7 by pressing the START/ENTER key.
10
Life Fitness Model 9500 Series Cross-Trainers
DIAGNOSTIC STATE 7 - ENGLISH / METRIC UNITS
UNI T S
Section II
E N GL I S H
To select ENGLISH or METRIC units, press the number 5 key or the arrows keys (DOWN ARROW for Metric and
UP ARROW for English).
When the ENGLISH default is selected the START/ENTER key LED illuminates. This setting is stored in EEPROM
when the unit is not in use.
Press the START/ENTER key to scroll forward to the next Diagnostic State or press the CLEAR/PAUSE key to
scroll backward to a previous program.
To exit diagnostics, press the CLEAR/PAUSE key when in Diagnostic State 1 to get back to the user display.
Proceed to Diagnostic State 8 by pressing the START/ENTER key.
11
Life Fitness Model 9500 Series Cross-Trainers
DIAGNOSTIC STATE 8 - MODEL SELECTION
9500HR
Section II
CT
For model selection, press the number 5 key or the arrow keys.
The START/ENTER key LED illuminates when the default model is selected. This setting is stored in the EEPROM
when the unit is not in use.
The display will read 9500L for Lower Body or 9500HR for Total Body units.
Press the START/ENTER key to scroll forward to the next Diagnostic State or press the CLEAR/PAUSE key to
scroll backward to previous program.
To exit diagnostics, press the CLEAR/PAUSE key when in Diagnostic State 1 to get back to the user display.
Proceed to Diagnostic State 9 by pressing the START/ENTER key.
12
Life Fitness Model 9500 Series Cross-Trainers
DIAGNOSTIC STATE 9 - TOTAL HOURS / STATISTICS
HOURS =
0
This program shows the TOTAL HOURS for all programs (Hill, Random, Manual, Fat, Cardio...), as well as total
individual hours for each program.
Press the UP ARROW to scroll forward through each program’s total hours. Press the DOWN ARROW to scroll
back to total hours.
Press the START/ENTER key to scroll forward to the next Diagnostic State or press the CLEAR/PAUSE key to
scroll backward to a previous program.
To exit diagnostics, press the CLEAR/PAUSE key through Diagnostic State 1 to get back to the user display.
Proceed to Diagnostic State 10 by pressing the START/ENTER key.
13
Life Fitness Model 9500 Series Cross-Trainers
DIAGNOSTIC STATE 10 - METS ENABLE / DISABLE
OFF
Section II
METS
The METS state shows the work load (optional). Within this state, the METS OPTION can be turned ON or OFF.
Press the number 5 key or the arrow keys to METS ON or METS OFF. The DOWN ARROW turns OFF METS and
the UP ARROW turns ON METS.
The START/ENTER key LED illuminates when the METS OFF default is selected. This value is stored in EEROM
when the unit is not in use.
Press the START/ENTER key to scroll forward to the next Diagnostic State or press the CLEAR/PAUSE key to
scroll backward to a previous program.
To exit diagnostics, press the CLEAR/PAUSE key when in Diagnostic State 1 to get back to the user display.
Proceed to Diagnostic State 11 by pressing the START/ENTER key.
14
Life Fitness Model 9500 Series Cross-Trainers
DIAGNOSTIC STATE 11 - PAUSE TIMEOUT DURATION
1
Section II
P A U S E T I MEOUT
The PAUSE TIME-OUT can be adjusted between 1 through 99 minutes.
The number 1 key or DOWN ARROW are used to decrease the setting in increments of one minute.
The number 3 key or UP ARROW are used to increase the setting in increments of one minute.
The START/ENTER key LED illuminates when the default, 1 minute, is selected. This value is saved in the
EEROM when the unit is not in use.
Press the START/ENTER key to scroll forward to the next Diagnostic State or press the CLEAR/PAUSE key to
scroll backward to a previous program.
To exit diagnostics, press the CLEAR/PAUSE key when in Diagnostic State 1 to get back to the user display.
Proceed to Diagnostic State 12 by pressing the START/ENTER key.
15
Life Fitness Model 9500 Series Cross-Trainers
DIAGNOSTIC STATE 12 - PHOTO SHOOT
28.45
52
135
725
Photo Shoot is used primarily for photography purposes in order to develop sales and marketing literature, training,
and for customer support. The sample data in each field is non-functional and used for display purposes only.
This completes diagnostics.
To exit diagnostics, press the CLEAR/PAUSE key through Diagnostic State 1 to get back to the user display.
16
Life Fitness Model 9500 Series Cross-Trainers
DIAGNOSTICS STATE 12 – LANGUAGE SELECTION w/ Integrated PCB
=
Section II
LANG
Within this state, the LANGUAGE can be changed to any one of 7 languages, including English, German, French,
Italian, Dutch, Spanish or Portuguese.
The ‘UP ARROW’ will display the next language in the list.
The ‘DOWN ARROW’ will display the previous language in the list.
The ENTER key led will indicate when the language is set to the default of ‘ENGLISH’.
This value is stored in EEROM and is kept when the unit is not in use.
Pressing the ‘CLEAR/PAUSE’ key will return to DIAGNOSTICS STATE 11
Pressing the ‘START/ENTER’ key will advance to DIAGNOSTICS STATE 13
17
Life Fitness Model 9500 Series Cross-Trainers
DIAGNOSTICS STATE 13 – EEPROM TEST w/ Integrated PCB
EEPROMTEST
Within this state, EEPROM can be tested.
Pressing the ‘DOWN ARROW’ will initiate the EEPROM test. If the test completes successfully, the message
‘EEPROM GOOD’ will appear. If the test fails, the message ‘EEPROM BAD AT XX’ will display with the bad
EEPROM location.
Pressing the ‘CLEAR/PAUSE’ key will return to DIAGNOSTICS STATE 12
Pressing the ‘START/ENTER’ key will advance to DIAGNOSTICS STATE 14
18
Life Fitness Model 9500 Series Cross-Trainers
DIAGNOSTIC STATE 14 - PHOTO SHOOT w/ Integrated PCB
52
135
725
Section II
28.45
This state is to be used only for PHOTO SHOOT.
None of the data items displayed are real.
Sleep timers are disabled.
Pressing the ‘CLEAR/PAUSE’ key will return to DIAGNOSTICS STATE 13.
19
Life Fitness Model 9500 Series Cross-Trainers
NOTES
20
Life Fitness Model 9500 Series Cross-Trainers
SECTION III
Section III
“How To...” SERVICE AND REPAIR GUIDE
1
Life Fitness Model 9500 Series Cross-Trainers
How To... Replace the Display Console Assembly
Tools required: Phillips screwdriver
Display Console
1. Turn the power OFF at the ON/OFF switch and unplug the ac
line cord from the electrical outlet.
2. Remove the four SCREWS securing the DISPLAY CONSOLE
to the MONO-COLUMN ASSEMBLY.
3. Carefully raise the DISPLAY CONSOLE off the DISPLAY
CONSOLE BRACKET and disconnect the three CABLE
CONNECTIONS from the back of the DISPLAY CONSOLE.
Set the worn DISPLAY CONSOLE aside.
Display Console
Bracket
Mono-Column
Assembly
4. Position the new DISPLAY CONSOLE above the DISPLAY
CONSOLE BRACKET and reverse steps 1 through 3 to return
parts to proper position.
5. Tighten the DISPLAY CONSOLE screws in a criss-cross
manner.
1
3
4
2
Screws
Model 9500HR Shown
CAUTION: BE CAREFUL NOT TO DISCONNECT THE TELEMETRY CABLE JACK
FROM THE RECEIVER DURING THE REPLACEMENT PROCESS.
2
Life Fitness Model 9500 Series Cross-Trainers
How To... Replace the Tray Assembly
Tools required: Socket set or Open end wrench, Phillips screwdriver
1. Turn power OFF at the ON/OFF switch and unplug ac line cord from electrical outlet.
2. Remove the SCREWS (4) securing the DISPLAY CONSOLE to the MONO-COLUMN ASSEMBLY.
Disconnect STOP SWITCH/TELEMETRY CABLE from CONSOLE CONNECTOR.
HELPFUL HINT: PLACE DISPLAY CONSOLE BACK ONTO MONO-COLUMN AND ATTACH A COUPLE OF
DISPLAY MOUNTING SCREWS TO HOLD DISPLAY.
3. Remove SCREWS (4) securing TRAY ASSEMBLY to MONO-COLUMN.
Screws
Monocolumn
Assembly
CAUTION: WHEN REPLACING TRAY ASSEMBLY THE
TELEMETRY CABLE JACK MAY BECOME
DISCONNECTED FROM RECEIVER.
Section III
4. Reverse steps 1 through 4 to return parts to proper
position.
Model 9500HR Shown
3
Life Fitness Model 9500HR Cross-Trainer
How To... Replace the Reading Rack Assembly
Tools required: Socket set or Open end wrench
1. Turn power OFF at the ON/OFF switch.
2. Remove the SCREWS (4) securing the READING RACK to the MONOCOLUMN.
3. Replace new READING RACK. Discard faulty
READING RACK.
Reading
Rack
Assembly
Screws
Monocolumn
Assembly
4
Life Fitness Model 9500 Series Cross-Trainers
How To... Replace the Stop Switch Assembly
Tools required: Standard screwdriver, Pliers, Socket set or Open end wrench, Phillips screwdriver
1. Turn power OFF at the ON/OFF switch and unplug ac line cord from electrical outlet.
2. Remove the SCREWS (4) securing the DISPLAY CONSOLE to the MONO-COLUMN ASSEMBLY.
Disconnect STOP SWITCH/TELEMETRY CABLE from CONSOLE CONNECTOR.
HELPFUL HINT: PLACE DISPLAY CONSOLE BACK ONTO MONO-COLUMN AND ATTACH A COUPLE OF
DISPLAY MOUNTING SCREWS TO HOLD DISPLAY.
3. Remove SCREWS (4) securing TRAY ASSEMBLY to MONOCOLUMN.
4. Remove the wiring harness from the worn STOP SWITCH.
5. Using a screwdriver bend the LOCKING CLIP TABS of the LOCKING
CLIP open.
7. Insert the new STOP SWITCH ASSEMBLY through the opening in the front of the TRAY ASSEMBLY taking
note to orient the SWITCH BODY so the word “STOP” is readable from the face of the TRAY ASSEMBLY.
8. Slide the LOCKING CLIP from the underneath side of the TRAY over the SWITCH BODY.
9. Bend each of the two LOCKING CLIP TABS of the LOCKING CLIP 90 degrees to secure the NUT into position
and prevent it from rotating. It may be necessary to back off the NUT slightly to insure that the tabs come in
contact with the flat spot on the NUT. The LOCKING CLIP TABS can sustain being bent several times to
insure a tight lock.
10. Install the plastic NUT on to the threaded portion of the SWITCH BODY with the flat side toward the TRAY and
tighten 1/8 of a turn past hand tight. (Torque 10-15 in/lbs)
CAUTION: OVERTIGHTENING THE NUT MAY CAUSE DAMAGE TO THE SWITCH BODY.
11. Insert the new SWITCH into the SWITCH BODY taking special note to orient the two parts so the SWITCH
PLUNGERS make contact upon assembly. DO NOT bend the CONNECTOR TABS on the SWITCH.
NOTE: VERIFY THAT THE PLUNGERS ARE MAKING CONTACT BY PRESSING THE STOP BUTTON AND
VISUALLY INSURING THEY TOUCH EACH OTHER. A CLICKING SOUND WILL BE HEARD FROM THE
SWITCH IF THE ASSEMBLY HAS BEEN INSTALLED PROPERLY.
12. Install the STOP SWITCH/TELEMETRY CABLE being extremely careful not to bend or break the
connecting tabs of the switch and reverse Steps 1 through 3 to return all parts to their proper position.
CAUTION: WHEN REPLACING TRAY ASSEMBLY THE TELEMETRY CABLE JACK MAY BECOME
DISCONNECTED FROM RECEIVER.
5
Section III
6. Back off the NUT and remove the STOP SWITCH BODY from the
TRAY ASSEMBLY.
Life Fitness Model 9500 Series Cross-Trainers
How To... Replace the Hood Shroud Assembly
Tools Required: Torx key, or Standard flat screwdriver, Socket Set, Hex Key Set
1. Turn power OFF at the On/Off switch and unplug the AC line cord
from electrical outlet.
Tray Assembly
Push Snap
2. Locate PUSH SNAPS (2) under the TRAY ASSEMBLY. Depress
the center tab down.
NOTE: USING A HEX KEY TOOL YOU CAN REACH UNDER THE
TRAY ASSEMBLY TO DEPRESS THE CENTER PIN.
3. Remove SCREWS (8) securing the HOOD SHROUD ASSEMBLY.
4. Gently press down on the HOOD SHROUD ASSEMBLY, just
below the PUSH SNAP and remove the HOOD SHROUD
ASSEMBLY.
Hood Shroud
Assembly
5. Place the new HOOD SHROUD ASSEMBLY into position.
6. Reverse steps 1 through 4 to return parts to proper location.
NOTE: TO REPLACE PUSH SNAP, POSITION INNER PIN SO THE HEAD OF THE PIN IS OUT AT THE TOP.
INSERT INTO BOTH SHROUD ASSEMBLES, AND DEPRESS. FOR PROPER INSTALLATION THE PUSH
SNAP WILL BE FLUSH WITH THE HOOD SHROUD ASSEMBLY.
6
Life Fitness Model 9500HR Cross-Trainer
How To... Replace Heart Rate Upper Arm Assembly
Tools Required: Phillips screwdriver, Socket Set
1. Turn power OFF at the ON/OFF switch and unplug AC line cord from the electrical outlet.
2. Remove SCREWS (2) securing the ARM CAP
SHROUD.
3. Locate and disconnect 2-PIN CONNECTOR.
4. Carefully remove the two MOUNTING BOLTS
(9/16”) with WASHERS securing HEART RATE
HANDLEBAR ASSEMBLY to the SHAFT HUB
ASSEMBLY of FRAME.
NOTE: HEART RATE HANDLEBAR ASSEMBLY
MOUNTING HOLES ARE ROUNDED ON THE
INNER ASSEMBLY. THE SHAFT HUB ASSEMBLY
HOLES ARE BEVELED TO INSURE PROPER
ASSEMBLY.
Section III
5. Place the new HEART RATE HANDLEBAR
ASSEMBLY (notched edge towards the front of
unit) and reverse steps 1 through 4 to insure
proper replacement of part.
CAUTION!: BE CAREFUL NOT TO PINCH HEART RATE CABLE WHEN ASSEMBLING THE ARM CAP
SHROUD. DO NOT OVER TIGHTEN THE SCREWS.
7
Life Fitness Model 9500 Cross-Trainer
How To... Replace Upper Arm Assembly
Tools Required: Phillips screwdriver, Socket Set
Reading Rack
1. Turn power OFF at the ON/OFF switch and
unplug AC line cord from electrical outlet.
Screw
2. Remove two SCREWS securing the ARM CAP
SHROUD
Upper Arm
Assembly
Shaft Hub
Assembly
Screw
3. Carefully remove the two MOUNTING BOLTS
(9/16”) with WASHERS securing the UPPER
ARM ASSEMBLY to the SHAFT HUB
ASSEMBLY of FRAME and the two screws
securing the UPPER ARM ASSEMBLY to the
READING RACK ASSEMBLY.
Arm Cap
Shroud
Washer
Bolt
NOTE: UPPER ARM ASSEMBLY MOUNTING HOLES ARE ROUNDED ON THE INNER ASSEMBLY. THE
SHAFT HUB ASSEMBLY HOLES ARE BEVELED TO INSURE PROPER ASSEMBLY.
4. Place the new UPPER ARM ASSEMBLY(notched edge towards the front of unit) and reverse steps 1 through
3 to insure proper replacement of part.
CAUTION!: DO NOT OVER TIGHTEN THE SCREWS.
8
Life Fitness Model 9500HR Cross-Trainer
How To...Replace Right Side Shroud For Heart Rate Units
Tools Required: Torx key, or Standard flat screwdriver, Socket Set, Hex Key Set
1. Turn power OFF at the On/Off switch and unplug line
cord from electrical outlet.
2. Remove HOOD SHROUD ASSEMBLY. See How To...
3. Remove RIGHT HEART RATE HANDLEBAR WITH
ELECTRODES. See How To...
5. Remove the upper SCREW (1) and loosen (do not
remove) the lower SCREW (1) securing the HEART
RATE CABLE CLAMP to the HEART RATE CABLE
BRACKET.
Heart Rate
Cable
Heart Rate
Cable Clamp
Screw
Heart Rate
Cable Clamp
Heart Rate
Cable Bracket
Inner Shroud
Cap Screw
Handrail
Mounting
Post
Front
Panel
Shroud
Handrail
Mounting
Bracket
Handrail
Mounting
Plate
Section III
4. Carefully unwrap the INSULATED WIRE CLAMP away
from the HEART RATE CABLE CONNECTOR, using a
Phillips screwdriver remove the upper SCREW (1), and
INSULATED WIRE CLAMP(1) securing the HEART
RATE CABLE BRACKET to INNER SHROUD CAP.
6. Carefully place the HEART RATE CABLE, through the cut out
area of the INNER SHROUD CAP and RIGHT SIDE SHROUD
ASSEMBLY.
7. Remove the lower SCREW (1) securing both the HEART RATE
CABLE BRACKET ASSEMBLY and the INNER SHROUD CAP, to
the SHAFT HUB FRAME ASSEMBLY. Set aside.
8. Using a (3/16”) Hex Key remove (2) BOLTS securing the user’s
right HANDRAIL MOUNTING PLATE to the HANDRAIL MOUNTING
BRACKET.
9. Using wrench (1/2”) loosen BOLTS (2) and NUTS (2) securing
the user’s right side HANDRAIL ASSEMBLY to the HANDRAIL
MOUNTING POST.
10. Using a (T20) torx screwdriver remove SCREWS (4) securing the RIGHT SIDE SHROUD ASSEMBLY to the
FRONT PANEL SHROUD, and SCREWS (2) securing the lower RIGHT SHROUD ASSEMBLY to the FRAME.
Separate the DUAL-LOCK securing the FRONT PANEL SHROUD to the SIDE SHROUD ASSEMBLY.
11. Carefully maneuver RIGHT SIDE SHROUD ASSEMBLY from between the HANDRAIL MOUNTING
BRACKET and the HANDRAIL MOUNTING PLATE, then maneuver the SIDE SHROUD off and away from the
SHAFT HUB ASSEMBLY, set aside.
12. Reverse steps 1 - 12 to replace all parts to proper position.
9
Life Fitness Model 9500 Cross-Trainer
How To... Replace Right Side Shroud For Non-Heart Rate Units
Tools Required: Torx key, or Standard flat screwdriver, Socket Set, Hex Key Set
1. Turn power OFF at the On/Off switch and unplug line
cord from electrical outlet.
2. Remove SCREWS (2) securing the ARM SHROUD
CAP.
3. Using a wrench loosen (do not remove) BOLTS (2)
securing the UPPER HANDRAIL ASSEMBLY to the
READING RACK.
4. Using a wrench remove BOLTS (2) securing the
LOWER HANDRAIL ASSEMBLY.
5. Remove the SCREWS (2) securing the INNER
SHROUD CAP to the HANDRAIL MOUNTING
PLATE.
6. Using a (T20) torx screwdriver remove SCREWS (7)
securing the RIGHT SIDE SHROUD ASSEMBLY to
the FRONT PANEL and the HOOD ASSEMBLY.
7. Carefully maneuer the RIGHT SIDE SHROUD
ASSEMBLY from between the HANDRAIL MOUNTING PLATE, and the HANDRAIL ASSEMBLY, set aside.
8. Reverse steps 1 through 7 to replace all parts to proper position.
10
Life Fitness Model 9500 Series Cross-Trainers
How To... Replace the IDLER PULLEY TENSION BRACKET
Tools Required: Two 9/16 inch wrenches or sockets
WARNING: TURN THE POWER OFF AT THE ON/OFF SWITCH AND DISCONNECT THE PLUG FROM THE ELECTRICAL
OUTLET PRIOR TO SERVICING ANY MACHINE OPERATING ON AC CURRENT.
Turn the unit off and unplug the
power cord from the wall.
2.
Loosen (do not remove) the
two bracket mounting bolts.
3.
Idler
Pulley
Hub
Slide Plate
Wear Plate
Acorn nut
Back out the tensioning bolt
from the tension bracket.
4.
Remove the bracket mounting
bolts and remove the two-piece
bracket assembly.
5.
Discard the two-piece bracket.
6.
Position the U-bracket with
wide slot to the inside of the
frame and the narrow slot over
the mounting holes in the
frame.
7.
Nylon Lock Nut
Jam
Bolt
Tensioning
Bolt
Plate Washer
Square
Spacer
Sleeve
Tension Bracket
Place external tooth washer on
each mounting bolt and install
square plate washer over the
mounting bolts.
Pulley Bolt
Tooth Washers (2)
Mounting Bolts (2)
8.
Install the bolts through the U-bracket narrow slot and mounting holes in the frame.
9.
Position the slide plate on the back side of the U-bracket and hand tighten the mounting bolts into the threaded plate.
10. Next position the spacer sleeve between the fork end of the U-bracket.
11. Position the pulley bolt through the bracket and spacer.
12. Now install the idler pulley on the bolt with its hub facing against the back side U-bracket.
13. Secure the nylon lock nut and tighten.
14. Place the main drive belt onto the idler pulley.
15. Position the wear plate between the slots of the U-bracket up against the frame.
16. Turn in the tensioning bolt as required to adjust the belt tension.
17. Using a belt tensioning gauge, adjust new belt tension from 165 to 170 lbs, and existing belt from 160 to 165 lbs. If a belt
tensioning gauge is unavailable, place a straight edge between the intermediate pulley and the crank pulley then at the
center of the belt press down on the belt and measure for deflection which should be a 1/4 inch.
18. With the main drive belt properly tensioned, tighten the bracket mounting bolts 5 to 10 ft. lbs.
NOTE: OVER TIGHTENING THE MOUNTING BOLTS WILL CAUSE DAMAGE TO THE SLIDE PLATE.
11
Section III
1.
Life Fitness Model 9500 Series Cross-Trainers
How To... Replace Drive Belt
Tools required:
Hex Key Set, Open End Wrench, Socket Set, Flat Blade and Phillips screwdriver
WARNING: FAILURE TO OBSERVE SAFE PROCEDURES WHEN SERVICING THIS UNIT COULD RESULT
IN INJURY AND OR ELECTRICAL SHOCK.
1. Turn power OFF at the ON/OFF switch then unplug power cord from electrical outlet.
2. Remove Hood Shroud Assembly. See How To...
3. Remove Right Side Shroud Assembly. See How To...
4. Loosen the ALTERNATOR BELT. See How To...
NOTE: NOTE THE POSITION OR PLACEMENT OF DRIVE BELT ON THE CRANK SHAFT ASSEMBLY
PULLEY. PLACE NEW DRIVE BELT IN SAME LOCATION.
5. Locate the TENSION IDLER BRACKET, on the user’s right side of
FRAME locate OUTER TENSIONER PLATE. Using a socket
wrench (9/16”) loosen (do not remove) the BOLTS (2) and star
WASHERS (2).
6. Using a socket wrench (9/16”) loosen the TENSIONER IDLER
ADJUSTMENT BOLT.
7. Using a (1/8”) hex key remove the SET SCREW securing the KEY
in the CRANK ARM and CRANK SHAFT.
8. Using a (3/16”) hex key loosen (do not remove) the CLAMPING
SCREW securing the CRANK ARM to the CRANK SHAFT.
SAFETY TIP: BEFORE PROCEEDING PLACE A BLOCK IN THE CRANK SHAFT PULLEY ASSEMBLY TO
STOP THE CRANK SHAFT PULLEY ASSEMBLY FROM ROTATION WHEN CRANK ARM IS REMOVED.
9. Using a standard screw driver place the blade into the SLOT of the CRANK ARM
ASSEMBLY , this will open the gap and allow for easier removal of the CRANK
ARM ASSEMBLY. Carefully remove CRANK ARM ASSEMBLY and PEDAL
LEVER ASSEMBLY from the CRANK SHAFT. Remove the KEY, and clean all
burrs off the KEY. Carefully position the PEDAL LEVER ASSEMBLY and CRANK
ARM ASSEMBLY on the floor inside unit.
NOTE: CAREFULLY REMOVE THE CRANKARM SQUARE KEYS. USE FINE SANDPAPER
TO REMOVE BURRS FROM KEYS.
NOTE: BEFORE PROCEEDING MARK OR SCORE THE LOCATION OF THE PILLOW
BLOCKS (TOP AND BOTTOM POSITIONS) OF THE INTERMEDIATE SHAFT AND CRANK
SHAFT PULLEY ASSEMBLY.
THE LOCATION OF THESE PILLOW BLOCKS ARE CRITICAL
FOR PROPER LIFE AND OPERATION OF DRIVE SYSTEM.
12
Life Fitness Model 9500 Series Cross-Trainers
How To... Replace Drive Belt (Continued)
10. Using a hex key (1/8”) loosen and remove the SET SCREWS (2) in the PILLOW BLOCK BEARINGS.
11. Using two wrenches (9/16’), remove the NYLON LOCK NUTS (2), BOLTS (2), and WASHERS, securing the
user’s right side PILLOW BLOCK to the FRAME.
12. Carefully remove the PILLOW BLOCK.
NOTE: SCRIBE OR MARK THE LOCATION OF THE INTERMEDIATE SHAFT ASSEMBLY BEFORE
REMOVAL.
13. Loosen the SET SCREWS (2), securing the PILLOW BLOCK
BEARINGS to the INTERMEDIATE SHAFT ASSEMBLY.
Section III
14. Using two wrenches (9/16”), remove the NYLON LOCK NUTS (2),
BOLTS (2), and WASHERS, securing the user’s right side PILLOW
BLOCK to the FRAME.
NOTE: NOTE THE POSITION AND LOCATION OF THE DRIVE BELT ON THE CRANK SHAFT PULLEY
ASSEMBLY AND THE TENSIONER IDLER ASSEMBLY.
15. Carefully remove the PILLOW BLOCK.
16. Remove the old DRIVE BELT and replace with the new DRIVE BELT. Reverse steps 9 through 15 to return
part to proper position. Torque PILLOW BLOCK bolts and nuts 20-25 ft. lbs.
IMPORTANT: REPLACE ALL SET SCREWS IN PILLOW BLOCKS AND CRANK ARM ASSEMBLY WITH
NEW SET SCREWS WITH LOCKING PATCH TO INSURE A PROPER LOCK.
17. Place the CRANK ARM and PEDAL LEVER ASSEMBLY onto the SHAFT, slide the KEY into position.
18. First tighten the new KEY SET SCREW to 60-70 in. lbs., then the CLAMPING SCREW to 120-130 in. lbs.
This will insure a proper placement of the KEY in the CRANK SHAFT ASSEMBLY.
19. Tension the ALTERNATOR BELT. (See “How To...”)
13
Life Fitness Model 9500 Series Cross-Trainers
How To...Replace Power Control Board Bracket Assembly
Tools Required: Torx screwdriver, Side cutter pliers, Phillips screwdriver
1. Turn power off at the ON/OFF switch and unplug ac line cord from electrical outlet.
2. Remove HOOD SHROUD ASSEMBLY. (See “How To...”)
3. Locate the POWER CONTROL BOARD BRACKET ASSEMBLY. Disconnect the POWER CONTROL
BOARD CONNECTORS (3) J1, J2, and J4.
4. With a screwdriver, remove the SCREWS (2) and remove faulty POWER CONTROL BOARD BRACKET
ASSEMBLY.
5. Reverse steps 1 through 4 to return all parts to proper location.
14
Life Fitness Model 9500 Series Cross-Trainers
How To... Replace Alternator
Tools Required: Torx key, or Standard flat screwdriver, Socket Set, Hex Key Set
1. Turn power OFF at the On/Off switch and unplug line cord from electrical outlet.
2. Remove HOOD SHROUD ASSEMBLY. (See “How To ...”)
NOTE: NOTE THE POSITION OF WIRE CONNECTIONS ON ALTERNATOR BEFORE REMOVAL.
3. Disconnect WIRE CONNECTION (5) from the ALTERNATOR ASSEMBLY.
4. Using a wrench (1/2”) loosen and
remove the TENSIONING BOLT from
the ALTERNATOR BRACKET STRAP.
5. Using two wrenches (3/4”), loosen
the ALTERNATOR PIVOT MOUNTING
BOLT and NUT. Carefully remove the
ALTERNATOR BELT and set aside.
Section III
6. With the ALTERNATOR BELT
removed, carefully remove the
ALTERNATOR PIVOT MOUNTING BOLT, WASHER and NUT securing the
ALTERNATOR ASSEMBLY to the FRAME.
7. Carefully place the new ALTERNATOR into position and reverse step 1 through 7 to return all parts to their
proper position.
HELPFUL HINT: TO ADJUST THE ALTERNATOR BELT TENSION, POSITION A WEDGE TOOL AGAINST
THE FRAME BRACKET UNDER THE ALTERNATOR. IF GAUGES ARE AVAILABLE TENSION A NEW BELT
TO 70-80 FT/LB., 60-70 FT/LB. FOR OLD. IF GAUGES NOT AVAILABLE TENSION TO 1/4” DEFLECTION.
15
Life Fitness Model 9500 Series Cross-Trainers
How To... Replace Alternator Belt
Tools Required: Torx key, or Standard flat screwdriver, Socket Set, Hex Key Set
1. Turn power OFF at the On/Off switch and unplug line cord from electrical outlet.
2. Remove HOOD SHROUD ASSEMBLY. (See “How To...”)
3. Using a wrench (1/2”) loosen the TENSIONING BOLT from the ALTERNATOR and ALTERNATOR
BRACKET STRAP.
4. Using two wrenches (3/4”), loosen the ALTERNATOR PIVOT MOUNTING BOLT
and NUT securing the ALTERNATOR ASSEMBLY to the FRAME.
5. Carefully remove ALTERNATOR BELT from assembly.
6. Carefully place the new ALTERNATOR BELT into position, tension to 70-80 ft/lb.
(if gauges are not available allow for 1/4” deflection) and reverse step 1 through 5 to
return all parts to their proper position.
HELPFUL HINT: TO ADJUST THE ALTERNATOR BELT TENSION, POSITION A WEDGE TOOL AGAINST
THE FRAME BRACKET UNDER THE ALTERNATOR.
16
Life Fitness Model 9500 Series Cross-Trainers
How To... Replace Pedal Lever Assembly
Tools required: Torx screwdriver (T20), Socket set, Open end wrench set
1.
Turn power OFF at the On/Off switch and unplug ac line cord from electrical outlet.
2.
Remove HOOD SHROUD ASSEMBLY. (See “How To...”)
3.
Using a torx screwdriver, remove SCREWS (4) securing the REAR STEP ASSEMBLY. Carefully lift from FRAME and set
aside.
4.
Using a torx screwdriver, remove SCREWS (4) securing the REAR FRAME PLATE
mounted to the rear of the unit.
5.
Washer
Lower Arm
Assembly
Nut
Pivot the user right PEDAL LEVER ASSEMBLY to its extreme forward position.
(Model 9500HR Only)
Locate the user right LOWER ARM ASSEMBLY and the 44” or 10 3/4” LINK BAR
(revision oriented). Remove the NUT, LOCKING WASHER and LINKAGE BOLT to free
the 44” or 10 3/4” LINK BAR from the LOWER ARM ASSEMBLY. Be careful while
disconnecting the two ASSEMBLIES not to let them drop or swing and possibly cause
damage to the machine.
10 3/4“ or 44”
Link Bar
Linkage
Bolt
point. Using a 9/16” socket and a 7/32” hex key, remove the NUT, two WASHERS,
and BOLT from the PEDAL LEVER ASSEMBLY and the 4” LINK on the CRANK ARM ASSEMBLY. Carefully rotate the 4”
LINK out of the way.
7. Using two 9/16” wrenches, remove the NUT, METAL WASHER, DELRIN SPACER, BOLT, and SHOULDERED SLEEVE,
and WASHER from the 14” LINK BAR and the SMALL EXTENSION pivot point.
CAUTION: BY REMOVING THE BOLT, YOU WILL BE SEPARATING THE PEDAL LEVER ASSEMBLY AND THE 14” LINK
BAR ( I ), THIS WILL CAUSE THE CRANK ARM ASSEMBLY TO ROTATE.
SAFETY TIP: PLACE A BLOCK BETWEEN THE CRANK ARM PULLEY ASSEMBLY AND FRAME TO PREVENT CRANK
ARM ASSEMBLY ROTATION.
Delrin
Spacer
Metal
Washer
Metal
Washer
Bolt
External Tooth
Locking Washer
Nut
Small
Extension Arm
Shouldered
Sleeve
14“ Link
Bar
6. Carefully place the user right PEDAL LEVER ASSEMBLY on the floor.
7. Slide the PEDAL LEVER ASSEMBLY out from the rear of the machine.
8. Reverse steps 1 through 9 to return parts to the proper location.
17
Section III
6. Locate the user right PEDAL LEVER ASSEMBLY) and the 4” LINK ASSEMBLY pivot
Life Fitness Model 9500 Series Cross-Trainers
How To...Replace Power Module Assembly
Tools Required: Torx screwdriver, Side cutter pliers, Socket Set
1. Turn power off at the ON/OFF switch and unplug ac line cord from electrical outlet.
2. Remove the HOOD SHROUD ASSEMBLY (See “How To...”).
3. Disconnect the 2 PIN CONNECTOR at CABLE CONNECTION in base of the unit and the POWER MODULE
ASSEMBLY. Replace ALL wire ties.
NOTE: THE CABLE FROM THE POWER CONTROL BOARD TO THE POWER MODULE DOES NOT NEED
TO BE REMOVED; DISCONNECT AT BASE OF FRAME.
4. With a socket wrench (5/16”), loosen and remove the GROUND TERMINAL
NUT which attaches the GROUNDING STRAP to the FRAME.
5. With a socket wrench (5/16”), loosen and remove the MOUNTING
SCREWS (4) securing the POWER MODULE to the FRAME. Carefully lift
POWER MODULE out from unit.
6. Reverse steps 1 through 5 to return all parts to proper position.
18
Life Fitness Model 9500HR Cross-Trainer
How To... Replace Crank Shaft Pulley Assembly
Tools required:
Hex Key Set, Open End Wrench, Socket Set, Flat Blade and Phillips screwdriver, Torxdriver
WARNING: FAILURE TO OBSERVE SAFE PROCEDURES WHEN SERVICING THIS UNIT COULD RESULT
IN INJURY AND OR ELECTRICAL SHOCK
1. Turn power OFF at the ON/OFF switch then unplug power cord from electrical outlet.
2. Remove Hood Shroud Assembly. (See “How To...”)
3. Remove Right Side Shroud Assembly. (See “How To...”)
4. Locate the TENSION IDLER BRACKET, and the OUTER TENSIONER PLATE on the user’s right side of
FRAME. Using a socket wrench (9/16”) loosen (do not remove) the BOLTS (2) and star WASHERS (2).
HINT: MARK THE LOCATION OF THE JAM NUT ON THE TENSIONER IDLER BRACKET. THIS WILL AID IN
RE-TENSIONING THE DRIVE BELT.
5. Using a socket wrench (9/16”) loosen the TENSIONING BOLT.
Section III
SAFETY TIP: BEFORE PROCEEDING PLACE A BLOCK IN THE CRANK SHAFT PULLEY ASSEMBLY TO
STOP THE CRANK SHAFT PULLEY ASSEMBLY FROM ROTATING WHEN CRANK ARM IS REMOVED.
6. Locate the mounting point of the CRANK ARM ASSEMBLY and
CRANK SHAFT ASSEMBLY. Using a (1/8”) hex key loosen the SET
SCREW securing the KEY in the CRANK ARM and CRANK SHAFT.
Loosen the CLAMPING SCREW using a (3/16”) hex key securing the
CRANK ARM to the CRANK SHAFT.
7. Using a standard screw driver place the blade into the SLOT of the
CRANK ARM ASSEMBLY , this will open the gap and allow for easier
removal of the CRANK ARM ASSEMBLY. Carefully remove CRANK
ARM ASSEMBLY and PEDAL LEVER ASSEMBLY from the CRANK
SHAFT Remove the KEY, and clean all burrs off the KEY. Carefully
position the PEDAL LEVER ASSEMBLY and CRANK ARM
ASSEMBLY on the floor inside unit.
Crank Arm
Assembly
Crank Shaft
Assembly
Slot
8. Carefully rotate the CRANK PULLEY ASSEMBLY into position for
removal of the users left side PEDAL LEVER and CRANK ARM ASSEMBLY, repeat steps 7 through 8.
NOTE: BEFORE PROCEEDING MARK OR SCORE THE LOCATION OF THE PILLOW BLOCKS (TOP AND
BOTTOM POSITIONS) OF CRANK SHAFT PULLEY ASSEMBLY. THE LOCATION OF THESE PILLOW
BLOCKS ARE CRITICAL FOR PROPER LIFE AND OPERATION OF DRIVE SYSTEM.
9. Using an open end wrench (9/16) along with a socket wrench (9/16) remove the NYLON LOCK NUTS (2),
BOLTS (2), and WASHERS, securing the user’s right side PILLOW BLOCK to the CRANK ARM PULLEY
SHAFT. Repeat step for left side.
NOTE: THE POSITION OF THE DRIVE BELT WITH THE TENSIONER IDLER ASSEMBLY.
10. Carefully remove main DRIVE BELT from around the CRANK SHAFT PULLEY ASSEMBLY and replace faulty
part.
11. Reverse steps 1 through 11 to return all parts proper position.
19
Life Fitness Model 9500 Series Cross-Trainers
How To... Replace Intermediate Pulley Assembly
Tools required:
Hex Key Set, Open End Wrench, Socket Set, Flat Blade and Phillips screwdriver, Torxdriver
WARNING: FAILURE TO OBSERVE SAFE PROCEDURES WHEN SERVICING THIS UNIT COULD RESULT
IN INJURY AND OR ELECTRICAL SHOCK
1. Turn power OFF at the ON/OFF switch then unplug power cord from electrical outlet.
2. Remove Hood Shroud Assembly. (See “How To...”)
3. Using a Torxdriver (T20), remove the four screws securing the PANEL SHROUD to the SIDE SHROUDS.
4. Remove the ALTERNATOR BELT. (See “How To...”)
NOTE: NOTE THE POSITION OR PLACEMENT OF DRIVE BELT ON THE INTERMEDIATE SHAFT
ASSEMBLY PULLEY. PLACE DRIVE BELT IN SAME LOCATION.
5. Locate the IDLER PULLEY TENSION BRACKET and its MOUNTING BOLTS on the user’s right side of
DRIVE FRAME. Using a socket wrench (9/16”), loosen but do not remove the two BOLTS and star
WASHERS.
HINT: MARK THE LOCATION OF THE JAM NUT ON THE TENSIONER IDLER BRACKET. THIS WILL AID IN
RE-TENSIONING THE DRIVE BELT.
6. Using a socket wrench (9/16”), loosen the TENSIONING BOLT.
NOTE: BEFORE PROCEEDING MARK OR SCORE THE LOCATION OF THE PILLOW BLOCKS (TOP AND
BOTTOM POSITIONS) OF INTERMEDIATE SHAFT PULLEY ASSEMBLY. THE LOCATION OF THESE
PILLOW BLOCKS ARE CRITICAL FOR PROPER LIFE AND OPERATION OF DRIVE SYSTEM.
7. Using an open end wrench (9/16”) along with a socket
wrench (9/16”), remove the two NYLON LOCK NUTS,
BOLTS, and WASHERS, securing the user’s right side
PILLOW BLOCK to the INTERMEDIATE SHAFT PULLEY.
Repeat for left side.
NOTE: THE POSITION OF THE DRIVE BELT WITH THE
TENSIONER IDLER ASSEMBLY.
Carefully remove INTERMEDIATE SHAFT PULLEY
ASSEMBLY and replace faulty part.
8. Reverse steps 1 through 8 to return all parts proper position.
9. Adjust the IDLER PULLEY TENSION. (See “How To...”)
10. Tension the ALTERNATOR BELT. (See “How To...”)
20
Life Fitness Model 9500 Series Cross-Trainers
SECTION IV
Section IV
ELECTRONICS OVERVIEW
AND
WIRING BLOCK DIAGRAMS
1
Life Fitness Model 9500 Series Cross-Trainers
ELECTRONICS OVERVIEW - DISPLAY CONSOLE BOARD (Equipped with DSP Heart Rate PCB)
Functional Description
Connector P5
The Display Console Board is designed
to work in conjunction with the
Alternator Control Board. It reads the
keypad input for changes or updates by
the user, and refreshes the status
LEDs, data display, and profile display
matrix.
Display EPROM
Connector P7
Connector P2
Connectors and Pin Descriptions
Connector
Location
Pin
Functional Description
P1 is a 17 pin, ribbon connector
that connects to the Overlay
Board
1
2
3
4
5
6
7
8
9
10
11
12
13
14
15
16
17
Ground
Strobe
Strobe
Return
Strobe
Return
Strobe
Return
Strobe
Return
Ground
Start
Strobe
Return
Strobe
Return
Ground
P2 is a 10 pin connects to the
Alternator Control Board
1
2
3
4
5
6
7
8
9
10
VSYS – POWER CONTROL (7-8VDC)
RPM (0-7.5 VDC)
GROUND
LOAD
VBAT – (6 VDC)
ALTREGLO (7-8 VDC)
FLDCMD
START
VBAT – (6VDC)
VBAT – (6VDC)
2
Connector P1
Life Fitness Model 9500 Series Cross-Trainers
ELECTRONICS OVERVIEW – DISPLAY CONSOLE (Equipped with DSP Heart Rate PCB)
Location
Pin
Functional Description
P5 is an 8 pin connector that
connects the Life Pulse Board to
the Console Board. Equipped for
LC9500HR only.
1
2
3
4
5
6
7
8
HR-ENABLE (3.8 VDC)
KEY
VSYS (7-8 VDC)
VSYS (7-8 VDC)
GROUND
GROUND
HR-D0 (4.5 VDC)
HR-D1 (4.5 VDC)
P7 is a 3 pin connector that
comes from the Polar connector
1
2
3
+VCC (5VDC)
POLAR SIGNAL
GROUND
Section IV
Connector
3
Life Fitness Model 9500 Series Cross-Trainers
ELECTRONICS OVERVIEW - DISPLAY CONSOLE BOARD (Equipped with Integrated PCB)
Functional Description
P9 and P10
The Display Console Board is designed to
work in conjunction with the Alternator
Control Board. It reads the keypad input for
changes or updates by the user, and
refreshes the status LEDs, data display, and
profile display matrix.
B G W
Life Pulse
Connector P4
Connector P7
Connectors and Pin Descriptions
Connector
P1 is a 17 pin, ribbon connector
that connects to the Overlay
Board
4
Location
Pin
1
2
3
4
5
6
7
8
9
10
11
12
13
14
15
16
17
Functional Description
Ground
Strobe
Strobe
Return
Strobe
Return
Strobe
Return
Strobe
Return
Ground
Start
Strobe
Return
Strobe
Return
Ground
Connector P1
Life Fitness Model 9500 Series Cross-Trainers
ELECTRONICS OVERVIEW - DISPLAY CONSOLE BOARD (Equipped with Integrated PCB)
Location
Pin
1
2
3
4
Functional Description
Right +
Right Left Left +
P9 and P10 are 8 pin
connectors that connect to the
CSAFE and Cardio Theater
interface
1
2
3
4
5
6
7
8
N/U - not used
N/U - not used
Receive Data
Transmit Data
+8 Vdc
CTS
Ground
N/U - not used
P7 is a 3 pin connector that
connects the polar receiver to
the console
1
2
3
+VCC (5VDC)
POLAR SIGNAL
GROUND
P4 is a 6 pin connector that
connects to the alternator
control board
1
2
3
4
5
6
VSYS +8 VDC
Ground
Load
VSYS +8 VDC
Ground
RPM 0-7.5 VDC
3 2 1
6 5 4
Section IV
Connector
Life Pulse
5
R1
PIN_PADSTACK
PIN_PADSTACK
+
HS3
PIN_PADSTACK
Q2
Pos
AC
BR1
PIN_PADSTACK
PIN_PADSTACK
PIN_PADSTACKPIN_PADSTACK
PIN_PADSTACK
PIN_PADSTACK
PIN_PADSTACK
R5
R4
R6
C14
D6
D7
R15
C7
R17
+
POS
Neg
_
PIN_PADSTACK
AC
PIN_PADSTACK
Neg
8 VDC
J2
PIN_PADSTACK
PIN_PADSTACK
PIN_PADSTACK
J1
_ D1
PIN_PADSTACK
PIN_PADSTACK
C
O
M
PO
N
EN
T
C8
Q2
PIN_PADSTACK
PIN_PADSTACK
PIN_PADSTACK
PIN_PADSTACK
R18
PIN_PADSTACK
R7
R3
R14
PIN_PADSTACK
PIN_PADSTACK
PIN_PADSTACK
PIN_PADSTACK
U1
R8
C12
R16
C6
R9
R2
PIN_PADSTACK
C11
PIN_PADSTACK
HS1
PIN_PADSTACK
PIN_PADSTACK
PIN_PADSTACK PIN_PADSTACK
J4
1997
PIN_PADSTACK
PIN_PADSTACK
FUSE1
PIN_PADSTACK
C5
C
Q1
HS4
C13
PIN_PADSTACK
RISK OF FIRE,REPLACE FUSE AS MARKED.
LIFE FITNESS
A080-92167-A000
U3
PIN_PADSTACK
J4
14 VAC
1
The Alternator Control Board is
designed to regulate the alternator
voltage by modulating the field
current. It regulates the pass
current (RPM signal) from the
Alternator to the Console, and the
pass current form the alternator to
the load resistor while providing
supply voltage for the console while
charging the system battery.
8 AMP S.B. 250V
C9
PIN_PADSTACK
WARNING:
PIN_PADSTACK
Functional Description
PIN_PADSTACK
PIN_PADSTACK
Life Fitness Model 9500 Series Cross-Trainers
ELECTRONICS OVERVIEW - ALTERNATOR CONTROL BOARD
Pin 3
RPM
Pin 4
8VDC
CONSOLE
See Wiring Diagram for more detailed information
Connectors and Pin Connections
Connector
J4 a 2 pin connector that
connects the control board to the
power supply.
Location
Pin
1
2
Functional Description
14 VAC
14 VAC
J2 a 5 pin connector that
connects the control board to
the alternator.
1
2
3
4
5
Ground
Key
RPM Sensor
Field Ctrl
Field Return
J1 a 7 pin connector that
connects to the control board to
the console.
1
2
3
4
5
6
7
Field Ctrl
RPM Sensor
+8VDC
+8VDC
Key
Ground
Ground
6
ALTERNATOR
BR 1
18 VDC
Life Fitness Model 9500 Series Cross-Trainers
ELECTRONICS OVERVIEW - ALTERNATOR
Functional Description
The 12 volt, 35 amp Alternator is designed to provide electrical power to the product, supply load
resistance while providing electrical power, and provice the RPM signal from the AC TAP to the Alternator
Control Board.
AC TAP TERMINAL
OUTPUT TERMINAL
N
AT IO
T
I
EXC
FIELD TERMINALS RETURN
Section IV
GROUND TERMINAL
7
Life Fitness Model 9500 Series Cross-Trainers
WIRING BLOCK DIAGRAM - DSP Heart Rate Board
8
K
P
J
N
U
R
L
G
S1
2
STATIC
RING
1
S
E
U
P
F
T
L
N
J
D
R
C
K
5
S3
H
13
G
7
B
3
S2
A
9
15
W
M
11
S
W
M
H
D
17
16
14
10
8
6
4
12
17
1
Left "Finger"
(WHITE or RED)
STATIC
RING
R6
R5
R4
R3
R2
R1
STA RT
CON17LIF
P1
CONSOLE
Left "Palm"
(BLACK)
2
P7
red
brown
blue
4
5
6
8
7
CON8MINI-FITJR
black
orange
3
2
white
green
D
CON6MINI-FITJR
blue
red
white
black
brown
green
*white
*red
*black
1
P6
6
3
2
1
5
4
P2
MINI-FIT Jr. RECPT.
Right "Palm"
(BLACK)
NU
GND
SCK
VSYS
MOSI
NETSEL
MOSO
NETOFF
RPM SENSE
GND
FIELD CTL
+8VDC
GND
+8VDC
VCC HRT
1
D
Right "Finger"
(WHITE or RED)
white or red
black
CON2MINIFITJR
2 1 2 1
CON2MINIFITJR
black
CON2MINIFITJR
white or red
CON4MINIFITJR
2 1 2 1
CON4MINIFITJR
1 3 2 4
1 3 2 4
GND
3
CON2MINIFITJR
GRN
C
KEYPAD SCHEMATIC
F
E
T
B
IN
STOP SW
BLK.
KEYPAD
A
+
STOP SW
*Yellow
RED
D
5
N.C.
WHT.
4
*Violet
2
blk
wht
P1
10
9
8
6
white
Line Filter
3
blue
1
blk
2
5
1
2
grn
brn
blu
Bkr 2A
3-14 awg. Line Cord
grn
4
ON/OFF
switch
brn
blu
J1
5
2
1
7
black
red
4
brown
wht
NETOFF
MOSO
GND
NU
NU
MOSI
SCK
NU
NETSEL
Field Excitation
AC Tap
P
KOREA
MAN DO
S
2
2
2
1
3
3
1
4
5
9
4
5
9
10
11
11
10
8
7
12
12
6
7
8
6
12 Pos. MNL
red
red
red
orn
blk
blk
org/blk
grn/blk
wht/blk
red/blk
red/yel
blu/blk
wht
2POSMNL
GND
J4 1
KEY
FIELD CTRL.
FIELD RTN.
RPM SENSE
KEY
Output
violet
orange /w hite
4
CON5S156K2
1
2
pink
5
Gnd
3
J2
Field Return
RPM SENSE
E
B
GND
FIELD CTL
GND
+8VDC
+8VDC
CONTROL
EX C.
L2
CON7S156K5
MANDO ALTERNATOR
green
Network card
VSYS
CON10MINI-FITJR
Section IV
grn
1
10 A.
white
black
7
6
5
orange
4
brown
3
2
1
blue
green
red
D
PO LAR
TELEMETRY
RECEIVER
Mov 1
STOP
Power
Transformer
(Split Bobbin)
red
red
violet
ALTERNATOR
Gn d
Field R eturn
AC Ta p
1 OHM
5%
black (2)
Fld. Exc.
Ou tput
2 40 W. 2 PLC S.
red (2)
Life Fitness Model 9500 Series Cross-Trainers
WIRING BLOCK DIAGRAM (Integrated PCB)
9
Life Fitness Model 9500 Series Cross-Trainers
NOTES:
10
Life Fitness Model 9500 Series Cross-Trainers
SECTION V
Section V
PARTS IDENTIFICATIONS
1
Life Fitness Model 9500 Series Cross-Trainers
MODEL IDENTIFICATION and SERIAL NUMBER LOCATION
Cross-Trainer Model Identification
Model 9500
Model 9500HR
Serial Number Location
Life Fitness Model 9500 Series Cross-Trainers
Serial Number
2
Life Fitness Model 9500HR Cross-Trainer
GK53-00012-XXXX
Serial Number 669724 - UP
Instruction Decall
OK53-01133-0001(Eng)
OK53-01133-0003(Ger)
OK53-01133-0004(Spn)
OK53-01133-0006(Jap)
OK53-01133-0007(Frn)
OK53-01133-0008(Itl)
OK53-01133-0009(Dut)
Reading Rack Trim
OK53-01226-0000
Console Assembly
SK53-00039-0001(R) Eng/Met
AK53-00039-0002(R) Eng/Eng
AK53-00039-0003(R) Ger/Met
AK53-00039-0004(R) Spn/Eur
AK53-00039-0005(R) Spn/Eng
AK53-00039-0006(R) Jap/Met
AK53-00039-0007(R) Frn/Eur
AK53-00039-0008(R) Itl/Met
AK53-00039-0009(R) Dut/Met
AK53-00039-0010(R) Frn/Met
Heartrate PCB Kit
GK46-00002-0009
Heart Rate Handlebar(RT)
AK53-00005-0003
Heartrate Handlebar(LT)
AK53-00005-0004
Stop Switch
SK45-00045-0000
Heartrate Sensor Kit
GK20-00002-0001
Handrail(RT)
AK53-0026-0003
Monocolumn Assembly
SK53-00063-0000
Handrail(LT)
AK53-00026-0004
Tray Assembly
SK53-00034-0000
Hood Shroud
AK53-00080-0000
Shroud(RT)
SK53-00021-0003
Shroud Cap
OK53-01090-0000
Inner Shroud Cap
OK53-01092-0000
Pedal Shroud
SK53-00057-0000
Pedal
OK53-01027-0000
Shroud(LT)
SK53-00021-0004
Rear Step Plate
OK53-01174-0000
Pedal Linkage Shroud
OK53-01172-0000
Pedal Lever(LT)
SK53-00074-0008
Rear Roller Asssembly
AK53-00092-0001
Anti-Lift Roller Assembly
AK53-00091-0000
Overlay Bezel
SK53-00040-0001 Eng/Eng/Met
AK53-00040-0003 Ger/Met
AK53-00040-0004 Spn/Eng/Eur
AK53-00040-0006 Jap/Met
AK53-00040-0007 Frn/Eur/Met
AK53-00040-0008 Itl/Met
AK53-00040-0009 Dut/Met
Section V
Reading Rack
SK53-00086-0000
Trim Shroud(LT)
OK53-01173-0002
Trim Shroud(RT)
OK53-01173-0001
Rear Plate w/Decal
AK53-00101-0000
3
Leveler Leg
0017-00009-0795
Jam Nut
0017-00103-0164
Pedal Lever(RT)
SK53-00074-0007
Rear Roller Asssembly
AK53-00092-0001
Anti-Lift Roller Assembly
AK53-00091-0000
4
Wheel
0017-00042-0674
Power Module
SK53-00094-0001(120v/60Hz)
AK53-00094-0002(100v/50Hz)
AK53-00094-0004(200v/50Hz)
AK53-00094-0005(220v/50Hz)
AK53-00094-0006(220v/60Hz)
AK53-00094-0007(240 volts+)
AK53-00094-0008(220v/UK)
Transformer
AK24-00162-0000
Resistor Assembly
SK53-00070-0000
14 Inch Link Bar
AK53-00170-0000
4 Inch Link Bar
AK53-00100-0002
Crankarm Assembly
SK53-00171-0000
Lower Arm
AK53-00097-0001
Line Cord
AK01-00015-0000(120v/60Hz,100v/50Hz)
AK01-00015-0002(220v+)
AK24-00241-0000(200v/50Hz)
AK36-00013-0002(220v/UK)
GK53-00002-0010(12 FT/Optional)
Crank Shaft Pulley Assembly
SK53-00073-0001
Main Drive Belt
0017-00009-0909
Alternator Assembly
SK53-00055-0001
Power Control Board
SK53-00071-0001
Heart Rate Cable
AK53-00023-0001
10-3/4 Inch Link Bar
SK53-00133-0002
U-Tension Bracket Assembly
GK53-00002-0012
Rear Heat Shield
OK53-01254-0001
Intermediate Shaft Assembly
SK53-00159-0000
Alternator Belt
OK53-01238-0000
Console Cable
AK53-00038-0000
Life Fitness Model 9500HR Cross-Trainer
GK53-00012-XXXX
Serial Number 669724 - UP
Life Fitness Model 9500HR Cross-Trainer
GK53-00014-XXXX
Serial Number 665000 - 669723
Instruction Decall
OK53-01291-0001(Eng)
OK53-01291-0003(Ger)
OK53-01291-0004(Spn)
OK53-01291-0006(Jap)
OK53-01291-0007(Frn)
OK53-01291-0008(Itl)
OK53-01291-0009(Dut)
Console Assembly
AK53-00126-0001(R) Eng/Eng/Met
AK53-00126-0003(R) Ger/Met
AK53-00126-0004(R) Spn/Met
AK53-00126-0006(R) Jap/Met
AK53-00126-0007(R) Frn/Met
AK53-00126-0008(R) Itl/Met
AK53-00126-0009(R) Dut/Met
Overlay Bezel
SK53-00040-0001 Eng/Eng/Met
AK53-00040-0003 Ger/Met
AK53-00040-0004 Spn/Met
AK53-00040-0006 Jap/Met
AK53-00040-0007 Frn/Met
AK53-00040-0008 Itl/Met
AK53-00040-0009 Dut/Met
Reading Rack Trim
OK53-01302-0000
Handrail w/Grip(LT)
SK53-00145-0002
Stop Switch
AK45-00045-0000
Monocolumn
w/Reading Rack
AK53-00118-0001
Handrail w/Grip(RT)
SK53-00145-0001
Hood Shroud
AK53-00080-0000
Tray Assembly
SK53-00034-0000
Shroud Cap
OK53-01090-0000
Inner Shroud Cap
OK53-01092-0000
Shroud w/Decal(RT)
AK53-00120-0001
Pedal Shroud
SK53-00057-0000
Shroud w/Decal(LT)
AK53-00120-0002
Section V
Pedal
OK53-01027-0000
Pedal Linkage Shroud
OK53-01172-0000
Pedal Lever(LT)
SK53-00125-0004
Rear Roller Asssembly
AK53-00092-0001
Anti-Lift Roller Assembly
AK53-00091-0000
Rear Step Plate
OK53-01174-0000
Trim Shroud(LT)
OK53-01173-0002
Trim Shroud(RT)
OK53-01173-0001
Rear Plate w/Decal
AK53-00121-0000
5
6
Leveler Leg
0017-00009-0795
Jam Nut
0017-00103-0164
Pedal Lever (RT)
SK53-00125-0003
Rear Roller Assembly
AK53-00092-0001
Anti-Lift Roller Assembly
AK53-00091-0000
Rear Heat Shield
OK53-01254-0001
Intermediate Shaft Assembly
SK53-00159-0000
Alternator Belt
OK53-01238-0000
Crankarm Assembly
SK53-00171-0000
Line Cord
AK01-00015-0000(120v/60Hz, 100v/50Hz)
AK01-00015-0002(220v+)
AK24-00241-0000(200v/50Hz)
AK36-00013-0002(220v/UK)
GK53-00002-0010(12 FT Optional)
Power Module
SK53-00094-0001(120v/60Hz)
AK53-00094-0002(100v/50Hz)
AK53-00094-0004(200v/50Hz)
AK53-00094-0005(220v/50Hz)
AK53-00094-0006(220v/60Hz)
AK53-00094-0007(240 volts+)
AK53-00094-0008(220v/UK)
Transformer
AK24-00162-0000
Resistor Assembly
SK53-00070-0000
14 Inch Link Bar
AK53-00170-0000
4 Inch Link Bar
AK53-00100-0002
Crank Shaft Pulley Assembly
SK53-00073-0001
Main Drive Belt
0017-00009-0909
Alternator Assembly
SK53-00055-0001
Power Control Board
SK53-00071-0001
U-Tension Bracket Assembly
GK53-00002-0012
Wheel
0017-00007-0674
Console Cable
AK53-00038-0000
Life Fitness Model 9500HR Cross-Trainer
GK53-00014-XXXX
Serial Number 665000 - 669723
Life Fitness Model 9500 Cross-Trainer
GK53-00013-XXXX
Serial Number 685000 - UP
Instruction Decall
OK53-01133-0001(Eng)
OK53-01133-0003(Ger)
OK53-01133-0004(Spn)
OK53-01133-0006(Jap)
OK53-01133-0007(Frn)
OK53-01133-0008(Itl)
OK53-01133-0009(Dut)
Reading Rack Trim
OK53-01226-0000
Overlay Bezel
SK53-00040-0001 Eng/Eng/Met
AK53-00040-0003 Ger/Met
AK53-00040-0004 Spn/Eng/Eur
AK53-00040-0006 Jap/Met
AK53-00040-0007 Frn/Eur/Met
AK53-00040-0008 Itl/Met
AK53-00040-0009 Dut/Met
Heartrate PCB Kit
GK46-00002-0009
Heartrate Handlebar(RT)
AK53-00005-0001
Heartrate Handlebar(LT)
AK53-00005-0002
Heartrate Sensor Kit
GK20-00002-0001
Stop Switch
SK45-00045-0000
Monocolumn Assembly
SK53-00063-0000
Handrail(RT)
AK53-0026-0003
Hood Shroud
AK53-00080-0000
Tray Assembly
SK53-00034-0000
Handrail(LT)
AK53-00026-0004
Shroud(RT)
SK53-00021-0003
Shroud Cap
OK53-01090-0000
Inner Shroud Cap
OK53-01092-0000
Pedal Shroud
SK53-00057-0000
Shroud(LT)
SK53-00021-0004
Section V
Reading Rack
SK53-00086-0000
Console Assembly
SK53-00039-0001(R) Eng/Met
AK53-00039-0002(R) Eng/Eng
AK53-00039-0003(R) Ger/Met
AK53-00039-0004(R) Spn/Eur
AK53-00039-0005(R) Spn/Eng
AK53-00039-0006(R) Jap/Met
AK53-00039-0007(R) Frn/Eur
AK53-00039-0008(R) Itl/Met
AK53-00039-0009(R) Dut/Met
AK53-00039-0010(R) Frn/Met
Pedal
OK53-01027-0000
Rear Step Plate
OK53-01174-0000
Pedal Linkage Shroud
OK53-01172-0000
Pedal Lever(LT)
SK53-00074-0008
Rear Roller Asssembly
AK53-00092-0001
Anti-Lift Roller Assembly
AK53-00091-0000
Trim Shroud(LT)
OK53-01173-0002
Trim Shroud(RT)
OK53-01173-0001
Rear Plate w/Decal
AK53-00101-0000
7
8
Leveler Leg
0017-00009-0795
Jam Nut
0017-00103-0164
Pedal Lever(RT)
SK53-00074-0007
Rear Roller Asssembly
AK53-00092-0001
Anti-Lift Roller Assembly
AK53-00091-0000
Wheel
0017-00042-0674
Power Module
SK53-00094-0001(120v/60Hz)
AK53-00094-0002(100v/50Hz)
AK53-00094-0004(200v/50Hz)
AK53-00094-0005(220v/50Hz)
AK53-00094-0006(220v/60Hz)
AK53-00094-0007(240 volts+)
AK53-00094-0008(220v/UK)
Transformer
AK24-00162-0000
Resistor Assembly
SK53-00070-0000
14 Inch Link Bar
AK53-00170-0000
4 Inch Link Bar
AK53-00100-0002
Crankarm Assembly
SK53-00171-0000
Lower Arm
AK53-00097-0001
Line Cord
AK01-00015-0000(120v/60Hz,100v/50Hz)
AK01-00015-0002(220v+)
AK24-00241-0000(200v/50Hz)
AK36-00013-0002(220v/UK)
GK53-00002-0010(12FT Optional)
Crank Shaft Pulley Assembly
SK53-00073-0001
Main Drive Belt
0017-00009-0909
Alternator Assembly
SK53-00055-0001
Power Control Board
SK53-00071-0001
Heart Rate Cable
AK53-00023-0001
10-3/4 Inch Link Bar
SK53-00133-0002
U-Tension Bracket Assembly
GK53-00002-0012
Rear Heat Shield
OK53-01254-0001
Intermediate Shaft Assembly
SK53-00159-0000
Alternator Belt
OK53-01238-0000
Console Cable
AK53-00038-0000
Life Fitness Model 9500 Cross-Trainer
GK53-00013-XXXX
Serial Number 685000 - UP
Life Fitness Model 9500 Cross-Trainer
CT95-0XXX-18
Serial Number 693097 - UP
Instruction Decall
OK53-01133-0001(Eng)
OK53-01133-0003(Ger)
OK53-01133-0004(Spn)
OK53-01133-0006(Jap)
OK53-01133-0007(Frn)
OK53-01133-0008(Itl)
OK53-01133-0009(Dut)
Reading Rack Trim
OK53-01226-0000
Console Assembly
SK53-00196-0001(R) Eng/Met
AK53-00196-0003(R) Ger/Met
AK53-00196-0005(R) Spn/Eng
AK53-00196-0006(R) Jap/Met
AK53-00196-0007(R) Frn/Eur
AK53-00196-0008(R) Itl/Met
AK53-00196-0009(R) Dut/Met
Heartrate PCB Kit
GK46-00002-0009
Heart Rate Handlebar(RT)
AK53-00005-0003
Heartrate Handlebar(LT)
AK53-00005-0004
Stop Switch
SK45-00045-0000
Heartrate Sensor Kit
GK20-00002-0001
Handrail(RT)
AK53-0026-0003
Monocolumn Assembly
SK53-00063-0000
Handrail(LT)
AK53-00026-0004
Tray Assembly
SK53-00034-0000
Hood Shroud
AK53-00080-0000
Shroud(RT)
SK53-00021-0003
Shroud Cap
OK53-01090-0000
Inner Shroud Cap
OK53-01092-0000
Pedal Shroud
SK53-00057-0000
Pedal
OK53-01027-0000
Shroud(LT)
SK53-00021-0004
Rear Step Plate
OK53-01174-0000
Pedal Linkage Shroud
OK53-01172-0000
Pedal Lever(LT)
SK53-00074-0008
Rear Roller Asssembly
AK53-00092-0001
Anti-Lift Roller Assembly
AK53-00091-0000
Overlay Bezel
SK53-00040-0001 Eng/Eng/Met
AK53-00040-0003 Ger/Met
AK53-00040-0004 Spn/Eng/Eur
AK53-00040-0006 Jap/Met
AK53-00040-0007 Frn/Eur/Met
AK53-00040-0008 Itl/Met
AK53-00040-0009 Dut/Met
Section V
Reading Rack
SK53-00086-0000
Trim Shroud(LT)
OK53-01173-0002
Trim Shroud(RT)
OK53-01173-0001
Rear Plate w/Decal
AK53-00101-0000
9
10
Leveler Leg
0017-00009-0795
Jam Nut
0017-00103-0164
Pedal Lever(RT)
SK53-00074-0007
Rear Roller Asssembly
AK53-00092-0001
Anti-Lift Roller Assembly
AK53-00091-0000
Wheel
0017-00042-0674
Power Module
SK53-00094-0001(120v/60Hz)
AK53-00094-0002(100v/50Hz)
AK53-00094-0004(200v/50Hz)
AK53-00094-0005(220v/50Hz)
AK53-00094-0006(220v/60Hz)
AK53-00094-0007(240 volts+)
AK53-00094-0008(220v/UK)
Transformer
AK24-00162-0000
Resistor Assembly
SK53-00070-0000
14 Inch Link Bar
AK53-00170-0000
4 Inch Link Bar
AK53-00100-0002
Crankarm Assembly
SK53-00171-0000
Lower Arm
AK53-00097-0001
Line Cord
AK01-00015-0000(120v/60Hz,100v/50Hz)
AK01-00015-0002(220v+)
AK24-00241-0000(200v/50Hz)
AK36-00013-0002(220v/UK)
GK53-00002-0010(12 FT/Optional)
Crank Shaft Pulley Assembly
SK53-00073-0001
Main Drive Belt
0017-00009-0909
Alternator Assembly
SK53-00055-0001
Power Control Board
SK53-00071-0001
Heart Rate Cable
AK53-00023-0001
10-3/4 Inch Link Bar
SK53-00133-0002
U-Tension Bracket Assembly
GK53-00002-0012
Rear Heat Shield
OK53-01254-0001
Intermediate Shaft Assembly
SK53-00159-0000
Alternator Belt
OK53-01238-0000
Console Cable
AK53-00038-0000
Life Fitness Model 9500 Cross-Trainer
CT95-0XXX-18
Serial Number 693097 - UP
Life Fitness Model 9500 Series Cross-Trainers
Section V
NOTES:
11
Life Fitness Model 9500 Series Cross-Trainers
SECTION VI
MISCELLANEOUS INFORMATION
1
Life Fitness Model 9500 Series Cross-Trainers
PREVENTIVE MAINTENANCE TIPS
ITEM
WEEKLY
Shrouds
Wipe Clean
Stop Switch
Inspect For
Proper
Operation
MONTHLY
QUARTERLY
Power Control Board
Drive Belt
Power Cord
Display Console
Handlebar and
Handrail
Inspect and
Retension
Inspect For
Excessive
Wear
Wipe Clean
Inspect For
Proper Cable
Connection
Wipe Clean
Wipe Clean
Link Bearings
Wipe Clean
Alternator Belt
1-2 Drops 30 Weight
Non-Detergent Oil
2
ANNUAL
Vacuum
Rear Roller and
Tracks
Level Machine
BI-ANNUAL
Inspect For
Loose Bolts
and Retighten
Inspect For
Excess Wear
Inspect For
Excess Wear
Inspect and
Retighten
Inspect and
Relevel
All Bearings
Life Fitness Model 9500 Series Cross-Trainers
UNPACKAGING INSTRUCTIONS
1. Remove all staples from the corrugated shipping container and fold down the four sides of the base tray (A).
2. Lift and open the top flaps of the shipping container sleeve (B). Lift and remove the four corner posts (C). Lift
and remove the top support (D) and the side supports (E).
3. With the help of another person, carefully lift the shipping container sleeve (B) up and off of the base tray (A)
and over the Cross-Trainer (F). Remove the remaining boxes and packaging from the Cross-Trainer deck and
set aside.
4. Remove the protective plastic sheet covering the Cross-Trainer (F).
5. Remove the glued-in block (G)
located in front of the CrossTrainer on the base tray (A). With
the help of another person, lift the
rear of the unit and roll the unit
forward beyond the flattened base
tray.
Section VI
6. Follow
Installation
Instructions
included in the parts bag to
complete the assembly of your
Cross-Trainer.
SAVE YOUR PACKING MATERIAL IN CASE OF RETURN
3
Life Fitness Model 9500 Series Cross-Trainers
COMMUNICATING BY FAX
If you would like to submit a parts order, or if you need help troubleshooting
a problem, we have included, for your convenience, a FAX form on the
following page. Simply make a copy (or copies) of the FAX sheet and fill in
the necessary information. You may FAX us at any time, 24 hours a day, to
either of the numbers shown. A Life Fitness service representative will
process your order, or respond to your problem, as quickly as possible.
4
CUSTOMER SUPPORT SERVICES
PARTS ORDER
SALE
( IF BOTH
PLEASE INDICATE )
PRODUCT TROUBLESHOOTING
WARRANTY
NAME:
CUSTOMER NO:
DATE:
PHONE:
FAX:
CONTACT NAME:
METHOD OF SHIPMENT:
1 DAY
2 DAY
GROUND
PARTS ORDER FORM
ITEM NO.
1
PART NUMBER
DESCRIPTION
QUANTITY
2
3
4
5
6
PRODUCT TROUBLESHOOTING
PRODUCT NAME:
SERIAL NO.
DETAILED DESCRIPTION OF PROBLEM:
PRODUCT NAME:
SERIAL NO.
DETAILED DESCRIPTION OF PROBLEM:
TIME COMPLETED:
TECHNICIAN NAME:
Section VI
TIME RECEIVED:
5
Life Fitness Model 9500 Series Cross-Trainers
NOTES:
6