1
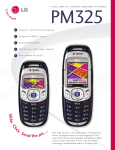
1 . 9 G H Z C D M A P C S | 80 0 M H Z C D M A / A M P S ( T R I - M O D E )
PM325
x
Slide.
Cl
i
ck
.S
end the pic …
TRAINING MANUAL
O P E R AT I N G I N S T R U C T I O N S
PM325
H e a d s e t Ja c k
S e l f- Po r t r a i t
Mirror
Ear Piece
Vo i c e D i a l &
Vo i c e M e m o
Vo l u m e U p / D o w n
Bluetooth® is a radio
technolog y that delivers
s h o r t- r a n g e w i r e l e s s
c o n n e c t i v i t y f o r u p t o 30
feet. It enables fast, secure
transmission of both
voice and data without
wires between mobile
phones and headsets,
laptops or PDAs in
c l o s e p r o x i m i t y.
Integrated VGA Camera
2 Bluetooth
L e f t S o f t Key
2 Taking Pictures
O K / C a m e ra Key
3 Camera Settings
R i g h t S o f t Key
TA L K K e y
3 Saving, Assigning &
B AC K Key
Sending Pictures
4 Web Access
4 Text Messaging
5 Sound Settings
5 Display Settings
5 Notable Settings
6 Personal Info Tools
6 Phone Book
6 Call Options
Phone Menu (back)
TA B L E O F C O N T E N T S
4 Downloading Content
Vo i c e m a i l K e y
E N D / P W R Key :
Po w e r s t h e p h o n e
on or off, ends a
call, or returns you
to the main menu
N a v i ga t i o n Key :
Scrolls through
menus and displays
the next or previous
message, entr y or item
Microphone
C h a r g i n g Po r t
(Charging time:
up to 3 hours)
S l i d i n g Key p a d
P M 325
BLUETOOTH WIRELESS TECHNOLOGY
USING YOUR HANDSET FOR DIAL-UP NETWORKING (DUN)
Connect a Bluetooth capable PC or handheld device wirelessly to the Internet with the PM325. Additional
service required for dial-up networking.
Pairing the Devices
1. From the Bluetooth (7) menu, select Enable Bluetooth and press OK.
2. Select Enable Bluetooth again and press OK.
3. Select Add New and press OK.
4. Select Waiting for Pairing and press OK.
5. You will be prompted for a PIN code, which is user definable. Enter the PIN code and press OK.
The PIN code provides for secure pairing between the handset and the other Bluetooth device. Consult the
instructions for the Bluetooth device to locate, establish pairings and establish connections.
USING YOUR HANDSET FOR HANDS-FREE CONVERSATION
The PM325 is compatible with devices that support the Bluetooth headset and/or hands-free profile(s).
You may create and store 20 pairings within the PM325 and connect to one at a time.
Pairing the Devices
1. From the Bluetooth (7) menu, select Add New and press OK.
2. Select Searching for Pairing and press OK.
3. Consult the Bluetooth device instructions to set the device to pairing mode.
4. The device will appear in the Add New screen once it has been located. Highlight the device and press OK.
5. The handset will prompt you for the PIN code. Consult the Bluetooth device instructions for the
appropriate PIN code. Enter the PIN code and press OK.
6. Select Connect and press OK.
7. Once pairing is completed, you will see the device listed in the Bluetooth menu.
Customizing the Headset Profile
Some Bluetooth headsets utilize the Bluetooth hands-free profile, which may support redialing, voice
dialing and call pick up for incoming calls through the multi-function button. Additional hands-free profile
features supported may include digit and speed dialing from a hands-free device. Consult your headset
instructions for the default action of the multi-function button.
For headsets utilizing the Bluetooth headset profile exclusively, the PM325 offers customizable options for
your headset’s multi-function button.
1. To distinguish if your headset supports the Bluetooth headset profile exclusively, select the paired
device from the Bluetooth (7) menu and press OK.
2. If Key Prompt is listed, the headset utilizes the headset profile. Select Key Prompt and press OK.
3. Select Recent Calls, Voice Dials or None and press OK.
BUILT-IN DIGITAL CMOS CAMERA
Taking a Picture
1. Press the OK/Camera Key.
2. Press the OK/Camera Key a second time to enable the camera viewfinder.
3. Press the OK/Camera Key a third time—or press the Left Soft Key for Capture—to take the picture.
Pictures are automatically saved in the My Pictures > In Camera menu. Use the mirror on the back of the
handset as a viewfinder for self-portraits.
2
PM 325
CUSTOMIZING CAMERA SETTINGS
The PM325 hosts an array of camera features for taking VGA-quality photographs for viewing, storing or
sharing wirelessly.
Changing the Resolution
The PM325 can store up to 20 high (VGA), 42 medium (QVGA) or 100 low (QQVGA) images.
1. Press the OK/Camera Key or select Pictures (1) from the main menu.
2. Select Camera to initiate the camera mode.
3. While in camera mode, select the Right Soft Key for Options.
4. Select Settings and press OK.
5. Select Resolution and press OK.
6. Select HI (640x480 pixels), Med (320x240 pixels) or LO (160x120 pixels) and press OK.
Digital Zooming
1. Press the OK/Camera Key, select Camera and press OK.
2. To zoom in, press the left arrow on the Navigation Key. To zoom out, press the right arrow on the
Navigation Key.
You can digitally zoom up to 2x in high, 4x in medium and 8x in low resolution. The magnification setting is
indicated in the upper left-hand corner of the camera mode screen.
Customizing Shutter Sounds
1. While in camera mode, select the Right Soft Key for Options.
2. Select Settings and press OK.
3. Select Shutter Sound and press OK.
4. Select from the three available shutter sound options or select Record Own and press OK.
SAVING AND ASSIGNING PICTURES
Assigning a Picture ID or Screen Saver
Assigning a picture ID or screen saver from pictures in the In Camera folder creates a QQVGA copy in the
Saved to Phone folder. The Saved to Phone folder can contain up to 50 pictures.
1. Press the OK/Camera Key, select My Pictures and press OK.
2. Select In Camera and press OK.
3. Highlight the picture you wish to assign and press OK to select.
4. Press the Right Soft Key for Options:
To set a picture ID…
1. Select Assign Picture ID and press OK.
2. Select New Entry to create a new contact entry or Find Entry for an existing contact entry and press OK.
3. For a new entry, enter the contact info and press the Left Soft Key for Done to assign.
For an existing contact, scroll to the desired entry and press OK to assign.
To set a screen saver…
1. Select Assign Screen Saver and press OK.
Sending Pictures to an Online Album
1. Press the OK/Camera Key, select My Pictures and press OK.
2. Select In Camera and press OK.
3. Select the images you wish to upload by highlighting and pressing OK for each image.
4. Press the Right Soft Key for Options.
5. Select Upload to Albums and press OK.
6. Select Upload Selection and press OK.
7. Select My Uploads and press OK. The handset will then initiate a browser session.
3
P M 325
SENDING PICTURES VIA PICTURE MAILSM
Select In Camera pictures and send to e-mail address, phone book contact, other mobile number or other
service. Record a 10-second voice memo, add a text message, and send up to 10 pictures per Picture Mail.
1. From the Messaging (2) menu, select Picture Mail and press OK.
2. Select Send Picture and press OK.
3. Choose either From My Pictures or Take New Picture and press OK.
4. Highlight the pictures you want to send, press OK to select each image, then press the Left Soft Key for Next.
5. Choose Mobile, Email, Contact(s) or Other Service and press OK.
6. Enter the mobile number or e-mail address, or select the contact(s) or service to which you would like
to send the message. Press the Left Soft Key for OK. Enter additional recipients at this time as well.
7. Press the Left Soft Key for Next to launch a web session to connect to the Picture Mail server.
• Select the voice memo icon to record a voice memo and press the Right Soft Key for Record.
• Select the text message icon to write a text message and press the Right Soft Key for Add.
8. Press the Left Soft Key for Send.
Shortcut: Press the up arrow on the Navigation Key to quickly access the Messaging menu.
CONNECTIVITY FEATURES
DOWNLOADING SPRINT PCS VISIONSM CONTENT
The PM325 can store up to 1,024 kilobytes of downloaded content from PCS Vision.
Downloading New Content from PCS Vision (Games, Ringers, Screen Savers, etc.)
1. From the Downloads (8) menu, select the desired content classification (Games, Ringers, Screen
Savers, Applications or Other) and press OK.
2. Select Get New and press OK to initiate a web session displaying PCS Vision content for the chosen
classification.
3. Select the desired content and follow PCS Vision prompts to complete the purchase and download
(extra fees may apply on some services).
Accessing Downloaded Content
1. From the Downloads (8) menu, select the content classification, then press OK.
Shortcut: Press the down arrow on the Navigation Key to quickly access the Downloads menu.
ACCESSING THE WEB
The PM325 features PCS Vision and Openwave 6.2.3 browser to access web and PCS Vision content.
1. Select Web (3) from the main menu.
2. Press the END Key to exit or end your browsing session.
Shortcut: From standby mode with the slide open, press the Right Soft Key for Web.
TEXT MESSAGING
Sending an SMS Message
1. From the Messaging (2) menu, select Send Message, then choose Text Message.
2. Enter the ten-digit telephone number, select a name from your contact list or enter an e-mail address
into the appropriate field and press OK.
3. Enter additional addresses (up to a total of ten recipients per message).
4. Press the Left Soft Key for Next.
5. Select Message and press OK.
6. Enter a message up to 160 characters and press OK.
7. Press the Left Soft Key for Send.
4
PM 325
CUSTOMIZABLE FEATURES
CHANGING THE SOUND SETTINGS
Selecting a Ringer
1. From the Settings (9) menu, select Sounds and press OK.
2. Select Ringers and press OK.
3. Select Caller ID, No Caller ID or Roaming and press OK.
4. Choose from the list of 30 available default ringers and press OK or select the list of downloaded or
voice memo ringers by selecting the Right Soft Key for More.
Adjusting Volume Settings
1. From the Settings (9) menu, select Sounds and press OK.
2. Select Volume and press OK.
3. Select Ringer, Earpiece, Key Beep, Application or Power On/Off and press OK.
4. Press the Navigation Key up for louder and down for softer. Press OK at the desired volume level.
Ringer Volume Shortcut: While in standby mode, press the volume keys on the side of the handset to
adjust the ringer volume.
Earpiece Volume Shortcut: During a conversation, press the volume keys on the side of the handset to
adjust the earpiece volume.
Silent Mode Shortcut: While in standby mode, press and hold the lower volume key on the side of the
handset to mute all sounds.
CHANGING THE DISPLAY SETTINGS
Changing the Screen Saver Image
1. From the Settings (9) menu, select Display and press OK.
2. Select Screen Savers and press OK.
3. Select from the list of eleven default images or select the Right Soft Key for More to view the list of
downloaded images and In Camera pictures.
4. Press OK to preview the screen saver or picture, and press OK again to Save.
Changing the Theme Skin
1. From the Settings (9) menu, select Display and press OK.
2. Scroll down to Theme Skins and press OK.
3. Select from the list of four available theme skins and press OK.
OTHER NOTABLE SETTINGS
Locking the Handset
This helps protect the phone from unauthorized use. Once the phone is locked, the phone is restricted
from making calls until the lock code is entered. However, you are able to make emergency calls and calls to
up to ten stored security phone numbers, as well as receive any incoming calls while in the locked mode.
1. From the Settings (9) menu, select Security.
2. Enter your lock code (commonly the last four digits of your mobile phone number).
3. Choose Lock Phone, select Lock now or On power up, and press OK. The On power up function will
lock the handset when the phone is power cycled.
Programming Navigation Key Shortcuts
1. From the Settings (9) menu, scroll down to Setup/Others and press OK.
2. Select Shortcuts and press OK. Press OK again after reading the directions.
3. Choose Left Navigation, Right Navigation, Up Navigation or Down Navigation and press OK.
4. Select the desired function from the list provided and press OK.
5
Pressing a direction on the Navigation Key in standby mode will now quickly access the set function(s).
P M 325
PERSONAL INFORMATION TOOLS
Scheduling an Event
1. From the Tools (4) menu, select Scheduler and press OK.
2. Highlight the event date using your Navigation Key and press OK.
3. Select Add Events to create a new event and press OK.
4. Set the appropriate start and end times, title, recurrence (if any), alarm and ringer by scrolling to the
corresponding field, entering the desired information, and pressing OK.
5. Select Left Soft Key for Save.
Shortcut: Press the left arrow on the Navigation Key to quickly access the Scheduler menu.
Scheduling an Alarm
1. From the Tools (4) menu, select Alarm Clock and press OK.
2. Select Alarm 1, Alarm 2, Alarm 3 or Quick Alarm and press OK.
3. Set the appropriate time, recurrence (if any) and ringer by scrolling to the corresponding field and
entering the desired information.
4. Select the Left Soft Key for Save.
Recording a Voice Memo
Record up to 30 voice memos (three minutes total). Voice memos may also be assigned as Call ID ringers.
1. From standby mode or during a call, press and hold the Voice Memo Key on the left side of the
handset, above the volume up/down side keys. (During a call, only the other party will be recorded.)
2. Start recording at the tone. To stop recording, press OK.
Note: Recorded voice memos can be found in the Tools menu under Voice Memo.
PHONE BOOK
The internal phone book is capable of storing up to 200 entries with up to 5 numbers per entry.
Adding a New Phone Book Entry
1. From the Contacts (6) menu, select Find/New Entry and press OK.
2. Select New Entry and press OK.
3. Enter the name and number into the appropriate fields and press OK.
4. Select a label (Mobile, Home, Office, Fax or Pager) and press OK.
5. To set the speed dial or voice dial, highlight the number and press the Right Soft Key for Options.
• Select Set Speed Dial and press OK. Enter the speed dial number (2-99) and press OK twice to set.
• Select Set Voice Dial and press OK. Select OK to record the voice dial.
Tip: You may also create additional entries, or save numbers to the phone book, by accessing the
Call History/standby screen and selecting Save. Follow the on-screen prompts.
Shortcut: Press the right arrow on the Navigation Key to quickly access the Find/Add Entry screen.
CALL OPTIONS
MAKING A CALL
Voice Dialing
Up to 30 three-second voice dials may be created to quickly access numbers within your phone book.
1. From standby mode, press and release the Voice Dial Key, above the volume up/down side keys.
2. Repeat the name that you have recorded as the voice tag (step 5 above) for the desired number.
Monitor Mode
1. During a call, scroll to Monitor On and press OK to amplify the phone’s audio for hands-free listening.
While the monitor function is enabled, the microphone will be muted.
Warning! Due to higher volume levels, don’t place the phone near your ear while monitor mode is enabled.
6
P M 325
PHONE MENU
a
Pictures (1)
1 Camera (Options)
Self Timer
C o l o r To n e
n Normal
n Sepia
n B l a c k & W h i te
n Negative
Image Controls
n Brightness
n W h i te B a l a n c e
S e tt i n g s
n Resolution
n Q u a l i ty
n S h u tte r S o u n d
n A u to - E ra s e
n Status Bar
Go to My Pictures
2 My Pic tures
I n C a m e ra
S ave d to P h o n e
3 Online Albums
View Albums
Upload Pictures
4 Account Info
Tools (4)
1 Scheduler
2 Alarm Clock
Alarm 1
Alarm 2
Alarm 3
Quick Alarm
3 Vo i c e M e m o
Record New
E ra s e A l l
Memory Info
4 N o te p a d
5 Ez Tip Calc
6 C a l c u l ato r
7 Wo r l d C l o c k
Call History (5)
1
2
3
4
Outgoing Calls
Incoming Calls
Missed Calls
Erase Calls
Outgoing Calls
Incoming Calls
Missed Calls
All Calls
Messaging (2)
1 Send Message
Te x t M e s s a g e
Picture Mail
2 Pic ture Mail
Inbox
Send Picture
3 Te x t M e s s a g e
Inbox
Outbox
D ra f t
E d i t Fo l d e r
Send Message
4 Instant Msg
5 E-mail
6 Vo i c e m a i l
Web (3)
Contacts (6)
1 Find/Add Entr y
2 Groups
Add Group
No Group
Fa m i l y
Friends
Colleagues
Business
School
3 Speed Dials
4 Vo i c e D i a l s
5 My Phone Number
6 Services
C u s to m e r S e r v i c e
Dir Assistance
Account Info
S p r i n t O p e ra to r
Vo i c e C o m m a n d
LG I n f o c o m m U SA , I n c .
10225 W i l l o w C r e e k R o a d
S a n D i e g o , C A 92131 - 1639
w w w. L G m o b i l e p h o n e s . c o m
C u s t o m e r S e r v i c e : 8 0 0 - 793 - 889 6
A c c e s s o r i e s : 8 0 0 - 851 - 6734
PM325TM-1104/Sprint
Bluetooth (7)
1 Enable/Disable
B l u eto o t h
2 Add New
Searching for
Pa i r i n g
Wa i t i n g f o r
Pa i r i n g
Downloads (8)
1 Games
Get New
M y C o n te n t
Manager
P h oto P u z z l e
M s . Pa c - M a n D e m o
S o l i ta i re D. D e m o
Te t r i s D e l u x e
Demo
2 Ringers
Get New
M y C o n te n t
Manager
3 Screen Savers
Get New
M y C o n te n t
Manager
4 Applications
Get New
M y C o n te n t
Manager
Demo ESPN
B o tt o m l i n e
M o b i T V Tr i a l
T h e We a t h e r
Channel
R e a l – r T V Tr i a l
5 Other
Get New
M y C o n te n t
Manager
6 Memor y Status
Settings (9)
1 Sounds
R i n g e rs
K e y To n e s
Vo l u m e
A l e r ts
2 Display
Greeting
Backlight
S c re e n S ave rs
Incoming Calls
C o n t ra s t
M e n u S ty l e
Theme Skins
Clock
Fo n t S i z e
Powe r S ave M o d e
3 PCS Vision
E n a b l e/D i s a b l e
Net Guard
U p d a te Vi s i o n
Profile
4 Roaming
Set Mode
Call Guard
5 Location
6 Messaging
Notification
Callback
Number
Signature
Pre-Set
Message
7 B l u eto o t h
M y B l u e to o t h
Name
Vi s i b i l i ty
M y B l u e to o t h
Address
8 S e c u r i ty
9 Vo i c e D i a l
Vo i c e D i a l
Tr a i n Wo r d s
10 S e t u p / O t h e r s
Shortcuts
Call Setup
A u to - A n s we r
Dialing Match
Language
TTY Mode
Airplane Mode
U p d ate P h o n e S W
11 P h o n e I n f o
All materials in this training manual including, without limitation, the design, the text, and
any marks are the property of LG Electronics, Inc. ALL RIGHTS RESERVED. The Bluetooth
word mark and logos are owned by the Bluetooth SIG, Inc. and any use of such marks by
LG InfoComm is under license. Copyright © 2004 LG Electronics, Inc. All product and
service marks contained herein that are not LG Electronics, Inc. proprietary marks are the
trademarks of their respective owners. LG Electronics, Inc. makes no claim to such properties.
Phone features and specifications are subject to change without prior notice. The use of
non-LG approved accessories will void the warranty and may result in damage to the phone,
the phone exploding, or other dangerous conditions.