1
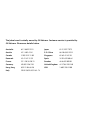
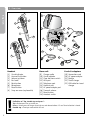
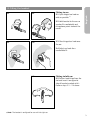
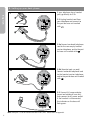
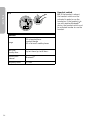
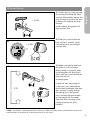
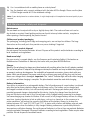
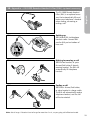
M5390
USER MANUAL
The Jabra brand is wholly owned by GN Netcom. Customer service is provided by
GN Netcom. Please see details below.
Australia
61 3 8823 9111
Japan
81 3 5297 7975
Austria
43 1 403 4134
P. R. China
86 10 6583 2311
Canada
1 905 212 11 02
Singapore
65 65 42 45 50
Denmark
45 43 43 15 52
Spain
34 91 639 80 64
France
33 1 30 58 30 31
Sweden
46 8 693 09 00
Germany
49 803 126 510
United Kingdom 44 1784 220 140
Hong Kong
852 21 04 68 28
USA
Italy
39 02 5832 8253-61-74
1 603 598 1100
Thank you
Thank you for purchasing the Jabra M5390 Multiuse headset.
The Jabra M5390 Multiuse headset is supplied together with the Jabra A335w Dongle and the Jabra M5390 Multiuse base.
This unique combination allows you to use one single headset for all your communication needs. The Jabra M5390 Multiuse
headset connects simultaneously to mobile phones and desk phones - or to mobile phones and PC softphones.
The headset base and the headset are used together with your desk phone.
The dongle allows the headset to communicate with a softphone such as Microsoft Office Communicator, Skype or Cisco IP
Communicator, etc. through your PC or laptop.
The headset can also be connected directly to your Bluetooth®-enabled mobile phone.
Furthermore, the headset and dongle have been optimised for the new wideband technology and are compliant to the
TIA-920 specifications that ensure clear and crisp voice reception and transmission (wideband is only supported between
the dongle and the headset).
En gli sh
Contents
1.
Overview . . . . . . . . . . . . . . . . . . . . . . . . . . . . . . . . . . . . . . . . . . . . . . . . . . 2
2.
Fitting the headset . . . . . . . . . . . . . . . . . . . . . . . . . . . . . . . . . . . . . . . . . . 3
3.
Setting up your desk phone . . . . . . . . . . . . . . . . . . . . . . . . . . . . . . . . . . . . 4
4.
Setting up your mobile phone . . . . . . . . . . . . . . . . . . . . . . . . . . . . . . . . . . 7
5.
Making a call from your desk phone . . . . . . . . . . . . . . . . . . . . . . . . . . . . . . 8
6.
Answering a call from your desk phone . . . . . . . . . . . . . . . . . . . . . . . . . . . 9
7.
Making and answering a call from your mobile phone . . . . . . . . . . . . . . . . 10
8.
Features . . . . . . . . . . . . . . . . . . . . . . . . . . . . . . . . . . . . . . . . . . . . . . . . . 12
9.
Reset/Pairing . . . . . . . . . . . . . . . . . . . . . . . . . . . . . . . . . . . . . . . . . . . . . 15
10. Using the Jabra M5390 Multiuse Headset with multiple
Bluetooth®-enabled devices . . . . . . . . . . . . . . . . . . . . . . . . . . . . . . . . . . . 16
11. Operating devices in multiuse scenarios . . . . . . . . . . . . . . . . . . . . . . . . . 16
12. Switching between Base and Jabra A335w Dongle in a multiuse scenario . 17
13. Troubleshooting & FAQ . . . . . . . . . . . . . . . . . . . . . . . . . . . . . . . . . . . . . . 17
14. Maintenance, safety and disposal . . . . . . . . . . . . . . . . . . . . . . . . . . . . . . . 18
15. Appendix – GN 1000 Remote Handset Lifter (RHL) (optional accessory) . . 19
1
2
1.Overview
1
6
4
En gli sh
9
5
3
2
10
23
18
17
1
6
16
11
12
8
15
13
19
7
2
14
21
20
Headset
[1] Visual indicator
[2] Answer/End button
[3] Volume up/down
7
[4] Ear hook
[5] Mute button
[6] Microphone
[7] Reset button
[8] Snap-on cover (replaceable)
!
22
8
Base unit
[9] Charge cradle
[10] Visual indicator
[11] Clear dial tone switch
[12] AUX port
[13] Telephone port
[14] Handset port
[15] AC power adapter port
[16] Transmit volume
[17] Reset button
[18]Headset switch
Cords & adapters
[19] Connection cord
[20] AC power adapter
[21] Dongle
[22] Travel charger
[23]USB cable for travel
charger
Definition of “Tap, double tap and press”:
Tap = Button press for up to 0.8 sec.
Press = Button press for longer than 0.8 sec, and release before 1.5 sec. Tone indication is heard.
Double tap = Two taps made within 0.5 sec.
4
2.Fitting the headset
2.3
2.1
Fitting to ear
2.1Open hinged ear hook as
wide as possible. 1)
2.2Hold headset to the ear so
speaker fits comfortably and
microphone points towards the
mouth.
2.4
2.3
2.4
2.3Close hinged ear hook over
the ear.
2.4Adjust ear hook for a
comfortable fit.
2.5
2.5
5
6
2.2
En gli sh
3
2.6
1) Note:
Fitting to left ear
2.5Pull ear hook hinge from the
slot and insert it on opposite
side of headset marked with L.
Perform steps 2.1 – 2.4 above.
The headset is configured for use with the right ear.
3
3.Setting up your desk phone
3.1
En gli sh
If your telephone has a headset
port, go directly to 3.2b.
3.1Unplug handset cord from
your telephone and connect to
the port on base unit marked
.
with
3.2a
3.2a Connect enclosed telephone
cord to the now empty handset
port on telephone, and to the port
.
on base unit marked with
3.2b
3.2b (Headset port use only)
Connect enclosed telephone cord
to the headset port on telephone,
and to the port on base unit marked
.
with
3.3
3.3Connect AC power adapter
to port on bottom of base unit,
then connect to AC power outlet.
If the headset is disconnected,
the indicator on the base will
flash green.
Note: AUX port is used for Remote Handset Lifter (RHL). Please refer to Appendix.
4
4.2
4.5
3.5
4.1
4.3
4.2
4.6
3.5Turn on headset by pressing4.5
Answer/End button for 1 sec.
(visual indicator will flash blue
four times and headset will beep
three times), or by placing headset
in charge cradle. Turn off headset
by pressing Answer/End button
for 2 sec. (visual indicator will
flash blue four times and headset
will beep three times).
2 sec
3.6
3.4Place headset in charge
cradle and charge for a minimum
of 30 min. before use. A full
charge takes about 2 hours.
Visual indicator on headset will
flash green while headset is
charging, and light steady green
when fully charged. The same
procedure is to be followed when
using the travel charger.
En gli sh
3.4
3.7
4.6
5.1
Clear dial tone
3.6Take headset out of charge
4.6
cradle and put it on.
4.7
3.7Lift handset from telephone
and listen for a dial tone in headset.
5.2
3.8
4.4
3.9
4.3
4.7
3.8If dial tone is missing or unclear,
slowly slide the clear dial tone
switch on bottom of base unit
through the 3 settings.
3.9Set switch to the position 4.7
that gives the clearest dial tone.
4.8
5
4.5
4.5
Setting transmit volume
3.10 Make a call (see section 4)
to someone who can act as a test
person.
3.10
En gli sh
3.11 Adjust outgoing volume with
transmit volume control on base
unit. Switch through the 3 settings
until test person confirms the
appropriate volume. 1)
4.6 3.11
4.6
3.12
4.7
Setting incoming volume
3.12 During a call, adjust incoming
volume by pressing Volume button
on headset.
3.13 A tone in headset will indicate
when min./max. volume is reached.
4.7
1) Note:
6
3.13
If you can hear your own voice, transmit volume is probably too high. Reduce volume setting on your
4.8desk phone (if available feature) and compensate by increasing volume on headset.
Setup
Pairing your headset with your mobile phone
NOTE: Before use, please charge your headset (see 3.4).
En gli sh
4.Setting up your mobile phone
Before using your Jabra M5390 Multiuse headset with a mobile phone, you need to pair it with
your mobile phone.
•Make sure the headset is off.
•During start-up keep pressing the Answer/End button for three seconds. Alternatively remove
the snap-on cover and press the reset button on the headset for three seconds. The visual
indicator on headset will light constant blue. (see 9.1)
•Set your Bluetooth® phone to ‘discover’ the Jabra M5390 Multiuse headset:
o Follow your phone’s User Manual. This usually involves going to a ‘setup,’ ‘connect’ or ‘Bluetooth’
menu on your phone and selecting the option to ‘discover’ or ‘add’ a Bluetooth® device.
o Your phone will find the Jabra M5390 Multiuse headset and ask if you want to pair with it.
•Accept pairing by pressing Yes/OK (or similar) on the phone and confirm with the passkey or
PIN ‘0000’ (4 zeros).
•Your phone will confirm when pairing is complete. If pairing is unsuccessful, repeat the steps
above. Some mobile phones require manual connection after pairing. Note that on some mobile
phones, the headset has to be set as “Trusted device”.
NOTE: If you accidentally put the headset into pairing mode, tap the Answer/End button to exit
pairing mode.
IMPORTANT: The same headset can be paired with multiple mobile phones. However, if you
have multiple mobile phones paired, switched on and within range of the headset, the headset will
not be able to connect to the base. It is only possible to be connected to one mobile phone and the
headset base at a time. To be able to connect to the headset base, only have one paired mobile
phone turned on and within range of the headset.
7
5.Making a call from your desk phone
5.1
5.1Put on headset. 1)
5.2
En gli sh
5.2
5.1
5.2Lift handset from telephone,
or press telephone´s “line” button
if connected to the headset port.
Then tap Answer/End button to
transfer the call to headset.
5.2
5.4
5.35.2
5.3
5.5
5.3Wait for dial tone, then dial
number.
5.4
5.3
5.6
5.4To end call, tap the Answer/
End button on the headset and
replace handset on telephone,
or press telephone’s “end call”
button if base is connected directly
to telephone’s headset port.
5.6
5.3
5.4
5.6
5.5
Making a call with handset
5.5Place headset in charge cradle.
5.6Use handset as usual.
5.4
5.4
1) Note:
If making a call with telephone handset, make sure the headset is placed in charge cradle.
Otherwise, the call will be routed through to the headset.
8
6.2
6.Answering a call from your desk phone
5.2
6.1Put on headset. 1)
6.2Lift handset from telephone,
or press telephone’s “line” button
if connected to the headset port.
Then tap Answer/End button to
transfer the call to headset.
En gli sh
5.1
6.2
6.1
6.3
5.2
6.3
5.3
5.3 6.4
6.4
6.5
5.4
6.3To end call, tap the Answer/
End button on the headset and
replace handset on telephone,
or press telephone’s “end call”
button if base is connected directly
to telephone’s headset port.
Switching from handset to
headset
6.4During a call using telephone
handset, take headset from charge
cradle. Tap Answer/End button and
the call will automatically be routed
to the headset. 1)
5.4
9
Switching from headset to
handset
6.5During a call using the headset,
pick up telephone handset and replace
headset in charge cradle. The call will
not be routed through to the telephone
handset until headset is in the charge
cradle.
6.5
En gli sh
1) Important:
Do not replace handset on telephone as this will disconnect the call.
7.Making and answering a call from your mobile phone
Making and ending a mobile phone call
•When you make a call from your mobile phone, the call will transfer to your headset
automatically (this is subject to phone settings, see your mobile phone’s User Manual to
find out how to activate this feature).
If your phone does not allow this feature, see your mobile phone’s User Manual on how to
answer a call with a headset.
end a call, tap the headset Answer/End button, OR press End/No (or similar) on your
•To
mobile phone.
Answering and ending an incoming mobile phone call
answer, tap the headset Answer/End button on your headset after the first ring OR,
•To
if the headset is placed in the base, simply remove it from the base.
end a call, tap the headset Answer/End button, OR press End/No (or similar) on your
•To
mobile phone, or place the headset in the base.
IMPORTANT: If you answer a call on your mobile phone handset, some mobile phone models
will not automatically transfer the call to your headset.
10
Switching from headset to mobile phone
the menu on your mobile phone to switch from headset to mobile phone during an active
•Use
call (see your mobile phone’s User Manual).
Switching from mobile phone to headset
En gli sh
You can switch from your headset to your mobile phone during an active call. You might want to
do this if, for example, your headset battery is running low.
It is possible to switch from your mobile phone to your headset during an active call.
the menu on your mobile phone to switch from mobile phone to headset during an active
•Use
call (see your mobile phone’s User Manual).
Rejecting an incoming call
•
Press the headset Answer/End button when the phone rings to reject an incoming call.
Depending on your phone settings, the person who called will either be forwarded to your voice
mail or hear a busy signal.
Making a call with Voice Dial
the headset Answer/End button to enter Voice Dial mode. (Consult your mobile phone’s
•Tap
User Manual for more information about how to use this feature.)
For best results, record the voice dialing tag through your headset.
Redialing the last number
•Double tap the headset Answer/End button.
Handling multiple calls
Having one active call in headset
tap on Answer/End button will put active call on hold and make a call to last dialled
•Double
phone number.
Having one active call while receiving one additional incoming call
•Tap on Answer/End button will end active call and answer incoming call.
•Double tap on Answer/End button will reject incoming call.
•Press Answer/End button for app. 1.5 sec to put active call on hold and answer incoming call.
Having one active call plus one call on hold
•Tap on Answer/End button will end active call and retrieve call on hold.
•Press Answer/End button for app. 1.5 sec. to switch between the two calls.
Please note that this behaviour might change depending on connected phone type.
11
En gli sh
3
6.4
Staying within range
The sound in your headset will deteriorate if you move beyond range.1) Move back into range to
restore sound quality. If you move too far from your mobile phone, the call might be ended or
re-routed to your mobile phone from the headset, depending on what mobile phone model you
are using. Please see your mobile phone’s User Manual for more information on this function.
Remember!
For optimal performance, wear the Jabra M5390 Multiuse headset and your mobile phone on the
same side of your body or within line of sight. In general, you will get better performance when
there are no obstructions between your headset and your mobile phone.
8.Features
8.1
8.2
6.5
4
Muting & unmuting
8.1Press Mute button on
headset. A dual tone will be
heard in the headset.
8.2To unmute, press Mute button
again. A dual tone will be heard
in the headset.
1) Note: If answering a call with telephone handset, make sure the headset is placed in charge cradle.
Otherwise, the call will be routed through the headset.
5
12
Low battery
8.3Approx. 10 minutes before
the headset runs out of battery,
the visual indicator on headset will
start to flash with a red light and
a series of tones will be heard.
If the battery runs out of power,
visual indicator on headset will
switch off automatically. Replace
headset in charge cradle and
continue the call using telephone
handset. The headset contains a
battery level indicator. By tapping
the Vol. up/down button the visual
indicator will flash quickly twice green, yellow or red depending on
the battery level.
8.3
3
10 min
10 min
4
4
5
Out of range
8.4 If you go out of range (app.
70 m), all buttons except Answer/
End button will stop working until
back in range again.2) Please note
that the majority of mobile phones
only support 10 m.
8.4
70m
5
2) Important:
En gli sh
3
If headset is muted when going
out of range, it will also be muted
when going within range again.
If headset is out of range for more than 1 min., the link between base and headset will be
terminated.
13
7.5
Headset switch
8.5If the headset is absent,
the headset switch must be
activated in order to use the
handset or, if the headset is in
use with another Bluetooth®
device, the headset switch must
be activated in order to use the
handset.
8.5
En gli sh
Features:
Range
14
70 m headset/base headset/dongle
10 m for most mobile phones
Talk time/
standby time
Up to 6 hours/up to 60 hours
Transmission
protocol
Bluetooth®
Frequency band
2.4 GHz
9.1
~ 3 sec.
2
9.2
~ 3 sec.
9.1Under start-up, keep pressing
the Answer/End button for three
seconds. Alternatively, remove the
snap-on cover and press the reset
button on the headset for three
seconds.
Visual indicator on headset will
light constant blue. 1)
En gli sh
9.Reset/Pairing
9.2 Then press reset button on
base unit for 3 seconds. Visual
indicator on base unit will light
constant blue.
3
9.3 Make sure headset and base
are within 1 m of each other.
When pairing is successful, both
visual indicators will flash blue 5
times, and the visual indicator on
base unit will turn
to steady green.
9.3
1m
In order to clear the pairing list
in the base, press and hold the
reset button underneath the base
for 5 seconds. In order to clear
the pairing list in the headset,
press and hold the reset button
on the headset for 5 seconds.
Note that after resetting, a new
pairing sequence has to be
initiated.
1) Note:
The headset is already paired with the base unit from the factory. Pairing should only be necessary if
a new headset has to work with an existing base unit (or vice versa).
15
10. Using the Jabra M5390 Multiuse headset with multiple Bluetooth®-enabled devices
En gli sh
Your Jabra M5390 Multiuse headset can be paired with up to 8 devices. However, only two can be
connected (paired with the headset, turned on and in range) with the headset at one time. This could
be any two Bluetooth® devices (for example, a mobile phone and the Jabra M5390 Multiuse base,
or the Jabra A335w Dongle and a mobile phone, or two mobile phones). Therefore, if the headset is
in range of the Jabra M5390 Multiuse base or Jabra A335w Dongle, only one additional Bluetooth®
device can be connected to the headset (paired with the headset, turned on and in range).
The headset is per default paired with the base from the factory. This means that the headset will
automatically connect to the base if in range and turned on. For the dongle pairing see the dongle
manual on CD.
It is also possible to have two Bluetooth®-enabled mobile phones connected to the Jabra M5390 Multiuse
headset simultaneously. In this case, both base and dongle should be disconnected from the headset.
11. Operating devices in multiuse scenarios
From the button interface of the headset, it is possible to operate both devices in a multiuse
scenario (two devices connected to the headset). Operations can be divided into handling for
incoming and outgoing calls.
If receiving an incoming call from either of the connected devices, this device will automatically
be the device “in focus” and a tap will answer the call. A press will reject the call.
If wanting to place an outgoing call activated from the headset, the user manually has to place
one of the devices “in focus”. Placing a device “in focus” means that all button presses made on
the headset will be sent to the given device. For example, if a Voice Dial is to be activated on
the second connected device, the user must first make sure that the given device is “in focus”.
After that, simply tap the button to activate a Voice Dial command.
In order to switch focus between the two connected devices, the Answer/End button has to be
pressed for app. 1.5 seconds.
After having made a focus-swap action, different indicators will be used to inform the user
which device is now “in focus”; If swapping focus to the Jabra A335w dongle, then the LED of
the dongle will give 5 quick light-blue flashes. Also the speaker of the headset will say “Dongle
in focus”. If swapping focus to the Jabra M5390 base, the LED of the base will give 5 quick
light-blue flashes. Also the speaker of the headset will say “Base in focus”. If swapping focus
to a mobile phone the speaker of the headset will say “Mobile in focus”.
Please note that this only applies to multiuse scenarios. If the headset is only connected to one
device, then this device will automatically be “in focus”.
Also note that the Last Number Redial command does not use the “in focus” concept. If double
tapping the Answer/End button, the Last Number Redial command will automatically be sent to
the connected device with the latest incoming call (when connected to the headset).
16
12. Switching between base and Jabra A335w Dongle in a multiuse scenario
A typical multiuse scenario is to have the headset connected to one mobile phone and either the
base or the dongle. If wanting to switch between base and dongle, while maintaining the mobile
phone connection, just press and hold the Volume up/down button for 4 seconds.
En gli sh
NOTE: When multiple Bluetooth-enabled devices are paired with the headset, the Voice Dial*
function will work with the last device that was paired.
13. Troubleshooting & FAQ
Q: Nothing happens when I try to adjust the clear dial tone.
A: Make sure the base is powered (visual indicator on base unit is steady green). Then establish
a voice link between base and headset (visual indicators on base unit and headset are
flashing green). Also ensure that the telephone is activated (handset is off the hook or
“line” button is pressed).
Q: I hear myself when I talk.
A: Your transmit volume level (please refer to section 3.10) is probably too high.
Turn down the transmit volume level (3->2, 2->1).
Q: The sound in the headset is of poor quality or the person at the other end cannot hear me.
A: Make sure that you have positioned the clear dial tone switch correctly. To do this, call
someone to adjust the clear dial tone switch.
Q: When I press the Answer/End button, the GN 1000 RHL lifts, but the call is not connected.
A: Make sure that you are using the telephone’s handset port and not the headset port
(if your telephone has one), when using a GN 1000 RHL for remote answering.
Q: I have moved desk at work. Is it possible to put my headset on another base?
A: Yes, this is possible. The headset only needs to be paired to the new base. Just follow the
procedure as described in section 9 of this guide.
Q: I cannot hear anything in my headset when using my mobile phone.
A: - Increase the volume on the headset (or phone).
- As the volume level needed might vary between your desk phone and mobile phone, it might
be best to adjust the level on the phones.
- Then use the headset volume level adjustments for general adjustments (but ensure that the
headset is paired with the mobile phone).
- M ake sure that the phone is connected to the headset - if it does not connect either from
the phone’s Bluetooth® menu or by tapping the Answer/End button, follow the pairing
procedure (see section 4 “Pairing your headset with your mobile phone” in this guide).
*If the mobile phone supports this feature.
17
Q: Can I use wideband with a mobile phone or a desk phone?
A: No, the headset only supports wideband with the Jabra A335w Dongle. Please see the Jabra
A335w Dongle manual on CD for wideband settings.
En gli sh
Note: If your desk phone has a volume button, it might help to adjust it to optimize the sound quality in your
headset.
14. Maintenance, safety and disposal
Maintenance
The ear hook can be wiped with a dry or slightly damp cloth. The cords and base unit can be
dry-dusted as required. Avoid getting moisture or liquids into any button sockets, receptors or
other openings. Avoid exposing the product to rain.
Children and product packaging
The packaging, including plastic bags and wrapping parts, are not toys for children. The bags
themselves or the small parts they contain may cause choking if ingested.
Batteries and product disposal
Do not expose the headset batteries to heat. Dispose of the product and/or batteries according to
local standards and regulations.
Need more help?
For your country’s support details, see the European and Australasia Safety & Declaration or
NorthAmerican Declaration & Warranty that came with your Jabra M5390 Multiuse.
Charger
Warning: Do not attempt to charge your Jabra headset with anything other than the AC adapter provided.
The use of any other AC adapter may damage or destroy the headset and may invalidate any approval
or warranty, and may be dangerous. For availability of approved accessories, please check with your
dealer. When you disconnect the power cord of any accessory, grasp and pull the plug, not the cord.
Never use a charger that is damaged. Important: The “colour” indicator light will be on while charging
and will turn off when charging is complete. The Jabra headset cannot be used while charging.
Battery information
Your device is powered by a rechargeable battery. The full performance of a new battery is achieved
only after two or three complete charge and discharge cycles. The battery can be charged and
discharged hundreds of times, but will eventually wear out. Recharge your battery only with the
provided approved chargers designated for this device. Unplug the charger from the electrical
plug and the device when not in use. Do not leave a fully charged battery connected to a charger,
since overcharging may shorten its lifetime. If left unused, a fully charged battery will lose its charge
over time. Leaving the device in hot or cold places, such as in a closed car in the summer or in
winter conditions, will reduce the capacity and lifetime of the battery. Always try to keep the
battery between 15°C and 25°C (59°F and 77°F). A device with a hot or cold battery may not work
temporarily, even when the battery is fully charged. Battery performance is particularly limited in
temperatures well below freezing. Do not dispose of batteries in a fire as they may explode. Batteries
may also explode if damaged. Dispose of batteries according to local regulations. Please recycle when
possible. Do not dispose as household waste.
18
9.x
The GN 1000 Remote Handset
Lifter (RHL) is an optional accessory that automatically lifts and
lowers your telephone’s handset
when making, answering or
ending a call.
9.x
En gli sh
15. Appendix – GN 1000 Remote Handset Lifter (RHL) (optional accessory)
9.x
9.x
9.x
15.1
Setting up
15.1 Attach RHL to telephone
handset cradle. Connect RHL
cord to AUX port on bottom of
base unit.
9.x
9.x
15.2
9.x 9.x
9.x
9.x
15.3
9.x
9.x
9.x
Making/answering a call
15.2 Put on headset, or press
Answer/End button if already
wearing headset. The RHL will
automatically lift telephone
handset.
Ending a call
15.3 Press Answer/End button,
or place headset in charge cradle.
The RHL will automatically replace
telephone handset, and the call
will be terminated.
Note: Out of range. If headset is out of range for more than 1 min., any on-going call will be terminated.
19
© 2008 GN Netcom A/S. All rights reserved. Jabra® is a registered
trademark of GN Netcom A/S. All other trademarks included herein
are the property of their respective owners. The Bluetooth® word
mark and logos are owned by the Bluetooth SIG, Inc. and any use
of such marks by GN Netcom A/S is under license. (Design and
specifications subject to change without notice).
www.jabra.com
Made in China