Transcript
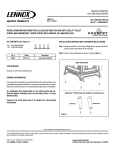
HEARTH PRODUCTS
KITS AND ACCESSORIES
P/N 506033-57
Rev. NC, 08/2011
GRANDVIEW™ DOOR TRIM KIT
INSTALLATION INSTRUCTIONS FOR INSTALLING DOOR TRIM
on a GRANDVIEW™ 230 WOODSTOVE
Step 2. Gently pry back the door gasket, only where the screws are located (next to the identifying holes), and loosen the three bottom
screws. NOTE* DO NOT REMOVE. An 1/8” allen wrench will be
necessary. Once bottom three screws are loosened, completely
remove remaining seven screws around the door.
KIT CONTENTS
Please ensure that all these parts are included
1 ea. Door Trim
1 ea. Instruction Sheet
Grandview™ Door Trim Kit
Cat. No.
Model
H8346
DRTRM-GV230-NKL
H8347
DRTRM-GV230-BRNKL
Description
Door Trim, Nickel
Glass
Retainer
Locate screws (10 ea.)
Door Trim, Brushed Nickel
(peal back gasket as shown)
Arrows indicate
screw locations
TOOLS NEEDED
1/8” Allen Wrench
Flat Head Screwdriver
Glass Cleaner/Soft Cloth
GENERAL INFORMATION
If you encounter any problems, need clarification of these instructions or
are not qualified to properly install this kit, contact you local distributor
or dealer.
Figure 1
Door Gasket
Back View of Door
Step 3. Separate the outer door from the inner door, by pulling apart at
the top, creating the necessary gap to slide the door trim in place.
Door Trim
Outer Door
Read this instruction sheet in its entirety before beginning the installation.
Glass Retainer
ALL WARNINGS, PRECAUTIONS AND INSTRUCTIONS IN THE INSTALLATION AND OPERATION MANUAL PROVIDED WITH THE APPLIANCE
APPLY TO THESE INSTRUCTIONS.
Check the contents of the kits upon receipt and check for any damaged
or missing parts. If there is hidden damage, notify your freight company
or Lennox Hearth Products dealer immediately.
Be sure to clean plated surfaces with a soft cloth and household glass
cleaner prior to burning the appliance. Fingerprints left on plated
surfaces while burning may remain on the finish permanently.
Installation Instructions
Step 1. Open the door on the stove and locate the stainless glass retainer
(see Figure 1). Screws are located underneath the white door
gasket, and directly in line with the identifying holes on the stainless glass retainer.
NOTE: DIAGRAMS AND ILLUSTRATIONS ARE NOT TO SCALE.
Inner Door
Figure 2
Glass with Gasket
Hex Head
Screws 10 ea.
Step 4. Slide door trim between inner and outer door, with desired finish
facing outward. Ensure the notches on the door trim seat into,
and are being captured by the mounting bosses on the outer
door.
Step 5. Once door trim is in place, re-install door screws and tighten
all door screws snugly. Ensure rope is firmly placed back into
channel.
Step 6. Wipe down door trim with glass cleaner and soft cloth, as any
fingerprints or dirt will remain permanently after stove is fired.
Lennox Hearth Products reserves the right to make changes at any time, without notice, in design, materials, specifications, prices and also to discontinue colors, styles and products.
Consult your local distributor for fireplace code information.
Printed in U.S.A. © 2011 Lennox Hearth Products
P/N 506033-57 Rev. NC 08/2011
Lennox Hearth Products
1508 Elm Hill Pike, Suite 108 • Nashville, TN 37210