1
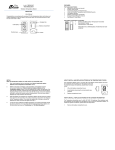
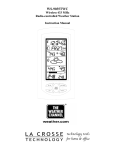
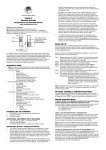
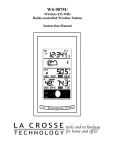
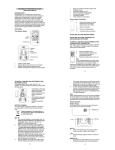
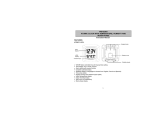
ACTIVATE/DEACTIVATE ALARM: Press and release the ALARM button to activate or deactivate the alarm. When the alarm is active the clock displays the alarm icon above the seconds. When deactivated, the alarm icon does not display. ALARM SOUND: The Alarm frequency is 2KHz for 90 seconds: The alarm sound pattern is one beep every 2 seconds for 30 seconds, then one beep every 1 second for 30seconds and then one beep every 2 seconds for 30 seconds and stop. WT-8100 TIMER WALL CLOCK Quick Setup Manual SNOOZE: When the time alarm sounds, press and release the DATE/MEMO button to activate the Snooze feature for 10 minutes. The alarm icon will flash when the snooze feature is activated. Press and release the + button to deactivate the snooze function. The Wall Clock with Timer is ideal for your kitchen, and fitness room. Displays time, weekday, indoor temperature and a timer all on one easy to read display. FEATURES COUNTDOWN TIMER Digital time Date display. Weekday display in 4 languages: English, French, German or Spanish. Indoor temperature (°F or °C) 12/24 hour time display. Time Alarm with snooze. Wall hanging or free standing. Countdown/Count up Timer with 8-memory recall. Low battery indicator. Temperature range: 14.4°F to 99.9°F (-9.9°C to +59.9°C). Requires 1-AA alkaline battery (not included). SET TIMER: Press and release the TIMER/SNZ button to enter the timer set mode. You will see this in the lower left-hand corner replacing the date. Hanging holes Battery compartment LCD display Foldable stands Function buttons INITIAL SET UP TIMER MINUTES: Press and release the TIMER/MIN button to adjust the Minutes. Hold the TIMER/MIN button to change the Minutes quickly. Minutes can be set from 0-99. TIMER SECONDS: Press and release the TIMER/SEC button to adjust the Seconds. Hold the TIMER/SEC button to change the Seconds quickly. Seconds can be set from 0-59. START OR STOP TIMER: Press and release the START/STOP button to begin the timer countdown to 0:00. Press and release the START/STOP button to stop the timer. TIMER ALARM: When the countdown timer reaches 0:00, the alarm will sound one beep every 0.5 seconds for 30 seconds. EXIT TIMER MODE: Press and hold the TIMER/MEMO button for 2 seconds to exit Timer mode. The date will be displayed. CREATE TIMER MEMORY: The Timer can be manually set (see set timer) or you can create up to eight different timers in memory, which can be recalled and reused. From a normal display, press and release the TIMER/MEMO button to enter timer mode. Install battery: The Wall Clock uses 1 x AA battery (IEC LR6, 1.5V). Insert battery into the Wall Clock, observing the correct polarity (see markings inside battery compartment). Set Time and Date. TIMER / SNZ button DATE / MEMO START / STOP button ALARM TIMER/ MIN Button SET Press and release the START/STOP button to start the count down, then again to stop the count down before it reaches 0:00 and the timer sounds. This will commit the timer to memory. TIMER/ SEC button + COUNTDOWN TIMER: Set a countdown timer (see set timer) or select one from memory. Press and release the START/STOP button to begin counting down. Press and release the START/STOP button to stop the count down before it reaches 0:00 and the timer sounds. This will commit the timer to memory. RECALL TIMER MEMORY: In timer mode press and release the TIMER/SNZbutton to recall a saved time memory. SET TIME Press and hold SET button for 5 seconds, to enter the time set mode. 12/24-HOUR: 12h will flash. Press and release the + button to switch to 24hour time. NOTE: The date will display as Month/Day in 12-hour mode and Day/Month in 24-hour mode. Press and release the SET button. HOUR: The Hour will flash. Press and release the + button to adjust the Hours. Be sure to AM or PM is showing as appropriate. Press and release the SET button. MINUTES: The Minutes will flash. Press and release the + button to adjust the Minutes. Hold the + button to change the Minutes quickly. Press and release the SET button. YEAR: The Year will flash. Press and release the + button to adjust the Year. Press and release the SET button. MONTH: The Month will flash. Press and release the + button to adjust the Month. Press and release the SET button. DATE: The Date will flash. Press and release the + button to adjust the Date. Press and release the SET button. NOTE: Day of the Week will set automatically. FAHRENHEIT/CELSIUS: °F will flash. Press and release the + button to switch to °C. Press and release the SET button again. LANGUAGE: US (English) will flash. Press and release the + button to change to French (F), Spanish (E), German (d) or back to English (US). Press and release the SET button to finish. NOTE: The timer will recall the time memory in ascending order rather than order saved. Example: Saved time memories are 7:00, 6:00, & 23:00. Recall will be 6:00, 7:00, & 23:00. Press and hold the ALARM button for 5 seconds to enter the alarm set mode. HOUR: The Hour will flash. Press and release the + button to adjust the Hours. Be sure the AM or PM is showing as appropriate. Press and release the ALARM button. MINUTES: The Minutes will flash. Press and release the + button to adjust the Minutes. Hold the + button to change the Minutes quickly. Press and release the DATE/MEMO button and you are done. RECALL SEARCH: Press TIMER/SNZ button to recall timer memory, it will search from the smallest timer memory to find timer larger than existing timer value and recall it. Example: Set timer to 6:30, then press TIMER/SNZ button to recall the memory. It will search the memory recall order 6:00, 7:00 & 23:00 and recall 7:00 as the next largest memory. TIMER MEMORY OVERWRITE: A time memory is created each time the countdown timer is started then stopped before the timer reaches 0:00 and sounds the alarm. A maximum of 8 count down time memories can be save and recalled, when count down memory is full, it will delete the oldest timer and add the new timer, in first-in-first-out order. CLEAR TIMER: In timer mode, with the timer stopped, press and hold the TIMER/MIN button and TIMER/SEC button together for 5 seconds to clear the oldest timer to 0:00. EXIT TIMER MODE: Press and hold the TIMER/SNZ button for 2 seconds to exit Timer mode. The date will be displayed. SET TIME ALARM COUNT UP TIMER: In Timer mode press and release the START/STOP button to begin counting up from 0:00. Press and release the START/STOP button to stop the count up. 1 SPECIFICATIONS: Indoor Temperature Range: 14.4°F to 99.9°F (-9.9°C to +59.9°C). Reads OFL if outside this range. Resolution: 0.2°F (0.1 °C) Measuring Period: Every 60 seconds. DISPLAY OPTIONS Battery: included). Requires 1 x LR6 (AA) alkaline battery (not Clock Size: x 26.3mm W) Time Display: 9.23 L x 7.61 H x 1.04 inches W (234.4 L x 193.4 H Numbers are 1.77 inches H (4.5 cm) WARRANTY INFORMATION La Crosse Technology, Ltd provides a 1-year limited warranty on this product against manufacturing defects in materials and workmanship. This limited warranty begins on the original date of purchase, is valid only on products purchased and used in North America and only to the original purchaser of this product. To receive warranty service, the purchaser must contact La Crosse Technology, Ltd for problem determination and service procedures. Warranty service can only be performed by a La Crosse Technology, Ltd authorized service center. The original dated bill of sale must be presented upon request as proof of purchase to La Crosse Technology, Ltd or La Crosse Technology, Ltd’s authorized service center. Countdown Timer or Month/Date Display CHANGE DISPLAY: From Timer mode, stop the timer. Then press and hold the DATE/MEMO button to change from Timer to Date display. La Crosse Technology, Ltd will repair or replace this product, at our option and at no charge as stipulated herein, with new or reconditioned parts or products if found to be defective during the limited warranty period specified above. All replaced parts and products become the property of La Crosse Technology, Ltd and must be returned to La Crosse Technology, Ltd. Replacement parts and products assume the remaining original warranty, or ninety (90) days, whichever is longer. La Crosse Technology, Ltd will pay all expenses for labor and materials for all repairs covered by this warranty. If necessary repairs are not covered by this warranty, or if a product is examined which is not in need or repair, you will be charged for the repairs or examination. The owner must pay any shipping charges incurred in getting your La Crosse Technology, Ltd product to a La Crosse Technology, Ltd authorized service center. La Crosse Technology, Ltd will pay ground return shipping charges to the owner of the product to a USA address only. NOTE: Date will show M/D when the clock is in 12-hour mode, and will show as D/M in 24-hour mode. POSITIONING OR MOUNTING CLOCK There are two possible ways to mount clock: use of the foldable table stands, or wall mounting. FOLDABLE TABLE STANDS The foldable table stands legs are located on the backside. Unfold the stands out, below the battery compartment. Once the foldout table stands are extended, place the clock in an appropriate location. Your La Crosse Technology, Ltd warranty covers all defects in material and workmanship with the following specified exceptions: (1) damage caused by accident, unreasonable use or neglect (including the lack of reasonable and necessary maintenance); (2) damage occurring during shipment (claims must be presented to the carrier); (3) damage to, or deterioration of, any accessory or decorative surface; (4) damage resulting from failure to follow instructions contained in your owner’s manual; (5) damage resulting from the performance of repairs or alterations by someone other than an authorized La Crosse Technology, Ltd authorized service center; (6) units used for other than home use (7) applications and uses that this product was not intended or (8) the products inability to receive a signal due to any source of interference.. This warranty covers only actual defects within the product itself, and does not cover the cost of installation or removal from a fixed installation, normal set-up or adjustments, claims based on misrepresentation by the seller or performance variations resulting from installation-related circumstances. WALL MOUNTING Install three mounting screws (not included) into a wall— leaving approximately 3/16 of an inch (5mm) extended from the wall. Place the clock onto the screws, using the three hanging holes on the backside. Gently pull the clock down to lock the screws into place. NOTE: Always ensure that the clock locks onto the screws before releasing. LA CROSSE TECHNOLOGY, LTD WILL NOT ASSUME LIABILITY FOR INCIDENTAL, CONSEQUENTIAL, PUNITIVE, OR OTHER SIMILAR DAMAGES ASSOCIATED WITH THE OPERATION OR MALFUNCTION OF THIS PRODUCT. THIS PRODUCT IS NOT TO BE USED FOR MEDICAL PURPOSES OR FOR PUBLIC INFORMATION. THIS PRODUCT IS NOT A TOY. KEEP OUT OF CHILDREN’S REACH. This warranty gives you specific legal rights. You may also have other rights specific to your State. Some States do not allow the exclusion of consequential or incidental damages therefore the above exclusion of limitation may not apply to you. BATTERY REPLACEMENT Low batteries should be changed to avoid the damage resulting from a leaking battery. If you notice that the LCD appears faint or is not working properly, or the low battery symbol appears above the seconds, try a fresh AA alkaline battery before contacting customer support. For warranty work, technical support, or information contact: La Crosse Technology, Ltd 2817 Losey Blvd. S. La Crosse, WI 54601 We recommend that you replace the batteries regularly to ensure optimum accuracy of this unit. Help us to keep our environment clean. Please do not dispose of old electronic devices and empty batteries in household waste. To protect the environment, take them to your retail store or to appropriate collection sites according to national or local regulations. Online: www.lacrossetechnology.com/support All rights reserved. This handbook must not be reproduced in any form, even in excerpts, or duplicated or processed using electronic, mechanical or chemical procedures without written permission of the publisher. This handbook may contain mistakes and printing errors. The information in this handbook is regularly checked and corrections made in the next issue. We accept no liability for technical mistakes or printing errors, or their consequences. All trademarks and patents are acknowledged. INTENDED USAGE AND SAFETY Keep the instrument in a dry place. Do not expose the instrument to extreme temperatures, vibration or shock. Clean it with a soft damp cloth. Do not use solvents or scouring agents. If the unit does not work properly, change the battery. The product is not a toy. Keep it out of reach of children. The product is not to be used for medical purpose or for public information, but is determined for home use only. The specifications of this product may change without prior notice. Improper use or unauthorized opening of housing will void the warranty. EJMA8100L210 Printed in China 2