1
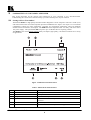
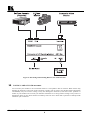
Kramer Electronics, Ltd.
USER MANUAL
Composite to Y/C Decoder/Switcher
Model: 401Dxl
IMPORTANT: Before proceeding, please read paragraph entitled
"Unpacking and Contents"
KRAMER ELECTRONICS LTD.
PN: 2900-009004
Table Of Contents
Section
1
1.1
1.2
2
3
4
4.1
5
5.1
6
6.1
7.
8.
8.1
8.2
9.
9.1
10
11
11.1
11.2
Name
Page
INTRODUCTION
A Word on Format Interfaces
Factors Affecting Quality of Results
SPECIFICATIONS
HOW DO I GET STARTED?
UNPACKING AND CONTENTS
Optional Accessories
COMPOSITE TO Y/C DECODER / SWITCHER
Getting to Know your 401Dxl
INSTALLATION
Rack Munting
CONNECTING TO VIDEO DEVICES
USING THE MACHINE
Turning On the Machine
Composite / YC Video Selection
TYPICAL APPLICATIONS
Interfacing and Switching Between Two Video Formats
TAKING CARE OF YOUR MACHINE
TROUBLESHOOTING
Power and Indicators
Video Signal
Limited Warranty
3
3
4
4
5
5
5
6
6
7
7
7
7
7
7
7
7
8
9
9
9
10
List Of Illustrations
Figure
1
2
Page
401Dxl Front Panel Features
Interfacing and Switching Between Two Video Formats
5
7
List Of Tables
Table
1
2
Page
Factors Affecting Quality of Results
401Dxl Front Panel Features
3
5
Kramer Electronics Ltd.
2
1
INTRODUCTION
Congratulations on your purchase of this Kramer Electronics format interface. Since 1981, Kramer has been
dedicated to the development and manufacture of high quality video/audio equipment. The Kramer line has
become an integral part of many of the best production and presentation facilities around the world. In recent
years, Kramer has redesigned and upgraded most of the line, making the best even better. Kramer’s line of
professional video/audio electronics is one of the most versatile and complete available, and is a true leader in
terms of quality, workmanship, price/performance ratio and innovation. In addition to the Kramer line of high
quality format interfaces, such as the one you have just purchased, Kramer also offers a full line of high quality
distribution amplifiers, switchers, processors, controllers and computer-related products. This manual includes
configuration, operation and option information for the 401Dxl.
1.1
A Word on Format Interfaces
There are several video signal formats: Composite, Y/C, YUV (Y, R-Y, B-Y), RGB (S) analog and digital.
Component analog video formats (YUV and RGB) are unmodulated signals, where the signal level represents
the signal intensity, (e.g., 1 Volt of “Y” signal represents a maximum white level). Converting from YUV to
RGB and vice versa does not involve modulation, and requires mainly an accurate matrix system. Composite
video and Y/C (Super Video) contains chrominance (color) information, which is a modulated signal using the
color subcarrier (3.58MHz in NTSC, 4.43MHz in PAL) as the carrier signal. Converting between Composite
video and Y/C involves adding or separating the color information to or from the luminance information. To
convert from Composite and Y/C to Component video, a color encoder or color decoder is needed, with very
complicated circuitry. The color encoder receives the component signal, and must create a chrominance signal
by extracting the blue and red information from the component video signal and modulating this information
using the color subcarrier signal. The color decoder does the opposite: it removes the color subcarrier and
extracts the color difference signals to create the video “components”.
The following format interfaces exist in Kramer’s line:
Video Decoders - used to decode (convert) a composite video signal to Y/C and to decode a composite
or Y/C signal to RGBS and/or Y, R-Y, B-Y.
Video Encoders - used to create a chrominance signal from video components, e.g., to convert RGBS
and/or Y, R-Y, and B-Y signals to composite video and Y/C.
Video Transcoders - bi-directional converters operating simultaneously in different directions, such as
converting from RGBS to Y, R-Y, and B-Y in both directions in the same machine, going from
composite to Y/C, bi-directionally or performing color decoding and encoding in the same machine at
the same time.
Audio Transcoders - used in audio and video production studios for converting from unbalanced lowlevel audio to balanced high-level audio, bi-directionally.
Kramer Electronics Ltd.
3
1.2
Factors Affecting Quality of Results
There are many factors affecting the quality of results when signals are transmitted from a source to an acceptor
as described in Table 1:
Table 1: Factors Affecting Quality of Results
FACTOR
2
EFFECT
Connection cables
Low quality cables are susceptible to interference; they degrade signal
quality due to poor matching and cause elevated noise levels. They should
therefore be of the best quality.
Sockets and connectors
of the sources and
acceptors
So often ignored, they should be of highest quality, since "Zero Ohm"
connection resistance is the objective. Sockets and connectors must also
match the required impedance (75ohm in video). Cheap, low quality
connectors tend to rust, thus causing breaks in the signal path
Amplifying circuitry
Must have quality performance when the desired end result is high
linearity, low distortion and low noise operation
Distance between
sources and acceptors
Plays a major role in the final result. For long distances between sources
and acceptors, special measures should be taken in order to avoid cable
losses. These include using higher quality cables or adding line
amplifiers.
Interference from
neighboring electrical
appliances
These can have an adverse effect on signal quality. Balanced audio lines
are less prone to interference, but unbalanced audio should be installed far
from any mains power cables, electric motors, transmitters, etc. even
when the cables are shielded
SPECIFICATIONS
401Dxl
Configuration
Inputs
Outputs
Controls
Video Bandwidth
Nonlinearity
Crosstalk
Coupling
Differential Gain
Differential Phase
K-Factor
Luma S/N Ratio
Maximal Input
Dimensions (W, D, H)
Weight
Power Source
Decoder / Switcher
1 Composite Video, 1Vpp/75 ohm on a BNC,
1 s-Video on a 4P connector, Y: 1Vpp/75ohm,
C: 0.3Vpp/75ohm.
1 s-Video on a 4P connector, Y: 1Vpp/75ohm,
C: 0.3Vpp/75ohm.
Input selector Switch.
3.7 MHz -3dB (CV in - YC out); >800 MHz -3dB (YC in - YC out).
0.5%.
-56 dB @ 5 MHz.
AC (CV to YC); DC (YC to YC)
0.9 %.
0.5 Deg.
2.1 % (Y/C to CV).
69 dB.
1.4 Vpp / 75 ohm, Composite; >4Vpp / 75 ohm YC.
12 x 7.5 x 2.5 (cm)
4.7" x 2.95" x 0.98" (W, D, H.)
0.3kg. (0.56 lbs.) Approx.
12VDC, 90 mA.
Kramer Electronics Ltd.
4
3
HOW DO I GET STARTED?
The fastest way to get started is to take your time and do everything right the first time. Taking 15 minutes to
read the manual may save you a few hours later. You don’t even have to read the whole manual. If a section
doesn’t apply to you, you don’t have to spend your time reading it.
4
UNPACKING AND CONTENTS
The items contained in your Kramer format interface package are listed below. Please save the original box and
packaging materials for possible future shipment.
4.1
Format Interface
User Manual
DC Power Supply
Kramer Concise Product Catalog
4 Rubber Feet
Mounting Brackets
Optional Accessories
The following accessories, which are available from Kramer, can enhance implementation of your machine. For
information regarding cables and additional accessories, contact your Kramer dealer.
Rack Adapter - Used to adapt smaller machines to a standard 1U rack. One or more machines may be
installed on each adapter.
105S - (1:5 s-Video Distribution Amplifier) can be serially connected between the format interface and an
acceptor for s-Video distribution. The 105S splits a single s-Video input source into five identical outputs.
The 105S uses an external 12VDC power source, and therefore is suitable for field work as well. The
105S uses state of the art technology and microchip design, boasting a signal bandwidth of over 230MHz,
thus making it suitable for the most demanding applications.
SP-11 - (Video/Audio Processor) can be serially connected between the video/audio source and the format
interface for video and audio control/correction. The machine provides camera control and
luminance/white balance correction. It is also capable of performing composite to Y/C conversion and bidirectional transcoding. The machine allows full control over the video signal: video gain down to full
fade, log or linear definition control, log or linear contrast control, color saturation control, black level
control, red, green and blue controls and a screen splitter control for “before-after” comparison. The Input
switch control is "audio-follow-video".
VIDEO TESTER - A new, unique, patented, indispensable tool for the video professional, the Video
Tester is used to test a video path leading to/from an amplifier. By pressing only one touch switch it can
trace missing signals, distinguish between good and jittery (VCR sourced) signals, and identify the
presence of good signals. Whenever a video signal is missing, because of bad connections, cable breaks or
faulty sources, the Video Tester is all you need.
Kramer Electronics Ltd.
5
5
COMPOSITE TO Y/C DECODER / SWITCHER
This section describes all the controls and connections of your composite to Y/C decoder/switcher.
Understanding the controls and connections helps you realize the full power of your machine.
5.1
Getting to Know Your 401Dxl
The Kramer 401Dxl is a high quality decoder/switcher designed to convert composite video into s-Video (Y/C)
and switch between the converted Composite input and an additional Y/C input to one output. It is an excellent
compatibility solution for many applications, especially for presentation applications where two different
formats must be switched to one acceptor. The 401Dxl has full compensation for Y/C delay, and comes with a
12V power supply. The optional VA-50P can power up to six Kramer devices requiring 12VDC.
The 401Dxl is part of the Kramer TOOLS family of compact, high quality, cost effective solutions for a variety
of applications.
Figure 1: 401Dxl Front Panel Features
Table 1: 401Dxl Front Panel Features
No.
Feature
1.
2.
3.
4.
Y/C OUT
Y/C IN
Composite IN
Input Selector
5.
6.
ON LED
12VDC feed connector
Function
A 4P output connector.
A 4P input connector.
Composite video input on a BNC connector.
Input selector switch – Composite video when released, Y/C when
pressed-in.
Lights when power is connected.
A DC connector that allows power to be supplied to the unit.
Kramer Electronics Ltd.
6
6
INSTALLATION
6.1
Rack Mounting
The Kramer 401Dxl may be rack mounted in a standard 19” (1U) EIA rack assembly, using a special TOOLS
Adapter (1U or 3U) and two mounting brackets (see section 4.1). They can be also table mounted using the
mounting brackets provided. These devices do not require any specific spacing above or below the unit for
ventilation. To mount any of the machines, follow the installation instructions enclosed with the machine.
7
CONNECTING TO VIDEO DEVICES
Video sources and output devices (such as monitors, projectors or recorders) may be connected to the machine
through the BNC and/or 4P type connectors located on the back of the unit. Unused inputs are terminated to
75ohm, and active inputs should be terminated by the connecting source. All signal connections that use more
than one cable interconnecting between devices should be of equal length.
8
USING THE MACHINE
8.1
Turning on the Machine
NOTES
1)
2)
1)
2)
8.2
The machine should only be turned on after all connections are
completed and all source devices have been turned on. Do not
attempt to connect or disconnect any video, audio or control
signals to the machine while it is turned on!
The socket-outlet should be near the equipment and should be
easily accessible. To fully disconnect equipment, remove
power cord from socket.
Connect the machine's DC socket to the power supply (provided with the machine). Observe proper
polarity! Note that the LED on the panel is illuminated.
Operate the source and the acceptors.
Composite / YC Video Selection
Selecting either Composite or Super video as input is simply done by using the INPUT SELECTOR switch on
the front of the machine. When the input selector is pressed-in, the Y/C INPUT is selected as the source (passed
through.) When the switch is released, the Composite Video input is selected as the source to be decoded by the
machine to Y/C.
9
TYPICAL APPLICATIONS
9.1
Interfacing and Switching Between Two Video Formats
The 401Dxl can be used, for example, for conversion from composite video to Y/C for studio and presentation
applications as follows:
1. Connect a composite video source to the Composite IN connector of the 401Dxl.
2. Connect an Y/C acceptor to the Y/C OUT connector of the 401Dxl (Video projector, VCR, Y/C monitor
etc.)
3. Connect an Y/C video source to the YC IN connector of the 401Dxl.
4. Connect the 401Dxl to an appropriate 12VDC power supply, with proper polarity.
5. Select with the INPUT SELECTOR switch whether you need the machine as decoder (Composite video
input selected) or a switcher (Y/C input selected).
6. Operate sources, acceptors and the 401Dxl.
Kramer Electronics Ltd.
7
Figure 2: Interfacing and Switching Between Two Video Formats
10
TAKING CARE OF YOUR MACHINE
Do not locate your machine in an environment where it is susceptible to dust or moisture. Both of these may
damage the electronics, and cause erratic operation or failure. Do not locate your machine where temperature
and humidity may be excessive. Doing so may also damage the electronics, and cause erratic operation or
failure of your machine. Do not clean your machine with abrasives or strong cleaners. Doing so may remove or
damage the finish, or may allow moisture to build up. Take care not to allow dust or particles to build up inside
unused or open connectors.
Kramer Electronics Ltd.
8
11
TROUBLESHOOTING
NOTES
Please note that if the output signal is disturbed or interrupted by very strong external electromagnetic
interference, it should return and stabilize when such interference ends. If not, turn the power switch off and on
again to reset the machine.
If the following recommended actions do not result in satisfactory operation, please consult your KRAMER
Dealer.
11.1 Power and Indicators
Problem
No Power
Remedy
1.
Confirm that power connections are secured at the machine and at the
receptacle. Make sure the receptacle is active, outputting the proper voltage.
2.
If there is still no power use a Philips screwdriver to remove screws on both
sides of the machine and release the panel.
3.
Locate fuse inside your machine. Confirm that the fuse is good by looking
for the wire connected between the ends of the fuse. If this wire is broken,
replace fuse with another, with the same rating.
4.
Install cover and tighten the Philips screws.
11.2 Video Signal
Problem
No video at the output
device
Video level is too high or
too dim.
Noise bars are "rolling"
up or down in the output
image
or:
Low Frequency Hum in
the output signal
Remedy
5.
Confirm that your source and output devices are turned on and connected
properly. The input of your machine should be of an identical signal format to
the output of your source. Signals at the output of your machine should be of
an identical signal format as at the input of your display.
6. Confirm that any other device in the signal path have the proper input and/or
output selected.
7. Use the Video Tester to test the video path leading to/from your machine (see
section 4.1"Video Tester")
8. Verify that the lines are well matched through 75ohm impedances.
9. Confirm that the connecting cables are of high quality and properly inserted.
10. Check level controls located on your source input device or output display.
Hum bars (ground loop) are caused by a difference in the ground potential of any
two or more devices connected to your signal path. This difference is
compensated by passing that voltage difference through any available
interconnection, including your video cables.
WARNING!
Do not disconnect the ground from any piece of
video equipment in your signal path!
Check the following to remove hum bars:
1. Confirm that all interconnected equipment is connected to the same phase
of power, if possible.
2. Remove equipment connected to that phase that may introduce noise, such
as motors, generators, etc.
3. Disconnect all interconnect cables and reconnect them one at a time until
ground loop reappears. Disconnect the affected cable and replace, or insert
an isolation transformer in the signal path.
Kramer Electronics Ltd.
9
LIMITED WARRANTY
Kramer Electronics (hereafter Kramer) warrants this product free from defects in material and workmanship
under the following terms.
HOW LONG IS THE WARRANTY
Labor and parts are warranted for three years from the date of the first customer purchase.
WHO IS PROTECTED
Only the first purchase customer may enforce this warranty.
WHAT IS COVERED AND WHAT IS NOT COVERED
Except as below, this warranty covers all defects in material or workmanship in this product. The following are
not covered by the warranty:
1)
2)
3)
Any product which is not distributed by Kramer, or which is not purchased from an authorized Kramer
dealer. If you are uncertain as to whether a dealer is authorized, please contact Kramer at one of the
agents listed in the web site www.kramerelectronics.com.
Any product, on which the serial number has been defaced, modified or removed.
Damage, deterioration or malfunction resulting from:
a) Accident, misuse, abuse, neglect, fire, water, lightning or other acts of nature.
b) Product modification, or failure to follow instructions supplied with the product.
c)
Repair or attempted repair by anyone not authorized by Kramer.
d) Any shipment of the product (claims must be presented to the carrier).
e)
Removal or installation of the product.
f)
Any other cause, which does not relate to a product defect.
g) Cartons, equipment enclosures, cables or accessories used in conjunction with the product.
WHAT WE WILL PAY FOR AND WHAT WE WILL NOT PAY FOR
We will pay labor and material expenses for covered items. We will not pay for the following:
1)
2)
3)
Removal or installations charges.
Costs of initial technical adjustments (set-up), including adjustment of user controls or programming.
These costs are the responsibility of the Kramer dealer from whom the product was purchased.
Shipping charges.
HOW YOU CAN GET WARRANTY SERVICE
1)
2)
3)
To obtain service on you product, you must take or ship it prepaid to any authorized Kramer service
center.
Whenever warranty service is required, the original dated invoice (or a copy) must be presented as proof
of warranty coverage, and should be included in any shipment of the product. Please also include in any
mailing a contact name, company, address, and a description of the problem(s).
For the name of the nearest Kramer authorized service center, consult your authorized dealer.
Kramer Electronics Ltd.
10
LIMITATION OF IMPLIED WARRANTIES
All implied warranties, including warranties of merchantability and fitness for a particular purpose, are limited
in duration to the length of this warranty.
EXCLUSION OF DAMAGES
Kramer’s liability for any defective products is limited to the repair or replacement of the product at our option.
Kramer shall not be liable for:
1)
2)
Damage to other property caused by defects in this product, damages based upon inconvenience, loss of
use of the product, loss of time, commercial loss; or:
Any other damages, whether incidental, consequential or otherwise. Some countries may not allow
limitations on how long an implied warranty lasts and/or do not allow the exclusion or limitation of
incidental or consequential damages, so the above limitations and exclusions may not apply to you.
This warranty gives you specific legal rights, and you may also have other rights, which vary from place to
place.
NOTE: All products returned to Kramer for service must have prior approval. This may be obtained from your
dealer.
NOTICE
This equipment has been tested to determine compliance with the requirements of:
EN-50081:
EN-50082:
CFR-47
"Electromagnetic compatibility (EMC);
generic emission standard.
Part 1: Residential, commercial and light industry"
"Electromagnetic compatibility (EMC) generic immunity standard. Part 1:
Residential, commercial and light industry environment".
FCC Rules and Regulations:
Part 15- “Radio frequency devices:
Subpart B- Unintentional radiators”
CAUTION!
⌦
⌦
⌦
Servicing the machines can only be done by an authorized Kramer technician. Any user who makes
changes or modifications to the unit without the expressed approval of the manufacturer will void user
authority to operate the equipment.
Use the supplied DC power supply to feed power to the machine.
Please use recommended interconnect cables to connect the machine to other components.
Kramer Electronics Ltd.
11
The list of Kramer distributors appears on our web site:
www.kramerelectronics.com
From the web site it is also possible to e-mail factory headquarters.
We welcome your questions, comments and feedback.
Kramer Electronics Ltd.
3 Am VeOlamo Street. Jerusalem 95463, Israel Tel: (972-2)-654-4000. Fax: (972-2)-653-5369
e-mail: [email protected]