1
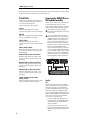
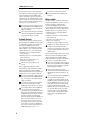
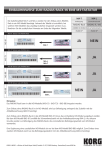
Function added in system version 2.0 E 1 RADIAS synthesizer/vocoder RADIAS operating system version 2.0 adds the following functions. Please read this document in conjunction with the “RADIAS owner’s manual” included with your RADIAS or RADIAS-R. Virtual Patch RADIAS version 2.0 adds the following parameters as virtual patch modulation destinations. This allows you even greater sound-making diversity. ☞p.92 P11 PATCH page “Dest (Destination)” Portamnto Modulation will be applied to the “Portamnto” (portamento time) parameter of the P05–1: PITCH page. OSC1Ctrl2 Modulation will be applied to the “Control2” parameter of the P06–1: OSC/MIXER - OSC1 tab page. Filt1EG1, Filt1KTrk Modulation will be applied to the “EG1 Int” or “KeyTrack” parameter of the P07–1: FILTER - FILTER1 tab page. Filt2Reso, Filt2EG1, Filt2KTrk Modulation will be applied to the “Resonance,” “EG1 Int,” or “KeyTrack” parameter of the P07–2: FILTER FILTER2 tab page. EG1Attack, EG1Decay, EG1Sustain, EG1Releas Modulation will be applied to the “Attack,” “Decay,” “Sustain,” or “Release” parameter of the P09–1: EG EG1 tab page. EG2Attack, EG2Decay, EG2Sustain, EG2Releas Modulation will be applied to the “Attack,” “Decay,” “Sustain,” or “Release” parameter of the P09–2: EG EG2 tab page. Connecting the RADIAS-R to an M3 keyboard assembly RADIAS version 2.0 allows you to connect the RADIAS tone module (RADIAS-R) to the 61/73/88-key keyboard assembly used by the M3 music workstation/ sampler, and play the RADIAS-R from that keyboard. When using the 61-key keyboard assembly, keyboard aftertouch and the ribbon controller will not be available. If you’re connecting the RADIAS-R to the 73/88key keyboard assembly, connect the M3-M to the TO MODULE connector, and the RADIAS-R to the TO MODULE (2nd) connector (see illustration below). If you connect the RADIAS-R to the TO MODULE connector, the keyboard’s aftertouch and ribbon controller will not be available, and the M3-M connected to the TO MODULE (2nd) connector may malfunction because of aftertouch. If you’re connecting the RADIAS-R by itself to the 73/88-key keyboard assembly, connect it to the TO MODULE connector (don’t use the TO MODULE (2nd) connector). In this case too, the keyboard’s aftertouch and ribbon controller cannot be used. M3-M EG3Attack, EG3Decay, EG3Sustain, EG3Releas TO MODULE Modulation will be applied to the “Attack,” “Decay,” “Sustain,” or “Release” parameter of the P09–3: EG EG3 tab page. Patch1Int, Patch2Int, Patch3Int, Patch4Int, Patch5Int, Patch6Int Modulation will be applied to the “Intensity” parameter of the P11: PATCH-P1 – PATCH-P6 tab pages. RADIAS-R TO MODULE(2nd) Keyboard Assembly 73/88 Joystick X axis This will operate in the same way as the PitchBend wheel of the RADIAS-KB. Moving the joystick in the X direction (left/right) will apply a pitch bend effect according to the “BendRange” setting of the Program Edit mode P05: PITCH page, and pitch bend change messages will be transmitted on the MIDI channel of the timbre selected by TIMBRE SELECT. When pitch bend change messages are received, the result will be the same as when you operate the joystick. If you want to apply a pitch bend effect, set the Program Edit mode P03–4: TIMBRE-MIDI tab page “PBnd” parameter to “O” (Enable). Make this setting for each timbre. If you want pitch bend change messages to be received and transmitted, set the Global mode P06: MIDI FILTER page “PitchBend” parameter to “O” (Enable). 2 Function added in system version 2.0 If you want to use the joystick X-axis (left/right) as a modulation source for another parameter, set the following parameters to P.Bend according to the parameter that you want to control. • Virtual patch P11 PATCH “Source” (RADIAS owner’s manual p.91) • Vocoder P07: FILTER “FcModSrc” (RADIAS owner’s manual p.105) • Effect control source (St.Filter “Ctrl Src,” etc.; RADIAS owner’s manual p.125) In these cases, the parameter will be controlled with mm=64 and bb=00 as 0 (the center value), in a range of -127 to +127 (received on the MIDI channel of the timbre). +Y axis This will operate in the same way as the Modulation wheel of the RADIAS-KB. Moving the joystick in the +Y direction will apply a vibrato effect from LFO2 according to the “VibratInt” setting of the Program Edit mode P05: PITCH page, and modulation depth (CC#01) will be transmitted on the MIDI channel of the timbre selected by TIMBRE SELECT. When CC#01 is received, the result will be the same as when you operate the joystick. If you want to apply a vibrato effect by moving the joystick in the +Y direction, set the Program Edit mode P03–5: TIMBRE CC-A tab page “Cntrl” parameter to “O” (Enable). Make this setting for each timbre. If you want MIDI control change messages to be transmitted and received, set the Global mode P06: MIDI FILTER page parameter “Ctrl Chg” to “O” (Enable). If you want to use the joystick +Y axis as a modulation source for another parameter, set the following parameters to M.Wheel according to the parameter that you want to control. • Virtual patch P11 PATCH “Source” (RADIAS owner’s manual p.91) • Vocoder P07: FILTER “FcModSrc” (RADIAS owner’s manual p.105) • Effect control source (St.Filter “Ctrl Src,” etc.; RADIAS owner’s manual p.125) –Y axis By setting one of the Global mode P04: MIDI page parameters “MIDI1”–“MIDI5” to #002, you can use the –Y axis of the joystick as the following sources. • Modulation source for a virtual patch (RADIAS owner’s manual p.91) • Modulation source for the vocoder filter (RADIAS owner’s manual p.105) • Effect control source (St.Filter “Ctrl Src,” etc.; RADIAS owner’s manual p.125) With the factory settings, “MIDI2” is set to #002. When you operate the joystick in the –Y direction, control change CC#02 will be transmitted on the MIDI channel of the timbre you’ve selected. When CC#02 is received, the result will be the same as when you operate the joystick. If you want to use the joystick –Y axis to apply an effect, set the Program Edit mode P03–5: TIMBRE CC-A tab page “Cntrl” parameter to “O” (Enable). Make this setting for each timbre. If you want MIDI control change messages to be transmitted and received, set the Global mode P06: MIDI FILTER page parameter “Ctrl Chg” to “O” (Enable). SW1/SW2 By setting one of the Global mode P04: MIDI page parameters “MIDI1”–“MIDI5” to #080 (SW1) or #081 (SW2), you can use SW1 or SW2 as a source for the following: • Modulation source for a virtual patch (RADIAS owner’s manual p.91) • Modulation source for the vocoder filter (RADIAS owner’s manual p.105) • Effect control source (St.Filter “Ctrl Src,” etc.; RADIAS owner’s manual p.125) With the factory settings, “MIDI3” is set to #080 and “MIDI4” is set to #081. On the RADIAS-R, SW1/SW2 operate only in toggle mode. The on/off status will alternate each time you press the switch. When you change programs, the switch will be reset to the “off” state. The lit/unlit status of the switch will depend on the connector to which you’ve connected the unit. If the RADIAS-R is connected to the TO MODULE connector If you connect the RADIAS-R to the TO MODULE connector of the 61-key or 73/88 key keyboard assembly, the status of the switch will match the operation of the RADIAS-R. The switch will be lit when on, and dark when off. If the RADIAS-R is connected to the TO MODULE (2nd) connector On the 73/88-key keyboard assembly, the status of the switch will reflect the setting of the module connected to the TO MODULE connector, but will not reflect the status of the module connected to the TO MODULE (2nd) connector. When you operate the module connected to the TO MODULE (2nd) connector, you’ll need to be aware of the lit/dark state of the switch. If the program etc. of the M3-M connected to the TO MODULE connector was written into memory with an SW1/SW2 setting of Toggle or Off, the switch status will match the operation of the RADIAS-R connected to the TO MODULE (2nd) connector. The on/off status of the switch cannot be saved in the RADIAS-R program. 3 RADIAS synthesizer/vocoder When you operate a switch, a control change CC#80 (SW1) or CC#81 (SW2) will be transmitted on the MIDI channel of the timbre selected by TIMBRE SELECT. Switch-on will transmit a value of 127, and switch-off will transmit a value of 0. When CC#80 (SW1) or CC#81 (SW2) are received, the on/off status of the switch will change. A value of 64 or higher will turn the switch on, and a value of 63 or lower will turn it off. If you want to apply an effect using SW1/SW2, set the Program Edit mode P03–5: TIMBRE CC-A tab page “Cntrl” parameter to “O” (Enable). Make this setting for each timbre. If you want control change messages to be transmitted and received, set the Global mode P06: MIDI FILTER page parameter “Ctrl Chg” to “O” (Enable). Keyboard aftertouch Aftertouch from the keyboard is available only if the M3-M is connected to the TO MODULE connector of the 73/88-key keyboard assembly, or if the RADIAS-R is connected to the TO MODULE (2nd) connector. If one of the Global mode P04: MIDI page parameters “MIDI1”–“MIDI5” are set to A.Touch, you’ll be able to use keyboard aftertouch as a source for the following: • Modulation source for a virtual patch (RADIAS owner’s manual p.91) • Modulation source for the vocoder filter (RADIAS owner’s manual p.105) • Effect control source (St.Filter “Ctrl Src,” etc.; RADIAS owner’s manual p.125) With the factory settings, “MIDI5” is set to A.Touch. When you apply keyboard aftertouch, channel aftertouch messages will be transmitted on the MIDI channel of the timbre that is selected in TIMBRE SELECT. When channel aftertouch is received, the result will be the same as when you operate the keyboard. If you want to use aftertouch to apply an effect, set the Program Edit mode P03–4: TIMBRE-MIDI tab page “AT” parameter to “O” (Enable). Make this setting for each timbre. If you want aftertouch messages to be transmitted and received, set the Global mode P06: MIDI FILTER page parameter “Ctrl Chg” to “O” (Enable). If you connect the RADIAS-R to the TO MODULE connector, the keyboard’s aftertouch will be unavailable. If you connect the RADIAS-R to the TO MODULE connector and the RADIAS-R or M3-M to the TO MODULE (2nd) connector, not only will the keyboard’s aftertouch be unavailable, but the RADIAS-R or M3-M connected to the TO MODULE (2nd) connector may malfunction when you use aftertouch. If you make connections in this way, please disable aftertouch reception on the RADIASR or M3-M that is connected to the TO MODULE (2nd) connector. (In the Program Edit mode P03–4: TIMBRE-MIDI tab page, set “AT” to “x”.) 4 The aftertouch sensitivity of the 73/88-key keyboard assembly cannot be adjusted on the RADIAS-R. Ribbon controller The ribbon controller is available only if the M3-M is connected to the TO MODULE connector of the 73/88key keyboard assembly, or if the RADIAS-R is connected to the TO MODULE (2nd) connector. If one of the Global mode P04: MIDI page parameters “MIDI1”–“MIDI5” are set to #016±, you’ll be able to use the ribbon controller as a source for the following: • Modulation source for a virtual patch (RADIAS owner’s manual p.91) • Modulation source for the vocoder filter (RADIAS owner’s manual p.105) • Effect control source (St.Filter “Ctrl Src,” etc.; RADIAS owner’s manual p.125) With the factory settings, “MIDI1” is set to #016. If “MIDI1” is set to #016, the effect may not return to 0 when you take your hand off the ribbon controller. If you want the effect to return to 0 when you take your hand off the ribbon controller, set “MIDI1” to #016±. When you operate the ribbon controller, control change CC#16 messages will be transmitted on the MIDI channel of the timbre that is selected in TIMBRE SELECT. When CC#16 is received, the result will be the same as when you operate the ribbon controller. If you want to use the ribbon controller to apply an effect, set the Program Edit mode P03–5: TIMBRE CC-A tab page “Cntrl” parameter to “O” (Enable). Make this setting for each timbre. If you want control change messages to be transmitted and received, set the Global mode P06: MIDI FILTER page parameter “Ctrl Chg” to “O” (Enable). If you connect the RADIAS-R to the TO MODULE connector, the ribbon controller will be unavailable. If you connect the RADIAS-R to the TO MODULE connector and the RADIAS-R or M3M to the TO MODULE (2nd) connector, not only will the ribbon controller be unavailable, but the RADIAS-R or M3-M connected to the TO MODULE (2nd) connector may malfunction when you operate the ribbon controller. If you make connections in this way, please disable ribbon controller reception on the RADIAS-R or M3-M that is connected to the TO MODULE (2nd) connector. Function added in system version 2.0 Global parameters So that you can connect the RADIAS to the 61-key/73key/88-key keyboard assembly used by the M3 music workstation/sampler and play the RADIAS from that keyboard, RADIAS version 2.0 adds the following functions as choices that can be selected in “MIDI1”– “MIDI5” (☞p.117 P04–1: MIDI page “MIDI1”– “MIDI5”). MIDI settings when using an M3-M and RADIAS-R together MIDI OUT M3-M MIDI IN RADIAS-R #016± (CC#16±) Select this if you want to use the ribbon controller of the keyboard assembly as a modulation source for the virtual patch. The ribbon controller will produce a control change value of 64 when you release your hand. When using the ribbon controller of the 73-key or 88-key keyboard assembly, you may not obtain the expected result unless you select #016±. #017± (CC#17±), #019± (CC#19±), #020± (CC#20±), #021± (CC#21±) Select these if you want to use the MIDI control changes transmitted by the four user sliders (Modulation Sliders 5, 6, 7, and 8) of the M3 control surface as modulation sources for virtual patches. For #017±, #019±, #020±, and #021±, the resulting modulation will be zero when the slider etc. is set to the center position (control change value of 064). For #017, #019, #020, and #021, the resulting modulation will be zero when the slider etc. is set to the “0” position (control change value of 0). Select the choice that will give you the desired type of change when you operate the slider or other controller. Monitoring the audio output of the M3-M and RADIAS-R If you would like an easy way to monitor the audio output of the M3-M and RADIAS-R without using a mixer or similar device, connect the RADIAS-R’s MAIN OUT jacks to the M3-M’s AUDIO INPUT jacks, set the M3-M’s rear panel AUDIO INPUT [MIC/LINE] switch to LINE, and set the Global P0: Basic Setup- Audio page “Bus Select” setting to L/R. With these settings, you’ll be able to monitor the sound via the M3-M’s headphone jack (or main output jacks). To adjust the volume, use the M3-M’s rear panel AUDIO INPUT [LEVEL] knob and the RADIAS-R’s [VOLUME] knob. TO MODULE TO MODULE(2nd) Keyboard Assembly 73/88 Preventing the RADIAS-R from double triggering If you have made the connections shown above–for example to synchronize the tempo of the M3-M and the RADIAS-R–messages such as note-on from the TO MODULE (2nd) connector and the MIDI messages from the M3-M’s MIDI OUT connector may cause the RADIAS-R to sound duplicate notes. To prevent this, make the following settings. • RADIAS-R GLOBAL P04–1 MIDI page “Clock”: External MIDI or Auto (RADIAS owner’s manual p.117) • RADIAS-R GLOBAL P04–1 MIDI page “LocalCtrl”: Off (RADIAS owner’s manual p.116) If you turn the RADIAS-R’s local control (“LocalCtrl”) off, note-on messages etc. from the TO MODULE (2nd) connector will not be received. Preventing KARMA generated note data from being received by the RADIAS-R If you have made the connections shown above and are playing an M3-M program or combi that uses KARMA (such as a rhythmic drum program generated by KARMA), the note data from the KARMA module may be transmitted to the RADIAS-R. To prevent this, make the following settings. • M3-M Global P1: MIDI- MIDI Routing page “Enable KARMA Module to MIDI OUT”: Off • RADIAS-R GLOBAL P04–1 MIDI page “LocalCtrl”: On (RADIAS owner’s manual p.116) With these settings, the M3-M will not transmit note data from the keyboard either, so turn the RADIAS-R’s “LocalCtrl” setting On. 5 4015-2 Yanokuchi, Inagi-city, Tokyo 206-0812 Japan 2007 KORG INC.