1
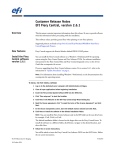
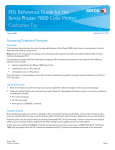
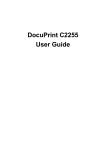
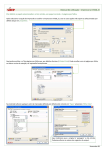
Matchprint Professional Server v3.0 for Xerox DocuColor 12 Printer/Copier Quick Start Part number - KY0730485 Trademarks © 2002 Kodak Polychrome Graphics. All Rights Reserved. Matchprint is a trademark of Kodak Polychrome Graphics. Kodak is a trademark of Eastman Kodak Company. Xerox and DocuColor 12 are trademarks of Xerox Corporation. Pantone and Pantone Matching System are trademarks of Pantone, Inc. All other trademarks and registered trademarks used herein are the property of their respective owners. October 2002. Revision A, MPS v3.0 Matchprint Professional Server for DocuColor 12 Printer/Copier – Quick Start Table of Contents QUICK START STEPS................................................................. 7 STEP 1. STARTING THE SOFTWARE .......................................... 7 STEP 2. PRINTER SETUP ........................................................... 7 STEP 3. PRINTER CALIBRATION ............................................... 9 Spectrocam Setup............................................................................. 10 Calibration Procedure ........................................................................ 10 Scanner................................................................................................... 13 Spectrocam ............................................................................................. 13 Spectrocam TIPs............................................................................... 16 STEP 4. ADDING A SPOOLER .................................................. 17 STEP 5. ADDING A HOT FOLDER ............................................. 19 STEP 6. SETTING PREFERENCES ............................................. 21 STEP 7. INSTALLING PPDS ..................................................... 25 STEP 8. JOB PRINTING ........................................................... 25 2002 Kodak Polychrome Graphics. All Rights Reserved. 3 Matchprint Professional Server for DocuColor 12 Printer/Copier – Quick Start Product Safety and Compliance Warning! Do not modify or use any AC power cord other than the one included with shipping. In some cases, the supplied power cord may not be compatible with the AC wall outlet in your region. If this is true, you must obtain a suitable power cord that meets the following criteria: The cord must be rated for use at the AC voltage available, with a current rating that is at least 125% of the current rating of the product. The AC plug end must be terminated in a grounding-type male plug designed for use in your region. The plug ends must be labeled or marked to indicate they have been certified by an agency acceptable in your region. The connector at the product end must be an IEC 320, sheet C13, female connector (or the equivalent EN 60 320 connector.) The cord must be less than 14.8 feet (4.5 meters) long and, for use in Europe, be created with <HAR> (harmonized) or VDE certified cordage. Warning! 1. The user must never remove chassis covers. Some system circuitry retains voltage even when the system is turned off. Only qualified service technicians should remove chassis covers. 2. There are no user-serviceable components in the KPG server. Refer all system repair to a qualified service technician. Warning! The power supply voltage standby circuit is active when the computer is turned off. Ensure that the computer is disconnected from its power source and from all telecommunication links, networks, or modem lines whenever the chassis cover is removed. Do not operate the computer with the cover removed. Only qualified service technicians should remove chassis covers if repair or component replacement is required. Warning! Danger of explosion if the battery is incorrectly replaced. Replace only with the same or equivalent type recommended by the equipment manufacturer. Discard used batteries according to manufacturer's instructions. 2002 Kodak Polychrome Graphics. All Rights Reserved. 4 Matchprint Professional Server for DocuColor 12 Printer/Copier – Quick Start Sécurité et conformité du produit Avertissement ! Ne modifiez ni n'utilisez aucun câble d'alimentation CA autre que celui qui vous a été livré avec le produit. Il peut arriver, dans certaines régions, que le câble d'alimentation fourni ne soit pas compatible avec la prise de courant murale. Si tel est le cas, procurezvous un câble d'alimentation adapté conforme aux critères suivants : La puissance du câble doit correspondre à la tension CA disponible, avec un courant nominal d'au moins 125 % du courant nominal du produit. Le câble CA doit avoir à son extrémité de branchement une fiche de terre mâle conçue et adaptée pour un usage dans votre région. Les fiches doivent être dotées d'une étiquette indiquant qu'elles ont été certifiées par une agence reconnue dans votre région. Le connecteur à l'extrémité du produit doit être de type femelle IEC 320, blindé C13 (ou équivalent EN 60 320). Le câble doit avoir une longueur maximum de 14,8 pieds (soit 4,5 mètres) et, en Europe, doit avoir été fabriqué à base de filin certifié <HAR> (norme harmonisée) ou VDE. Avertissement ! 1. L'utilisateur ne doit jamais ôter le couvercle du châssis. Certains circuits continuent d'être alimentés lorsque le système est hors tension. Seuls des techniciens de service qualifiés sont habilités à ôter le capot du châssis. 2. Aucun composant du serveur Professional ne peut être réparé par l'utilisateur. Tout dépannage doit être effectué par un technicien de service qualifié. Avertissement ! Le circuit de réserve de tension d'alimentation reste actif lorsque l'ordinateur est éteint. Assurez-vous que l'ordinateur est débranché et que tous les réseaux, liaisons de télécommunications ou lignes de modem sont déconnectés lorsque le couvercle du châssis doit être ôté. Ne tentez jamais de faire fonctionner l'ordinateur tant que le couvercle n'est pas remis en place. Seuls des techniciens de service qualifiés sont habilités à ôter le couvercle du châssis si des réparations s'avèrent nécessaires ou qu'il est indispensable de remplacer des composants. Avertissement ! Danger d'explosion si la batterie n'est pas parfaitement remise en place. Remplacez une batterie usée uniquement par le même type ou un type équivalent recommandé par le fabricant de l'appareil. Mettez les batteries usées au rebut conformément aux instructions du fabricant. 2002 Kodak Polychrome Graphics. All Rights Reserved. 5 Matchprint Professional Server for DocuColor 12 Printer/Copier – Quick Start Service Information Contact your Xerox representative for technical support or product related questions. Agency Approvals U.S. FCC Class A required, FCC Class B preferred UL 1950 standard testing Canada Canadian EMI Class A CSA 950 Europe CISPR 22 Class B CE Mark EN 60950 LUD The radiated and conducted emissions are per EN 55022 class B limits. The radiated and conducted immunity are per EN 55024 class B limits. For European safety, EN60950 under 73/23/EEC, Low Voltage Directive (LVD) amendment is correct. Documentation Online Help Please refer to the Matchprint Professional Server (MPS) online help for more information on using new and existing features of the application. To access the online help, launch the MPS application, then go to Help > Read the User Guide. Printable PDF of User’s Guide There is also a user guide.pdf located on the application’s CD-ROM. 2002 Kodak Polychrome Graphics. All Rights Reserved. 6 Matchprint Professional Server for DocuColor 12 Printer/Copier – Quick Start Quick Start Steps To quickly get your system set up for printing from the client, go through the following procedures listed in the order shown: Steps: 1. Start the Matchprint Professional Server software. 2. Printer Setup. 3. Printer Calibration. 4. Add a Spooler. 5. Add a Hot Folder. 6. Set Preferences. 7. Install PPDs. 8. Job Printing. You should now be able to successfully print from your client application to the DocuColor 12. Step 1. Starting the Software 1. Double-click the Matchprint Professional Server software icon. 2. The Matchprint Professional Server main application window appears. Step 2. Printer Setup The software is shipped to you with the Printer Settings already set. However, you should confirm that the Media Settings (media type and size) for each tray match what is in your DocuColor 12. Note: If the printer is deleted, you will need to perform the following printer setup instructions. To add a printer or change printer settings, complete the following steps: 1. If you have had previous versions of the Matchprint Professional Server on your system, delete previous printers prior to adding new ones. If the system asks you if you want to delete previous files used only with this printer, select Yes. 2. Go to Printer > Add Printer or select Xerox DocuColor 12 (or the name of the printer you need to change). The Printer Settings window displays: 2002 Kodak Polychrome Graphics. All Rights Reserved. 7 Matchprint Professional Server for DocuColor 12 Printer/Copier – Quick Start 3. Confirm the desired Printer Options: Active: Make sure this is checked. This ensures the printer is available to the MPS RIP. More Options... Not currently used. Calibration...: Go to the Printer Calibration section for more information on this topic. Page Alignment...: Contains instructions on how to adjust Page Alignment. CMYK Count, Gray Count, and Proof Count: Displays the current print totals for those categories. The Proof Count can be reset to zero by clicking on the Reset Proof Count button. 4. Confirm the desired Media Settings for each tray and click OK. The contents of each tray can vary from site to site, however standard tray setup is as follows: Tray 1: Media Type - Normal Bond, Media Size - Letter (8.5 x 11 inches) Tray 2: Media Type - Normal Bond, Media Size - Letter SEF (11 x 8.5 inches) Tray 3: Media Type - Normal Bond, Media Size - Legal (8.5 x 14 inches) Tray 4: Media Type - Normal Bond, Media Size - Tabloid (11 x 17 inches) 2002 Kodak Polychrome Graphics. All Rights Reserved. 8 Matchprint Professional Server for DocuColor 12 Printer/Copier – Quick Start Tray 6 (High Capacity Feeder) – Optional: Media Type - Normal Bond, Media Size - Letter (8.5 x 11 inches) Notes: • Tray 5 is a manual feed tray located on the left side of the Xerox DocuColor 12. (Tray 5 is not configured here.) • Load paper so the watermark wording is face down in the tray. • The DocuColor 12 can be set to disable automatic tray switching, however the Matchprint Professional Server overrides this setting if the job's parameters are set to Automatically Select the input tray. Go to the Setting Job Parameters, Printer tab in the online help or the user guide.pdf for more information. Step 3. Printer Calibration KPG recommends daily calibration and recalibration each time the printer is serviced. Calibrate for Bond medias using the following Xerox Color Xpressions media. When using supplied profiles and device links for premium medias, printer calibration must use the Matchprint Co-Branded Xerox Color Laser Proofing Paper. This is the only premium paper authorized by KPG and Xerox to accurately simulate Matchprint color. The Color Profiles and Device Links supplied for normal, heavyweight, and extra heavyweight bond were all created using the following Xerox media: • Normal Bond: Xerox Color Xpressions 24 lb., Bright White 96 paper. • Heavyweight Bond: Xerox Color Xpressions 60 lb., Bright White 96 paper. • Extra Heavyweight Bond: Xerox Color Xpressions 80 lb., Bright White 98 paper. Important! If a media other than the recommended Xerox media is used, the following error appears: “Warning! The media used for calibration appears to be significantly different from the Normal Bond (or Heavyweight) media recommended for used with this application. Results of the calibration on this media may not be typical.” Printer calibration can be performed internally by using the DocuColor 12 built-in scanner or by using the Spectrostar Spectrocam, an external measurement device. Both procedures are described in this section. If calibration is to be performed using the Spectrocam, please go through the following Spectrocam Setup instructions before beginning the calibration process. If calibration is to be performed using the DocuColor 12 scanner, please skip to the section titled, Calibration Procedure. 2002 Kodak Polychrome Graphics. All Rights Reserved. 9 Matchprint Professional Server for DocuColor 12 Printer/Copier – Quick Start Spectrocam Setup 1. Shut down the computer. 2. Connect the Spectrocam to the COM 1 (or appropriate) serial port on the back of the Matchprint Professional Server. 3. Plug the Spectrocam power connector into the AC adapter and then plug the AC adapter into a power outlet. 4. Power on the computer. 5. Launch the Matchprint Professional Server software. Note: Always disconnect the Spectrocam from the AC power supply before removing the Spectrocam from the Matchprint Professional Server. Calibration Procedure 1. From the Printer menu, select XeroxDocuColor 12 (or the name of the printer requiring calibration). The Printer Settings window displays. 2. Click on Calibration to display menu selections Perform Printer Calibration and Printer Calibration Setup. 3. Select Printer Calibration Setup to display the following setup screen: 2002 Kodak Polychrome Graphics. All Rights Reserved. 10 Matchprint Professional Server for DocuColor 12 Printer/Copier – Quick Start 4. Select a specific media, then enter how often the printer requires calibration for that particular media. Repeat this process for each media. The Last Calibration column displays the time elapsed since a particular media has been calibrated. Uncalibrated medias display "n/a" in this column. If the time elapsed is longer than the calibration interval, the "Calibrated?" column will read "No." Note: Selecting the Reset button, nullifies the most recent calibration and returns the selected media to its default setting. 5. Click OK. 6. From the Calibration menu, select Perform Printer Calibration. The following screen appears: Note: The calibration process cannot be started until all active jobs in the queue have finished printing. 2002 Kodak Polychrome Graphics. All Rights Reserved. 11 Matchprint Professional Server for DocuColor 12 Printer/Copier – Quick Start 7. From the Device drop-down list box, choose either the DocuColor 12 Scanner or the Spectrocam Device. 8. From the Media Type drop-down list box, select the media to be calibrated. Note: Transparency media cannot be calibrated. 9. From the Media Size drop-down list box, select the media size on which to print the calibration form. 10. From the Tray drop-down list box, select the input tray containing the specified media. The input tray can be specified if the user wants to calibrate the media contained in a specific tray of the DocuColor 12. An Automatic selection chooses the input tray if no input tray is specified. If ExtraHeavyweight or a KPG/Xerox co-branded media is selected, the input tray defaults to Manual Feed. In this case, the user is not able to change the input tray. 2002 Kodak Polychrome Graphics. All Rights Reserved. 12 Matchprint Professional Server for DocuColor 12 Printer/Copier – Quick Start 11. Click on Print Test Form button. A progress bar appears as the form prints: 12. When the form printing is complete: Go to Scanner for scanner calibration. Go to Spectrocam for Spectrocam calibration. Scanner 1. Place the calibration form on the platen of the DocuColor 12 and click Calibrate. 2. If the calibration is successful, the screen display says, "The calibration process was successful. You may now calibrate another media." 3. Click OK to go back to the calibration window. Note: If the calibration process fails, check to make sure the test page is properly positioned on the platen. The scanable area is 11"x 17". If the calibration test form is outside this area, calibration will fail. Spectrocam 1. Place the test form and ruler on the black scanner plate and position the measurement device on the first patch on the upper, left corner. 2. Click on the Calibrate button. If the Spectrocam was not previously calibrated, a prompt directs you to measure/remeasure the white reference. Place the measurement device on the white target reference and touch the green sensor. After remeasuring the white reference, reposition the measurement device on the first patch on the upper 2002 Kodak Polychrome Graphics. All Rights Reserved. 13 Matchprint Professional Server for DocuColor 12 Printer/Copier – Quick Start left corner of the test form. Important Note on Calibrating the Spectrocam: Each Spectrocam needs to be calibrated against its own unique White Reference Target before taking measurements. The Spectocam and its White Reference have matching serial numbers. For additional information, please see the Spectrocam user documentation. 3. Touch the green sensor and move the device slowly across the first row. When you complete the first row, reposition the Spectrocam over the first patch of the second row and touch the green sensor again to begin measuring the second row. Continue in this fashion until all rows are read. Patches are read from left to right in a slow, steady manner. The color patches appear on the screen as they are measured. It should take approximately 6 to 8 seconds to completely scan one row. If you move too slowly or too rapidly, patches are not read correctly. Within the calibrate dialog an X appears on any patch that is miss-read. If this happens, reposition the device on the first patch of that row and touch the sensor to start the patch reading of that row again. The Instruction box at the top of the window will indicate any action you must take regarding measurement readings. To read the last two rows, you will need to move the test form up so the Spectrocam rests on the black scanner plate. Note: The Spectrocam times out after 10 minutes of inactivity. Instructions appear directing the user to restart the calibration process. If the calibration is successful, the following message appears: "The calibration process was successful. You may now calibrate another media." 2002 Kodak Polychrome Graphics. All Rights Reserved. 14 Matchprint Professional Server for DocuColor 12 Printer/Copier – Quick Start 4. Click on OK to return to the calibration window. 2002 Kodak Polychrome Graphics. All Rights Reserved. 15 Matchprint Professional Server for DocuColor 12 Printer/Copier – Quick Start Spectrocam TIPs Calibrating the Spectocam Make sure the Spectrocam is calibrated with the white target reference that was shipped with your Spectrocam. The serial numbers on the bottom of the white target reference target and the Spectrocam must match. Setting the white reference to a different target can result in inaccurate printed color. When measuring on the white target reference, be sure the device is seated correctly. Scanning the Test Form Make sure the printed test form is properly aligned to the black scan plate. The Spectrocam must start inside the first patch directly in the center. Otherwise, patches will be read incorrectly. Make sure the Spectrocam is securely seated in the guide ruler and not tipped while you read patches. Tipping or miss-aligning the Spectrocam while on the guide ruler will cause errors. The green sensor on top of the Spectrocam responds to transitions from light to dark. The sensor must be activated to measure each row. Inadvertently covering the sensor can prematurely initiate the measurement sequence. Listen for the flashlamp before you move off the first patch. Sometimes there is a slight delay before it begins to measure. Reading patches too rapidly is a common error. Scanning one row should take about 6 to 8 seconds. 2002 Kodak Polychrome Graphics. All Rights Reserved. 16 Matchprint Professional Server for DocuColor 12 Printer/Copier – Quick Start Step 4. Adding a Spooler Creating a spooler allows workstations to see the proofer over the network as a custom printer with its own user definable configurations. Files that are sent to the spooler are automatically entered into the Job Queue for proofing. Note for Windows NT and 2000: At the client Windows machine, either log into the same domain as the Matchprint Professional Server, or connect to the Matchprint Server with a valid user name and password that has a minimum of read access. For security purposes, KPG does NOT recommend enabling the Guest Account. Failure to do so will result in Windows 2000 clients receiving the following error message when trying to print an image: "Could not complete the print command because the selected printer driver could not be found. Please select a printer from the control panel and try again." 1. Go to Input > Add Spooler. The Enter Spooler Name window displays: 2. Enter a spooler name. (This name is what client users will see when they select a printer on the network.) Note: When creating a spooler to be used in a mixed Operating System environment, remember that Windows 98 require the spooler name to be 12 characters or less. (Alpha-numeric characters and spaces are allowed.) 3. Click OK. The Input Method window displays: 4. Make sure Active is checked. (The default setting is for Active to be checked.) 5. Click on the parameter tabs and enter the Spooler configuration. When the file enters this Spooler, it is given these default settings. 6. When parameter information is complete, click OK to apply these settings. Note: For PostScript jobs submitted via a Print File, job parameter settings for Number of Copies, Input Tray and Media Type override the PostScript file codes. For all other settings, the PostScript file settings override the job parameter settings. 2002 Kodak Polychrome Graphics. All Rights Reserved. 17 Matchprint Professional Server for DocuColor 12 Printer/Copier – Quick Start For jobs submitted through a spooler or hot folder, the values in the Postscript file always override the default job parameters for that spooler or hot folder. The spooler will now appear in the drop-down list box under the Input menu selection. You can access and change spooler parameters by selecting it from this list. 2002 Kodak Polychrome Graphics. All Rights Reserved. 18 Matchprint Professional Server for DocuColor 12 Printer/Copier – Quick Start Step 5. Adding a Hot Folder Hot Folders are folders the Matchprint Professional Server software "watches" for incoming job files. When a recognized file is placed into a Hot Folder, it is automatically entered into the job queue for printing. Important! Files are automatically deleted from a Hot Folder after successfully printing. Do not place original files into Hot Folders. Always "copy" files to a Hot Folder. 1. Go to Input > Add Hot Folder. A browser window displays: 2. You may select an existing folder or create a new folder. (Create a new folder by navigating to the location where you want the folder. At the end of the path string type \xxx [where xxx is the new folder name], then click OK. Answer Yes to the question, "Do you want the folder to be created?") The Input Method settings window displays: 3. Make sure Active is checked. (The default setting is for Active to be checked.) 4. Under the More Options button, enter the Poll Interval seconds to set how often this Hot Folder will be checked for jobs. (Default setting is 10 seconds.) 2002 Kodak Polychrome Graphics. All Rights Reserved. 19 Matchprint Professional Server for DocuColor 12 Printer/Copier – Quick Start 5. Click on the parameter tabs to enter Hot Folder custom configurations. When the file enters this Hot Folder, it is given these default settings. Click OK to continue. 6. When all parameter settings are complete, click OK to apply these settings. Note: For PostScript jobs submitted via a Print File, job parameter settings for Number of Copies, Input Tray and Media Type override the PostScript file codes. For all other settings, the PostScript file settings override the job parameter settings. For PostScript jobs submitted through a spooler or hot folder, the values in the PostScript file always override the default job parameters for that spooler or hot folder. The hot folder will now appear in the drop-down list box under the Input menu selection. You can access and change the hot folder parameters by selecting it from this list. 2002 Kodak Polychrome Graphics. All Rights Reserved. 20 Matchprint Professional Server for DocuColor 12 Printer/Copier – Quick Start Step 6. Setting Preferences Go to File > Options > Preferences. The File Preferences dialog box displays. The Preferences dialog contains four tabs: General, Cache, Paths and Roles. General Tab The General tab allows you to customize how sizes are displayed in the File Information and Job Parameters subsets, and to customize the Job Slug Options. Display Units allows you to set inches, centimeters, or pixels. This setting customizes how sizes are displayed in the File Information and Job Parameter subsets. Language allows you to select English, French, Italian, German, or Spanish languages. You need to restart the software for a language change to take affect. Job Slug Options allows you to selectively display document name, user name, media type, color target, page number and job ID. The Job Slug is an optional block of information that can be added to your proofs. (See Setting Job Parameters.) Automatic Media Size Conversion allows US size documents (e.g. Letter, Tabloid, TabloidExtra) to be printed on corresponding metric-sized paper, and visa versa. Select None, Convert Metric to English or Convert English to Metric. Conversion is available for the following page sizes: 2002 Kodak Polychrome Graphics. All Rights Reserved. 21 Matchprint Professional Server for DocuColor 12 Printer/Copier – Quick Start Note: This feature only works for PostScript files. For all other job types, media size must be selected on the Printer tab while setting Job Parameters. Metric Media Size US Media Size A4 Letter A3 Tabloid SRA TabloidExtra Print on Best Available Media allows jobs to print to the next best page size (larger) than the size configured in the printer setup. If Print on Best Available Media is not selected, the job goes into a "waiting for media" status and a message displays indicating what size media the job is expecting. Cache Tab The Cache tab allows you to customize how long files will be kept before being purged based on age, total size, or both. 1. Enter the number of days and/or megabytes the Spooled Job files should be saved. (The default is 14 days or when 2000 MB is exceeded.) When the size limit is exceeded, the fewest possible files (oldest first) are deleted. 2. Enter the number of days and/or megabytes the RIP'ed Job files should be saved. (The default is 14 days or when 2000 MB is exceeded.) When the size limit is exceeded, the fewest possible files (oldest first) are deleted. 2002 Kodak Polychrome Graphics. All Rights Reserved. 22 Matchprint Professional Server for DocuColor 12 Printer/Copier – Quick Start Paths Tab The Paths tab allows you to change the location of Saved Jobs, Temporary Files, RIP'ed Pages and Archive Jobs Default. 2002 Kodak Polychrome Graphics. All Rights Reserved. 23 Matchprint Professional Server for DocuColor 12 Printer/Copier – Quick Start Roles Tab The Roles tab allows you to enable roles for Administrator, Operator, or Guest. Each role allows the user to perform various tasks with the program. Refer to User Roles for more information on Role Management and Role Passwords. • Administrator can perform all functions in the program. A password is required. • Operator can perform most functions except configuration. A password is required. • Guest has read-only access to the program. No password is required. 2002 Kodak Polychrome Graphics. All Rights Reserved. 24 Matchprint Professional Server for DocuColor 12 Printer/Copier – Quick Start Step 7. Installing PPDs Once the software is installed, Postscript Printer Driver (PPD) installation may be necessary to allow client Macintosh or PC computers to properly print to the Xerox DocuColor 12 copier over the network. Refer to the online user information for PPD installation information: 1. Go to Help > Read the User’s Guide. 2. In the navigator bar of the online user information, go to Installing the Software > Installing PPDs on Client Machines. 3. Locate the PPD information for your client machine. Step 8. Job Printing You can print individual jobs from the Matchprint Professional Server, print from a Hot Folder, or print from a Spooler setup on the network. To print to a Hot Folder or Spooler: Simply drag-and-drop the file(s) to the Hot Folder or Spoolers you’ve created. The files will print using the parameter setup you designated. To print a job from the Matchprint Professional Server: 1. Go to File > Print File.. from the menu. A file selection dialog box displays. 2. Browse to the file you want to print, select the file and then click Open. The Print File dialog box displays with the following tabs: 3. Set your parameters or use the default settings. For an explanation of tab information, go to the Setting Job Parameters topic, located in the online help. Notes: For PostScript jobs submitted via a Print File, job parameter settings for Number of Copies, Input Tray and Media Type override the PostScript file codes. For all other settings, the PostScript file settings override the job parameter settings. For jobs submitted through a spooler or hot folder, the values in the Postscript file always override the default job parameters for that spooler or hot folder. Printing Multiple Files To print more than one file: 1. Locate the files on the hard drive and select them. (Use the Shift or Ctrl key to select multiple files.) 2002 Kodak Polychrome Graphics. All Rights Reserved. 25 Matchprint Professional Server for DocuColor 12 Printer/Copier – Quick Start 2. Drag the selected files onto the Professional Server icon or the Job Queue window. A Print File dialog is displayed for the selected files. Select the desired options common to the files and click OK. 3. The files now enter the job queue. Highlight individual jobs and change parameters, if desired. 2002 Kodak Polychrome Graphics. All Rights Reserved. 26 CALL TOLL-FREE 1-877-KPGraphics (1-877-574-7274), EXT. 411 FOR ADDITIONAL INFORMATION. OR VISIT US ON THE WEB AT www.kpgraphics.com Because of our constant endeavor to improve quality and design, modifications may be made to products from time to time. Details of stock availability and specifications given in this publication are subject to change without notice. All weights and dimensions are approximate. © 2002 Kodak Polychrome Graphics. All rights reserved. Prepared and printed using materials manufactured and marketed by Kodak Polychrome Graphics. Matchprint is a trademark of Kodak Polychrome Graphics. Kodak is a trademark of Eastman Kodak Company. Other trademarks and registered trademarks used herein are the property of their respective owners. October 2002. Revision A, MPS V3.0