1
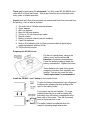
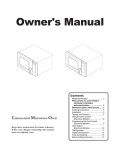
Hi-Fidelity Bedside Clock Radio with iPod dock Model KC-80 Owner’s Manual Audio Systems 11131 Dora St. Sun Valley, CA 91352 The lightning flash with arrowhead symbol, within an equilateral triangle, is intended to alert the user to the presence of un-insulated “dangerous voltage” within the product’s enclosure that may be of sufficient magnitude to constitute a risk of electric shock to persons. The exclamation point within an equilateral triangle is intended to alert the used to the presence of important operating and maintenance (servicing) instructions in the literature accompanying the appliance. IMPORTANT SAFETY INSTRUCTIONS CAUTION • Read all of these instructions. • Save these instructions for later use. • Follow all Warnings and Instructions marked on the equipment. 1) 2) 3) 4) 5) 6) 7) Read Instructions – All the safety and operating instructions should be read before the product is operated. Retain Instructions – The safety and operating instructions should be retained for future reference. Heed Warnings – All warnings on the product and in the operating instructions should be adhered to. Follow Instructions – All operating and use instructions should be followed. Cleaning – Unplug this product from the wall outlet before cleaning. Do not use liquid cleaners or aerosol cleaners. Use a damp cloth for cleaning. Attachments – do not use attachments not recommended by the product manufacturer as they may cause hazards. Water and Moisture – Do not use this product near water – for example, near a bathtub, washbowl, kitchen sink, or laundry tub; in a wet basement; or near a swimming pool and the like. 8) 9) 10) 11) 12) 13) 14) Accessories – Do not place this product on an unstable cart, stand, tripod, bracket, or table. The product may fall, causing serious injury to a child or adult, and serious damage to the product. Use only with a cart, stand, tripod, bracket, or table recommended by the manufacturer, or sold with the product. Any mounting of the product should follow the manufacturer’s instructions, and should use a mounting accessory recommended by the manufacturer. Product and cart combination – A product and cart combination should be moved with care. Quick stops, excessive force, and uneven surfaces may cause the product and cart combination to overturn. Ventilation – Slots and openings in the cabinet are provided for ventilation and to ensure reliable operation of the product and to protect it from overheating, and these openings must not be blocked or covered. The openings should never be blocked by placing the product on a bed, sofa, rug, or other similar surface. This product should not be placed in a built-in installation such as a bookcase or rack unless proper ventilation is provided or the manufacturer’s instructions have been adhered to. Power Sources – This product should be operated only from the type of power source indicated on the marking label. If you are not sure of the type of power supply to your home, consult your product dealer or local power company. For products intended to operate from battery power, or other sources, refer to the operating instructions. Grounding or Polarization – This product may be equipped with a polarized alternating-current line plug (a plug having one blade wider than the other). This plug will fit into the power outlet only one way. This is a safety feature. If you are unable to insert the plug fully into the outlet, try reversing the plug. If the plug should still fail to fit, contact your electrician to replace your obsolete outlet. Do not defeat the safety purpose of the polarized plug. Power Cord Protection – Power-supply cords should be routed so that they are not likely to be walked on or pinched by items placed upon or against them, paying particular attention to cords at plugs, convenience receptacles, and the point where they exit from the product. Outdoor Antenna Grounding – If an outside antenna or cable system is connected to the product, be sure the antenna or cable system is grounded so as to provide some protection against voltage surges and built-up static charges. Article 810 of the National Electrical Code, ANSI/NFPA 70, provides information with regard to proper grounding of the mast and supporting structure, grounding of the lead-in wire to an antenna discharge unit, size of grounding conductors, location of antennadischarge unit, connection to grounding electrodes and requirements for the grounding electrode. Note to CATV system installer: This reminder is provided to call the CATV system installer’s attention to Section 820-40 of the NEC which provides guidelines for proper grounding and, in particular, specifies that the cable ground shall be connected to the grounding system of the building, as close to the point of cable entry as practical. 15) 16) 17) 18) 19) 20) Lightning – For added protection for this product during a lightning storm, or when it is left unattended and unused for long periods of time, unplug it from the wall outlet and disconnect the antenna or cable system. This will prevent damage to the product due to lightning and power-line surges. Power Lines – An outside antenna system should not be located in the vicinity of overhead power lines or other electric light or power circuits, or where it can fall into such power lines or circuits. When installing an outside antenna system, extreme care should be taken to keep from touching such power lines or circuits, as contact with them might be fatal. Overloading – Do not overload wall outlets, extension cords, or integral convenience receptacles as this can result in risk of fire or electric shock. Object and Liquid Entry – Never push objects of any kind into this product through openings as they may touch dangerous voltage points or short-out parts that could result in a fire or electric shock. Never spill liquid or any kind on the product. Servicing – Do not attempt to service this product yourself as opening or removing covers may expose you to dangerous voltage or other hazards. Refer all servicing to qualified service personnel. Damage Requiring Service – Unplug this product from the wall outlet and refer servicing to qualified service personnel under the following conditions: a) when the power-supply cord or plug is damaged b) if liquid has been spilled, or objects have fallen into the product. c) If the product has been exposed to rain or water. d) if the product does not operate normally by following the operating instructions. Adjust only those controls that are covered by the operating instructions as an improper adjustment of other controls may result in damage and will often require extensive work by a qualified technician to restore the product to its normal operation. e) if the product has been dropped or damaged in any way. f) when the product exhibits a distinct change in performance – this indicates a need for service. Replacement Parts – When replacement parts are required, be sure the service technician has used replacement parts specified by the manufacturer or have the same characteristics as the original part. Unauthorized substitutions may result in fire, electric shock, or other hazards. Safety Check – Upon completion of any service or repairs to this product, ask the service technician to perform safety checks to determine that the product is in proper operating condition. Wall or Ceiling Mounting – The product should be mounted to a wall or ceiling only as recommended by the manufacturer. Heat – The product should be situated away from heat sources such as radiators, heat registers, stoves, or other products (including amplifiers) that produce heat. 21) 22) 23) 24) CAUTION • • • • • • • • • DO NOT REMOVE THE EXTERNAL CASES OR CABINETS TO EXPOSE THE ELECTRONICS. NO USER SERVICEABLE PARTS ARE WITHIN! IF YOU ARE EXPERIENCING PROBLEMS WITH THIS PRODUCT, CONTACT KLH FOR A SERVICE REFERRAL. DO NOT USE THE PRODUCT UNTIL IT HAS BEEN REPAIRED. USE OF CONTROLS OR ADJUSTMENTS OR PERFORMANCE OF PROCEDURES OTHER THAN THOSE SPECIFIED HEREIN MAY RESULT IN HAZADOUS RADIATION EXPOSURE. Do not expose this apparatus to drips or splashes. Do not place any objects filled with liquids, such as vases, on the apparatus. Do not install this apparatus in a confined space such as a bookcase or similar unit. The apparatus draws nominal non-operating power from the AC outlet with its POWER switch in the off position. The apparatus should be located close enough to the AC outlet so that you can easily grasp the power cord plug at any time. An apparatus with Class I construction shall be connected to an AC outlet with a protective grounding connection. FCC Statement This equipment has been tested and found to comply with the limits for a Class B digital device, pursuant to Part 15 of the FCC Rules. These limits are designed to promote reasonable protection against harmful interference in a residential installation. This equipment generates, uses, and can radiate radio frequency energy and, if not installed and used in accordance with the instructions, may cause harmful interference to radio communications. However, there is no guarantee that interference will not occur in a particular installation. If this equipment does cause harmful interference to radio or television reception, which can be determined by turning the equipment off and on, the user is encouraged to try to correct the interference by one of more of the following measures: • Reorient or relocate the equipment and/or the receiving antenna. • Increase the separation between the equipment and receiver. • Connect the equipment into an outlet on a circuit different from that to which the receiver is connected. • Consult the dealer or an experienced radio/TV technician for help. CAUTION Changes or modifications to this equipment not expressly approved by KLH for compliance will void the user’s warranty. Thank you for purchasing the musicdock by KLH model KC-80 AM/FM clock radio with iPod dock and remote. With proper care this device should provide many years of reliable operation. Unpack and verify that all accessories are present and have been removed from the packing. Here is what is included: 1. 2. 3. 4. 5. 6. 7. 8. 9. The main unit w/ FM wire antenna attached Power adapter AM Loop antenna Base for AM loop antenna 3.5 mm to 3.5 mm interconnect cable Remote control Battery for remote control (may be installed) 2 each AA batteries Snap-in iPod adapter pack for iPods purchased before Apple began supplying adapters with new iPods. 10. This instruction booklet Preparing the KC-80 for use Flip the unit upside down, remove the battery cover, and install two AA batteries in the battery compartment. Follow the polarity markings inside the battery compartment. Replace the cover. These batteries are used during power outages to maintain clock operation and settings. They do not power the radio. Yearly replacement is recommended. Install the CR2025 “coin” battery in the remote control. To open the battery compartment, use a fingernail to depress the release clip while pulling to the right on the battery holder. Your battery may be pre-installed. If it is preinstalled there may be a small insulating tab protruding from the battery compartment at the back edge of the remote. This tab (if present) must be removed prior to use. This battery should be replaced when the remote’s operating range deteriorates. Antenna preparation Unpack the AM antenna and snap it’s cylindrical end onto the base/mounting plate. Stretch out the twisted cord and Insert the small rectangular plug at the end into the socket located at the bottom center on the back of the radio. Note, this plug is keyed and only fits one way. Orient the AM antenna for best reception of your favorite AM station. Unroll the FM wire antenna and stretch it out. This antenna is permanently attached to the back of the radio. Position this antenna for best reception of your favorite FM station. Select a location for your radio Since the radio generates heat during operation it is necessary to provide open space around it for proper cooling. Failure to do so can significantly reduce the service life. Do not place the radio near a heater or in direct sunlight. In addition, the radio should not be placed atop electronic devices that generate heat. In many buildings the best radio reception will be had when the antennas are near a window. For proper remote control operation there must be an unobstructed path between the remote and the radio face. The KC-80 includes an auxiliary input allowing sound from computers, TV sets, MP3 players, portable tape players, or other device with a headphone output to play through the KC-80. If this feature will be used, keep in mind the length of the interconnect cable needed when selecting the location. Connecting power Attach the DC power adapter to the DC-In jack on the back of the radio. Plug the adapter into an always-on (un-switched) AC outlet. Turn on the radio and verify operation. Use only the supplied adapter. Button locations Button descriptions A: POWER button. Press once to turn unit on, press again to place unit in standby mode. B: MUTE. (Remote only function) Press to temporarily silence the unit, press again to restore sound. C: PRESET. (Remote only function) Used to recall favorite stations in radio mode. D: SLEEP. Sets the sleep timer delay to 120, 90, 60, 30, or 15 minutes. E: PROG. (Remote only function) Used to store favorite stations in radio mode. F: BAND/RADIO. This button switches between AM and FM radio bands. G: ST/MONO. Switches the receiver between FM stereo and mono modes. Mono reduces the noise heard when listening to weak FM stations. H: PLAY/PAUSE. Used to control the iPod. I: SKIP. When an iPod is present and playing, these buttons change the tracks, or if held down, they allow searching within the current track. In radio (AM or FM), they increase or decrease the received frequency. J: VOLUME. Adjusts the volume up or down. K: AUX (Main unit only function) Press this button to select the rear panel 3.5 mm auxiliary input. This input allows the KC-80 to function as an amplified speaker for any device with a headphone output. Suitable devices include MP3 players, TV sets, computers, personal tape players, personal CD players etc. L: WAKE (Main unit only function) This button selects the type of wake-up sound. The choices are iPod, radio, and buzz. M: SNOOZE/DIMMER control. (Main unit only function) After the alarm has gone off, pressing this bar initiates a 10-minute delay before the next wake-up sound occurs. The snooze function can be used repeatedly for up to 1 hour after the original wake up time. This button’s also adjusts the display brightness. N: ALARM1 and ALARM2. (Main unit only function) The KC-80 has two alarms that can be set independently. These buttons are used to operate the two alarms. With them, either alarm can be turned on, off, or set to wake at a particular time. O: iPod dock. (Main unit only feature) Insert the appropriate adapter for your particular iPod, and insert the iPod. Adapters for older iPods are included with the KC-80. Newer iPods include adapters; so if an adapter was packed with your iPod, then use that adapter. Insert the flat cover (supplied) if the iPod dock will not be used. P: CLOCK button (Main unit only feature). Used to set the clock time. Button is located on back center of main unit. Setting the clock (You must progress through the following process with less than 10 second between steps to avoid dropping out of time set mode.) 1. Hold the CLOCK ADJ button (P) down until the time display begins flashing. Note: If this function is accidentally activated, do nothing and normal operation will resume after 10 seconds. 2. Use the SKIP buttons (I) to select 12 or 24-hour time format. 3. Within 10 seconds, press CLOCK ADJ (P) again to advance to time setting. 4. Press the SKIP button (I) to set the hour, and the SKIP button to set the minute. Note: In 12-hour mode, “PM” showing in the display window indicates an afternoon time. There is no “AM” indicator. 5. Within 10 seconds, press the CLOCK ADJ (P) to move to the year setting. 6. Press the SKIP buttons (I) to set the year. 7. Within 10 seconds, press the CLOCK ADJ (P) again to advance to the month and day setting. 8. Use the SKIP buttons (I) to set the month and day. Note: These buttons can be held down to rapidly advance, or pressed repeatedly for precise control. During month and day setting, these buttons move forward and back in days only. To set the month to December, you must go through 334 days. 9. Within 10 seconds, press the CLOCK ADJ (P) button one last time to finalize the setting. The seconds will start from 00 at this point. Adjust the display brightness 1. Press the SNOOZE/DIMMER button (M) to cycle through the display brightness choices. The choices are off, dim, medium, and bright. Using the radio 1. Press the POWER button (A) to turn the unit on. If the radio does not begin playing, press BAND/RADIO button (N) to activate the radio. When in radio mode, this button alternates between AM and FM bands. 2. Use the SKIP buttons (I) to tune the radio. There are two tuning modes. You can hold either SKIP button down until you reach a particular frequency. Or, you can press either SKIP button for 1 second and then release to have the radio automatically seek the next receivable station. 3. Radio reception is strongly influenced by antenna placement. Tune in your favorite AM or FM station and position the respective antenna for best reception. 4. If after optimizing the FM wire antenna placement, there is still too much noise, press the FM Mode button (F) to force the radio into mono mode lowering the noise. Storing favorite stations for easy access Note: This operation is only available from the remote control. 1. Tune to an AM or FM station that you wish to add to your favorites. 2. Press the PROG button (E) and within 5 seconds, press the PRESET button (C) 1 to 10 times to choose location 1 to 10 to store the station on, and, within 5 seconds press the PROGRAM button to store. 3. Repeat the above process to store up to 10 AM and 10 FM favorites. Selecting stored stations 1. Turn the unit on. If necessary, press the BAND/RADIO button (F) to activate the radio and select the AM or FM band. 2. Repeatedly press the PRESET button (E) to step through the stored stations until the desired station is reached. Alarm setting The KC-80 features two independent alarms for weekday and weekend, or husband and wife use. 1. Press and hold Alarm1 or Alarm2 (O) until the time display begins to flash. Notice that the icon for Alarm1 or Alarm2 will appear in the display window. 2. While the display is flashing, use the SKIP buttons (I) to set the wake up hour and minute. In 12-hour mode, you must cycle through the first 12 hours in order to set a “PM” wake up time. 3. The WAKE button (L) changes the wake up sound. Choices are iPod, radio, or buzz. If radio or iPod is selected, the “Month—Day” display will change to flashing “V—NN”, where NN is a 2-digit number between 10 and 40. When this is flashing, the wake up volume NN can be set using the VOLUME +/- (J) buttons. 4. Repeat steps 2 through 4 to set the second alarm. Activating the alarm 1. Press ALARM1 or ALARM2 once to turn on the respective alarm. The corresponding alarm icon will appear on the display. 2. Press the POWER button (A) or the SLEEP button (D) so that the unit will be in standby mode when wake up time arrives. The alarm WILL NOT FUNCTION if the unit is playing at wake up time. 3. If radio was selected for the wake-up sound, tune to the station that you wish to wake to before completing step 2. 4. Likewise, if iPod was selected as the wake up sound, be sure that your iPod is inserted in the dock before completing step 2. 5. To turn off the alarm, press ALARM1 OR ALARM2 and notice that the icon disappears from the display. SNOOZE function 1. This function is only available after the unit has been activated by one of the alarms. 2. Press the SNOOZE/DIMMER button (M) to silence the unit for 10 minutes. You can repeatedly press the SNOOZE button for up to one hour after the initial wake up time. 3. Pressing POWER (A) will disable the snooze timer. ALARM1 or ALARM2 (O) can also be turned off to disable to snooze timer. DIMMER 1. Press the SNOOZE/DIMMER button (M) to adjust the brightness of the display. Display brightness adjustment is available when the unit is in standby or has been turned on via the POWER button (A). 2. The dimmer function is not available (because it is in snooze mode) if the unit has been activated by one of the alarms. iPod use 1. It is very important to use the correct adapter for your iPod. The adapter aligns the connector on the bottom of the iPod with the connector on the KC-80. Use of an oversize or worse, no adapter can lead to mechanical damage to the iPod’s connector or to the one on the KC-80. Damage of this sort is NOT covered under the warranty. 2. Current and future “dockable” iPods ship with adapters that fit into the universal well on the KC-80. This insures that your KC-80 will not become obsolete. 3. Snap-in adapters are included for the following pre-universal well iPod models: a. Video 30GB b. Video 60GB c. Nano d. Mini e. 20GB (color) + photo 40GB/60GB f. 20GB + U2 Special Edition w/ click wheel g. 40GB w/ click wheel 4. Removing the iPod from the dock while it is playing will put the KC-80 into standby mode, and put the iPod into pause. 5. The KC-80 will fully charge an iPod when the iPod is in the dock and the KC-80’s adapter is plugged into an AC outlet. 6. To listen to your iPod, place it in the dock and press the PLAY/PAUSE (H) button. 7. Press the PLAY/PAUSE playback. 8. Press the SKIP button (H) again to stop and resume buttons (I) to change tracks. 9. Press and hold either of the SKIP buttons (I) to quickly move to a point in a recording that you want to begin listening from. Release the button when the desired point is located. Using the AUX input 1. Any device that has a standard headphone jack can be played through the KC-80. Use the supplied 3.5 mm to 3.5 mm stereo interconnect cable to connect the device’s headphone jack to the AUX input on the back of the KC-80. Activate the AUX input by pressing the AUX button (K) on the control panel of the KC-80. 2. Volume can be controlled from the external device or from the KC-80. Normally, the volume of the external device should be set to approximately half way and the listening volume controlled from the KC80. If you notice distortion at low volume, turn down the volume on the external device. 3. Laptop computers, Portable DVD, CD, MP3, Tape players, and hand-held TVs are ideal devices to connect to the AUX input. Using the AUX OUT 1. The AUX out (located on the back of the KC-80) can be used to feed audio to an external device such as a tape recorder, computer, or wired/wireless music distribution system. User notes: WARRANTY ONE-YEAR NEW PRODUCT WARRANTY VALID ONLY IN THE U.S.A. ON NON-REFURBISHED PRODUCTS This musicdock™ by KLH product is warranted to be free from defects in workmanship and materials under normal use and service for a period of one year from the date of original purchase. During the warranty period, KLH agrees to repair or replace defective components without charge to the original purchaser. To obtain service, the purchaser must return the component to KLH. The purchaser will pay all costs incurred in returning product to KLH. KLH assumes no risk until the product is accepted at our facility. Upon receipt and at its sole discretion, KLH will repair or replace defective component using new or refurbished parts. KLH agrees to return product to the purchaser prepaid, by the shipment method of its choice. Replaced components are warranted to be free from defects in workmanship and materials for the balance of the original product's warranty period based on the original purchase date. To obtain service under this warranty, a legible copy of the original dated purchase invoice must be included with the returned product. Do not send the original invoice. The liability of KLH will be limited to the purchase price of the product, and KLH will not be liable for incidental or consequential damages. KLH limits its obligations under any implied warranties under state laws to a length of time not to exceed the warranty period. Some states do not allow limitations on the length of an implied warranty. Additionally, some states do not allow the exclusion or limitation of incidental or consequential damages. The above limitations or exclusions may not apply to you. This warranty gives you specific legal rights, and you may have other rights, which vary, from state to state. KLH Audio Systems 11131 Dora Street Sun Valley, CA 91352 Customer service: (818) 767-2843 ext. 117