1
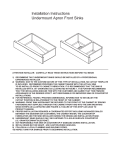
™
Undermount Sinks
For installation with solid surfaces
Installation Instructions and
Use & Care Guide
Quick Reference
Table of Contents:
Pages
2 Tools and Parts
2 Installation Requirements
3 - 4 Installation Instructions
5 Use & Care Guide
5 Warranty
6 Requesting Assistance or Service
Part No. 8534965
Installation requirements...
The KitchenAid™ Undermount System is based on installing
Undermount Series sinks, including the plywood
reinforcement sheet (sink support), with the countertop at the
fabricator’s shop.
Tools and Parts:
Assemble the required tools and parts before starting
installation. Read and follow the instructions provided with
any tools listed here.
Tools needed:
• drill
• 5/16” drill bit
• clamps
• 4, 1/2" Phillips flathead
screws
• dust mask
• tape measure
• solvent, such as denatured
alcohol
• silicone sealant*
• router
• 3/8" router guide bushing
• 1-3/16" router guide
bushing
• 1/4” straight cutter bit
• 1/2” straight cutter bit
• #2 Phillips screwdriver
Parts and Materials needed:
• 1/2" plywood sheets
• faucet with check valve and accompanying plumbing
supplies as needed.
• strainer basket
*Silicone caulk/sealant must meet the qualifications of
ASTM C920, FDA regulation no. 21, CFR 177.2600, NSF-51,
Dow Corning® 786 is recommended.
Check local codes. All plumbing connections should be made
by a licensed, qualified plumber.
Installation must be performed by a qualified fabricator/
installer. The sink installation must comply with national and
local plumbing codes and ordinances.
If more holes are required in the sink deck, the holes must be
added by a qualified plumber according to the faucet
manufacturer’s specifications.
Parts supplied:
• sink
• sink template (Masonite)
• Installation Instructions/Use and Care Guide
Additional Resources available:
CNC program download - sink template/cut-out dimensions
(see “Create Template”section).
Plumbing requirements
Sink should be plumbed to local plumbing codes.
All plumbing connections should be made by licensed,
qualified plumbers.
Countertop requirements
This undermount sink is intended to be installed with solid
surfaces only.
These instructions are intended for use by qualified
fabricators and installers only.
2
Installation Instructions...
• As with all metal objects, follow proper handling techniques.
• Freight handling and job site exposure may have damaged
the sink. This sink should be examined for damage prior to
enclosure/installation. Do not install a damaged sink. Return
the sink to the dealer from whom you purchased it. Failure
to do so will void the warranty.
• Installation of all KitchenAid™ Undermount sinks is based
on “sandwiching” the rim of the sink between the
countertop and 1/2” plywood reinforcement sheet (sink
support). The reinforcement sheet rests on top of the
cabinet. The front edge of the countertop must be built-up to
hide this 1/2” underlayment.
1/2” reinforcement
sheet
Countertop
1.
Fasten the masonite template (provided) to the 1/2”
plywood sheet with 1/2” Phillips flathead screws. The
screws must be flush with or below the top of the
masonite template.
2. Drill
a 5/16” pilot hole in the 1/2” plywood at a tangent
to the masonite template, in order to begin the router
cut.
3. Create
the female template from the 1/2” plywood
sheet by using the 3/8” router guide bushing and the
1/4” straight cutter bit, as shown.
Sink rim
3/16”
3/8” O.D. collar
(router guide bushing)
1/8” Masonite
cut-out scrap
1/4” straight cutter bit
Sink
Cabinet
supports
1/2” plywood
Cabinet
front
Part A
Create Female Template
1-3/16” O.D. collar
(router guide bushing)
• Aesthetics are essential to presentation of the installed sink.
Take the necessary care to ensure that the exposed silicone
joint is kept to a minimum, the sink is properly aligned to
the cut-out, and the excess silicone is cleaned from the sink.
Create female template
NOTE: As an alternative to creating a female template
according to the instructions shown here, an
“ElectronicTemplate” is also available.
A CNC program file is available to download from the
internet address: http//www.kitchenaid.com/.This file includes
the necessary sink template dimensions for cutting the holes
in the countertop material and the plywood countertop
reinforcement sub-layer.
If you have any questions regarding the downloadable
program file, the file format, or program file requirements,
please contact KitchenAid at 800-422-1230, and/or
www.kitchenaid.com for frequently asked questions.
IMPORTANT: The Masonite template supplied by KitchenAid
has been machined to the exact size and shape of the
finished countertop cut-out. It is recommended that the
Masonite template be used to create a female template from
1/2” plywood as outlined in the instructions following. The
female template will determine the final sink location.
19/32”
cut-out scrap
Part B
1/2” plywood
female template
countertop
1/2” straight cutter bit
1/4”
Cut Out Countertop
Figure 1
4. Sand
the new female template (plywood) edge clean
and smooth.
3
Create sink support
Install undermount sink
1.
1.
Prepare minimum 1/2” plywood sheet (sink support) by
cutting to dimensions of cabinet it will be mounted to.
2. Secure
1/2” plywood sheet (sink support) to work
surface using various clamps. Fasten the female
template (plywood) to the 1/2” plywood sheet (sink
support). Using the 1-3/16” router guide bushing and
the 1/2” straight cutter bit, cut opening in the 1/2”
plywood sheet (sink support). Do not remove the
female template from the sink support.
3. Using
the 1/4” straight cutter bit, recess the opening in
the sink support by .050” to .060”, to accept flange of
Clean flange and rim of sink, and countertop mating
surface (underside of countertop) with solvent such as
denatured alcohol.
2. Set sink in sink support cutout.
3. Generously
apply a continuous silicone bead around
the sink rim. (Dow Corning 786 recommended.)
®
4. Liberally
apply silicone dabs on plywood sink support
at least 2” back from the sink cut-out. (See Figure 3.)
sink. (As shown in Figure 2).
NOTE: For reference, 1/16” is .0625”.
Sink
Silicone
dabs
.050” / .060”
Silicone
Section Detail
1/2” plywood
reinforcement
sheet
Section Detail
Figure 2
4. Remove the female template and set aside.
Cut out countertop
IMPORTANT: All solid surfaces (such as marble and granite)
must be cut by a qualified installer or fabricator.
1.
Clamp 1/2” plywood female template on top surface of
countertop, in desired position. This position will be
determined by the relationship of the sink rim to
cabinet gables, cabinet supporting members, and deck
mounted fittings.
Figure 3
5. Align
sink to underside of countertop cut-out so that a
uniform sink edge is visible from the topside of the
countertop around the periphery of the cut-out.
IMPORTANT: You cannot make any adjustments after
performing Step 6, following:
6. Clamp
sink support and sink rim to countertop. Use a
non-abrasive cloth and solvent to remove excess
silicone that has been squeezed out beyond the cut-out
edge. Do not use any metal implements that will
scratch the sink. Keep clamps on for a minimum of 24
hours before installing in cabinet.
2. Cut
out countertop by tracing edge of female template,
using the 1-3/16” router guide bushing and the 1/2”
straight cutter bit.
3. Finish
cut-out edge of countertop with desired finishing
techniques.
4
Use & Care Guide
Do routine cleaning
Use soap, warm water and sponge. Rinse thoroughly
and wipe dry.
To remove stubborn stains
Use any cleaner acceptable for use on stainless steel.
Always rub in the direction of the grain. Rinse
thoroughly and wipe dry.
To maintain luster
Use a small amount of mineral oil on a soft cloth. Apply
evenly to the entire surface of the sink and buff to a
shiny finish.
Do not use steel wool, scouring pads, steel brushes,
etc. Their particles may become embedded in the sink
surface and cause a rusty discoloration.
Do not use rubber mats. They trap water causing iron
deposits and surface discoloration.
Warranty
LIFETIME LIMITED WARRANTY
For the lifetime of the product from the date of purchase, when this sink is installed, operated and maintained
according to instructions attached to or furnished with the product, KitchenAid will replace sinks found to be
defective in materials or workmanship with an equivalent stainless steel sink supplied by KitchenAid.
KitchenAid reserves the right to inspect any sink reported to be defective prior to replacement. This Lifetime
Limited Warranty is offered to the original owner of the sink.
KitchenAid WILL NOT Pay For:
• Service calls to correct the installation of your sink, to instruct you on how to use your sink, to replace house
fuses or correct house wiring or plumbing.
• Repairs when your sink is used in other than normal, single-family household use.
• Damage resulting from accident, alteration, unauthorized modification, misuse, abuse (such as heavy impact or
dropped objects), fire, floods, acts of God, improper installation or installation not in accordance with local
electrical and plumbing codes, or use of products not approved by KitchenAid.
• Damages resulting from improper care or maintenance.
• Damages resulting from improper application (such as exposure to corrosive chemical, photographic solution, etc.)
• Any unauthorized modifications made to the product after it leaves KitchenAid (or its suppliers) premises
whether performed by a contractor, service company, or yourself.
• Any labor cost during the limited warranty period.
• Replacement parts for units operated outside the United States.
• Pickup and delivery. This product is designed to be serviced in the home.
KITCHENAID SHALL NOT BE LIABLE FOR INCIDENTAL OR CONSEQUENTIAL DAMAGES.
Some states do not allow the exclusion or limitation of incidental or consequential damages, so this exclusion or
limitation may not apply to you. This warranty gives you specific legal rights and you may also have other rights,
which may vary from state to state.
Outside the 50 United States, this warranty does not apply. Contact your authorized KitchenAid dealer to
determine if another warranty applies.
If you believe that you have a warranty claim, contact KitchenAid through your Dealer, Plumbing Contractor,
Home Center or E-tailer. Or call our Customer Interaction Center at 1-800-422-1230 from anywhere in the USA, or
write: CIC Center, KitchenAid Brand Home Appliances, Customer Interaction Center, 553 Benson Road, Benton
Harbor, MI 49022-2692. In the event of a warranty claim, the owner will be required to provide proof of purchase
and a complete description of the problem.
This warranty supersedes all other warranties, expressed or implied.
Keep this book and your original invoice together for
future reference. You must provide proof of purchase or
installation date for in-warranty service.
Dealer Name ____________________________________
Write down the information about your sink in the box to
the right to better help you obtain assistance or service if
you ever need it.
Phone Number __________________________________
Address _________________________________________
Product _________________________________________
Model Number __________________________________
Color and Finish _________________________________
Purchase Date ___________________________________
5
Requesting Assistance or Service
If you need assistance or service in U.S.A.
Call the KitchenAid Customer Interaction
Center toll-free at 1-800-422-1230.
Our consultants are available to assist you.
When calling: Please know the purchase date, and
the complete model of your sink. This
information will help us better respond
to your request.
Our consultants provide assistance with:
• Features and specifications on our full line of sinks
• Installation information
• Use and maintenance procedures
• Accessory and repair parts sales
• Specialized customer assistance (Spanish speaking,
hearing impaired, limited vision, etc.)
• Referrals to local dealers, service companies, and
repair parts distributors
For further assistance
If you need further assistance, you can write to
KitchenAid with any questions or concerns at:
KitchenAid Brand Home Appliances
Customer Interaction Center
553 Benson Road
Benton Harbor, MI 49022-2692
Please include a daytime phone number in your
correspondence.
™
Part No. 8534965
® Registered Trademark/™ Trademark of KitchenAid, U.S.A.
® Dow Corning is a registered trademark of Dow Corning Corporation.
© 2003 All rights reserved.
7/2003
Printed in U.S.A.