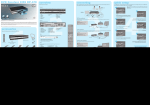
1
THIS PRODUCT UTILIZES A LASER.
USE OF CONTROLS OR ADJUSTMENTS OR PER-FORMANCE OF PROCEDURES OTHER THAN THOSE SPECIFIED HEREIN MAY RESULT IN HAZARDOUS RADIATION EXPOSURE.
DO NOT OPEN COVERS AND DO NOT REPAIR YOUR-SELF. REFER SERVICING TO QUALIFIED PERSONNEL.
TO REDUCE THE RISK OF FIRE, ELECTRIC SHOCK OR PRODUCT DAMAGE, DO NOT EXPOSE THIS APPARATUS TO RAIN, MOISTURE, DRIPPING OR SPLASHING AND THAT NO
OBJECTS FILLED WITH LIQUIDS, SUCH AS VASES, SHALL BE PLACED ON THE APPARATUS.
• DO NOT INSTALL, OR PLACE THIS UNIT, IN A BOOKCASE, BUILT-IN CABINET OR IN ANOTHER CONFINED SPACE. ENSURE THE UNIT IS WELL VENTILATED. TO PREVENT RISK
OF ELECTRIC SHOCK OR FIRE HAZARD DUE TO OVERHEATING, ENSURE THAT CURTAINS AND ANY OTHER MATE-RIALS DO NOT OBSTRUCT THE VENTILATION VENTS.
• DO NOT OBSTRUCT THE UNIT’S VENTILATION OPENINGS WITH NEWSPAPERS, TABLECLOTHS, CURTAINS, AND SIMILAR ITEMS.
• DO NOT PLACE SOURCES OF NAKED FLAMES, SUCH AS LIGHTED CANDLES, ON THE UNIT.
• DISPOSE OF BATTERIES IN AN ENVIRONMEN-TALLY FRIENDLY MANNER.
THE FOLLOWING APPLIES ONLY IN THE U.S.A. AND CANADA:
TO PREVENT ELECTRIC SHOCK MATCH WIDE BLADE OF PLUG TO WIDE SLOT, FULLY INSERT.
For the Middle East, South Africa and Asia
THIS UNIT IS INTENDED FOR USE IN TROPICAL CLIMATES.
For Australia, N.Z. and units with PX printed on the outer packaging
THIS UNIT IS INTENDED FOR USE IN MODERATE CLIMATES.
This product may receive radio interference caused by mobile telephones during use. If such interference is apparent, please increase separation between the product and
the mobile telephone.
DANGER
CAUTION
VISIBLE AND INVISIBLE LASER RADIATION WHEN OPEN. AVOID DIRECT EXPOSURE TO BEAM. (FDA 21 CFR)
VISIBLE AND INVISIBLE LASER RADIATION WHEN OPEN. AVOID EXPOSURE TO BEAM. (IEC60825-1)
THE FOLLOWING APPLIES ONLY IN THE U.S.A.:
This equipment has been tested and found to comply with the limits for a Class B digital device, pursuant to Part 15 of the FCC Rules.
These limits are designed to provide reasonable protection against harmful interference in a residential installation. This equipment generates, uses and can radiate
radio frequency energy and, if not installed and used in accordance with the instructions, may cause harmful interference to radio communications. However, there is no
guarantee that interference will not occur in a particular installation. If this equipment does cause harmful interference to radio or television reception, which can be
determined by turning the equipment off and on, the user is encouraged to try to correct the interference by one or more of the following measures:
•
Reorient or relocate the receiving antenna.
•
Increase the separation between the equipment and receiver.
•
Connect the equipment into an outlet on a circuit different from that to which the receiver is connected.
•
Consult the dealer or an experienced radio/TV technician for help.
Any unauthorized changes or modifications to this equipment would void the user’s authority to operate this device.
This device complies with Part 15 of the FCC Rules. Operation is subject to the following two conditions: (1) This device may not cause harmful interference, and (2) this
device must accept any interference received, including interference that may cause undesired operation.
THE FOLLOWING APPLIES ONLY IN THE U.S.A. AND CANADA:
2
The laser product label has not been attached to products for U.S.A. and Canada.
Read these operating instructions carefully before using the unit. Follow the safety instructions on the unit and the safety precautions listed below. Keep these operating
instructions handy for future reference.
Safety
1.Power source :Connect the unit to a power source of the type described in these instructions or as marked on the unit.
2.Polarization - The unit is equipped with a polarized power plug where one blade is wider than the other. This safety feature ensures that the plug fits into your
household AC outlet only one way. If the plug doesn’t fit one way, try reversing it. If the plug still doesn’t fit, contact an electrician to replace the obsolete outlet. Do not
attempt to defeat the safety purpose of the plug.
3.Power cord protection - Route the AC power supply cord so that it will not be walked on or pinched by items placed on or against it. Never take hold of the plug or
cord with wet hands. Always grasp the plug body firmly when connecting and disconnecting it.
4.Overloading - When connecting the AC power supply cord, be careful not to overload the household AC outlet, extension cord, or outlet from any other device as this
can result in fire or electric shock.
5.Nonuse periods - Turn the unit off when it is not in use. Unplug the unit from the household AC outlet if it is not to be used for a long time. Unplug the unit during
lightning storms.
6.Attachments and accessories - Use only the attachments and accessories recommended in these operating instructions.
Installation
Placement
1.
Ventilation - Situate the unit so that it receives proper ventilation. Do not install in a confined space such as a bookcase or cabinet. Allow at least 10 cm (4
inches) clearance from the rear of the unit. To prevent the risk of electric shock or fire due to overheating ensure curtains and other materials do not obstruct
the unit’s ventilation.
2.
Foreign material - Ensure objects and liquids do not get into the unit. Avoid exposing the unit to excessive smoke, dust, mechanical vibration, and shock.
3.
Magnetism - Situate the unit away from equipment and devices that generate strong magnetic fields.
4.
Stacking - Do not place heavy objects on top of this unit.
5.
Surface - Place the unit on a flat, level surface.
6.
Carts and stands - Use the unit only with carts and stands recommended by the manufacturer. Move carts with care.
Sudden stops, excessive force, and uneven surfaces can cause carts to overturn.
7.
Wall and ceiling mounting - Do not mount the unit on walls or ceilings unless specified in the instructions.
Environment
1.
Water and moisture - Do not use the unit near water, such as near a bathtub or swimming pool. Avoid damp basements.
2.
Heat - Situate the unit away from heat sources, such as radiators. Do not situate where temperatures fall below 5° C (41° F) or rise above 35° C (95° F).
Maintenance
Unplug the unit from the household AC outlet before cleaning.
Clean with a damp cloth.
Do not use abrasive pads, scouring powders, or solvents.
Service
1.
Damage requiring service-The unit should be serviced by qualified service personnel if: The AC power supply cord or the plug has been damaged; or Objects
or liquids have gotten into the unit; or The unit has been exposed to rain; or The unit does not operate normally or exhibits a marked change in performance;
or The unit has been dropped or the cabinet damaged.
2.
Servicing - Do not attempt to service the unit beyond that described in these operating instructions. Refer all other servicing to authorized servicing
personnel.
3.
Replacement parts - When parts need replacing ensure the servicer uses parts specified by the manufacturer or parts that have the same characteristics as
the original parts. Unauthorized substitutes may result in fire, electric shock, or other hazards.
4.
Safety check - After repairs or service, ask the servicer to perform safety checks to confirm that the unit is in proper working condition.
To clean this unit, wipe with a soft, damp cloth.
•
Never use alcohol, paint thinner or benzine to clean this unit.
•
Before using chemically treated cloth, read the instructions that came with the cloth carefully.
3
english
Contents
Accessories and Connections
Quick Setup
Advanced Setup
Playing Media
Advanced Functions
WebRadio
KiSS PC-Link
Support
5
7
9
11
12
13
15
17
Congratulations on your new DVD Player
The many different functions provided by your new player will be a source of pleasure to you for many years to
come. Naturally, you can play and watch DVD films with superb audio and visual quality.
You can watch films in many other formats than DVD, such as SVCD, MPEG-4, XviD, DivX.
The audio features also give you the option of playing music CDs, MP3 or Ogg Vorbis files. The DP-500
automatically recognises each format and can read CD-RW and DVD-RW alike. Your new DP-500 also supports
Picture CDs (jpg), which means that you can display your photos directly on the TV screen. This includes the
pictures developed at the photo shop and any photos you have scanned and saved on a CD yourself.
Note: Do not use the DVD Player until you have studied the configuration menu. To do so, the DVD Player must be connected to a TV set.
4
1
Accessories and Connections
Make sure the following accessories are included with your DVD Player.
DVD-Player KiSS DP-500
Batteries
for the remote control [size “AAA” (R6P)]
Remote control
KiSS PC-Link Software CD
Power Cable
Scart Cable
Composite Video
Audio Cable
Video Connection
Connecting your KiSS DP-500 DVD player to
your TV can be done with any of the cables
below. (Only one cable can be connected at a
time).
1. RGB via SCART
2. S-Video (the cable is an extra accessory)
3. Composite via SCART
4. Composite Video
5. Component SCART (the cable is an extra accessory)
DP-500
TV
1 3
5
4
2
Audio Connection
Connecting your KiSS DP-500 DVD player to
your amplifier can be done with any of the
cables below. (Only one cable can be connected
at a time).
DP-500
Amplifier
8
6
6. Optical output (the cable is an extra accessory)
7. Coaxial output (the cable is an extra accessory)
8. Analogue Stereo
7
5
PC to DVD connection
Below is an example of a connection for your DP-500 to a PC via an Ethernet Switch, to enable use of all its features and programmes.
Extra information regarding cabling and connecting can be obtained by your local electronics´ supplier.
DP-500
Ethernet Switch
PC
Presentation
The front panel has the following standard buttons. The functions of the buttons depend on
whether they are used for playing various media, or used in connection with the “Setup Menu”
3
1
1
7 9
5 13 15
2
4 6 8 10
11 12 14 16
1.
2.
3.
4.
5.
6.
7.
On/Off
CD Tray
Open/Close
Play/Pause
Stop
Previous Chapter
Next Chapter
8. Rewind
9. Fast Forward
10. Menu
Option on the Setup Menu
11. Enter
12. Navigate Left
13. Navigate Right
14. Navigate Up
15. Navigate Down
16. Close
2
3
4
5
6
7
9
8
7
10
8 1 2 3 4 5
11
6
14
1.
2.
3.
4.
5.
6.
7.
8.
Ordinary Stereo Output
Composite Video Output for TV Set
S-Video Output for TV Set
Coaxial Output for Amplifier
Optical Output for Amplifier
SCART for TV Set
AC Input
Ethernet
1
2
4
3
The DVD Player is equipped with a VFD display which indicates the current ongoing activities.
1. Indicates the selection of the disk being played
2. Indicates the number or chapter being shown/played
3. Indicates the current function, such as play or stop
4. Indicates the type of media being played
6
13
12
16
15
18
17
19
20
21
22
23
24
25
26
28 27
1. Standby
2. Open/Close
3. Title/Menu
4. Menu
5. Back
6. Up Arrow
7. Left Arrow
8. Enter
9. Right Arrow
10. Down Arrow
11. Rewind
12. Play/Pause
13. Fast Forward
14. Previous Chapter
15. Stop
16. Next Chapter
17. Select Lang/Audio
18. Next Picture
19. Select Subtitles
20. Select Angle
21. Zoom
22. Repeat
23. Unused
24. Setup
25. Clear Input
26. Search
27. Increase Volume
28. Decrease Volume
Note:
Certain functions will
only work if supported
by the media.
2
Quick Setup
If your DVD Player is correctly connected (see the chapter on cable connections), a menu will appear when you
turn on the DVD Player. The menu installs the most important settings for your TV set and language.
Note: If this menu does not appear when you start the DVD Player, recheck the cable connections.
Note: Try connecting your TV set using the Composite Video cables. Composite Video always produces a picture.
Language
Select the language that will be used whenever
you open the DP-500’s built-in menus. Use the
arrow buttons on the remote control to move
the rectangular frame to the language you wish
to select and press ENTER.
Connection
Select your TV set’s connection. Your options are
SCART, S-Video and Composite. The connection
depends on the inlets available on your TV set.
(If you select SCART, this connection also
includes RGB and Composite Video).
7
TV
This screen presents two different types of TV
formats: 4:3 (normal) or 16:9 (wide screen).
Note: Some 4:3 TV screens can display 16:9 format.
Audio
If your TV set is connected via SCART, your TV is
automatically provided with sound. If you would
rather use an amplifier to reproduce the sound,
you have two options to choose from: the phono
jack or one of the two digital outputs.
Note: The default Audio choice should be stereo
unless your player is connected to a digital
amplifier
IP Address
In order to use the KiSS PC-Link software, you
need to provide your DVD player with your
computer IP address. To easily find this number,
first install the KiSS PC-Link software on your
computer. Once this step is completed, you will
find the number under the Info Panel. Type it
on the provided screen. Leave it blank if you do
not want to set up your PC connection for the
moment. You can always go back to the quick
setup menu if you want to provide the IP address
at a later stage.
Note: Your KiSS PC-Link software will ONLY work if the KiSS DP-500 is provided with
a valid IP address.
You can always go back and start over if you happen to do something wrong, or if you wish to enter the Setup menu and edit it.
8
3
Advanced Setup
You can always access the Setup menu and adjust the DP-500 to your specific requirements and hardware. When
DP-500 appears on the main screen, press the SETUP button on your remote control, and a menu will appear with
the available options. The orange frame shows your position on the menu. Use the arrow buttons to move the
frame and select by pressing the ENTER button. The settings on some of the menus have already been determined
under Quick setup, but there are several settings available under Advanced setup as well.
Language Settings
The first menu is the Language settings menu.
Here you select the language you wish to use
for the menus, that will appear on the screen,
and your preferred language when playing a DVD
film – for subtitles, speech and menus (they will
only be used if the film supports the language).
Video settings
You can also select a different TV system from
PAL (the European standard), and you can
indicate whether you have RGB via SCART,
Component via SCART or S-Video. Refer to your
TV set’s instruction manual before selecting
the connection. Only one setting at a time is
possible.
Note: Composite Video via SCART is always activated.
9
Audio Settings
This menu enables you to select either RAW or PCM.
PCM: Stereo sound. Used for slightly older
amplifiers. Choose this option to obtain
analogue sound.
RAW: Plays the surround sound track on the disk.
Recommended as default.
Miscellaneous Settings
This display lets you set your preferred level of
protection on the films. Some films are divided
into levels, so that parents can prevent their
children from seeing a specific type of film. In
the next menu item, you create a password that
is required for editing this setup*. The light in the
DVD Player’s display can be modified from dim
to normal or bright. All settings can be reset in
the “Restore settings” menu, and the Quick setup
can be re-initiated from the last menu.
*If you wish to modify this setup later on, you
must re-enter the password.
To leave a menu, press the left arrow on the remote control.
10
4
Playing Media
The DVD Player supports the following media: DVD Video, DivX, XviD, ISO MPEG-4, VCD, SVCD, Audio CD, MP3,
Ogg Vorbis and JPG.
DVD Menu
MP3 and Ogg Vorbis
If you have adjusted your DVD Player according to the
instructions above, you can now insert a DVD into your
DVD Player. A moment later, the DVD menu will appear.
Use the arrow buttons to navigate in the menu and start
the film.
Note: As this menu is part of the DVD itself, it will vary from
DVD to DVD.
When you insert an audio CD with MP3 or Ogg Vorbis
music files, the player will automatically recognise the
format and let you select the songs you wish to hear. You
can choose the order in which you want to listen to the
tracks, listen to just a few songs/albums/folders or play
them at random by pressing the SETUP button on your
remote control and selecting the preferred method for the
playing order.
DivX, XviD and MPEG-4
Photo CD and JPG
The DP-500 recognises the format and automatically
starts playing the CD when you insert it into the drive. Use
the counter in the display to help you to see where you are
in the film. You have access to the usual playback options,
such as stop, pause, go to next, time search, etc.
You can either have your photos burned on a disk in the
shop, where you had them developed or burn your own
disk on your computer.
Afterwards the photos can be shown on your TV to the
delight of your family and friends. You select whether the
photos should be shown one by one in the order you prefer
or as a slide show. Press SETUP to select slide show.
DVD films are normally supplied with a regional code (1), (2), etc., and can only be played on DVD players with the same regional code. You can see the
region on the back of the player. Region tags appear as follows:
11
5
Advanced Functions
A number of advanced functions are located on the lower section of the remote control.
These functions are described below. Some functions may not work with all media formats.
STEP
This function not used
AUDIO
Press the (AUDIO) button to change the sound format. The audio format options, such as
two-channel stereo and six-channel surround, are determined by the film producer.
ZOOM
When watching the film, you can zoom in on specific areas. You can zoom in either as the
film is playing or after you have paused it. Activate the function by pressing the (ZOOM)
button, and return to the normal picture by pressing the button again.
TIP: Use the arrow buttons to move around the enlarged screen display.
REPEAT
As the film is playing, press the (REPEAT) button and three options will appear on the
screen.
MODE: Shuffle (random chapter playing) or Off (deactivated)
Repeat: Lets you decide whether to repeat the section or the entire film.
CLEAR
Use this function to delete all previous inputs.
SRCH
Use (SRCH) to find a specific spot on the disk.
Time: Specify time, minutes and seconds
Title/Chapter: Find the title or the chapter
ANGLE
If the film supports more than one camera angle, you can switch from one angle to
another by pressing the (ANGLE) button.
SUBPIC
Use this button to change the film’s subtitles. If you press the (SUBPIC) button, a message
will appear in the top left corner of the screen indicating the number of available
languages and the language that is currently active. If you press the (SUBPIC) button
again, you go to the next language option. The number of languages is also determined
by the film’s producer.
SETUP
If the DVD Player is in the process of showing a film or playing music, press the (SETUP)
button to see the available options on the disk. For instance, if you are watching a DVD
film, the left-hand side of the screen will show information about the film’s length, the
number of chapters, the language options and the number of subtitles.
If the DVD player is turned on, but not playing films or other media, pressing this button
will take you to a menu, where you can configure your DVD player. Here you can select the
default settings for language, sound, video, parental level, etc.
These buttons are used for increasing and decreasing the sound volume.
MARK
This function not used
12
6
WebRadio
WebRadio enables you to listen to a great number of radio stations via the internet.
Remember that all the functions disscussed below are only available if a valid IP address has been entered in
your Quick Setup menu (see Quick Setup Chapter).
Setting up your connection
To use the KiSS WebRadio service, you will have to connect your
DVD player DP-500 to the Internet (please refer to the “connection”
part of the manual). When done turn on your DVD player - press the
“menu” button on your remote, then press “enter”. Go to “WebRadio via
Internet” It will detect your connection.
New User
On your PC, type: http://webradio.kisstechnology.com in the address menu of your
favourite web browser. The window shown here
should then open. If you are a first time user on
our WebRadio web site press the link: “First time
visitor? Sign up here to log in!”
Complete the information form. The marked
areas HAVE to be filled in. If you already have
done this, log in with your existing username
and password.
E-mail confirmation
After sending your information, you will receive
an e-mail with your username and a password.
You can change the given password after you
have logged in.
Note: You can write your password and username
in the space below.
Username:
Password:
13
Entering your player ID number
Now you will have to provide your WebRadio
account with your player ID – The player ID is
a 12-digit number, you can find it by turning on
your DVD player DP-500, then press the “Menu”
button and the number will be displayed in the
top of the screen. Type this number into the
provided field on your PC.
Main radio menu
Once logged-in, a default list of online radio
station appear on your screen. You can add/
remove/edit your favourite radio stations by
providing their stream information. The selection
will then be available to play from your DVD
player.
Selecting WebRadio from the DP-500
Pressing the "menu" button on your remote
control will send you to the WebRadio panel.
You can then see your radio selection on your TV
screen. This function is only available when the
player is NOT playing.
14
7
KiSS PC-Link
KiSS PC-Link enables you to connect your computer to your DVD player through the KiSS PC-Link software. You
can therefore play, watch or listen to your PC files on your TV via the KiSS DP-500.
Note: Clicking the search function will help your computer to find your multimedia files
Installing the software
The KiSS PC-Link software must be installed on your computer, it is
PC compatible and requires a machine running minimum Microsoft
Windows 98, Internet Explorer 4. After inserting the disk, the
installation program will start automatically, if not double click the
"Setup" icon on your CD. Select your preferred language and click
"Next". Once the installation is completed, the KiSS PC-Link programme
will open. The main window is divided into four folders, Audio, Video,
Pictures and Info.
Accessing your files on the DP-500
After connecting your PC to your DP-500
(see Connection Chapter) and entering your
computer IP address on your DVD player (see
Quick Setup Chapter), press the “Menu” button
on your remote control and choose PC-Link. Then
from the submenu you can access, Audio, Video
or Pictures.
KiSS PC-Link Audio Panel
Drag and drop the audio files you would like to
access from your DP-500.
You can create folders with your favourite music
or specific types of music. You can easily add,
remove or move the files either by using the
window buttons or right clicking on the mouse
and select an action.
15
KiSS PC-Link Video Panel
Drag and drop or select a movie file through the
search window. As for the Audio Panel you can
define actions by selecting, pressing the window
buttons or right-click a file.
KiSS PC-Link Pictures Panel
Direct access to the picture files located on
your PC. These can be selected or dragged and
dropped. You can also tidy them into a folder
from the KISS PC-link window.
KiSS PC-Link Info Panel
You will find your computer IP address located
in this panel. This has to be entered in the
last menu of the Quick Setup (see Quick Setup
Chapter). This menu also enables you to “Check
for Updates” and access the KiSS web site.
16
8
Support
More information or assistance is available at KiSS Technology’s website under Support for DVD Player.
Address: www.kiss-technology.com
Updates
At our website, you can update the DVD Player’s firmware/operating system with the latest new features. To do so, download the software from the
support section at the www.kiss-technology.com website. Then burn it on a CD-R and load it into the DVD player. See our website under support for
additional information.
If you do not have Internet access, or do not own or have access to a CD burner, an update can be purchased from the dealer where you purchased your
DVD Player.
To reset the settings of the DP-500, press the following buttons on the remote control: “Open”, “Clear”, “1”, “2”, “3”
KiSS Technology A/S reserves the right to change all settings and specifications without notice.
Important safety information
•
•
•
•
•
•
Read these instructions carefully and pay attention to all warnings and guidelines.
Do not overload electrical sockets or extension cables. Overloading can result in fire or electric shock.
Never insert objects into the DVD player’s cabinet door. They might come into contact with dangerous voltage points or short-circuit components,
which can cause fire or electric shock.
Do not spill liquids on the DVD player.
If the DVD Player does not function normally, or if it emits unusual sounds or odours, pull out the plug immediately and contact an authorised
technician.
Do not attempt to service the DVD player yourself. If you open or dismantle the shielding, you expose yourself to dangerous voltage and other
hazards. All maintenance must be carried out by qualified service technicians.
Environmental information
•
•
The system is made of recyclable materials which can be reused if disassembled by authorised personnel.
Please follow local regulations for the disposal of packaging materials, used batteries and discarded units.
Copyright
This product contains copyright technology which is protected pursuant to the patents that are the property of Macrovision Corporation and other
copyright holders. Any use of this copyright technology must be approved by Macrovision Corporation. The technology is intended for use in the home
unless otherwise approved by Macrovision Corporation. Breakdown and disassembly are prohibited.
Made under license from Dolby Laboratories. “Dolby” and the double “D” symbol are trademarks of Dolby Laboratories. “DTS” and “DTS Digital Out” are
trademarks of Digital Theater Systems, Inc.
KiSS Instant Repair Service
If the DVD player is STILL UNDER WARRANTY, KiSS Technology A/S will pay freight costs back and forth to the customer. Please follow the instructions
given by the HelpDesk. Always remember to write the RMA number (provided by the HelpDesk) on the freight bill. If the DVD player is NOT UNDER
WARRANTY, all costs must be held by the customer.
There are three ways to obtain an RMA number. “An RMA number is a reference number generated in every single case for administrative purposes.”
1.
2.
3.
By fax or e-mail: Fax: +45 44 78 41 48 and e-mail: [email protected]. Enclose the error description, serial no., invoice no., copy of the invoice/
sales receipt.
Personal contact: Phone KiSS’s Help Desk on +45 70 26 82 70 and request an RMA number.
From the dealer: take the product to the dealer, where it was purchased. Important: Never send the product to be repaired without obtaining an
RMA no. first, otherwise it will be rejected. The product must always be packed properly, otherwise the product warranty will be discontinued.
(Packaging can be purchased from KiSS Technology at the market price). Retrieval and delivery to the end user. The product can be picked up
from and delivered directly to the end user. To do so, the end user must follow the HelpDesk’s instructions at the time of the RMA enquiry. If
these instructions are not followed, the end user will be charged for extra costs that must be paid on delivery.
Warranty certificate
KiSS Technology A/S provides a twenty-four (24) month warranty from the date of purchase against material and manufacturing defects. In the event of
defects covered by the warranty, the product must be returned to the dealer that sold the product, or refer to the enclosed appendix on the KiSS Instant
Repair Service. The expected time of repair, including transport, is approximately five working days (except for remote areas).
If any problems arise, information on our authorised service centres is available at the following address, or from the dealer who sold the product.
17
Terms of Warranty
1.
2.
3.
4.
5.
6.
The warranty is only valid on presentation of a correctly completed warranty certificate and sales ticket, and if the serial number on the product
is fully legible.
The obligations of KiSS Technology are limited either to repair or replacement of defective components. The repair or replacement of defective
components is based on an assessment by KiSS Technology.
Exchange is only possible if the repair cannot be performed.
Warranty repairs must be performed by an authorised KiSS Technology dealer, or an authorised service centre. No remuneration is provided for
repairs performed by unauthorised workshops. Any repairs or damage to the product caused by unauthorised intervention are not covered by this
warranty.
This product will not be viewed as defective, either in materials or in manufacture, if adaptation to national, local, technical or safety-related
requirements is required in countries other than the specific country for which the product was originally designed and manufactured.
This warranty does not cover these types of adaptations, and no remuneration will be offered for these types of adaptations or for any
consequential damages. The warranty does not cover the following:
a) Periodic inspection, maintenance and repair or replacement of parts resulting from normal wear.
b) Costs connected to transport, disassembly or installation of the product.
c) Misuse, including use for other purposes than was intended, or faulty installation.
d) Damage caused by lightning, water, fire, natural catastrophes, war, insurrection, incorrect line voltage, insufficient ventilation or other causes
beyond the control of KiSS Technology.
This warranty applies to every legal owner of the product during the warranty period.
KiSS Technology A/S, Slotsmarken 10, DK 2970 Hørsholm, Denmark
Hotline (user support) +45 45 17 00 07
[email protected]
All contacts with KiSS Support should be addressed in English
Information we must receive before repairing the product:
Model name: KiSS DVD Player DP-500
Serial no.:
RMA no.:
Copy of the invoice or sales receipt
The dealer’s name, address and phone no.
Personal information: Name, address, post code/city, phone no. and e-mail address (optional).
Your signature
Dealer’s stamp and signature
Date
18
19
KiSS Technology A/S • Printed in Denmark • DP-500 v 1.6 4L• www.kiss-technology.com
Copyright • KiSS Technology A/S • 2003