1
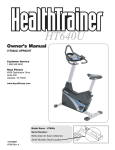
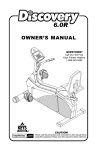
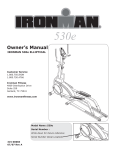
OWNER’S MANUAL
QUESTIONS?
Call Our Toll Free
Keys Fitness Helpline
1-888-340-0482
1-888-340-0482
Monday-Friday
8:30-5:30 Central Time
Keys Fitness Products, L.P.
4009 Distribution Dr.
Suite 250
Garland, Texas 75041
Keys Fitness Products, L.P.
P.O. Box 551239
Dallas, Texas 75355-1239
CAUTION!
Please read the precautions and
instructions in this manual before
using this equipment. Please save
this manual for future reference.
KEYS FITNESS PRODUCTS, LP LIMITED WARRANTY
Keys Fitness is committed to
quality products that demonstrate
our commitment to excellence!
ALLIANCE ELLIPTICAL TRAINER
Model: ET920D
Questions?
Please call if:
• you need assistance about
operating your exercise bike
• parts are missing
• parts become worn or need to
be replaced
1-888-340-0482
Monday-Friday
8:30-5:30 Central Time
When requesting information please have
the following available:
• The Name
• The Model
• The Part Number
• The Description
PRODUCT:
HOME USE WARRANTY:
ALLIANCE 920D ELLIPTICAL TRAINER
Frame: Liftetime, Parts: 2 Years, Labor: 1 Year
This Limited Warranty applies in the United States and Canada to products manufactured or distributed by Keys
Fitness Products, LP (“Keys”) under the KEYS brand name. The warranty period to the original purchaser is listed above
in the table.
Keys warrants that the Product you have purchased for use from Keys or from an authorized Keys reseller is free
from defects in materials or workmanship under normal use during the warranty period. Your sales receipt, showing the
date of purchase of the Product, is your proof of purchase. This warranty only extends to you, the original purchaser. It is
not transferable to anyone who subsequently purchases the Product from you. It excludes expendable parts (wear items).
Wear items pertain to components that might need to be replaced due to normal wear and tear. These items vary per
product but will include computer overlays, pedal straps, rope cords, seats, grips, chains, bottom bracket assemblies,
pads, upholstery, pulleys, bearings, etc. Please contact a Keys Fitness customer service representative for specifics on
wear items. This Limited Warranty becomes VALID ONLY if the product is purchased through a Keys Fitness authorized
dealer unless otherwise authorized by Keys Fitness in writing.
During the warranty period Keys will repair or replace (at Keys' option) the product if it becomes defective, malfunctions, or otherwise fails to conform with this Limited Warranty under normal use. In repairing the Product, Keys may
replace defective parts, or at the option of Keys, serviceable used parts that are equivalent to new parts in performance.
All exchanged parts and Products replaced under this warranty will become the property of Keys. Keys reserves the
right to change manufacturers of any part to cover any existing warranty.
This warranty DOES NOT COVER shipping charges, export taxes, custom duties and taxes, or any other charges
associated with transportation of the parts or Product.
To obtain warranty service, you must contact a Keys authorized retailer, service technician or Keys Fitness at our
phone numbers located in this manual. Any parts determined to be defective must be returned to Keys to obtain warranty service. You must prepay any shipping charges, export taxes, custom duties and taxes, or any other charges associated with transportation of the parts or Product. In addition, you are responsible for insuring any parts or Product
shipped or returned. You assume the risk of loss during shipment. You must present Keys with proof-of-purchase documents (including the date of purchase). Any evidence of alteration, erasing or forgery of proof-of-purchase documents
will be cause to void this Limited Warranty.
This warranty does not extend to any product not purchased from Keys or from an authorized Keys reseller. This
Limited Warranty does not extend to any Product that has been damaged or rendered defective; (a) as a result of accident, misuse, or abuse; (b) by the use of parts not manufactured or sold by Keys; (c) by modification of the Product or
normal wear and tear; (d) operation on incorrect power supplies; or (e) as a result of service by anyone other than Keys,
or an authorized Keys warranty service provider. Product on which the serial number has been defaced or removed is
not eligible for warranty service. Should any Product submitted for warranty service be found ineligible, an estimate of
repair cost will be furnished and the repair will be made if requested by you upon Keys' receipt of payment or acceptable
arrangements for payment.
EXCEPT AS EXPRESSLY SET FORTH IN THIS WARRANTY, KEYS MAKES NO OTHER WARRANTIES,
EXPRESSED OR IMPLIED, INCLUDING ANY IMPLIED WARRANTIES OF MERCHANTABILITY AND FITNESS FOR A
PARTICULAR PURPOSE. KEYS EXPRESSLY DISCLAIMS ALL WARRANTIES NOT STATED IN THIS LIMITED WARRANTY. ANY IMPLIED WARRANTIES THAT MAY BE IMPOSED BY LAW ARE LIMITED TO THE TERMS OF THIS
LIMITED WARRANTY. NEITHER KEYS NOR ANY OF ITS AFFILIATES SHALL BE RESPONSIBLE FOR INCIDENTAL
OR CONSEQUENTIAL DAMAGES. SOME STATES DO NOT ALLOW LIMITATIONS ON HOW LONG AN IMPLIED
WARRANTY LASTS OR THE EXCLUSION OR LIMITATION OF INCIDENTAL OR CONSEQUENTIAL DAMAGES, SO
THE ABOVE LIMITATIONS OR EXCLUSION MAY NOT APPLY TO YOU. This Limited Warranty gives you specific legal
rights and you may also have other rights that may vary from state to state. This is the only express warranty applicable
to Keys-branded products. Keys neither assumes nor authorizes anyone to assume for it any other express warranty.
PLEASE SEND IN THE ATTACHED WARRANTY CARD WITHIN TEN (10) DAYS OF PURCHASE TO REGISTER
YOUR UNIT WITH KEYS FITNESS PRODUCTS, LP.
MAIL WARRANTY CARD TO:
KEYS FITNESS PRODUCTS, PO BOX 551239, DALLAS, TX 75355
1
Before You Start
Safety Precautions and Tips
Thank you for purchasing a Keys Elliptical Trainer! This quality
product you have chosen was designed to meet your needs for
cardiovascular exercise.
It is the owner's responsibility to ensure that all users of this elliptical trainer have read the Owner's Manual and are familiar with
warnings and safety precautions.
Prior to assembly, remove components from the box and verify
that all the listed parts were supplied. Assembly instructions are
described in the following steps and illustrations.
• This elliptical trainer has a maximum user capacity of 300
pounds.
Important Safety Information
WARNING!
1) Before using this elliptical trainer or starting any exercise
program, consult your physician. This is especially important
for persons over the age of 35 and/or persons with pre-existing
health problems. Keys Fitness Products LP assumes no responsibility for personal injury or property damage sustained by or
through the use of this product.
2) To reduce the risk of electrical shock, burns, fire or other possible injuries to the user, it is important to review
this manual and the following precautions before operation.
• The Alliance Elliptical Trainer should only be used on a level
surface and is intended for indoor use only. It should not be
placed in a garage, patio or near water. Keys recommends an
equipment mat be placed under the unit to the protect the floor
or carpet and for easier cleaning.
• Wear comfortable, good-quality walking or running shoes and
appropriate clothing. Do not use this elliptical trainer with bare
feet, sandals, socks or stockings!
• Always examine your elliptical trainer before using to ensure all
parts are in working order.
• Do not leave children unsupervised near or on the elliptical
trainer.
• Never operate the elliptical trainer where oxygen is being
administered or where aerosol products are being used.
• Never insert any object or body parts into any opening.
• Service to your Alliance Elliptical Trainer should only be performed by an authorized service representative, unless authorized and/or instructed by a Keys technician. Failure to follow
these instructions will void the warranty.
2
3
Assembly of Alliance
ET920D Elliptical Trainer
REMOVE ALL SECURITY TAPE AND WRAPPING
BEFORE BEGINNING.
2
1
2. Attach both the Left and Right Rear Foot Frames (32, 33) to
the Left and Right Front Foot Frames (30,31) with Carriage Bolts
(62) and Locknuts (49).
1. Attach the Aluminum Extrusions (45) to the Main Frame
Assembly (1) with Screws (63). Connect the Aluminum
Extension Plate (34) between the Extrusions (45) with Screws
(64).
4
5
4
3
3. First connect the Controller Extension Wire (27). Then slide
the Main Upright (2) onto the Main Frame Assembly (1) and
secure with Screws (56), Flat Washers (50) and Locknuts
(49).
6
4. Insert the batteries provided into the back of the Monitor (5)
7
5
6
5. Feed the two Pulse Wires (26) from the Console (5)
down into the Main Upright (2) and out the handlebar
hole. Connect the Controller Wire (28) to the Console (5).
Then connect the Monitor (5) to the Main Upright (2)
with Screws (59).
8
6. First connect the Pulse Wires (26) to the T-Shaped Handlebar
(10). Then connect the T-Shaped Handlebar (10) to the Main
Upright (2) with Screws (55), Flat Washers (50) and Locknuts
(49).
9
7
8
7. Slide on Curved Washers (79) then the left and right handlebars (3, 4) onto the Main Upright (2). Secure handlebars with
Washers (61), Snap Caps (21), Washers (69), Nuts (52), and
Nut Caps (22).
10
8. Secure the Connecting Arms (29) to the left and right
handlebars (3, 4) with Screws (67), Washers (69),
Caps (68), and Nuts (52). Attach bottle rack (2-1) to Main
Upright (2).
11
ET920D PARTS LIST
ET920D EXPLODED VIEW
#
1
2
2-1
3
4
5
6
7
8
9
10
11
12
13
14
15
16
17
18
19
20
21
22
23
24
25
26
27
28
29
30
31
32
33
34
35
36
37
38
39
40
41
42
12
PART
QTY
MAIN FRAME ASSEMBLY
1
MAIN UPRIGHT
1
BOTTLE RACK
1
LEFT FOAM HANDLE
1
RIGHT FOAM HANDLE
1
MONITOR
1
PULLEY
1
GENERATOR
1
CONTROLLER BOARD
1
V-BELT
1
T-SHAPED HANDLEBAR
1
BOTTOM LEFT HOUSING
1
BOTTOM RIGHT HOUSING
1
TOP HOUSING
1
CONSOLE TUBE COLLAR
1
ROUND COVER
1
FOOT PEDAL
1
END CAP
1
ROLLER CAP
2
FOOT CAP
1
WHEEL
2
SNAP CAP
2
NUT CAP
2
38mm BALL PLUG
2
31.8mm BALL PLUG
2
HAND PULSE
2
PULSE WIRE
2
CONTROLLER EXT. WIRE
1
CONTROLLER WIRE
1
CONNECTING ARM
2
LEFT FRONT FOOT FRAME
1
RIGHT FRONT FOOT FRAME
1
LEFT REAR FOOT FRAME
1
RIGHT REAR FOOT FRAME
1
ALUMINUM EXTENSION PLATE 1
6004 PRECISE BEARING
6
608 PRECISE BEARING
8
38mm HANDLEBAR SLEEVE
2
76mm BUSHING
4
BELT TENSION BRACKET
1
ADJUSTMENT CHANNEL
2
EYEBOLT
3
SPRING
1
#
43
44
45
46
47
48
49
50
51
52
53
54
55
56
57
58
59
60
61
62
63
64
65
66
67
68
69
70
71
72
73
74
75
76
77
78
79
80
81
82
83
84
13
PART
QTY
IDLER PULLEY
1
ROLLER
2
ALUMINUM EXTRUSION
2
M6 LOCKNUT
4
M6 HEX NUT
3
M10 CAP NUT
2
M8 LOCKNUT
10
M8 IDX18.8mm OD
FLAT WASHER
12
M20X32X2mm WASHER
4
M10 NUT
10
M8X17mm SCREW
1
M8X38mm SCREW
1
M8X57mm SCREW
2
M8X60mm SCREW
3
TP4X12mm SCREW
48
TP5X50mm SCREW
4
M5X10mm SCREW
4
M6X15mm
8
M10X38 WASHER
4
M8X80mm CARRIAGE BOLT
4
M8X100 mm SCREW
4
M8X15mm SCREW
6
M10X55-8mm SCREW
2
M10X48 MACHINE SCREW
2
M10X58mm SCREW
2
15.8X10X4.3 CAP
4
M10X23mm WASHER
4
25mm BUSHING
8
NUT CAP
4
CRANK NUT
2
LEFT CRANK
1
RIGHT CRANK
1
SHAFT BUSHING
2
JOINITER
2
M8X30mm WASHER
2
RETAINING RING
2
M26 CURVED WASHER
4
M16X28 WASHER
2
M8 NUT
3
38mm END CAP
2
31.8mm END CAP
2
13.7 X 10X8 CAP
4
ET920D Display Instructions
Your Alliance ET920D is equipped with a programmable monitor
to help you track your progress and motivate you to reach your
fitness goals. In order to set your programmable monitor, you
must begin pedaling.
1. Key Functions:
a. RESET - Resetting all cumulative values to zero.
b. ENTER - Confirming of “set values,” “selections” and
“Quick Start” function.
c. + - Increasing and decreasing the set values and resistance
during Operation.
2. Display:
There are three displays in the console:
W1= display window on top, W2=display window in middle and
W3= last display window at bottom of console.
a. W1 = Display every cumulative value including TIME, CALORIES,
DISTANCE, SPEED and RPM.
. .. .
.8..8. 8 8
b. W2 =
1. display profile of every program.
2. display operation information in input mode by rolling characters.
3. display “score” when “Fitness Test” program is finished. (see step 4D)
c. W3 = Display “Heart Rate” and ”Workout Level.”
888
14
15
3. Indicator:
C. “HRC” program.
1. Step 1 to 6 is similar to B, but “HRC” program also requires age and
target heart rate.
7. Press ENTER key, (W2) displays “ENTER AGE” and (W1) displays
preset age of last operation.
8. Set age of exerciser by + - keys.
9. Press ENTER key, (W2) displays “TARGET HART RATE,” (W1)
displays preset value of target heart rate, which depends on age of
the exerciser.
10. Choose target heart rate by + - keys.
11. Press ENTER key.
12. (W2) displays “PRESS ENTER TO BEGIN”
13. Press ENTER key and start to exercise.
a. TIME
b. CALORIES
d. SPEED
e. RPM
f. SCAN
g. MANUAL
h. CONSTANT POWER
i. INTERVAL
j. HILLS
k. PLATEAU
l. MOUNTAIN
m. HRC
n. FITNESS TEST
4. Operation Process:
A. “QUICK START” MODE:
1. Press RESET key, all LED of the console turns on for 2 seconds.
2. Press ENTER key during 2 seconds in step 1, the console is in “Quick
Start” mode, and displays the profile of “Manual” program.
3. “TIME” and “SCAN” indicators of (W1) turn on. Operation time is counting up and every display value of (W1) is scanning per 4 seconds interval.
4. (W2) displays each column as 1 minute of operation then the completed
column will shift to the right.
5. Exerciser can adjust working level by + - keys
6. Stop this mode by pressing RESET key.
B. “MANUAL,” “CONSTANT POWER,” “INTERVAL,” “HILLS,”
“PLATEAU” and “MOUNTAIN” programs.
1. Press RESET key, (W2) displays ENTER WEIGHT
2. Preset weight of exerciser by + - keys.
3. Press ENTER key, (W2) displays “SELECT PROGRAM”.
4. Choose desired program by + - keys and indicators of desired program
turn on. Corresponding profile of program is displayed on (W2).
5. Press ENTER key, (W2) displays “WORKOUT TIME” and (W1)
displays preset time value of last operation.
6. Set new time value by + - keys.
7. Press ENTER key.
8. (W2) displays “PRESS ENTER TO BEGIN”
9. Press ENTER key and start to exercise.
16
D. “FITNESS TEST” program.
This 8 minute test program calculates your approximate oxygen uptake. At
the end of the program you will receive a Fit Test Score which is the equivalent of your approximate VO2 max. This number should be used as a reference to gauge aerobic improvements over an extended workout protocol.
Please use the following table for reference only:
Standards for evaluating aerobic fitness (VO2 max)
Age
Women
20-29
30-39
40-49
50-59
60-69
Low
Fair
Average
Good
High
<24
<20
<17
<15
<13
24-30
20-27
17-23
15-20
13-17
31-37
28-33
24-30
21-27
18-23
38-48
34-44
31-41
28-37
24-34
>49
>45
>42
>38
>35
Men
20-29
30-39
40-49
50-59
60-69
<25
<23
<20
<18
<16
25-33
23-30
20-26
18-24
16-22
34-42
31-38
27-35
25-33
23-30
43-52
39-48
36-44
34-42
31-40
>53
>49
>45
>43
>41
17
Monitoring Your Heart Rate
1. Step 1-4 is similar to B, but “FITNESS TEST” program also requires age
and sex of user.
5. Press ENTER key, (W2) displays “ENTER AGE” and (W1) displays
preset age of last operation.
6. Set age of the exerciser by + - keys.
7. Press ENTER key, (W2) displays “SET SEX,”
8. Choose “MALE” or “FEMALE” by + - keys, (W1) displays MALE
or FEMALE correspondingly.
9. Press ENTER key, (W2) displays “PRESS ENTER TO BEGIN”
10. Press ENTER key and start to exercise.
E. START MODE
1. Each column of (W2) represents one minute of operation when time is
being counted up.
2. In (W2) presetting time value divided by 16 is equal to each column
when operation time is being counted down.
3. Press ENTER key to change the “SCAN” function in operation and the
corresponding indication of “SCAN” will turn on or off.
4. The exerciser can adjust workout level by using + - keys in operation
except during “FITNESS TEST” program.
F. RESULT MODE
1. When operation time is finished, the console is in
“Result state”, (W1) displays the following data in
4 second intervals.
a. Total operation time.
b. Cumulative calories.
c. Cumulative distance.
d. Average speed.
e. Average RPM.
2. W3 displays “average heart rate”
3. W2 displays “RESULTS MODE” and shows profiles
of every program for 2.5 seconds sequentially, except in
“FITNESS TEST” program.
4. W2 displays “SCORE=000” when “FITNESS TEST”
Program is completed.
18
To obtain the greatest cardiovascular benefits from your exercise
workout, it is important to work within your target heart rate
zone. The American Heart Association (AHA) defines this target
as 60%-75% percent of your maximum heart rate.
Your maximum heart rate may be roughly calculated by subtracting your age from 220. Your maximum heart rate and aerobic
capacity naturally decreases as you age. This may vary from one
person to another, but use this number to find your approximate
effective target zone. For example, the maximum heart rate for an
average 40 year-old is 180 bpm. The target heart rate zone is
60%-75% of 180 or 108-135 bpm. See Fitness Safety on page 20.
Before beginning your workout, check your normal resting heart
rate. Place your fingers lightly against your neck, or against your
wrist over the main artery. After finding your pulse, count the
number of beats in 10 seconds. Multiply the number of beats by
six to determine your pulse rate per minute. We recommend taking your heart rate at these times; at rest, after warming up, during your workout and two minutes into your cool down, to accurately track your progress as it relates to better fitness.
During your first several months of exercising, the AHA recommends aiming for the lower part of the target heart rate zone60%, then gradually progressing up to 75%.
According to the AHA, exercising above 75% of your maximum
heart rate may be too strenuous unless you are in top physical
condition. Exercising below 60% of your maximum will result in
minimal cardiovascular conditioning.
19
Check your pulse recovery rate – If your pulse is over 100 bpm
five minutes after you stop exercising, or if it’s higher than
normal the morning after exercising, your exertion may have been
too strenuous for your current fitness level. Rest and reduce the
intensity next time.
Fitness Safety
The target heart rate chart indicates average rate zones for different ages. A variety of different factors (including
medication, emotional state, temperature and other conditions) can
affect the target heart rate zone that is best for you. Your physician or
health care professional can help you determine the exercise intensity
that is appropriate for your age and condition.
(MHR) = Maximum Heart Rate
(THR) = Target Heart Rate
220 - age = maximum heart rate (MHR).
MHR x .60 = 60% of your maximum heart rate.
TARGET HEART RATE ZONE
100%
200
195
190
185
180
Serious
athletic
training range
85%
170
166
162
157
Cardiovascular
conditioning
range
75%
150
146
143
139
153
135
Fat burning
range
60%
120
117
114
111
108
MHR x .75 = 75% of your maximum heart rate.
For example, if you are 30 years old, your
calculations will be as follows:
220 - 30 = 190
190 x .60 = 114 (low end or 60% of MHR)
190 x .75 = 142 (high end or 75% of MHR)
30 year-old (THR) Target Heart Rate would be 114-142.
20
25
30
35
40
149
131
105
45
AGE
See Table on right for additional calculations.
20
175
21
170
145
128
165
140
124
160
136
120
155
132
116
102
99
96
93
50
55
60
65