1
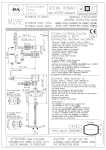
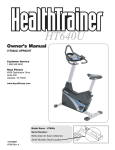
CardioMax
535 Dual Action Bike
OWNER’S MANUAL
QUESTIONS?
Call Our Toll Free
Keys Fitness Helpline
1-888-340-0482
1-888-340-0482
Monday-Friday
8:30-5:30 Central Time
Keys Fitness Products, L.P.
4009 Distribution Dr.
Suite 250
Garland, Texas 75041
Keys Fitness Products, L.P.
P.O. Box 551239
Dallas, Texas 75355-1239
CAUTION!
Please read the precautions and
instructions in this manual before
using this equipment. Please save
this manual for future reference.
Keys Fitness is committed
to quality products that
demonstrate our commitment
to excellence!
Keys Exercise Bike
Model: CM535D
Before You Start
Thank you for purchasing a Keys exercise bicycle! This quality
product you have chosen was designed to meet your needs for
cardiovascular exercise.
Prior to assembly, remove components from the box. Assembly
instructions are described in the following steps and illustrations.
Questions?
Please call if:
• you need assistance about
operating your exercise bike
• parts are missing
• parts become worn or need to
be replaced
1-888-340-0482
Monday-Friday
8:30-5:30 Central Time
Please have the following product information
available:
• Model Number
• Part Number
• Description
Important Safety Information
WARNING!
1) Before using this exercise bicycle or starting any
exercise program, consult your physician. This is especially
important for persons over the age of 35 and/or persons with
pre-existing health problems. Keys Fitness Products LP
assumes no responsibility for personal injury or property
damage sustained by or through the use of this product.
2) To reduce the risk of electrical shock, burns, fire or other
possible injuries to the user, it is important to review
this manual and the following precautions before operation.
1
Safety Precautions and Tips
It is the owner's responsibility to ensure that all users of this
exercise bike have read the Owner's Manual and are familiar
with warnings and safety precautions.
• This exercise bike has a maximum user capacity of 300
pounds.
• The CardioMax Exercise bike should only be used on a level
surface and is intended for indoor use only. It should not be
placed in a garage, patio or near water. Keys recommends an
equipment mat be placed under the bicycle to the protect the
floor or carpet and for easier cleaning.
• Wear comfortable, good-quality walking or running shoes
and appropriate clothing. Do not use this exercise bike with
bare feet, sandals, socks or stockings!
ASSEMBLY PARTS
PART
Front Foot Tube
Rear Foot Tube
Frame
Right Pedal
Left Pedal
Seat
Seat Post
Locking Knob
Console Tube
Right Handlebar
Left Handlebar
Right Connecting Arm
Left Connecting Arm
21
22
13
• Always examine your exercise bike before using to ensure all
parts are in working order.
• Do not leave children unsupervised near or on the exercise
bicycle.
• Never operate the exercise bicycle where oxygen is being
administered or where aerosol products are being used.
#
2
2A
3
9
10
13
14
15
16
21
22
23
24
16
14
10
15
2A
• Never insert any object or body parts into any opening.
• Service to your CardioMax exercise bike should only be performed by an authorized service representative, unless authorized and/or instructed by a Keys technician. Failure to follow
these instructions will void the warranty.
3
9
23/24
2
2
3
Assembly of CardioMax
535 Dual Action Bike
REMOVE ALL SECURITY TAPE AND WRAPPING
BEFORE BEGINNING
2. Attach the FRONT FOOT TUBE to the FRAME by using the
CARRIAGE BOLTS, WASHERS and CAP NUTS.
1. Attach REAR FOOT TUBE to the FRAME by using the
CARRIAGE BOLTS, WASHERS and CAP NUTS.
4
5
3. Thread SHAFTS of PEDALS into CRANK and tighten with
wrench.
IMPORTANT:
Axles of pedals are branded “L” and “R.”
The pedal marked “R” goes on the right
hand side of the bike and the one marked
“L” on the left hand side. Tighten the left
pedal by turning counter-clockwise and the
right pedal by turning clockwise.
4. Place SEAT upside down and remove NUTS on MOUNTING
BOLTS. Lower MOUNTING PLATE of SEAT POST down
onto MOUNTING BOLTS and fasten with removed NUTS.
6
7
DETAIL
5. Turn LOCKING KNOB counterclockwise to loosen. Pull
LOCKING KNOB out and insert SEAT POST into SEAT
POST TUBE to desired seat height. Release LOCKING
KNOB so that it springs into a hole in the SEAT POST and
turn clockwise until tight to remove any looseness.
IMPORTANT: LOCKING KNOB must be locked tightly
into hole in SEAT POST before you sit on
the SEAT.
8
6. Connect EXETENSION WIRE in CONSOLE TUBE to
REED SWITCH WIRE in FRAME. Connect the TENSION
CABLE in CONSOLE TUBE to the TENSION BLOCK in
FRAME (See Detail). Secure CONSOLE TUBE to FRAME
with BUTTON HEAD SCREWS and WASHERS.
9
8. ATTACHING CONNECTING ARMS TO PEDALS:
(DUAL ACTION MODE)
Slide RETAINER onto CONNECTING ARM until it has cleared
SLOT in CONNECTING ARM as shown in DETAIL.
DETAIL
Lower SLOT in CONNECTING
ARM down over PEDAL
BUSHING - see Figure A.
Slide RETAINER in direction of
ARROW until CONNECTING
ARM is locked in DUAL
ACTION MODE - see Figure B.
FIGURE A
7. With PIVOT TUBES on rear side of HANDLEBARS and
CONNECTING ARMS to inside, slide RIGHT and LEFT
HANDLEBARS onto AXLE. Slide LARGE WASHER onto
end of AXLE. Carefully tap PUSHNUT onto end of AXLE
with hammer. Connect heart rate wires from CONSOLE
TUBE (B) to heart rate wire in each handlebar (A).
10
FIGURE B
11
10. CONNECTING ARM ADJUSTMENT
9. ATTACHING CONNECTING ARMS TO LOCKOUT ROD:
(SINGLE ACTION MODE)
Carefully tap PUSHNUT onto ends of LOCKOUT ROD with
hammer. Lower SLOT in CONNECTING ARM onto LOCKOUT
ROD and slide RETAINER back over LOCKOUT ROD to lock
CONNECTING ARM in SINGLE ACTION MODE.
12
NOTE: There are three ADJUSTMENT HOLES in each
CONNECTING ARM. The CONNECTING ARM comes
attached to the END HOLE. The END HOLE puts the
GRIP end of the HANDLEBARS closer to you, which is
better for shorter people. The INSIDE HOLE puts the GRIP
end farther away from you which is better for taller people.
Remove HAIRPIN COTTER and 5/16” WASHER from
PIVOT PIN in HANDLEBAR. Slide desired ADJUSTMENT HOLE of CONNECTING ARM onto PIVOT PIN of
HANDLEBAR. Place 5/16” WASHER over PIVOT PIN
and insert HAIRPIN COTTER through hole in PIVOT PIN
to lock in place.
13
11. Remove BATTERY DOOR of
CONSOLE and insert TWO
“AA” SIZE BATTERIES,
then replace BATTERY
DOOR.
NOTE: Do not use rechargeable
batteries. They will cause a short
circuit and destroy console.
Monitoring Your Heart Rate
To obtain the greatest cardiovascular benefits from your exercise workout, it is important to work within your target heart
rate zone. The American Heart Association (AHA) defines this
target as 60%-75% percent of your maximum heart rate.
Your maximum heart rate may be roughly calculated by
subtracting your age from 220. Your maximum heart rate and
aerobic capacity naturally decreases as you age. This may vary
from one person to another, but use this number to find your
approximate effective target zone. For example, the maximum
heart rate for an average 40 year-old is 180 bpm. The target
heart rate zone is 60%-75% of 180 or 108-135 bpm. See Fitness
Safety on page 16.
Before beginning your workout, check your normal resting
heart rate. Place your fingers lightly against your neck, or against
your wrist over the main artery. After finding your pulse, count
the number of beats in 10 seconds. Multiply the number of beats
by six to determine your pulse rate per minute. We recommend
taking your heart rate at these times; at rest, after warming up,
during your workout and two minutes into your cool down, to
accurately track your progress as it relates to better fitness.
PULSE
WIRE
During your first several months of exercising, the AHA
recommends aiming for the lower part of the target heart rate
zone- 60%, then gradually progressing up to 75%.
12. Remove the four MACHINE SCREWS from back of CONSOLE.
Carefully plug EXTENSION WIRE and PULSE WIRE into bottom of CONSOLE. Attach CONSOLE to CONSOLE TUBE
with MACHINE SCREWS from CONSOLE.
14
According to the AHA, exercising above 75% of your maximum heart rate may be too strenuous unless you are in top physical condition. Exercising below 60% of your maximum will result
in minimal cardiovascular conditioning.
15
Check your pulse recovery rate – If your pulse is over 100 bpm
five minutes after you stop exercising, or if it’s higher than
normal the morning after exercising, your exertion may have been
too strenuous for your current fitness level. Rest and reduce the
intensity next time.
TARGET HEART RATE ZONE
Fitness Safety
The target heart rate chart indicates average rate zones for different
ages. A variety of different factors (including medication, emotional
state, temperature and other conditions) can affect the target heart rate
zone that is best for you. Your physician or health care professional can
help you determine the exercise intensity that is appropriate for your
age and condition.
(MHR) = Maximum Heart Rate
100%
200
195
190
185
85%
170
166
162
157
Cardiovascular
conditioning
range
(THR) = Target Heart Rate
220 - age = maximum heart rate (MHR).
MHR x .60 = 60% of your maximum heart rate.
MHR x .75 = 75% of your maximum heart rate.
For example, if you are 30 years old, your
calculations will be as follows:
220 - 30 = 190
190 x .60 = 114 (low end or 60% of MHR)
180
Serious
athletic
training range
75%
150
146
143
139
153
135
Fat burning
range
60%
120
20
117
25
114
30
111
35
108
40
149
131
105
45
AGE
190 x .75 = 142 (high end or 75% of MHR)
For a 30 year-old the (THR) Target Heart Rate
would be 114-142.
See Table on right for additional calculations.
16
175
17
170
145
128
165
140
124
160
136
120
155
132
116
102
99
96
93
50
55
60
65
CM535D PARTS LIST
#
1
2
2A
3
4
5
6
7
8
9
10
11
12
13
14
15
16
17
18
19
20
21
22
23
24
25
26
27
28
29
30
31
32
33
34
PART
M8x1.25x60mm Carriage Bolt
Front Foot Tube
Rear Foot Tube
Frame
M8 IDx18.8mm OD Flat Washer
M8x1.25 Cap Nut
Foot Cap
Wheel
Pedal Bushing
Right Pedal
Left Pedal
Crank
Pedal Nut
Seat
Seat Post
Locking Knob
Console Tube
Extension Wire
Reed Switch
Tension Block
M8x1.25x12mm Button Head Scr
Right Handlebar
Left Handlebar
Right Connecting Arm
Left Connecting Arm
Large Washer
Pushnut
Grip
Retainer
Hairpin Cotter
Console
M6x1x10mm Machine Screw
“V” Belt
M10 Cap Nut
M10 Washer
QTY
4
1
1
1
10
4
2
2
2
1
1
1
2
1
1
1
1
1
1
1
2
1
1
1
1
2
4
2
2
2
1
4
1
2
2
# PART
35 Magnetic Brake
36 M6x1x10mm Machine Screw
37 Spring
38 Belt Tension Bracket
39 M6x20mm Machine Screw
40 M6x1 Hex Nut
41 Idler Pulley
42 Idler Bushing
43 M8x45mm Button Head Screw
44 Eyebolt
45 Adjustment Channel
46 M6x1 Locknut
47 Bearing Cup
48 Bearing
49 M5x0.8x70 Machine Screw
50 Notched Bearing Nut
51 Crank Washer
52 Crank Nut
53 Pulley
54 Magnet
55 M4x16mm Sheet Metal Screw
56 M5x0.8 Hex Nut
57 Right Seat Post Bushing
58 Left Seat Post Bushing
59 Bottom Left Cover
60 Bottom Right Cover
61 Connecting Left Cover
62 Connecting Right Cover
63A Top Left Cover
63B Top Right Cover
64 Pivot Bushing
65 M8 Locknut
66 Cap
67 Hand Pulse
68 Pulse Wire
18
CM535D EXPLODED VIEW
QTY
1
4
1
1
1
6
1
1
1
2
2
1
2
2
2
1
1
1
1
1
6
2
1
1
1
1
1
1
1
1
4
6
2
2
2
19
KEYS FITNESS PRODUCTS, LP LIMITED WARRANTY
PRODUCT:
HOME USE WARRANTY:
CARDIOMAX 535 DUAL ACTION BIKE
Frame:
2 Years
Parts:
1 Years
This Limited Warranty applies in the United States and Canada to products manufactured or distributed by Keys
Fitness Products, LP (“Keys”) under the KEYS brand name. The warranty period to the original purchaser is listed above
in the table.
Keys warrants that the Product you have purchased for use from Keys or from an authorized Keys reseller is free
from defects in materials or workmanship under normal use during the warranty period. Your sales receipt, showing the
date of purchase of the Product, is your proof of purchase. This warranty only extends to you, the original purchaser. It is
not transferable to anyone who subsequently purchases the Product from you. It excludes expendable parts (wear items).
Wear items pertain to components that might need to be replaced due to normal wear and tear. These items vary per
product but will include computer overlays, pedal straps, rope cords, seats, grips, chains, bottom bracket assemblies,
pads, upholstery, pulleys, bearings, etc. Please contact a Keys Fitness customer service representative for specifics on
wear items. This Limited Warranty becomes VALID ONLY if the product is purchased through a Keys Fitness authorized
dealer unless otherwise authorized by Keys Fitness in writing.
During the warranty period Keys will repair or replace (at Keys' option) the product if it becomes defective, malfunctions, or otherwise fails to conform with this Limited Warranty under normal use. In repairing the Product, Keys may
replace defective parts, or at the option of Keys, serviceable used parts that are equivalent to new parts in performance.
All exchanged parts and Products replaced under this warranty will become the property of Keys. Keys reserves the
right to change manufacturers of any part to cover any existing warranty.
This warranty DOES NOT COVER shipping charges, export taxes, custom duties and taxes, or any other charges
associated with transportation of the parts or Product.
To obtain warranty service, you must contact a Keys authorized retailer, service technician or Keys Fitness at our
phone numbers located in this manual. Any parts determined to be defective must be returned to Keys to obtain warranty service. You must prepay any shipping charges, export taxes, custom duties and taxes, or any other charges associated with transportation of the parts or Product. In addition, you are responsible for insuring any parts or Product
shipped or returned. You assume the risk of loss during shipment. You must present Keys with proof-of-purchase documents (including the date of purchase). Any evidence of alteration, erasing or forgery of proof-of-purchase documents
will be cause to void this Limited Warranty.
This warranty does not extend to any product not purchased from Keys or from an authorized Keys reseller. This
Limited Warranty does not extend to any Product that has been damaged or rendered defective; (a) as a result of accident, misuse, or abuse; (b) by the use of parts not manufactured or sold by Keys; (c) by modification of the Product or
normal wear and tear; (d) operation on incorrect power supplies; or (e) as a result of service by anyone other than Keys,
or an authorized Keys warranty service provider. Product on which the serial number has been defaced or removed is
not eligible for warranty service. Should any Product submitted for warranty service be found ineligible, an estimate of
repair cost will be furnished and the repair will be made if requested by you upon Keys' receipt of payment or acceptable
arrangements for payment.
EXCEPT AS EXPRESSLY SET FORTH IN THIS WARRANTY, KEYS MAKES NO OTHER WARRANTIES,
EXPRESSED OR IMPLIED, INCLUDING ANY IMPLIED WARRANTIES OF MERCHANTABILITY AND FITNESS FOR A
PARTICULAR PURPOSE. KEYS EXPRESSLY DISCLAIMS ALL WARRANTIES NOT STATED IN THIS LIMITED WARRANTY. ANY IMPLIED WARRANTIES THAT MAY BE IMPOSED BY LAW ARE LIMITED TO THE TERMS OF THIS
LIMITED WARRANTY. NEITHER KEYS NOR ANY OF ITS AFFILIATES SHALL BE RESPONSIBLE FOR INCIDENTAL
OR CONSEQUENTIAL DAMAGES. SOME STATES DO NOT ALLOW LIMITATIONS ON HOW LONG AN IMPLIED
WARRANTY LASTS OR THE EXCLUSION OR LIMITATION OF INCIDENTAL OR CONSEQUENTIAL DAMAGES, SO
THE ABOVE LIMITATIONS OR EXCLUSION MAY NOT APPLY TO YOU. This Limited Warranty gives you specific legal
rights and you may also have other rights that may vary from state to state. This is the only express warranty applicable
to Keys-branded products. Keys neither assumes nor authorizes anyone to assume for it any other express warranty.
PLEASE SEND IN THE ATTACHED WARRANTY CARD WITHIN TEN (10) DAYS OF PURCHASE TO REGISTER
YOUR UNIT WITH KEYS FITNESS PRODUCTS, LP.
MAIL WARRANTY CARD TO:
KEYS FITNESS PRODUCTS, PO BOX 551239, DALLAS, TX 75355
20