1
796.4158*
*
MFL68639705
TABLE OF CONTENTS
PROTECTION AGREEMENTS
Master Protection Agreements
Congratulations on making a smart purchase. Your new
Kenmore Elite® product is designed and manufactured
for years of dependable operation. But like all products,
it may require preventive maintenance or repair from
time to time. That’s when having a Master Protection
Agreement can save you money and aggravation.
The Master Protection Agreement also helps extend the
life of your new product. Here’s what the
Agreement* includes:
vParts and labor needed to help keep products
operating properly under normal use, not just defects.
Our coverage goes well beyond the product warranty.
No deductible, no functional failure excluded from
coverage – real protection.
vExpert service by a force of more than 10,000
authorized Sears service technicians, which means
someone you can trust will be working on your product.
vUnlimited service calls and nationwide service, as
often as you want us, whenever you want us.
“No-lemon”guarantee– replacement of your
covered product if four or more product failures occur
within twelve months.
Productreplacementif your covered product can not
be
vAnnual Preventive Maintenance Check at your request
– no extra charge.
vFast help by phone – we call it Rapid Resolution.
Phone support from a Sears representative on all
products. Think of us as a “talking owner’s manual.”
vPower surge protection against electric damage due to
IMPORTANT SAFETY INSTRUCTIONS ............................. 3-5
GROUNDING REQUIREMENTS............................................. 5
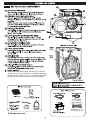
FEATURES AND BENEFITS
Key Parts and Components .................................................6
Included Accessories ........................................................... 6
Optional Accessories ........................................................... 6
INSTALLATION REQUIREMENTS
...................................7
Choose the Proper Location ............................................... 7
Flooring ..................................................................................7
Clearances ............................................................................7
INSTALLATION INSTRUCTIONS
Unpacking and Removing Shipping Bolts ......................... 8
Connecting the Water Lines ................................................ 9
Connecting the Drain Hose ............................................... 10
Connect to the Power Supply.............................................10
Leveling the Washer ........................................................... 11
Installation of Non-Skid Pads (optional) ...........................11
HOW TO USE
Control Panel Features ........................................................ 12
Operating the Washer.........................................................13
Cycle Guide .................................................................... 14-15
Sorting Wash Loads ............................................................ 16
About the Dispenser Drawer ..............................................17
Detergent and Dispenser Use .............................................18
Time and Status Display .................................................... 19
.......................................................20
Steam Cycles and Options.................................................21
Special Functions ................................................................ 22
CARE AND CLEANING
Regular Cleaning .......................................................... 23-24
Maintenance ..................................................................25-26
Cleaning the Water Inlet Filters ....................................25
Cleaning the Drain Pump Filter .....................................26
KENMORE CONNECT™ System.........................................27
TROUBLESHOOTING GUIDE
Normal Sounds You May Hear......................................... 28
Before Calling for Service .......................................... 28-30
WARRANTY ............................................................................ 31
PRODUCT RECORD
In the space below, record the date of purchase, model,
the washer door. Have these items of information available
whenever you contact Sears concerning your
product.
Model No.
Date of Purchase
Serial No.
Save these instructions and your sales receipt for future
reference.
2
v$250 food loss protection annually for any food
spoilage that is the result of mechanical failure of any
covered refrigerator or freezer.
vRental reimbursement if repair of your covered
product takes longer than promised.
v 25% discount
repair service and related installed parts.
Once you purchase the Agreement, a simple phone
call is all that it takes for you to schedule service. You
can call at any time day or night or schedule a service
appointment online.
The Master Protection Agreement is a risk-free purchase.
If you cancel for any reason during the product
warranty period, we will provide a full refund, or a
prorated refund any time after the product warranty
period expires. Purchase your Master Protection
Agreement today!
Some limitations and exclusions apply.
For prices and additional information in the U.S.A.
call 1-800-827-6655.
*Coverage in Canada varies on some items.
For full details call Sears Canada at 1-800-361-6665.
Sears Installation Service
For Sears professional installation of home appliances,
garage door openers, water heaters, and other major
home items, in the U.S.A. or Canada call:
1-800-4-MY-HOME®.
SAFETY MESSAGES
7KHUHDUHPDQ\LPSRUWDQWVDIHW\PHVVDJHVLQWKLVPDQXDODQGRQ\RXUDSSOLDQFH$OZD\VUHDGDQGREH\
DOOVDIHW\PHVVDJHV
7KLVLVWKHVDIHW\DOHUWV\PERO7KLVV\PERODOHUWV\RXWRSRWHQWLDOKD]DUGVWKDWFDQUHVXOWLQSURSHUW\
GDPDJHDQGRUVHULRXVERGLO\KDUPRUGHDWK
$OOVDIHW\PHVVDJHVZLOOIROORZWKHVDIHW\DOHUWV\PERODQGHLWKHUWKHZRUG'$1*(5RU:$51,1*
7KHVHZRUGVPHDQ
,QGLFDWHVDKD]DUGRXVVLWXDWLRQZKLFKLIQRWDYRLGHGZLOOUHVXOWLQGHDWKRUVHULRXV
LQMXU\
,QGLFDWHVDKD]DUGRXVVLWXDWLRQZKLFKLIQRWDYRLGHGFRXOGUHVXOWLQGHDWKRUVHULRXV
LQMXU\
$OOVDIHW\PHVVDJHVZLOOWHOO\RXZKDWWKHSRWHQWLDOKD]DUGLVWHOO\RXKRZWR
UHGXFHWKHFKDQFHRILQMXU\DQGWHOO\RXZKDWFDQKDSSHQLIWKHLQVWUXFWLRQVDUH
QRWIROORZHG
IMPORTANT SAFETY INSTRUCTIONS
WARNING
WARNING
v'RQRWLQVWDOORUVWRUHWKHZDVKHUZKHUHLWZLOOEH
H[SRVHGWRWKHZHDWKHURUIUHH]LQJWHPSHUDWXUHV
v'RQRWWDPSHUZLWKFRQWUROV
v'RQRWUHSDLURUUHSODFHDQ\SDUWRIWKHZDVKHURU
DWWHPSWDQ\VHUYLFLQJRWKHUWKDQDVGHVFULEHGLQWKLV
PDQXDO:HVWURQJO\UHFRPPHQGWKDWDQ\VHUYLFHEH
SHUIRUPHGE\DTXDOLoHGWHFKQLFLDQ
v6HH,QVWDOODWLRQ,QVWUXFWLRQVIRUJURXQGLQJUHTXLUHPHQWV
v$/:$<6IROORZWKHIDEULFFDUHLQVWUXFWLRQVVXSSOLHGE\
WKHJDUPHQWPDQXIDFWXUHU
v'RQRWSODFHLWHPVH[SRVHGWRFRRNLQJRLOLQ\RXU
ZDVKHU,WHPVFRQWDPLQDWHGZLWKFRRNLQJRLOVPD\
FRQWULEXWHWRDFKHPLFDOUHDFWLRQWKDWFRXOGFDXVHD
ORDGWRFDWFKoUH
v8VHIDEULFVRIWHQHUVRUSURGXFWVWRHOLPLQDWHVWDWLFRQO\
DVUHFRPPHQGHGE\WKHPDQXIDFWXUHU
v7KLVZDVKHULVQRWGHVLJQHGIRUPDULWLPHXVHRUIRU
PRELOHLQVWDOODWLRQVVXFKDVLQ59VDLUFUDIWHWF
v7XUQ2))WKHZDWHUIDXFHWVDQGXQSOXJWKHZDVKHULI
WKHPDFKLQHLVWREHOHIWIRUDQH[WHQGHGSHULRGRI
WLPHVXFKDVGXULQJYDFDWLRQV
v3DFNDJLQJPDWHULDOFDQEHGDQJHURXVIRUFKLOGUHQ
7KHUHLVDULVNRIVXçRFDWLRQ.HHSDOOSDFNDJLQJ
IURPFKLOGUHQ
v$OZD\VFKHFNWKHLQVLGHRIWKHZDVKHUIRUIRUHLJQ
REMHFWVEHIRUHORDGLQJODXQGU\.HHSWKHGRRUFORVHG
ZKHQQRWLQXVH
vWARNING:7KLVSURGXFWFRQWDLQVFKHPLFDOVNQRZQ
WRWKH6WDWHRI&DOLIRUQLDWRFDXVHFDQFHUDQGELUWK
GHIHFWVRURWKHUUHSURGXFWLYHKDUPWash hands after
handling.
7RUHGXFHWKHULVNRIoUHHOHFWULFVKRFNRULQMXU\WR
persons when using this appliance, follow basic
precautions, including the following.
v%HIRUHXVHWKHZDVKHUPXVWEHSURSHUO\LQVWDOOHGDV
GHVFULEHGLQWKLVPDQXDO
v'RQRWZDVKDUWLFOHVWKDWKDYHEHHQSUHYLRXVO\FOHDQHG
LQZDVKHGLQVRDNHGLQRUVSRWWHGZLWKJDVROLQHGU\
FOHDQLQJVROYHQWVRURWKHUpDPPDEOHRUH[SORVLYH
VXEVWDQFHVDVWKH\JLYHRçYDSRUVWKDWFRXOG
LJQLWHRUH[SORGH
v'RQRWDGGJDVROLQHGU\FOHDQLQJVROYHQWVRURWKHU
pDPPDEOHRUH[SORVLYHVXEVWDQFHVWRWKHZDVKZDWHU
7KHVHVXEVWDQFHVJLYHRçYDSRUVWKDWFRXOGLJQLWH
RUH[SORGH
v8QGHUFHUWDLQFRQGLWLRQVK\GURJHQJDVPD\EH
SURGXFHGLQDKRWZDWHUV\VWHPWKDWKDVQRWEHHQ
XVHGIRUWZRZHHNVRUPRUH+<'52*(1*$6,6
(;3/26,9(,IWKHKRWZDWHUV\VWHPKDVQRWEHHQXVHG
IRUVXFKDSHULRGEHIRUHXVLQJWKHZDVKHUWXUQ21
DOOKRWZDWHUIDXFHWVDQGOHWWKHZDWHUpRZIURPHDFK
IRUVHYHUDOPLQXWHV7KLVZLOOUHOHDVHDQ\DFFXPXODWHG
K\GURJHQJDV$VWKHJDVLVpDPPDEOHGRQRWVPRNH
RUXVHDQRSHQpDPHGXULQJWKLVWLPH
v'RQRWDOORZFKLOGUHQWRSOD\RQRULQWKHZDVKHU&ORVH
VXSHUYLVLRQRIFKLOGUHQLVQHFHVVDU\ZKHQWKHZDVKHULV
XVHGQHDUFKLOGUHQ
v%HIRUHWKHZDVKHULVUHPRYHGIURPVHUYLFHRU
GLVFDUGHGUHPRYHWKHGRRUWRSUHYHQWFKLOGUHQIURP
FOLPELQJLQVLGH
3
IMPORTANT SAFETY INSTRUCTIONS
WARNING
WARNING
7RUHGXFHWKHULVNRIoUHHOHFWULFVKRFNRULQMXU\WR
persons when using this appliance, follow basic
precautions, including the following.
8QSOXJWKHZDVKHUEHIRUHFOHDQLQJWRDYRLGWKHULVNRI
HOHFWULFVKRFN
vNever use harsh chemicals, abrasive cleaners, or
solvents to clean the washer.7KH\ZLOOGDPDJH
WKHoQLVK
vDo not put oily or greasy rags or clothing on top of
the washer.7KHVHVXEVWDQFHVJLYHRçYDSRUVWKDW
FRXOGLJQLWHWKHPDWHULDOV
vDo not wash items that are soiled with vegetable or
cooking oil.7KHVHLWHPVPD\FRQWDLQVRPHRLODIWHU
ODXQGHULQJDQGPD\FDWFKoUH
vDisconnect this appliance from the power supply
before attempting any user maintenance. Turning the
controls to the OFF position does not disconnect this
appliance from the power supply.)DLOXUHWRIROORZWKLV
ZDUQLQJFDQFDXVHVHULRXVLQMXU\oUHHOHFWULFVKRFN
RUGHDWK
vDo not combine detergents, fabric softeners, and/or
other ODXQGU\SURGXFWVIURPGLçHUHQWPDQXIDFWXUHUV
IRUXVHLQDORDGXQOHVVVSHFLoHGRQWKHIDEULFODEHO
vDo not mix chlorine bleach with ammonia or acids
such as vinegar. Follow package directions when
using laundry products.,QFRUUHFWXVDJHFDQSURGXFH
SRLVRQRXVJDVUHVXOWLQJLQVHULRXVLQMXU\RUGHDWK
vDo not reach into the washer while parts are moving.
Before loading, unloading, or adding items, push in the
cycle selector knob and allow the drum to coast to a
complete stop before reaching inside.)DLOXUHWRIROORZ
WKLVZDUQLQJFDQFDXVHVHULRXVLQMXU\oUHHOHFWULFVKRFN
RUGHDWK
WARNING
WARNING
vRefer to INSTALLATION INSTRUCTIONS for detailed
grounding procedures.,QVWDOODWLRQLQVWUXFWLRQVDUH
SDFNHGLQWKHZDVKHUIRUWKHLQVWDOOHU VUHIHUHQFH,IWKH
ZDVKHULVPRYHGWRDQHZORFDWLRQKDYHLWFKHFNHG
DQGUHLQVWDOOHGE\DTXDOLoHGVHUYLFHWHFKQLFLDQ)DLOXUH
WRIROORZWKLVZDUQLQJFDQFDXVHVHULRXVLQMXU\oUH
HOHFWULFVKRFNRUGHDWK
vDo not, under any circumstances, cut or remove the
third (ground) prong from the power cord.)DLOXUHWR
IROORZWKLVZDUQLQJFDQFDXVHVHULRXVLQMXU\oUHHOHFWULF
VKRFNRUGHDWK
vFor personal safety, this appliance must be properly
grounded. )DLOXUHWRIROORZWKLVZDUQLQJFDQFDXVH
VHULRXVLQMXU\oUHHOHFWULFVKRFNRUGHDWK
vThe power cord of this appliance is equipped with a
3-prong (grounding) plug which mates with a standard
3-prong (grounding) wall outletWRPLQLPL]HWKHSRVVLELOLW\
RIHOHFWULFVKRFNKD]DUGIURPWKLVDSSOLDQFH
vThis washer must be plugged into a 120VAC, 60Hz
grounded outlet. )DLOXUHWRIROORZWKLVZDUQLQJFDQ
FDXVHVHULRXVLQMXU\oUHHOHFWULFVKRFNRUGHDWK
vHave the wall outlet and circuit checked by a
TXDOLoHGHOHFWULFLDQWRPDNHVXUHWKHRXWOHWLVSURSHUO\
grounded. )DLOXUHWRIROORZWKLVZDUQLQJFDQFDXVH
VHULRXVLQMXU\oUHHOHFWULFVKRFNRUGHDWK
vWhere a standard 2-prong wall outlet is encountered,
it is your personal responsibility and obligation to
have it replaced with a properly grounded 3-prong
wall outlet. )DLOXUHWRIROORZWKLVZDUQLQJFDQFDXVH
VHULRXVLQMXU\oUHHOHFWULFVKRFNRUGHDWK
vDo not install on carpet. Install the washer on a solid
pRRU)DLOXUHWRIROORZWKLVZDUQLQJFDQFDXVHVHULRXV
OHDNGDPDJH
vDo not remove grounding prong. Do not use an
adapter or extension cord. Plug into a grounded
3-prong outlet.)DLOXUHWRIROORZWKHVHZDUQLQJVFDQ
FDXVHVHULRXVLQMXU\oUHHOHFWULFVKRFNRUGHDWK
vThe washer should always be plugged into its own
individual electrical outlet which has a voltage rating
that matches the rating plate.7KLVSURYLGHVWKHEHVW
SHUIRUPDQFHDQGDOVRSUHYHQWVRYHUORDGLQJKRXVH
ZLULQJFLUFXLWVZKLFKFRXOGFDXVHDoUHKD]DUGIURP
RYHUKHDWHGZLUHV
vNever unplug your washer by pulling on the power
cord. $OZD\VJULSSOXJoUPO\DQGSXOOVWUDLJKWRXW
IURPWKHRXWOHW)DLOXUHWRIROORZWKLVZDUQLQJFDQ
FDXVHVHULRXVLQMXU\oUHHOHFWULFVKRFNRUGHDWK
vImmediately repair or replace all power cords that
have become frayed or otherwise damaged. Do not
use a cord that shows cracks or abrasion damage
along its length or at either end.&RQVXOWZLWKD
TXDOLoHGVHUYLFHWHFKQLFLDQ)DLOXUHWRIROORZWKLV
ZDUQLQJFDQFDXVHVHULRXVLQMXU\oUHHOHFWULFVKRFN
RUGHDWK
vWhen installing or moving the washer, be careful not
to pinch, crush, or damage the power cord.)DLOXUH
WRIROORZWKLVZDUQLQJFDQFDXVHVHULRXVLQMXU\oUH
HOHFWULFVKRFNRUGHDWK
vThe washer must be installed and electrically
JURXQGHGE\DTXDOLoHGVHUYLFHWHFKQLFLDQLQ
accordance with local codesWRSUHYHQWVKRFNKD]DUG
DQGDVVXUHVWDELOLW\GXULQJRSHUDWLRQ
vThe washer is heavy. Two or more people may be
needed to install and move the appliance. )DLOXUH
WRGRVRFDQUHVXOWLQGDPDJHWRSURSHUW\RUVHULRXV
ERGLO\LQMXU\
vStore and install the washer where it will not be
exposed to temperatures below freezing or exposed
to outdoor weather conditions.)DLOXUHWRIROORZWKLV
ZDUQLQJFDQFDXVHVHULRXVOHDNGDPDJH
vTo reduce the risk of electric shock, do not install
the washer in humid spaces.)DLOXUHWRIROORZWKLV
ZDUQLQJFDQFDXVHVHULRXVLQMXU\oUHHOHFWULFVKRFNRU
GHDWK
4
IMPORTANT SAFETY INSTRUCTIONS
WARNING:WARNING
RISK TO CHILDREN
v.HHSODXQGU\SURGXFWVRXWRIFKLOGUHQ VUHDFK7R
SUHYHQWSHUVRQDOLQMXU\REVHUYHDOOZDUQLQJVRQ
SURGXFWODEHOV)DLOXUHWRFRPSO\ZLWKWKHVHZDUQLQJV
FRXOGUHVXOWLQVHULRXVSHUVRQDOLQMXU\
v%HIRUH\RXUZDVKHULVUHPRYHGIURPVHUYLFHRU
GLVFDUGHGUHPRYHWKHGRRUWRWKHZDVKLQJFRPSDUWPHQW
WRDYRLGWKHGDQJHURIFKLOGUHQRUVPDOODQLPDOV
JHWWLQJWUDSSHGLQVLGH)DLOXUHWRGRVRFDQUHVXOWLQ
VHULRXVSHUVRQDOLQMXU\RUGHDWK
v'RQRWDOORZFKLOGUHQWRSOD\RQRULQWKHZDVKHU&ORVH
VXSHUYLVLRQRIFKLOGUHQLVQHFHVVDU\ZKHQWKHZDVKHULV
XVHGQHDUFKLOGUHQ$VFKLOGUHQJURZWHDFKWKHPWKH
SURSHUVDIHXVHRIDOODSSOLDQFHV)DLOXUHWRFRPSO\ZLWK
WKHVHZDUQLQJVFRXOGUHVXOWLQVHULRXVSHUVRQDOLQMXU\
v'HVWUR\WKHFDUWRQSODVWLFEDJDQGRWKHUSDFNLQJ
PDWHULDOVDIWHUWKHZDVKHULVXQSDFNHG&KLOGUHQ
PLJKWXVHWKHPIRUSOD\&DUWRQVFRYHUHGZLWKUXJV
EHGVSUHDGVRUSODVWLFVKHHWVFDQEHFRPHDLUWLJKW
FKDPEHUV)DLOXUHWRFRPSO\ZLWKWKHVHZDUQLQJVFRXOG
UHVXOWLQVHULRXVSHUVRQDOLQMXU\
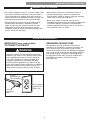
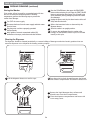
GROUNDING REQUIREMENTS
IMPORTANT: Please read carefully.
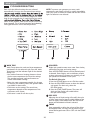
TO CONNECT ELECTRICITY
GROUNDING INSTRUCTIONS
7KLVDSSOLDQFHPXVWEHJURXQGHG,QWKHHYHQWRI
PDOIXQFWLRQRUEUHDNGRZQJURXQGLQJZLOOUHGXFHWKH
ULVNRIHOHFWULFVKRFNE\SURYLGLQJDSDWKRIOHDVW
UHVLVWDQFHIRUHOHFWULFFXUUHQW7KLVDSSOLDQFHLVHTXLSSHG
ZLWKDFRUGKDYLQJDQHTXLSPHQWJURXQGLQJFRQGXFWRU
DQGJURXQGLQJSOXJ7KHSOXJPXVWEHSOXJJHGLQWR
DQDSSURSULDWHRXWOHWWKDWLVSURSHUO\LQVWDOOHGDQG
JURXQGHGLQDFFRUGDQFHZLWKDOOORFDOFRGHV
DQGRUGLQDQFHV
WARNING
,PSURSHUFRQQHFWLRQRIWKHHTXLSPHQWJURXQGLQJ
FRQGXFWRUFDQUHVXOWLQULVNRIHOHFWULFVKRFN&KHFN
ZLWKDTXDOLoHGHOHFWULFLDQRUVHUYLFHWHFKQLFLDQ
LI\RXDUHLQGRXEWDVWRZKHWKHUWKHDSSOLDQFH
LVSURSHUO\JURXQGHG'RQRWPRGLI\WKHSOXJ
SURYLGHGZLWKWKHDSSOLDQFH,ILWGRHVQRWoWWKH
RXWOHWKDYHDSURSHURXWOHWLQVWDOOHGE\DTXDOLoHG
HOHFWULFLDQ)DLOXUHWRIROORZWKHVHZDUQLQJVFDQ
FDXVHVHULRXVLQMXU\oUHHOHFWULFVKRFNRUGHDWK
SURQJ
JURXQGLQJW\SH
ZDOOUHFHSWDFOH
SURQJ
grounding
SOXJ
(QVXUHSURSHU
JURXQGH[LVWV
EHIRUHXVH
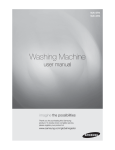
Safely and conveniently keeps the door ajar when the
washer is not in use, to promote air circulation and allow
the interior of the drum to dry. To use this feature, close
the door gently until it just contacts the door magnet.
120 VAC, 60 Hz
14.5 – 142 PSI (100 – 980 kpa)
27" (W) x 29 3/4" (D) x 38 11/16" (H). 51" (D with door open)
68.6 cm (W) X 75.6 cm (D) X 98.3 cm (H), 129.5 cm (D with door open)
205 lbs (93 kg)
1,300 RPM
22 1/4 "
(57 cm)
29 3/4 "
(81.2 cm)
4 in.
(10 cm)
51"
(129.5 cm)
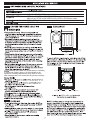
Installing the washer in a humid space, or installing
or storing the washer where it will be exposed to the
weather or freezing temperatures, may result in rust or
other damage that is not covered in the product warranty.
1"
(2.5 cm)
27"
(68.6 cm)
27in. (68.6 cm)
1"
(2.5 cm)
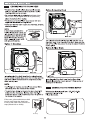
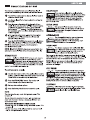
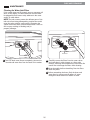
INSTALLATION INSTRUCTIONS
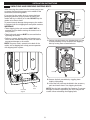
UNPACKING AND REMOVING SHIPPING BOLTS
:KHQUHPRYLQJWKHZDVKHUIURPWKHFDUWRQEDVHEHVXUH
WRUHPRYHWKHIRDPGUXPVXSSRUWLQWKHPLGGOHRIWKH
FDUWRQEDVH6HHGUDZLQJEHORZ
,I\RXPXVWOD\WKHZDVKHUGRZQWRUHPRYHWKHEDVH
SDFNDJLQJPDWHULDOVDOZD\VSURWHFWWKHVLGHRIWKH
ZDVKHUDQGOD\LWFDUHIXOO\RQLWVVLGHDO NOTOD\WKH
ZDVKHURQLWVIURQWRUEDFN
7RSUHYHQWLQWHUQDOGDPDJHGXULQJWUDQVSRUWWKHZDVKHU
LVHTXLSSHGZLWKIRXUVKLSSLQJEROWVDQGSODVWLFUHWDLQHUV
IMPORTANT:
v7KHVHVKLSSLQJEROWVDQGUHWDLQHUVMUST NOTEH
UHPRYHGXQWLOMXVWEHIRUHPRYLQJWKHZDVKHULQWRLWV
oQDOSRVLWLRQ
v7KHVHEROWVDQGUHWDLQHUVMUSTEHUHPRYHGEHIRUH
RSHUDWLQJWKHZDVKHU
v)DLOXUHWRUHPRYHVKLSSLQJEROWVDQGUHWDLQHUVPD\
FDXVHVHYHUHYLEUDWLRQDQGQRLVHZKLFKFDQOHDGWR
SHUPDQHQWGDPDJHWRWKHZDVKHU
NOTE:7KHSRZHUFRUGLVVHFXUHGWRWKHEDFNRIWKH
ZDVKHUZLWKDVKLSSLQJEROWWRKHOSSUHYHQWRSHUDWLRQ
ZLWKVKLSSLQJEROWVLQSODFH
Shipping
Bolts
Power
Cord
1. 6WDUWLQJZLWKWKHERWWRPWZRVKLSSLQJEROWVXVHWKH
ZUHQFK LQFOXGHG WRIXOO\ORRVHQDOOIRXUVKLSSLQJ
EROWVE\WXUQLQJWKHPFRXQWHUFORFNZLVH
Shipping Bolts
Hole Cap
2.5HPRYHWKHEROWDVVHPEOLHVE\ZLJJOLQJWKHP
VOLJKWO\ZKLOHSXOOLQJ
3./RFDWHWKHIRXUKROHFDSVLQFOXGHGLQWKHDFFHVVRU\
SDFNDQGLQVWDOOWKHPLQWKHVKLSSLQJEROWKROHV
NOTE:6DYHWKHEROWDVVHPEOLHVIRUIXWXUHXVH7RSUHYHQW
GDPDJHWRLQWHUQDOFRPSRQHQWV'2127WUDQVSRUWWKH
ZDVKHUZLWKRXWUHLQVWDOOLQJWKHVKLSSLQJEROWV
Carton
Base
Foam Tub
Support
8
INSTALLATION INSTRUCTIONS
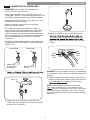
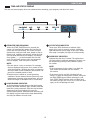
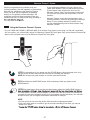
CONNECTING THE WATER LINES
vIMPORTANT: Use new hoses when installing the
washer. Do NOT reuse old hoses.
v Water supply pressure must be between 14.5 psi and
142 psi (100 – 980 kPa) . If the water supply pressure is more
than 142 psi, a pressure reducing valve must be installed.
v Periodically check the hose for cracks, leaks, and wear,
and replace the hose if necessary.
v Make sure that the water lines are not stretched,
pinched, crushed, or kinked.
v The washer should never be installed or stored in a
location subject to freezing temperatures. Damage to the
water lines and internal mechanisms of the washer can
result. If the washer was exposed to freezing temperatures
prior to installation, allow it to stand at room temperature
for several hours before use and check for leaks prior
to operation.
v For optimal wash performance, the hot water temperature
should be set at 120°-135°F (48-57°C) and the cold water
at 60°F (15°C).
RubberSeal
3. Always run a gallon or two of water through each
of the water lines. Doing so will help prevent future
allow you to verify which water line is hot and which
is cold.
RubberSeal
Cold
Water
Inlet
Water Hose
(to water inlet
on washer)
Hot
Water
Inlet
Water Hose
(to tap)
1.
WARNING: Do not overtighten the hoses. Overtightening
can damage the valves resulting in leaking and property
damage.
4. Attach the (red) hot water line to the hot water inlet on
the back of the washer. Attach the (blue) cold water line
to the cold water inlet on the back of the washer.
sure there is a rubber seal in place in both ends.
Water Faucet
NOTE: When installing the hoses onto the water
inlet valves, be careful not to cross-thread the hose
DO NOT overtighten the hoses; this could cause
damage to internal components, the valve or the hose
gasket. Overtightening could result in property damage
from leaks.
2. Connect the water supply hoses to the HOT and
COLD water faucets tightly by hand and then tighten
another ï turn with pliers.
9
hose lower than
29 in. (73.7 cm) or higher than 96 in. (243.8 cm)
If the water valves and drain are built
into the wall, fasten the drain hose
to one of the water hoses with the tie
strap (ribbed side on inside).
Tie Strap
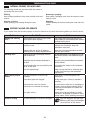
HOW TO USE
WARNING: To reduce the risk of
electric shock, or injury to persons, read and follow this
entire Use & Care Guide, including the Important Safety Instructions, before operating this washer.
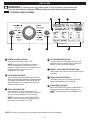
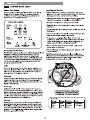
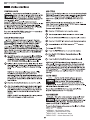
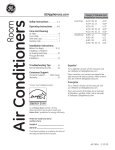
CONTROL PANEL FEATURES
F
A
G
C
B
A POWER (ON/OFF) BUTTON
Press to turn the washer ON or OFF.
NOTE: Pressing the POWER button during a
cycle will cancel that cycle and any load
settings will be lost. The door will unlock after a
brief pause, unless the water level or
temperature is too high.
E
D
D CYCLE MODIFIER BUTTONS
Use these buttons to adjust the settings for the
selected cycle. The settings light up above the
buttons to show the current selection.
E SPECIAL CYCLE AND OPTION BUTTONS
These buttons are used to activate special cycles
or options.
B CYCLE SELECTOR KNOB
Turn this knob to select the desired cycle. Once the
desired cycle has been selected, the standard presets
will appear in the display. These settings can be
adjusted using the cycle setting buttons anytime
before starting the cycle.
F TIME AND STATUS DISPLAY
The display shows the cycle status, door lock
status and estimated time remaining.
G STEAM TREAT BUTTON
Select the STEAM TREAT button to add steam to
the selected cycle for added cleaning power.
NOTE: The steam option is not available on all
cycles.
C START/PAUSE BUTTON
Press this button to start the selected cycle.
If the washer is running, use this button to pause
the cycle without losing the current settings.
NOTE: If you do not press the START/PAUSE
button within four minutes of selecting a cycle,
the washer automatically turns OFF.
NOTE: To protect your clothing, not all settings are available on all cycle selections.
12
HOW TO USE
OPERATING THE WASHER
SORT LAUNDRY AND LOAD WASHER
Sort laundry by fabric type, soil level, color and load size,
as needed. Open the door and load selected items into the
washer.
2 TURN ON THE WASHER
Press the POWER button to turn ON the washer. The lights
around the cycle selector knob will illuminate and a chime
will sound.
1
3 SELECT A CYCLE
Turn the cycle selector knob in either direction to select the
desired cycle. The preset Wash Temperature, Spin Speed, Soil
Level, and Option settings for that cycle will be shown.
4 SELECT CYCLE MODIFIERS
Default settings for the selected cycle can now be changed if
NOTE:
on all cycles.
5
SELECT CYCLE OPTIONS
Cycle options can be added using the option buttons.
NOTE: 7RSURWHFW\RXUIDEULFVQRWDOOPRGLoHUVDUHDYDLODEOH
on all cycles. Cycle options can also be added by using the
option buttons.
NOTE: 1RWDOORSWLRQVDUHDYDLODEOHRQDOOF\FOHV$GLçHUHQW
chime will sound and the LED will not come on if the selection
is not allowed.
6 ADD DETERGENT
$GG+LJK(èFLHQF\ +( GHWHUJHQWWRWKHGHWHUJHQW
dispenser drawer. For proper wash performance, always
measure the detergent using the measuring device
provided by the detergent manufacturer.
7 BEGIN CYCLE
Press the START/PAUSE button to begin the cycle. The door
water to measure its weight. Once the weight of the load is
measured, the washer will begin the selected wash cycle.
Pressing the START/PAUSE button will pause the cycle and
the door will unlock. Press the START/PAUSE button again to
resume the wash cycle.
13
26-53
Extra Hot
Hot
Cold
Tap Cold
74-131
66-76
56
56
86-96
99-132
*CERTIFIED BY NSF: NSF International (formerly the National Sanitation
)RXQGDWLRQ FHUWLoHVWKDWWKLVZDVKF\FOHUHGXFHVRIEDFWHULDRQ
ODXQGU\WKURXJKKLJKWHPSHUDWXUHZKHQXVHGZLWKSRZGHUHGGHWHUJHQW
Protocol P172
Sanitization Performance of Residential and
Commercial, Family Sized Clothes Washers
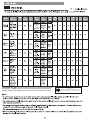
HOW TO USE
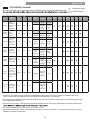
CYCLE GUIDE (continued)
The cycle guide below shows the default settings, available options and recommended fabric types
Cycle
Fabric or
Load Type
Sanitize
Heavily
soiled items
such as work
clothes,
diapers, etc.
Permanent
Workout press,
Wear
synthetic
items.
Dress shirts,
blouses,
Delicates nylons, sheer
or lacy
garments.
Small
Load
Normally
soiled and
small loads.
Express
Wash
Lightly soiled
clothing and
small loads.
Cold
Clean
Rinse &
Spin
Small loads
of cotton,
linen, towels,
shirts, sheets,
jeans, mixed
loads.
Loads that
only need to
be rinsed.
Display
Time
(Min.)
Load
Sensing
Wash
Option
Wash
Temp.
Extra Hot
110-120
57
41
45
15
73-82
18
Yes
No
No
Yes
No
Yes
No
Yes
Yes
Yes
Yes
No
Soil
Level
High
Normal
Extra High
Medium
Low
No Spin
Heavy
Light
Warm
Medium
Normal
Cold
Tap Cold
Low
No Spin
Heavy
Light
Cold
Medium
Normal
Warm
Tap Cold
Low
No Spin
Heavy
Light
Warm
High
Normal
Hot
Cold
Tap Cold
Extra High
Medium
Low
No Spin
Heavy
Light
Hot
Extra High
Light
Warm
Cold
Tap Cold
High
Medium
Low
No Spin
Normal
Heavy
Cold
High
Normal
Tap Cold
Extra High
Medium
Low
No Spin
Light
Cold
High
N/A
Yes
Yes
Spin Speed
Accela- Steam Pre- Extra
Wash
Treat wash Rinse
= Available Option
= Default Setting
Delay
Start
Stay Auto Save
Fresh Soak Energy+
Extra High
Medium
Low
No Spin
NOTE:
v To protect your garments, not every wash temperature, spin speed, soil level, or option is available with every
cycle. A chime will sound and the LED will not light if the selection is not allowed.
v The washer automatically adjusts the wash time for the amount of laundry, water pressure, water heating time and
other operating conditions.
v These cycles use various wash motions to enhance cleaning and/or fabric care performance. The wash motions may
v The recommended load size for the Sanitize cycle is 10 lbs.
v When the Accela-wash option is selected, the drum spins to rinse the clothes. To use the No Spin option, you must
deselect the Accela-wash option.
15
HOW TO USE
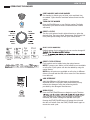
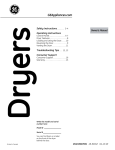
ABOUT THE DISPENSER DRAWER
Liquid Chlorine
Bleach
Compartment
The automatic dispenser consists of four compartments
which hold:
v Liquid chlorine bleach.
v Liquid fabric softener.
v Liquid or powdered detergent for prewash.
v Liquid or powdered detergent and color-safe bleach
for main wash.
Liquid Fabric
Softener
Compartment
Liquid
Detergent
Cup
Prewash
Detergent
Compartment
Main Wash Detergent
Compartment
Pre-Wash Detergent Compartment
Liquid Bleach Compartment
Add liquid or powdered detergent to this compartment
when using the Pre-Wash option. Always use High-
This compartment holds liquid chlorine bleach, which is
dispensed automatically at the proper time during the
wash cycle.
v Do not add powdered or liquid color-safe bleach to
this compartment. The bleach compartment is designed
to dispense liquid chlorine bleach only. Powdered or
liquid color-safe bleach will not dispense properly.
v Always follow the manufacturer’s recommendations
when
line since this can cause the bleach to be dispensed
immediately, causing damage to fabrics. Using too much
bleach can damage fabrics.
v Never pour undiluted liquid chlorine bleach directly
onto the load or into the drum. Fabric damage can occur.
The amount of detergent added for the Pre-Wash
option should be ½ the amount recommended for the
main wash cycle. For example, if the main wash cycle
requires ½ measure of detergent, add ¼ measure to the
Pre-Wash compartment.
NOTE: If using liquid detergent for the main wash, when
using the Pre-Wash option, the liquid detergent cup
accessory must be used in the main wash dispenser. This
will prevent the main wash liquid detergent from being
dispensed immediately.
Main Wash Detergent Compartment
Fabric Softener Compartment
This compartment holds laundry detergent for the main
wash cycle. The detergent is added to the load at the
This compartment holds liquid fabric softener, which is
detergent with your washing machine. Either powdered
or liquid detergent may be used.
Never exceed the manufacturer’s recommendations
when adding detergent. Using too much detergent can
result in detergent buildup in clothing and the washer.
NOTE: Liquid or powdered color-safe bleach may be
added to the main wash compartment with detergent of
the same type. DO NOT add liquid or powdered
color-safe bleach to the bleach dispenser. DO NOT mix
liquid and powdered cleaning agents within the same
compartment.
Never exceed the manufacturer’s recommendations when
adding softener. Using too much fabric softener can result
in buildup in clothing and the washer. Either powdered or
liquid fabric softener may be used.
v Always follow the manufacturer’s recommendations
when adding fabric softener. Do not exceed the
stain clothes.
v Dilute concentrated fabric softeners with warm water.
v Never pour fabric softener directly onto the load or
into the drum.
17
HOW TO USE
DETERGENT AND DISPENSER USE
To add detergent and fabric softener to the
automatic dispenser:
A Word About Detergents
performance, and help to keep the interior of your
washer clean. Using detergent that is not HE may cause
oversudsing and unsatisfactory performance which
could result in error codes, cycle failure, and
machine damage.
Maximum
Normal Load Amount
Liquid
Detergent
Filling the Dispenser
Powdered
Detergent
For proper wash performance, always measure the
detergent using the measurements provided by the
detergent manufacturer.
The normal amount of HE detergent needed, for average
loads, is less than ½ of the recommended maximum.
Use less detergent for soft water, light soil or smaller
loads. Never use more than the maximum amount
recommended by the detergent manufacturer.
Designed to use only
(HE) detergent
IMPORTANT: Your washing machine is designed for use
contain suds-reducing agents. Always look for the HE
symbol when purchasing detergent.
IMPORTANT: Not all detergents are the same. Pay
careful attention to the amount of detergent used to
avoid oversudsing, poor rinsing and detergent buildup in
clothing, and residue buildup that can contribute to odors
in the machine. NEVER use a cup or scoop other than the
one supplied by the manufacturer of the detergent you
are using. Never use more than the maximum amount of
detergent recommended by the manufacturer.
Always measure the detergent amount. While HE
detergents are designed for this type of washing
machine, be careful when measuring the detergent. For
most normal loads, no more than ¼ to ½ of cap or
scoop of HE detergent should be used.
NOTE: Extra care must be exercised when using 2X and
3X concentrated detergents because even a little bit extra
can contribute to the problems mentioned above.
NOTE: Detergents designated as HE compatible may not
provide optimal results.
1
Open the dispenser drawer.
2
Load the laundry products into the
appropriate compartments.
3
Close the drawer before starting the cycle.
NOTE: It is normal for a small amount of water to
remain in the Bleach dispenser and softener
compartment at the end of the cycle.
IMPORTANT: Do not place or store laundry products,
such as detergent, Bleach, or liquid fabric softener,
on top of your washer or dryer.
Wipe up any spills immediately.
HOW TO USE
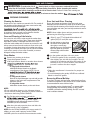
TIME AND STATUS DISPLAY
7KHWLPHDQGVWDWXVGLVSOD\VKRZVWKHHVWLPDWHGWLPHUHPDLQLQJF\FOHSURJUHVVDQGGRRUORFNVWDWXV
C
D
A
B
A ESTIMATED TIME REMAINING
:KHQWKH67$573$86(EXWWRQLVSUHVVHGWKH
ZDVKHUZLOODXWRPDWLFDOO\GHWHFWWKHORDGVL]HIRU
F\FOHVWKDWXVHORDGVHQVLQJ7KHFRQWUROZLOOWKHQ
RSWLPL]HWKHZDVKDQGULQVHWLPHVEDVHGRQWKHVH
OHFWHGF\FOHPRGLoHUVDQGRSWLRQV:KHQWKHORDG
VL]HKDVEHHQGHWHUPLQHGWKHGLVSOD\ZLOOFKDQJH
IURPGDVKHV WRWKHHVWLPDWHGWLPHIRUWKDW
F\FOH)RUQRQORDGVHQVLQJF\FOHVWKHHVWLPDWHG
WLPHZLOOGLVSOD\ZKHQWKHF\FOHLVVHOHFWHG
NOTE:
v7KHWLPHVKRZQLVRQO\DQHVWLPDWH)RUH[DPSOH
WKHWLPHGLVSOD\HGPD\SDXVHIRUDSHULRGRIWLPH
ZKLOHWKHPDFKLQHLVKHDWLQJWKHZDWHURUEDODQFLQJ
WKHORDG8QGHUFHUWDLQFRQGLWLRQVWKHPDFKLQHFDQ
SDXVHIRUH[WHQGHGSHULRGVRIWLPH
v(VWLPDWHGWLPHLVEDVHGRQQRUPDORSHUDWLQJ
FRQGLWLRQV6HYHUDOH[WHUQDOIDFWRUV ORDGVL]HURRP
WHPSHUDWXUHLQFRPLQJZDWHUWHPSHUDWXUHHWF DOVR
DçHFWWKHOHQJWKRIHVWLPDWHGWLPHYVDFWXDOWLPH
C CYCLE STATUS INDICATOR
7KHVHVWDWXV/('VLOOXPLQDWHWRLQGLFDWHZKLFK
VWDJHRIWKHF\FOHLVFXUUHQWO\UXQQLQJ$EOLQNLQJ
OLJKWLQGLFDWHVWKHDFWLYHVWDJHRIWKHF\FOH:KHQ
WKDWVWDJHLVFRPSOHWHWKHOLJKWZLOOUHPDLQVWHDG\
D DOOR LOCK INDICATOR
,QGLFDWHVWKDWWKHGRRULVORFNHG7KHZDVKHUGRRU
ZLOOORFNZKLOHWKHZDVKHULVRSHUDWLQJ7KHGRRUFDQ
EHXQORFNHGE\SUHVVLQJ67$573$86(WRSDXVH
WKHZDVKHU
NOTE:
v,IWKHWHPSHUDWXUHLQWKHZDVKHULVWRRKLJKWKH
GRRUFDQQRWEHXQORFNHGXQWLOWKHZDVKHU
KDVFRROHG
v,IWKHZDWHUOHYHOLVWRRKLJKWKHGRRUZLOOQRW
XQORFN7RGUDLQWKHZDWHUSUHVV32:(5WKHQSUHVV
WKH63,163(('EXWWRQZLWKRXWVHOHFWLQJDF\FOH
3UHVV67$573$86(DQGWKHZDWHUZLOOGUDLQDQG
WKHFORWKHVZLOOVSLQRXW'RQRWWU\WRIRUFHWKHGRRU
RSHQDVWKLVZLOOGDPDJHWKHGRRU
B LOAD-SENSING INDICATOR
$WWKHEHJLQQLQJRIF\FOHVWKDWXVHWKHORDGVHQVLQJ
IHDWXUHWKH/2$'6(16,1*OLJKWZLOOEOLQNZKLOHWKH
ORDGVL]HLVEHLQJPHDVXUHG2QFHWKHVL]HKDVEHHQ
GHWHUPLQHGWKHFRQWURODGMXVWVWKHF\FOHIRU
RSWLPXPSHUIRUPDQFH(VWLPDWHGWLPHUHPDLQLQJZLOO
QRWGLVSOD\XQWLOWKHORDGVL]HKDVEHHQGHWHUPLQHG
DQGPD\EHGLçHUHQWIRUHDFKORDG
HOW TO USE
CYCLE MODIFIER BUTTONS
NOTE: To protect your garments, not every wash
temperature, spin speed, soil level, or option is available
with every cycle. A chime will sound and the LED will not
light if a selection is not allowed.
Each cycle has default settings that are selected
automatically. You may also customize these settings
value is lit. The washer automatically adjusts the water
level for the type and size of wash load for best results
nature of this product, water levels may be much lower
than expected. This is normal operation and cleaning/
rinsing performance will not be compromised.
A
C
B
A WASH TEMP
Wash Temp selects the wash and rinse temperature
combination for the selected cycle. Press the Wash
Temp button until the indicator light for the desired
setting is lit.
v Your washer features a heating element to boost
the hot water temperature for Extra Hot settings.
This provides improved wash performance at
normal water heater settings.
v Select the water temperature suitable for the type
of load you are washing. Follow the garment fabric
care labels for best results.
v Cold rinses use less energy. The actual rinse
temperature depends on the temperature of the
cold water at the faucet.
v Cold water is used for all rinse cycles.
D
B SPIN SPEED
Higher spin speeds extract more water from clothes,
reducing drying time and saving energy.
Press the SPIN SPEED button until the desired speed
is selected. Some fabrics, such as delicates, require
a slower spin speed. To protect your clothing, not all
spin speeds are available for all cycles.
The Drain & Spin cycle:
1. Press the POWER button to turn ON the washer.
2. Press the SPIN SPEED button to select the desired
spin speed. For drain only, select the
NO SPIN option.
3. Press the START/PAUSE button. The water will
drain and the clothes will tumble before
the spin routine begins.
C SOIL LEVEL
Adjusting the soil level setting will modify the cycle
to allow more time for heavily soiled clothes or less
time for lightly soiled clothes. Press the SOIL LEVEL
button until the desired soil level is selected.
D CHIME
Press repeatedly to adjust the volume of the chime
and keypad tones. You may turn the end-of-cycle
chime and keypad tones ON or OFF with the CHIME
button.
20
three
three
3
3
and the Control Lock must be
POWER
three
Control Lock.
three
three
three
30-minute
three
three
NORMAL - Hot becomes Warm
NORMAL – Warm becomes Cold
HEAVY DUTY – Hot becomes Warm
HEAVY DUTY – Warm becomes Cold
CARE AND CLEANING
WARNING: To reduce the risk of
electric shock, or injury to persons, read and follow this
entire Use & Care Guide, including the Important Safety Instructions, before operating this washer.
v Unplug the washer before cleaning to avoid the risk of electric shock. Failure to follow this warning can
v Never use harsh chemicals, abrasive cleaners, or solvents to clean the washer.
REGULAR CLEANING
Cleaning the Exterior
Door Seal and Glass Cleaning
Proper care of your washer can extend its life. The outside of
the machine can be cleaned with warm water and a mild,
nonabrasive household detergent.
IMPORTANT: Do not use solvents, cleaning alcohols, or similar products. Never use steel wool or abrasive cleaners
because they can damage the surface.
Due to the location and nature of the door seal, some
detergent and soil residue may build up on the door glass
and seal. Periodic cleaning with a bleach solution can help
remove buildup and stains, and can help sanitize the seal to
prevent odors.
NOTE: Wear rubber gloves and eye protection while
performing the following procedure:
Care and Cleaning of the Interior
1
Dilute ¾ cup (177 ml) liquid chlorine bleach in 1
gallon (3.8 L) of warm/hot water.
2
Use this solution to wipe down
all surfaces of the gasket and
door glass to remove any
deposits. Be sure to fold back the
lip of the gasket to get under
the inner edge where residue
can build up.
3
Dry the gasket and glass with a dry cloth.
4
To allow the gasket to dry completely, secure the
door slightly ajar with the door magnet. This will
promote air circulation and allow the interior of the
machine to dry. To use this feature, close the door
just until it contacts the door magnet.
Use a towel or soft cloth to wipe around the washer door
opening, door seal, and door glass. These areas should be
kept clean to ensure a watertight seal. Be sure to wipe
under the inside rubber seal to remove any moisture or soil.
Always remove items from the washer as soon as the cycle
is complete. Leaving damp items in the washer can cause
wrinkling, color transfer, and odor. Run the CLEAN WASHER
cycle once a month, or more often if needed, to remove
detergent buildup and other residue.
Clean Washer
1 Remove any clothing in the drum.
2 Open the dispenser drawer.
3 Add liquid chlorine bleach or another drum cleaner
washers.
- If using liquid chlorine bleach
Add liquid chlorine bleach to the bleach
compartment of the drawer. (NOTE : Do not
NOTE:
v Follow the manufacturer’s instructions for proper use
of bleach.
v To avoid damaging the gasket, NEVER use undiluted
bleach to clean the gasket.
undiluted liquid bleach directly into the wash
drum.)
- If using powder cleaner
Remove the liquid detergent cup and add powder
cleaner to the main wash compartment of the
dispenser drawer.
- If using tablet cleaner
Add tablet cleaner directly to the wash drum.
Removing Mineral Buildup
If you live in an area with hard water, mineral scale can form
on internal components of the washer. Use of a water softener
is recommended in areas with hard water.
Use a descaler, such as Washer Magic®, to remove visible
mineral buildup. After descaling, always run the CLEAN
WASHER cycle before washing clothing. Do NOT use steel
wool or abrasive cleaners.
NOTE:
v Do not add tablet cleaner to the dispenser drawer.
v Do not add any laundry detergent or fabric softener to
the drawer when using CLEAN WASHER.
4 Turn ON the washer and press and hold the
three
will blink. Selecting any other cycle after CLEAN
WASHER has been selected will cause the CLEAN
WASHER cycle to be cancelled.
5 After the cycle ends, open the door and allow the
drum interior to dry completely.
NOTE: Run the CLEAN WASHER cycle once a month. If a
mildewy or musty smell is present, run the CLEAN
WASHER cycle once a week for three consecutive weeks.
23
CARE AND CLEANING
REGULAR CLEANING (continued)
5 Press the POWER button, then press the SPIN SPEED
button without selecting a cycle. Press the START/PAUSE
button to activate the drain pump. This will expel some
of the antifreeze, leaving enough to protect the washer
from damage.
6 Unplug the power cord, dry the drum interior with a soft
cloth, and close the door.
Storing the Washer
If the washer will not be used for an extended period of time
and is in an area that could be exposed to freezing
temperatures, perform the following steps to protect the
washer from damage.
1 Turn OFF the water supply.
2 Disconnect the hoses from the water supply and drain water
from the hoses.
3 Plug the power cord into a properly grounded
electrical outlet.
4 Add 1 gallon of nontoxic recreational vehicle (RV)
antifreeze to the empty wash drum and close the door.
7 Refer to the instructions below to clean and dry the
dispenser drawer.
8 Store the washer in an upright position.
9 To remove the antifreeze from the washer after
storage, run the EXPRESS WASH cycle. Do not add
laundry to this cycle.
Cleaning the Dispenser
The dispenser should be cleaned periodically to remove buildup of detergent and other laundry products that can
cause the dispenser not to dispense the laundry product properly.
2 Press down the lock tab located between the bleach
and softener compartments and slide the drawer out.
1 Pull the dispenser drawer out until it stops.
3 Remove the liquid detergent box, softener and
bleach inserts from their compartments.
4 Clean the dispenser compartments and inserts with
warm soapy water.
24
CARE AND CLEANING
MAINTENANCE
&OHDQLQJWKH:DWHU,QOHW)LOWHUV
,IWKHZDVKHUGRHVQRWoOOSURSHUO\DQHUURUPHVVDJHZLOO
VKRZRQWKHGLVSOD\7KHLQOHWYDOYHoOWHUVFUHHQVFRXOG
EHSOXJJHGE\KDUGZDWHUVFDOHVHGLPHQWLQWKHZDWHU
VXSSO\RURWKHUGHEULV
NOTE: 7KHLQOHWVFUHHQVSURWHFWWKHGHOLFDWHSDUWVRIWKH
LQOHWYDOYHIURPEHLQJGDPDJHGE\SDUWLFOHVWKDWFRXOG
HQWHUWKHYDOYHVZLWKWKHZDWHUVXSSO\2SHUDWLQJWKH
ZDVKHUZLWKWKHVHoOWHUVUHPRYHGFRXOGFDXVHDYDOYHWR
IDLOWRRSHQUHVXOWLQJLQpRRGLQJDQGRU
SURSHUW\GDPDJH
Inlet Filter
2&DUHIXOO\UHPRYHWKHoOWHUVIURPWKHZDWHUYDOYHV
DQGVRDNWKHPLQZKLWHYLQHJDURUDOLPHVFDOH
UHPRYHUIROORZLQJWKHPDQXIDFWXUHU VLQVWUXFWLRQV%H
FDUHIXOQRWWRGDPDJHWKHoOWHUVZKLOHFOHDQLQJ
3 5LQVHWKRURXJKO\EHIRUHUHLQVWDOOLQJ3UHVVWKHoOWHUV
EDFNLQWRSODFH
4 %HIRUHUHDWWDFKLQJWKHKRVHVpXVKWKHKRVHVDQG
ZDWHUOLQHVE\UXQQLQJVHYHUDOJDOORQVRIZDWHU WKURXJKWKHKRVHVDQGLQWRDEXFNHWRUGUDLQ
11.7XUQ2))ERWKZDWHUIDXFHWVFRPSOHWHO\8QVFUHZWKH
KRWDQGFROGZDWHUOLQHVIURPWKHEDFNRIWKHZDVKHU
CARE AND CLEANING
MAINTENANCE (continued)
Cleaning the Drain Pump Filter
washer
lint and foreign objects like buttons, keys, and coins from
causing damage to the pump. If the washer fails to drain
properly, unplug the washer and allow the water to cool, if
necessary, before proceeding.
Plug
1.1
3 Remove the plug from the drain hose, and allow the
water to drain completely.
NOTE: If there is a large amount of water in the drum,
you may have to empty your container several times.
Pump Filter
Drain Hose
2 Unclip the drain hose and pull it out. Place the end
4
Remove any lint and foreign objects from the pump
the pump
the opening
and twist clockwise to secure. Be sure to close the
drain pumSoOWHUDFFHVVSDQHO
drain. Make sure not to pull the hose out too far, or
it may not drain properly.
26
Kenmore Connect™ System
If you experience problems with your washer, call
1-800-4-MY-HOME ® . Only use the Kenmore Connect
System feature when instructed to do so by the
Kenmore Connect Team. The transmission sounds that
you will hear are normal and sound similar to a fax
machine.
Kenmore Connect cannot be activated unless your
washing machine is turned on by pressing the POWER
button. If your washing machine is unable to turn
on, then troubleshooting must be done without using
Kenmore Connect.
Should you experience any problems with your
washing machine, it has the capability of transmitting
data via your telephone to the Kenmore Connect
Team. This gives you the capability of speaking
directly to our specially trained technicians. The
technician records the data transmitted from your
machine and uses it to analyze the issue, providing a
Using the Kenmore Connect™ System
First, call 1-800-4-MY-HOME® ,IWKHQXPEHURIWKHSKRQH\RXDUHXVLQJLVRQoOHDQGLVDVVRFLDWHG
with your washer, you will be quickly relayed to a Kenmore Connect(TM) Team agent. Only use the Kenmore Connect(TM)
feature when instructed to do so by the Kenmore Connect(TM) Team agent.
HOLD the mouthpiece of your phone over the POWER button, when instructed to do so by
the call center, no more than one inch from (but not touching) the machine.
NOTE: Do not press any other buttons or turn the cycle selector knob.
PUSH and hold the WASH TEMP button while continuing to hold your phone to the
POWER button.
6
LISTEN for three beeps. After you hear the three beeps, release the WASH TEMP button. A
This takes about 6 seconds, and the display will count down the time. Once the countdown is
over and the tones have stopped, resume your conversation with the technician, who will then
be able to assist you in using the information transmitted for analysis.
NOTE:
v For best results, do not move the phone while the tones are being transmitted.
v If the call center agent is not able to get an accurate recording of the data, you may be
asked to try again.
v
27
TROUBLESHOOTING GUIDE
NORMAL SOUNDS YOU MAY HEAR
7KHIROORZLQJVRXQGVPD\EHKHDUGZKLOHWKHZDVKHULV
RSHUDWLQJ7KH\DUHQRUPDO
Clicking:
'RRUORFNLQJPHFKDQLVPFOLFNVZKHQWKHGRRUORFNVDQG
XQORFNV
Humming or gurgling:
'UDLQSXPSLVSXPSLQJZDWHUIURPWKHZDVKHUDWWLPHV
GXULQJDF\FOH
Spraying or hissing
:DWHUVSUD\LQJRUFLUFXODWLQJGXULQJWKHF\FOH
Splashing:
&ORWKHVWXPEOLQJLQWKHGUXPGXULQJWKHZDVKDQGULQVH
F\FOHV
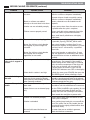
BEFORE CALLING FOR SERVICE
,I\RXUZDVKHUGRHVQRWIXQFWLRQSURSHUO\RUGRHVQRWIXQFWLRQDWDOOFKHFNWKHIROORZLQJEHIRUH\RXFDOOIRUVHUYLFH
Problem
Possible Cause
Rattling and clanking
noise
)RUHLJQREMHFWVVXFKDVNH\VFRLQVRUVDIHW\
SLQVPD\EHLQGUXPRUSXPS
Thumping sound
+HDY\ZDVKORDGVPD\SURGXFHD
WKXPSLQJVRXQG
Vibrating noise
Water leaking around
washer
Excessive sudsing
Solutions
6WRSZDVKHUFKHFNGUXPDQGGUDLQoOWHUIRU
IRUHLJQREMHFWV,IQRLVHFRQWLQXHVDIWHUZDVKHULV
UHVWDUWHGFDOOIRUVHUYLFH
7KLVLVQRUPDO,IVRXQGFRQWLQXHVZDVKHULV
SUREDEO\RXWRIEDODQFH6WRSDQG
UHGLVWULEXWHZDVKORDG
:DVKHUORDGPD\EHRXWRIEDODQFH
:DVKLQJVKRHVRUWLJKWO\WDQJOHGFORWKHV
6KLSSLQJEROWVDQGRUSDFNDJLQJPDWHULDOV
ZHUHQRWUHPRYHG
3DXVHWKHF\FOHDQGUHGLVWULEXWHWKHORDG
DIWHUWKHGRRUXQORFNV
6HHWKH813$&.,1*$1'5(029,1*6+,3
3,1*%2/76VHFWLRQLQWKHLQVWDOODWLRQUHTXLUH
PHQWV
:DVKORDGPD\EHXQHYHQO\GLVWULEXWHGLQ
WKHGUXP
3DXVHWKHF\FOHDQGUHGLVWULEXWHWKHORDGDIWHU
WKHGRRUXQORFNV
1RWDOOOHYHOLQJIHHWDUHUHVWLQJoUPO\DQG
HYHQO\RQWKHpRRU
6HH/HYHOLQJWKH:DVKHULQWKH,QVWDOODWLRQ
,QVWUXFWLRQV
)ORRUQRWULJLGHQRXJK
0DNHVXUHWKDWWKHpRRULVVROLGDQGGRHV
QRWpH[6HH)ORRULQJLQWKH,QVWDOODWLRQ
5HTXLUHPHQWV
&KHFNKRVHV&KHFNDQGWLJKWHQKRVH
FRQQHFWLRQV
,QOHWKRVHFRQQHFWLRQLVORRVHDWWDS
RUZDVKHU
+RXVHGUDLQSLSHVDUHFORJJHG
8QFORJGUDLQSLSH&RQWDFWDSOXPEHULI
QHFHVVDU\
'UDLQKRVHKDVFRPHRXWRIGUDLQ
'UDLQKRVHLVQRWLQVHUWHGIDUHQRXJK
7LHGUDLQKRVHWRLQOHWKRVHRUVWDQGSLSHWR
SUHYHQWLWIURPFRPLQJRXWGXULQJGUDLQ,W
VKRXOGEHLQVHUWHGDERXWLQFKHVLQWR
WKHVWDQGSLSH
'RRUJODVVLVGLUW\
,QVSHFWGRRUJODVVSHULRGLFDOO\WRPDNH
VXUHWKHUHLVQREXLOGXSRIUHVLGXHRURWKHU
IRUHLJQPDWWHU)ROORZFOHDQLQJLQVWUXFWLRQV
7RRPXFKGHWHUJHQWRULQFRUUHFWGHWHUJHQW
28
2QO\XVHGHWHUJHQWZLWKWKH+LJK
(èFLHQF\ +( ORJR6HH'HWHUJHQW
8VHLQWKH+RZWR8VHVHFWLRQ
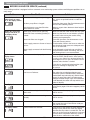
TROUBLESHOOTING GUIDE
BEFORE CALLING FOR SERVICE (continued)
Problem
Staining
Possible Cause
Solutions
%OHDFKRUVRIWHQHUGLVSHQVHG
WRRVRRQ
'LVSHQVHUFRPSDUWPHQWLVRYHUoOOHGFDXVLQJ
EOHDFKRUVRIWHQHUWRGLVSHQVHLPPHGLDWHO\
'LVSHQVHUGUDZHUFORVHGWRRTXLFNO\FDXVLQJ
EOHDFKRUVRIWHQHUWRGLVSHQVHLPPHGLDWHO\
%OHDFKRUVRIWHQHUZDVDGGHG
/DXQGU\FKHPLFDOVPXVWEHORDGHGLQWRWKH
GLUHFWO\WRWKHZDVKORDGLQWKHGUXP GLVSHQVHU
Washer will not turn ON
:DVKHUZDVQRWXQORDGHGSURPSWO\
$OZD\VUHPRYHLWHPVIURPWKHZDVKHUDVVRRQ
DVSRVVLEOHDIWHUWKHF\FOHLVFRPSOHWH
&ORWKHVZHUHQRWSURSHUO\VRUWHG
$OZD\VZDVKGDUNFRORUVVHSDUDWHO\IURPOLJKW
FRORUVDQGZKLWHVWRSUHYHQWGLVFRORUDWLRQ
1HYHUZDVKKHDYLO\VRLOHGLWHPVZLWKOLJKWO\
VRLOHGLWHPV
3RZHUFRUGLVQRWSURSHUO\SOXJJHGLQ 0DNHVXUHWKDWWKHSOXJLVSOXJJHGVHFXUHO\LQWR
DJURXQGHGSURQJ9$&+]RXWOHW
+RXVHIXVHLVEORZQFLUFXLWEUHDNHU
KDVWULSSHGRUSRZHURXWDJHKDV
RFFXUUHG
5HVHWFLUFXLWEUHDNHURUUHSODFHIXVH'RQRW
LQFUHDVHIXVHFDSDFLW\,IWKHSUREOHPLVDFLUFXLW
RYHUORDGKDYHLWFRUUHFWHGE\DTXDOLoHG
HOHFWULFLDQ
+RXVHIXVHLVEORZQFLUFXLWEUHDNHU
KDVWULSSHGGXHWRPXOWLSOH
DSSOLDQFHVRQRQHRXWOHW
Door will not unlock
when cycle is stopped or
paused
5HVHWFLUFXLWEUHDNHURUUHSODFHIXVH,IPRUH
WKDQRQHDSSOLDQFHLVFRQQHFWHGWRWKHRXWOHW
FDOODQHOHFWULFLDQWRKDYHDQDGGLWLRQDOFLUFXLW
LQVWDOOHG
,QWHULRUWHPSHUDWXUHRIZDVKHULVWRRKLJK 7KHZDVKHUGRRUKDVDVDIHW\IHDWXUHWRSUHYHQW
SHUVRQDOLQMXU\)RUH[DPSOHLIWKHZDVKHULV
SDXVHGGXULQJWKHKRWZDVKVWDJHRIDVDQLWL]H
F\FOHWKHLQWHULRUWHPSHUDWXUHRIWKHGUXPZLOO
EHYHU\KRWVRWKHGRRUZLOOQRWXQORFN7KLV
LVQRUPDO$OORZWKHZDVKHUWRFRROXQWLOWKH
'225/2&.LQGLFDWRUWXUQV2))RQWKHGLVSOD\
:DWHUOHYHOLQZDVKHULVWRRKLJK
Wash cycle time is longer
than usual
Musty or mildewy odor in
washer
7RGUDLQWKHZDWHUSUHVV32:(5WKHQSUHVVWKH
63,163(('EXWWRQZLWKRXWVHOHFWLQJDF\FOH
7KHZDVKHUDXWRPDWLFDOO\DGMXVWVWKH 7KLVLVQRUPDO7KHZDVKHUDGMXVWVF\FOHWLPHDXWR
ZDVKWLPHIRUWKHDPRXQWRIODXQGU\ PDWLFDOO\WRSURYLGHRSWLPDOUHVXOWVIRUWKHVHOHFWHG
ZDWHUSUHVVXUHZDWHUKHDWLQJWLPHDQG F\FOH7KHWLPHUHPDLQLQJVKRZQLQWKHGLVSOD\LVRQO\
RWKHURSHUDWLQJFRQGLWLRQV
DQHVWLPDWH$FWXDOWLPHPD\YDU\
,QFRUUHFWRUWRRPXFKGHWHUJHQWKDV 8VHRQO\+LJK(èFLHQF\ +( GHWHUJHQWLQ
EHHQXVHG
DFFRUGDQFHZLWKWKHPDQXIDFWXUHU VLQVWUXFWLRQV
,QVLGHRIGUXPZDVQRWFOHDQHGSURS 5XQWKH&/($1:$6+(5F\FOHUHJXODUO\%HVXUH
HUO\
WRZLSHDURXQGDQGXQGHUWKHGRRUVHDOIUH
TXHQWO\6HH&DUHDQG&OHDQLQJRIWKH,QWHULRU
Wrinkling
:DVKHUQRWXQORDGHGSURPSWO\
&OHDQDURXQGGRRUVHDOJODVVWRSUHYHQWRGRU
$OZD\VUHPRYHLWHPVIURPWKHZDVKHUDVVRRQ
DVWKHF\FOHLVFRPSOHWH
:DVKHURYHUORDGHG
:KHQZDVKLQJODUJHORDGVGRQRWRYHUVWXçWKH
GUXP7KHZDVKHUFDQEHIXOO\ORDGHGEXWWKH
GUXPVKRXOGQRWEHWLJKWO\SDFNHGDQGWKHGRRU
VKRXOGFORVHHDVLO\
+RWDQGFROGZDWHULQOHWKRVHVDUH
UHYHUVHG
+RWZDWHUULQVHFDQVHWZULQNOHVLQJDUPHQWV
&KHFNWKHLQOHWKRVHFRQQHFWLRQV
TROUBLESHOOTING GUIDE
BEFORE CALLING FOR SERVICE (continued)
<RXUZDVKLQJPDFKLQHLVHTXLSSHGZLWKDQDXWRPDWLFHUURUPRQLWRULQJV\VWHPWRGHWHFWDQGGLDJQRVHSUREOHPVDWDQ
HDUO\VWDJH
Problem
Possible Cause
Water in the washer
drains slowly or not at
all, or the display shows:
'UDLQKRVHLVNLQNHGSLQFKHGRUFORJJHG
:DVKHUoOOVZLWKZDWHU
slowly or not at all, or
the display shows:
Cycle won’t start, or the
display shows:
or
The display shows:
The display shows:
The display shows:
Solutions
0DNHVXUHWKHGUDLQKRVHLVIUHHRIFORJVNLQNV
HWFDQGLVQRWSLQFKHGEHKLQGRUXQGHUWKH
ZDVKHU
7KHGUDLQSXPSoOWHULVFORJJHG
&OHDQWKHGUDLQSXPSoOWHU6HH0DLQWHQDQFHLQ
WKH&DUHDQG&OHDQLQJVHFWLRQ
'UDLQGLVFKDUJHLVPRUHWKDQLQFKHV
$GMXVWRUUHSDLUGUDLQ0D[LPXPGUDLQKHLJKWLV
DERYHERWWRPRIZDVKHU
LQFKHV
:DWHUVXSSO\IDXFHWVDUHQRWRSHQIXOO\
0DNHVXUHWKDWWKHZDWHUIDXFHWVDUHIXOO\RSHQ
:DWHUOLQHKRVHVDUHNLQNHGSLQFKHGRU
0DNHVXUHWKHKRVHVDUHQRWNLQNHGRUSLQFKHG
FUXVKHG
%HFDUHIXOZKHQPRYLQJWKHZDVKHUGXULQJ
FOHDQLQJDQGPDLQWHQDQFH
:DWHULQOHWoOWHUVDUHFORJJHG
&OHDQWKHLQOHWoOWHUV6HH0DLQWHQDQFHLQWKH
&DUHDQG&OHDQLQJVHFWLRQ
:DWHUVXSSO\SUHVVXUHWRIDXFHWRUKRXVHLV &KHFNDQRWKHUIDXFHWLQWKHKRXVHWRPDNHVXUH
WRRORZ
WKDWKRXVHKROGZDWHUSUHVVXUHLVDGHTXDWHDQG
pRZLVQRWUHVWULFWHG
:DWHUVXSSO\FRQQHFWHGZLWKOHDNOLPLWLQJ +RVHVGHVLJQHGWROLPLWOHDNVFDQWULSIDOVHO\
KRVHV
DQGSUHYHQWWKHZDVKHUIURPoOOLQJ7KHXVHRI
OHDNOLPLWLQJKRVHVLVQRWUHFRPPHQGHG
7KHGRRULVQRWFORVHGSURSHUO\
0DNHVXUHWKDWWKHGRRULVFORVHGSURSHUO\DQG
SUHVVWKH67$573$86(EXWWRQ$IWHUVWDUWLQJ
DF\FOHLWPD\WDNHDIHZPRPHQWVEHIRUHWKH
GUXPEHJLQVWRWXUQRUVSLQ7KHZDVKHUZLOOQRW
RSHUDWHXQOHVVWKHGRRULVORFNHG
,IWKHGRRULVFORVHGDQGORFNHGDQGWKHRSHQ
GRRUHUURUPHVVDJHLVGLVSOD\HGFDOO
IRUVHUYLFH
/RDGLVWRRVPDOO
$GGRUVLPLODULWHPVWRKHOSEDODQFHWKHORDG
/RDGLVRXWRIEDODQFH
7KHZDVKHUKDVDQLPEDODQFHGHWHFWLRQDQG
FRUUHFWLRQV\VWHP,ILQGLYLGXDOKHDY\DUWLFOHVDUH
ORDGHG EDWKPDWEDWKUREHHWF DQGWKHLPEDO
DQFHLVWRRJUHDWWKHZDVKHUZLOOPDNHVHYHUDO
DWWHPSWVWRUHVWDUWWKHVSLQF\FOH,IDQLPEDODQFH
LVVWLOOGHWHFWHGWKHZDVKHUZLOOVWRSDQGWKHHUURU
FRGHZLOOGLVSOD\
&RQWUROHUURU
8QSOXJWKHZDVKHUDQGZDLWVHFRQGV5HFRQQHFW
SRZHUDQGWU\DJDLQ,IWKHHUURUUHDSSHDUVFDOOIRU
VHUYLFH
:DWHUOHYHOLVWRRKLJKGXHWRDIDXOW\
&ORVHWKHZDWHUIDXFHWVXQSOXJWKHZDVKHUDQG
ZDWHUYDOYH
FDOOIRUVHUYLFH
The display shows:
7KHZDWHUOHYHOVHQVRULVQRWZRUNLQJ
FRUUHFWO\
&ORVHWKHZDWHUIDXFHWVXQSOXJWKHZDVKHUDQG
FDOOIRUVHUYLFH
The display shows:
$PRWRUHUURUKDVRFFXUUHG
The display shows:
$SRZHUIDLOXUHKDVRFFXUUHG
$OORZWKHZDVKHUWRVWDQGIRUPLQXWHVDQG
WKHQUHVWDUWWKHF\FOH,IWKH/(HUURUFRGHSHU
VLVWVFDOOIRUVHUYLFH
,IWKHSRZHUWRWKHZDVKHUKDVEHHQLQWHUUXSWHG
GXULQJDF\FOHWKH3)HUURUFRGHZLOOGLVSOD\
WKHQH[WWLPHWKHZDVKHULVWXUQHG217KLVZLOO
DOHUW\RXWRWKHIDFWWKDWWKHSUHYLRXVF\FOHPD\
QRWKDYHEHHQFRPSOHWHG6HOHFWDQ\F\FOHWR
FOHDUWKHHUURUFRGHDQGXVHWKHZDVKHU
30
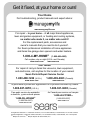
Get it fixed, at your home or ours!
Your Home
For troubleshooting, product manuals and expert advice:
www.managemylife.com
For repair – in your home – of all major brand appliances,
lawn and garden equipment, or heating and cooling systems,
no matter who made it, no matter who sold it!
For the replacement parts, accessories and
owner’s manuals that you need to do-it-yourself.
For Sears professional installation of home appliances
and items like garage door openers and water heaters.
1-800-4-MY-HOME®
(1-800-469-4663)
Call anytime, day or night (U.S.A. and Canada)
www.sears.com
www.sears.ca
Our Home
For repair of carry-in items like vacuums, lawn equipment,
and electronics, call anytime for the location of your nearest
Sears Parts & Repair Service Center
1-800-488-1222 (U.S.A.)
www.sears.com
1-800-469-4663 (Canada)
www.sears.ca
To purchase a protection agreement on a product serviced by Sears:
1-800-827-6655 (U.S.A.)
1-800-361-6665 (Canada)
Para pedir servicio de reparación
a domicilio, y para ordenar piezas:
Au Canada pour service en français:
1-888-SU-HOGAR®
(1-888-784-6427)
www.sears.com
1-800-LE-FOYER MC
(1-800-533-6937)
www.sears.ca
® Registered Trademark / TM Trademark of KCD IP, LLC in the United States, or Sears Brands, LLC in other countries
® Marca Registrada / TM Marca de Fábrica de KCD IP, LLC en Estados Unidos, o Sears Brands, LLC in otros países
MC
Marque de commerce / MD Marque déposée de Sears Brands, LLC