1
Use & Care Guide
E
L
I
T
Blender
5 Speed
Model No.
100.90001
CAUTION;
Read, understand and follow
all Important Safeguards and Operating
Instructions in this Manuel before using
this product.
Sears, Roebuck and Co., Hoffman Estates, IL 60179 USA,
www, kenmoreocom
KENtYIORE ELITE FULL WARRANTY
If this product tails due to a defect in material or workmanship within five years from the
date of purchase, return it to any Sears store or other Konmore outlet in the United Slates
forfree replacement
if the motor of this product fails due to a defect in malarial or workmanship within 10 years
from the date of purchase, relurn this product to any Sears store or other Kenmore eut_et
in the Uniled Slates for free replacement
This warranty does not include expendable parts, such as filters or b_ades, which can wear
out from normal use within the warranty period
This warranty applies for only 90 days if this product is ever used for other lhan privale
household purposes
This warranty appiies only while this product is used in the United States,
This warranty gives you specific legal rights, and you may a_se have other rights which
vary from state to state.
Sears, Roebuck and Co, Hoftman Estates, 1L60179
When using electrical appliances, basic safety precautions
followed, including the following:
should always be
1 READ all lnstructions,
2 To protect against risk of electrical shuck do not put blender in water or other liquid
3 Close supervision is necessary when any appliance
is used by or near children.
4. UNPLUG from outlet when not in use, before puffing on. or taking off pads, and
before cleaning
5 AVOID contact with moving parts
6 DO NOT operate any appliance with a damaged cord or plug. or after the appliance
malfunctions or has been dropped or damaged in any mann'Jr Return appltance to
the nearest authorized service facility for examinalion, repair or adjustment
7 The use of accessory attachments, Including canning jars nut recommended by the
app}iance manufacturer may cause a risk of personal iniury
8 DO NOT use ouldoor8
9
DO NOT te_ the cord hang over the edge of table or counter
10
Keep hands and utensffs out el container white blending to reduce the risk of severe
injury to persons or damage to the blender A scraper may be used, but must be
used ONLY when the blender is not running.
11
Blades are sharp Handle carefully
12Toreduce the
risk of injury, never place cutter-assembly blades on base without jar
properly attached
13, ALWAYS operate blender with cover in place.
14. When blending hot liquids, remove measuring cup from the two-piece lid Do not lill
jar beyond 3-cup level.
15 To protect against electrical shock, this appliance is equipped with a cord having a
3-prong grounding-type piug for insertion into a proper grounding-type receptacle.
DO NOT atter the plug for use in a 2-prong receptacle If the plug wilf not fit into
a receptacle, have the proper receptacle installed by a qualified electrician
is SAVETHESE
INSTRUCTIONS!
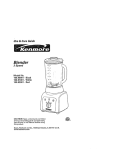
Measuring
cup (middle of lid)
Lid
Fig, 1
Jar
Gasket
Btade
Assembly
Collar
!
LCD
I
Motor/Base
Unit
Dis
Stir
.Mix button
button
button
ICE CRUSH
OFF
PULSE
I Before
assembling
you_"
bfender,
wipeblender
base
withawarm
sudsy
cloth.
',b,
enwipec_ean
withadamp
ctoth.
Drywithasoft_o_,Wash
blender
ja_'.
fid,coltar
andblades
Inwarm.
sudsy
water
Rinse
andwipeparts
dry
Fig. 2
2, Turn blender jar upside down Place Ihe
gasket on the blade assembly (Fig2)
3
Place the blade assembly with the gasket
in the bottom opening o! the jar (F|g.3)
4 Twisl coIlar onto iar, Be sure to engage
threads properly and securely (Fig.4),
Turn assembled jar right side up (FigS).,
Fig. 3
Fig. 5
Fig° 4
CAUTION:
CAUTION:
Blades are sharp° Handle carefully,
NEVER place blender's moter_ase
!
in water or other tiqutds. ]
I:
0 PERATIN GYOU
Your blender has been designed to work in a
variety of ways to suit your blending needs
Or_ce you plug the blender in, the OFF button
ilfuminales Operate the blender in either
continuous er pulse mode by pressing the
speed buttons The blender has a soft start
function when used ]n the continuous mode
(Ftg_ 6)
1
Make sure the power cord is unplugged
2
Place Blender molortbase on a dry fevel,
slable su r'iace
BLENDE:R
Fig. 6
L_ L
3. Set ar assembly into place on motodbase,
mak ng sure motoflbaae and jar are
securely lighlened inlo place
4
5
Place Ihe food solids and liquids to be
blended into the jar and put the lid on
the jar before blending Be sure lhe
measuring cup Is in place in the middle
of the lid
Plug power cord tnlo a standard
120-V, 60 Hz AC-only, 3-prong
electrical oul/eL. The blue LCD
display will say, 0:0O for lhe timer,
and the blue Off indicator Itght will
I[luminale (Fig. 7).
Flg. 7
I(@®®
r_
L
I
T
t_
6 To lurn on the blender in continuous
mode, pleas one of the followin_ speed
bullons: Stir (slowest), Chop, Mix, Puree
or Liquefy (fastest)The button for the
speed you select will illuminate blue and
the blender's timer will start counting the
seconds the blender is in operation
The blender wlt_run conlinueusly after
you press lhe button and until yeu press
the same button again, or press the OFF
button.
You can change blender speeds by
pressing a difterent button without tirst
pressing OFE The timer feature will
continue while you are blending and wtfl
pause in ils count when you re-push a speed button to shut Ihe blender elf The timer
will re-set ilselt to zero only if yeu press the OFF button
7 To run [he blender Intermittently (pulse mode) rather Ihan continuously, first press the
PULSE button The PULSE butlon light will flash blue Then press one of the five
speed buttons above il The speed button you press wilt illuminate b_ue.Then
press and hold down the PULSE button to run the blender at
that speed When you retease the button the blender wilt slop and lurn OFF
_
WARNING:
Flashing light indicates
Do
not touch blades,
ready
to
operate.
8 The Ice Crush button is the htghesl and strongest blender speed The blender will
begin to operate at this speed as soon aa you press the butlon but will only con inue
le operate as long as you held the button down. While the bulton is pressed
it iltumina es blue As soon as you stop pressing lhe button, Ihe blender turns OFF
9 As a safely lecture, the limer on Ihe blender will shut the blender off when il reaches
5 minutes. It will then be in the OFF made with the b_ue OFF butLon illuminated
10 To add food or fruit to the jar while the blender is running remove the measuring cup
in the middle of the lid Add Ihe food or fruit through the ho_e in the middle of the _id
and lhen replace Ihe measuring cup on lid NEVER start up the blender without the
lid in place The speed of the blades wilt throw contents high up in the jar and
wtihout the Ild it could spill out.
NOTE: Only operate blender
in one speed at a time,
For quicker, eas_er blending, cut food Into 2-In. tong pieces before adding [o brander ar
To chop, grate or prepare frutt smoothies, with either fresh or frozen fruit, cut fruit into
about 3/4-inch long pieces
To best circulate foods or fruit thai are to be blended wtth liquid, pour the Hquid Into the jar
first, Ihen add the solid foods or fruit
Some tasks cannel be performed efficiently with a blender, These are: Beating egg whites
whipping cream, mashing potatoes, grinding meats, mixing dough and extracfing juices
from fruit and vegetables
The following items should never be placed in Iha blender jar, as they can cause damage:
Bones, large pieces of acrid frozen foods, or dense, tough foods such as turnips
To crush ice. ALWAYS have liquid in the jar Slart out with 2 cups of liquid, and add about
2 cups of ice cubes Hold one hand firmly on the lid Push the Ice Crush button
If more ice is needed, remove the measuring cup in the middte of the lid and add cubes
one at a time through lhe hole in the lid DO NOT CRUSH ICE WITHOUT LIQUID
Failure to follow Ihese directions can result in damage to lhe blades, Jar, biender motor,
and possibty result in personal injury,
if you should ever need replacement parts for this blender, cenlact Sears Parts and
Repair Service at 1-800-4-MY-HOME _',
1 Before c!aaning, unplug the blender.
2. Rinse )?arts ( or, blade assembly, gasket, collar, lid and measuring cup inner lid)
mmediately after branding for easier cleanup
3
AJt removable parts can be washed by hand or tn a dishwasher The lid, measuring
cup, collar, gasket and blade assembly sheuid be placed in the top rack only.
Disassemble before placing in Ihe dishwasher. The jars are boltom rack
dishwasher-safe
Do not place the jar or any other parts in boiling liquids.
4 The meier/base is designed to be resistant le liquids if liquids spitl into the motedbase
• Unplug lhe moierlbase
,, Wipe with a damp cloth and dry thoroughly
5
Do not use abrasive scouring pads or cleaners on base as finish may become
scratched or damaged
Get
'ne or ours!
Your Home
For repair - in your home - of all major brand appliances,
lawn and garden equipment, or heating and cooling systems,
no matter who made it, no matter who sold itl
For the replacement paris, accessories and
owner's manuals that you need to do-it-yourself.
For Sears pro[essional installation of home app!iances
and ilems like garage door openers and waler heaters
1-800-4-MY-HOME
®
Cellanytime,
(1-B00_169-4563)
WINW
(USA
BeBt$,com
WWW
For expert home soluliens
day or night
and Canada)
eaar_,,ca
advice; www manegemyhbme,com
Our Home
For repair of carry-in products like vacuums, fawn equipment,
and electronics, cal! or go on-line for the nearest
Sears Parts & Repair Service Center
1-B00_48B-1222 (u S_A)
1-800-469-4663
(Canada)
Cal! anytime, day or nighl
WVVW_S
Bare.corn
www,siBa
fe,_a
To purchase a protection agreement on a product serviced by Sears:
1-800-827-6655
(USA)
%800-36%6665
(C,_,naOa)
Pare pedir servicio de reparaciSn
a domicilio, y pare ordenar p=ezas:
1-aBB,,SU-HOGAR_
Au Canada pour service en frangais:
1.80D.I_E.FOYERMC
(1_800-533-6937)
('_-888-784-6427)
www seats ca
............
•S rs
.......
© Se,",,_,s
Sran_, LLC
® Reglslered Trademark l'_k_Trademark I s_,_
Service M_rk of Seats Brands. LLC
® Marco Reglstrada / TUMarco de F_brtce t _t Morea de Servic_o de Sea{s Brands LLC
=*¢Marque de commBrae1 L,_Marque d_p_s_e de Seres Brands.LLC