1
Use & Care Guide
Blender
3 Speed
Model No.
100_80001 - Black
100.81001 - White
100.82001 - Red
CAUTION:
Read, understand and follow
all Important Safeguards and Operating
instructions in this Manual before using
this product.
Sears, Roebuck and Co,, Hoffman Estates, IL 60179 U,S,A_
www.kenmore,com
I
KENMORE FULL WARRANTY
Ii this product fails due lea defect in maledal or workmanship within two years from the
date of purchase, return it to any Sears store or other Kenmors culler in the United States
for free replacement
This warranty does ncl include expendable pads, such as filters or btades, which can wear
out from normal use within the warranty period
This warranty applies for only 90 days if this product is ever used for other Ihan private
household purposes
This warranty applies only while this product is used in the United States
This warranty gives you speclfie legal rights, and you may also have other righls which
vary from state to slate
Sears, Roebuck and Co. Hoffman Estates. tL 60179
When using electrical appliances, basic safety precautions
be followed, Including the following:
1 READall
should
always
Instructions,,
2 To protacl against risk of electrical shock do not pul blender in walor or other tiquid
3 Close supervision is necessary when any appliance Is tread by or near children.
4 UNPLUG from outlet when not in use, before putting on or taking eft paris.
and before cleaning.
5 AVOID contact with moving parts
6 DO NOT operate any appliance wi[h a damaged cord or plug, or after the appliance
malfunctions or has been dropped er damaged in any manner Return appliance to
the nearest aulhorized service facility for exam[nalion, repair or adjustment
7 The use ef atlachments, including canning jars, not recommended
manufacturer may cause a risk of injury tc; persons
by the appliance
2, DO NOT use ouidoers.
9
DO NOT lel the cord hang ever the edge of table or counter
10
Keep hands and utensils out of conlainer while blending to reduce the risk ol severe
injury to persons or damage to the blender A scraper may be used, but must be
used ONLY when the blender is not running
11
Blades are sharp Handle carelut;y
2
12Toreduce
theriskofinjury,
never
place
cutter-assembly
blades on base without
jar proper_y attached
13, ALWAYS operate blender with cover in place
14 When blending hot _iqu]ds, remove measLirtng cup from ttle two-piece Itd.
Do not fill jar beyond 3-cz_p level
15
To protect against electrical shock_ this appliance is equipped with a cord having
a 3-prong grounding-type plug for Insertion into a proper grounding-lype receptacle.
DO NOT alter the plug for use in a 2-prong receptacle II lhe plug witl not fit into
a receplacle° have the proper receptacle Installed by a qualiIted electrician
16. SAVE THESE INSTRUCTIONSt
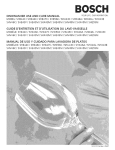
FTg. 1
Measuring cup (middle o(lid)
Lid
Jar
Blade __
Assembly
Coltar
Button
Control
Switch
! Before
assembling your
blender, wipe blender base with e warm sudsy cloth,
then wipe clean with a damp cloth. Dry with a soft ctoth Wash blender jar, lid, collar
and blades in warm, sudsy water Rinse and wipe parts dry
2 Turn bl_,ndet jar upside down Place the
gasket on the blade as_embfy (Figo2)
3 Place the biade assembly withthe gasket
in the bottom openingof the jar (Fig,,3).
4 Twist collar onto jar Be sure to engage
threads properly and securely (Fig.4)_
Turn assemWed jar right side up (FigS)
Fig, 3
Fig. 4
CAUTION:
Bledes are sharp. Handle carefully,
CAUTION: NEVERplace blender's motor/base in wateror
t
Fig° 6
Your blender has been designed to work
In a vadely of ways to suit your blending needs
®
Once you plug the blander in, it illuminates
to show what mode it is in, You can easily
control its function by a simple push of the
buttons end turn o! the control switch
®
OFF"
@
This blender has a soft start function when
used in the normat ON position with either
lhe High or Low speed (Fig. 6)
1
Make sure the Control Switch is in the OFF position and the power cord is unplugged
2 Place Blender moledbase
on e dry, level, stable surface
3 Set jar assembly into place on motor/base,
securely tightened into placer
making sure motor/base and jar are
4
Place the food solids and liquids to be blended tnto the jar and put the lid on the jar
before blending Be sure the measuring cup [s in place in the middle of the lfd.,
5
Plug power cord into a standard
120-V, 60 Hz AC-only,
3-prong electrical outlet
The OFF indicator should be
illuminated to show that the blender is
plugged in and that the Control Switch
is in the OFF position (Fig. 7),
Fig. 7
f
®
®
V
OFF
@
6. Turn the ControlSwitchto turn the unit ON, The ON ind}catorwill Itlumlnstegreen_
Press and release the High or Low
button to startbrander,The button you
presswillilluminate gresn_The blender
will runcontinuouslyuntilyou press the
button again to turnttOFF°
Fig B
Youcan also turn the blender OFF by
turning the controlswitch to OFE
The Ice Crushbutton Is the highest and
strongest speed of the blender,
In the ice Crush speed the blender will
stay on only as longas you keep
pressing the button. As soon as you
stop pressing,the blenderwiltturn
OFF (Rg. 8).
7. To run the blenderintermittentlyratherthan continuously, turn the ControlSwitchto
PULSE. When the blander is in PULSE mode, the PULSE Indicatorlightflashes
green and the button youpressfor either High Low or ice Crushwill only stay on
as longas youare pressingthe button. As soon as you stop, the blender will
turnOFF.
_
ARNING: Flashing tight indicates ready to operate. Do not touch
blades°
B To add food or fruit Io the jar whife the blender is running, remove the measuring cup
in the middle of the lid Add the food or fruit through the hole tn the middle of the lid
and then replace the measuring cup on lid
NEVER start LJpthe blender witheu! the lid in place+ The speed of the blades will
lh_'ow contents high up in the jar and without the lid it could spill out
NOTE: Only operate
blender In one speed at a time.
For quicker, easier blending, cut food into about 2-in {one pieces before addlng to
blender _,r_To chop, grate or prepare fruit smoothies, with eilher fresh or h'ozen fruit,
cut fruit in[o about 3/4.inch long pieces
To best circulate foods or fruit that are to be blended with liquid, pour the liquid into the
jar ffrst, then add the solid feeds or fruit
Some tasks cannot be performed efficientfy with a blender. These are: Beating egg whites
whipping cream, mashing potatoes, grinding meats, mixing dough, and extracting juices
from fruit and vegetables
The following items should never be placed in the blender jar, as they can cause damage:
Bones, }arge pieces of soiid frozen foods, or dense, tough foods such as turnips.
To crush Ice, ALWAYS have liquid in the jar. Start out with 2 cups of liquid, and add about
2 cups of ice cubes Hold one hand firmly on the lid Pulse the ice Crush button
{! more ice is neede& remove the measuring cup in the middle of the lid and add cubes
one at a time through the hole in the fid. DO NOT CRUSH ICE WITHOUT LIQUID
Failure to re{low Ihese d#eelions can result in damage to the b{ades, jar, blender motor,
and possibly resull in personal injury.
if you sheutd ever need replacement _arts for this blender, contact Sears Pads end
Repair Service at 1-800-4-MY-HOME"
1 Before cleaning, turn the conlrei knob switch to OFF and unplug the blender
2. Rinseparts ( at, blade assembly, gaskel co{far, lid and measuring cup inner {{d)
immediately after blending for easier cleanup
3 AII removable parts can be washed by hand or In a dishwasher The lid measuring
cup, collar, gasket and bfade assembly should be placed in lhe top rack only
Disassemble belOre ptacing [n the dishwasher, The are are bottom rack
dishwasher-safe Do not place the iar or any other parts n be ng qu ds
4 The motor/base is designed to be resistant to liquids, Efliquids spill {hie the motor/base
" Unplug the motor/base
• Wipe with a damp cloth and dry thoroughly
5. Do no{ use abrasive scouring pads or cleaners on base as finish may become
scratched or damaged
Get it fixed, at your home or ours!
i
Your Home
For repair - in your home - of all major brand apptiances,
fawn and garden equipment, or heating and cooling systems.
no matter who made it, no matter who sold it]
For the replacement parts, accessories and
owner's manuals that you need to do-it-yourself
For Sears professional installation of home appliances
and items like garage door openers and water heaters
1-800-4-MY-HOME
®
(1-800_469-4663)
_,%_rsV= a2era
celt anyltme, day or night
(U S A, and Canada)
,cam
www
For expert home solutions
B;l_ara.ca
advice" www manegemyhome,com
Our Home
For repair of carry-in products like vacuums, tawn equipment,
and electronics, call or go on-tine for the nearest
Sears Parts & Re pair Service Center
1-BOD-488-1222 (u SA )
Call anylime,
WWW,BD;_rS.com
1-B00-469-4663 (Canada)
day or nighl
WWW aE{ara,ca
To purchase a protection agreement on a product serviced by Sears:
1-800-B27-6655
(usA)
1-B00-36t -6665 (canada)
Pare pedir serv[cia de reparaci6n
Au Canada pour service en fran_is:
a domicilio, y para ordenar p_ez_as:
1.800.LE.FOYER_C
1-eB8-SU-HOGAR ®
(1-800533-6937)
(1,,BBB.764,r_27)
www sears ca
..........
, Se /rs
© SeamSmfw:_,
LLC
® Registered Tradsmmk / _u Tradurnmk f _ Service Mark of Sears Brands, LLC
®Matca Regt_trad_ I TM Matca de F_bdca I s_._
Matca de 5ervls_ade Sears Stands LLC
_c Marqus da commerce Ivo Marque d_pes_e de Soars Brands, LLC
[