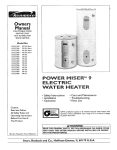
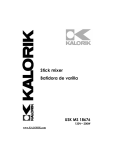
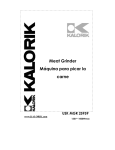
1
Steam press
Prensa de planchar
USK SIT 25803
www.KALORIK.com
120V~60Hz 1000W
IMPORTANT SAFEGUARDS
1. READ ALL INSTRUCTIONS
2. Use this appliance for its intended use only.
3. Check that your mains voltage corresponds to that stated on the
appliance.
4. To protect against a risk of electric shock, do not immerse the
appliance in water or other liquids.
5. The iron should always be turned to OFF before plugging in or
unplugging from outlet. Never yank cord to disconnect from
outlet: instead, grasp plug and pull to disconnect.
6. Do not allow cord to touch hot surfaces.
7. The plug must be removed from the electric socket before
cleaning, maintaining, or when filling with water or emptying and
when not in use.
8. Close supervision is necessary for any appliance being used by or
near children. This appliance is not intended for use by young
children.
9. The iron must not be left unattended while it is connected to the
supply mains.
10. Children should be supervised to ensure they do not play with the
appliance.
11. This appliance is not intended for use by persons(including
children) with reduced physical sensory or mental capabilities, or
lack of experience and knowledge, unless they have been given
supervision or instruction concerning use of the appliance by a
person responsible for their safety.
12. Burns can occur from touching hot metal parts, hot water, or
steam. Use caution when you turn the steam iron upside down, as
there may be hot water in the outlet holes.
13. To avoid a circuit overload, do not operate another high
wattage appliances on the same circuit.
14. If an extension cord is absolutely necessary, a 10-ampere cord
should be used. Cord rated for less amperage may overheat.
Care should be taken to arrange the cord so that it cannot be
2
USK SIT 25803 - 080425
pulled or tripped over.
15. If the supply cord is damaged, disconnect the appliance from
the socket immediately and the supply cord must be replaced by
the manufacturer, its service agent or a similarly qualified person
in order to avoid a hazard.
16. Do not operate the appliance if it has been dropped or
damaged. To avoid the risk of electric shock, do not disassemble
the appliance, take it to a service agent or a similarly qualified
person for examination and repair. Incorrect reassembly can
cause a risk of electric shock when iron is used.
17. Do not continue to use this appliance if any part appears to be
faulty, missing or damaged.
18. Do not carry out maintenance work other than that shown in this
manual.
19. Do not put anything other than water into the reservoir.
20. The iron must be used on a stable surface.
21. When placing the iron on its stand, ensure that the surface on
which the stand is placed is stable.
22. The iron is not to be used if it has been dropped, if there are
visible signs of damage or if it is leaking.
SPECIAL INSTRUCTIONS
•
•
To avoid a circuit overload, do not operate another high
wattage appliance on the same circuit.
If an extension cord is absolutely necessary, a 10-ampere cord
should be used. Cords rated for less amperage may overheat.
Care should be taken to arrange the cord so that it cannot be
pulled or tripped over.
3
USK SIT 25803 - 080425
SAVE THESE INSTRUCTIONS
POLARIZED PLUG INSTRUCTIONS
This appliance has a polarized plug (one blade is wider than the
other). To reduce the risk of electric shock, this plug will fit into the
polarized outlet only one way. If the plug does not properly fit into
the outlet at first, reverse it. If it still does not fit, contact a competent
qualified electrician. Do not attempt to modify the plug in any way.
For appliances equipped with a standard plug, simply insert the plug
into the outlet without paying attention to the way you plug it.
SHORT CORD INSTRUCTIONS
A short detachable power supply cord is provided to reduce the
hazards resulting from becoming entangled in, or tripping over a
longer cord. Longer detachable power supply cords may be used if
care is exercised in their use.
• The electrical rating of the longer cord should be at least that
of the appliance. If the electrical rating of the extension cord
is too low, it could overheat and burn.
• The longer cord should be arranged so that it will not drape
over the counter top or tabletop where it can be pulled on by
children or tripped over. The extension cord should be a
grounding-type 3-wire cord.
4
USK SIT 25803 - 080425
PART DESCRIPTION
5
USK SIT 25803 - 080425
These accessories are included with your appliance. Carefully check
to make sure you have all the parts listed below.
Unit Features & Accessories
1. Hanger
2. Pole
3. Steam Iron
4. Iron Holder
5. Fabric Brush
6. Iron Bracket
7. Ironing Board
8. Main Bracket
9. Tilted Bracket
10. Steam Adjustment Knob
11. Water Reservoir Cap
12. Water level indicator light
13. Power Switch
14. Lock Button
15. Pole Fix Nut
16. Unlock Button
17. Rear Wheel
18. Bottom Cover
19. Water Filling Cup
20. Funnel
21. Brush
22. Screw Nut
23. Metal Screw
24. Left and Right Shafts
25. Screw covers
26. Bracket covers
27. Hooks for holding power cord
28. Hooks for holding power cord
29. Filter cartridge
30. Jewelry cleaner
6
USK SIT 25803 - 080425
Figure1: Take the main bracket with ironing
board part from package. First insert the pole
fixing nuts (part 15) into each pole then slide the
bracket into the holes at the back of the front
cover (Part 18). Then push the two fixing nuts
down to secure the bracket firmly.
Figure 2: Inset the 2 shafts of the tilted bracket
into the front holes of the front cover, by
positioning the black pegged parts into correct
position. Push down to fix firmly.
Figure 3: Clip on the two shaft covers (part 24).
Figure 4: Adjust the tilted bracket against the
main bracket, align the holes in the two
brackets, and then use the metal screws and
nuts to secure the two brackets together using
part 26. Clip on screw covers. Please use the
screws that do not have a plastic washer
Figure 5: Take the two parts of the ironing board
and clip them together.
Figure 6: Support the ironing board as shown by
inserting the diagonal bar into the clamp.
Figure 7a: The bolts to secure the diagonal
support brackets have a plastic washer. This
washer must be placed between the two
brackets.
Figure 7b: Sort into pairs and clip on the screw
covers. The cover with a hole in it is placed on
the side where the bolt is, sothat the bolt fits
inside the hole.
7
USK SIT 25803 - 080425
Figure 8: Attaching the iron holder: Align the holes
of the iron holder with the slots on the side of the
iron bracket, and push down to fix.
Figure 9: Attaching iron bracket to the frame: take
the assembled iron bracket (6), making sure the
iron holder faces towards the ironing board, then
align the two pillar connectors with main bracket
holes and push down to lock.
Figure 10: Assemble the pole:
Insert the pole into the hole at the top of the iron
bracket.
Figure 11: Attaching the hanger: Make the hanger
face the direction as in figure 11, align the hole of
the hanger with top of pole, then push it down
firmly.
Figure 12: Placing the iron. Place the steam iron on
to the iron holder.
Figure 13: Attaching the fabric brush accessory:
Turn it and make the bristle face toward you and
align it with brush hanger on the bracket, then
slide the brush into its position on the iron bracket.
Figure 14: Slide the ironing board cover onto
board from the front end
first, smooth out and
fasten. The cover will be
creased at first, but these
creases can be steamed
out the first time you use
the ironing station.
8
USK SIT 25803 - 080425
INSTRUCTIONS FOR USE
FILLING RESERVOIR WITH WATER
Note: When the water level is low, the water level indicator will
illuminate. It is normal to hear a pumping sound coming from the
water reservoir when the water level is low. Adding water will stop
the sound.
Caution: Be sure that the power is OFF and the appliance is
unplugged before filling the water reservoir with water.
Warning: To prolong the life of this product and to ensure that the
ironing station’s performance is optimum, we strongly recommend
that you use distilled or cooled, pre-boiled water. Do not use borehole water or water taken from a well. For complete care and
maintenance instructions please see the maintenance section in this
instruction manual.
1. Turn the reservoir cap counter-clockwise to
open and remove the cap.
5
1
e
r
u
g
i
F
2. Using the measuring cup and funnel
provided, fill water reservoir with no more than
2500ml of water. (As shown in figure 15).
Do NOT add detergent or other chemicals to
the water reservoir. Doing so may result in
damage to the appliance.
3. Replace the reservoir cap and turn the arrow to closed position.
9
USK SIT 25803 - 080425
STEAM SETTINGS
Figure 16
Both buttons can be either held down manually or locked into
position for ease of use when ironing or steaming for a lengthy period
of time. For ordinary steam, press and hold or press and lock the left
button.
For the steam jet first press and lock the steam button and then press
and lock the steam jet button. Should you only want a short burst of
steam, simply hold the steam jet button down for a few seconds
whilst using regular steam. These two buttons control the type of
steam output. To regulate the strength of the steam output, adjust
the knob on the top of the water reservoir.
REGULATING STEAM OUTPUT
The knob on the top of the water reservoir can be turned to control
the steam output at various levels between minimum and maximum.
When steaming, you can regulate the strength of the steam
according to type and thickness of fabric.
This knob also controls the moisture content of the steam. For steam
with a higher moisture content, turn the knob clockwise towards
maximum. For drier steam, turn the knob anti-clockwise towards
minimum. It is possible that some of the moisture will condensate
when the knob is turned all the way to maximum and this will
account for minor dripping, to prevent this, turn the knob slightly
back towards minimum.
10
USK SIT 25803 - 080425
Figure 17
ATTACHING FABRIC BRUSH TO IRON
CAUTION: Use care when attaching fabric brush, as the sole plate
may be hot. Do not attempt to attach fabric brush while appliance is
emitting steam. As shown in figure 18 below, slide the fabric brush
over the sole plate until it clicks in place. When the fabric brush is
clipped in place you may begin steaming.
OPERATING THE IRONING STATION
1. NOTE: The very first time you use the ironing station, turn the steam
output dial to maximum, press and lock the regular steam button
and let the appliance run for 2 minutes on maximum. This is only
required the very first time you use the ironing station. For subsequent
use, it is not necessary to run the unit for 2 minutes, it can be used
immediately. For the first hour of use, the ironing station may not
perform at its optimum. This is due to the appliance needing time to
settle. After the first hour, performance will improve.
11
USK SIT 25803 - 080425
2. To prevent the appliance moving freely during use, push down
the lock button on the front to lock the appliance in place.
Figure 19
3. Plug power cord into a convenient electrical outlet.
4. Set Lighted ON/OFF switch to “ON”, and check that the switch is
illuminated, the heater indicator light will illuminate indicating that
heater is active.
5. After approximately 30 to 40 seconds of heating time, the unit will
be ready for use.
6. Direct steam nozzle (with fabric brush, if desired) towards material
you wish to steam.
CAUTION:
* Always be sure that steam iron is pointed in a safe direction (away
from yourself, other people, pets and plants) before pressing the
steam button.
* If hot water drips from the soleplate during use, adjust the knob on
top of unit to anti-clockwise direction to regulate the output strength
of the steam.
7. To vertical steam your clothes:
Press and lock the left steam button, after a few seconds, the
appliance will begin producing a flow of steam. This unit has an
integrated clothes hanger, first hang your clothes on the hanger and
attach the brush to the iron. Keep the flow of steam focused on
12
USK SIT 25803 - 080425
material you are steaming. Using light back and forth motions over
the area you are steaming will further enhance the process. If use for
a long period of time, some water might be sprinkled on the clothes
if used from too near.
8. Press ironing your clothes:
Detach the brush, and lay the fabric flat on the ironing board, push
and lock the left steam button and then press the sole plate on the
fabric and make back and forth movements, after several motions,
the clothes will be ironed.
CAUTION: Before doing flat ironing you should do a patch test on a
spare piece of fabric.
9. For convenience and safety always put the steam iron into the
safety holder when not in use or when turning over your garments
during ironing
10. To get a turbo jet of steam for stubborn creases, press the regular
steam button and the jet steam button.
11. When you are finished using your appliance, immediately set
lighted ON/OFF switch to OFF position and unplug power cord from
electrical outlet.
USING THE JEWELRY CLEANER ACCESSORY
Clip or attach desired item of jewelry into the appropriate place on
the jewelry cleaner. Using the steam jet function, aim the steam jet
at the item of jewelry and steam it clean. Please note, in order to
avoid scalding, hold the jewelry cleaner by its handle. The jewelry
cleaner can be stored underneath the ironing board as shown in the
picture below.
Figure 20
13
USK SIT 25803 - 080425
PROPER STORAGE
1. Turn the power switch to OFF and unplug power cord from
electrical outlet.
2. Allow unit to cool completely(at least 30 minutes)
3. Remove the Fabric brush attachment from unit (if attached,
please refer to following detaching steps)
A. Use your finger to push the back of the fabric brush to unlock
it.(figure 21)
B. Gently slide the fabric brush off the sole plate.
CAUTION: Do not attempt to detach the brush if the iron plate is hot!!
1
2
e
r
u
g
i
F
4. Push done on the wheel lock button to unlock wheels to allow
the unit to move freely.
5. Drain any remaining water in water reservoir into a sink or tub by
turning and removing the draining cap at back of the appliance,
as shown in figure 22. Do not forget to put the draining cap in
place after draining.
p
a
C
n
i
a
r2
D2
e
r
u
g
i
F
14
USK SIT 25803 - 080425
6. Wrap the power cord onto the cord clamp on the main bracket,
as figure 23 shows.
7. Set the ironing board to the lowered position as shown in figure
23.
8. Store the ironing station in a cool, dry place.
Figure 23
MAINTENANCE
CHANGING THE FILTER CARTRIDGE
The filter cartridge is located inside the water reservoir. The filter
cartridge needs to be changed every 3 months. Failure to do so will
invalidate this appliance’s warranty. Before changing the filter
cartridge, make sure the appliance is switched off and unplugged. It
is recommended that you allow the appliance to cool. Please note
that when unscrewing the water drainage cap to change the filter
cartridge, residue water will automatically start to drain from the
reservoir. For this reason it is recommended that you open the
appliance over a basin. Once you have unscrewed and removed
the cap you will see a tubular object inside. Pull this out. This tubular
object is the filter cartridge.
15
USK SIT 25803 - 080425
Each new unit of the ironing station comes complete with a new filter
cartridge already inside the water reservoir and a spare filter
cartridge. Thereafter you will need to contact the retailer to
purchase replacement filter cartridges.
The spare filter cartridge can be found in the space under the ironing
board as shown in figure 25b below. This is to prevent the spare filter
cartridge from being misplaced.
Figure 25b
MINUTE SELF CLEAN FUNCTION
To ensure optimum performance use the “3 minute self-cleaning
function” at least once a month. Whilst using this self-cleaning
function it is normal for water to drip from the steam holes on the sole
plate as there is an excessive amount of steam being forced out
through the steam holes.
Turn the steam strength dial to “Self-Clean”. Depress and click the
left steam button on the iron. Allow the unit to run for 3 minutes or
until the steam and water being emitted runs clear. It is
16
USK SIT 25803 - 080425
recommended that you place a basin or a rag under the iron so as
to prevent the ironing board from getting wet.
NOTE: This function is solely for the purpose of cleaning the internal
structure
of this appliance. This function is not to be used during ironing as it
will soak the clothes and possibly stain the clothes with the mineral
residue that is being cleaned out of the system.
Figure 26
Caution: The steam being emitted during the self clean is very strong
and very hot. Take care to avoid scalding!
TROUBLE SHOOTING
PROBLEM
Unit fails to heat
up,
heater
indicator light does
not illuminate.
Unit heats up, but
fails
to steam. (Note:
POSSIBLE
CAUSE
Unit
is
not
plugged in
Household
circuit Breaker/
Ground
fault
interrupter has
tripped
or
blown a fuse
Water reservoir
is empty
17
SOLUTION
Plug electrical cord into
outlet
Reset
circuit
breaker/ground fault
Interrupter. Or replace
fuse.
if
you
need
assistance, contact a
licensed electrician
Refill
water
reservoir
according
to
filling
procedure
USK SIT 25803 - 080425
allow proper time
for the unit
to heat up and
begin producing
steam)
Steam
output
power is reduced
or intermittent.
Loud
pumping
sound when steam
button is pressed.
Dirt/ mineral build
up coming out of
steam holes.
Steam button is Press and hold the steam
not
being button for a few seconds
pressed
for steam to begin flowing
Steam jet holes
have mineral
build
up
blocking
the
steam.
Low
water
level in water
reservoir.
1.
Used
incorrect water
type.
Use “self clean” function
cleaning for 3 minutes.
Refill
water
reservoir
according
to
filling
procedure
1. Immediately empty all
water from the reservoir
and refill using clean
water. Perform “self clean”
function to clear the
system and steam jet holes
of dirty water and mineral
build up.
2. Have not 2. Use “self clean” function
routinely
cleaning for 3 minutes.
performed the
“self-clean”
function.
Water
indicator
illuminates.
3. Have not
changed the
filter cartridge
at suggested
interval
as
shown
in
manual.
level Reservoir is low
light on water.
18
3. Change filter cartridge
as per instructions in
maintenance section.
Refill reservoir according to
filling procedure.
USK SIT 25803 - 080425
DISPOSAL OF THIS APPLIANCE
This unit is marked to show that it should not be disposed with other
household wastes throughout the EU. To prevent possible harm to the
environment or human health from uncontrolled waste disposal,
recycle it responsibly to promote the sustainable reuse of material
resources. To return your used device, please use the return and
collection systems or contact the retailer where the product was
purchased. They can inform you where to return this product for
environmentally safe recycling.
19
USK SIT 25803 - 080425
WARRANTY
We suggest that you complete and return the enclosed Product
Registration Card promptly to facilitate verification of the date of
original purchase. However, return of the Product Registration Card is
not a condition of these warranties. You can also fill this warranty
card online, at the following address: www.KALORIK.com
This KALORIK product is warranted for 1 year from the date of
purchase against defects in material and workmanship. This warranty
is not transferable. Keep the original sales receipt. Proof of purchase
is required to obtain warranty performance.
During this period, the KALORIK product that, upon inspection by
KALORIK, is proved defective, will be repaired or replaced, at
KALORIK's option, without charge to the customer. If a replacement
product is sent, it will carry the remaining warranty of the original
product.
This warranty does not apply to any defect arising from a buyer's or
user's misuse of the product, negligence, failure to follow KALORIK
instructions noted in the user’s manual, use on current or voltage
other than that stamped on the product, wear and tear, alteration
or repair not authorized by KALORIK, or use for commercial purposes.
There is no warranty for glass parts, glass containers, filter basket,
blades and agitators, and accessories in general. There is also no
warranty for parts lost by the user.
ANY WARRANTY OF MERCHANTABILITY OR FITNESS WITH RESPECT TO
THIS PRODUCT IS ALSO LIMITED TO THE ONE YEAR LIMITED WARRANTY
PERIOD
Some states do not allow limitation on how long an implied warranty
lasts or do not allow the exclusion of incidental or consequential
damages, so the above limitations may not apply to you. This
warranty gives you specific legal rights, and you may also have other
rights which vary from state to state.
20
USK SIT 25803 - 080425
If the appliance should become defective within the warranty
period and more than 30 days after date of purchase, do not return
the appliance to the store: often, our Consumer Service
Representatives can help solve the problem without having the
product serviced. If servicing is needed, a Representative can
confirm whether the product is under warranty and direct you to the
nearest service location.
If this is the case, bring the product (or send it, postage prepaid),
along with proof of purchase and indicating a return authorization
number given by our Consumer Service Representatives, to the
nearest authorized KALORIK Service Center (please visit our website
at www.KALORIK.com or call our Customer Service Department for
the address of the nearest authorized KALORIK Service Center).
If you send the product, please include a letter explaining the nature
of the claimed defect.
If you have additional questions, please call our Consumer Service
Department (please see below for complete contact information),
Monday through Friday from 9:00am - 6:00pm (EST). Please note
hours are subject to change.
If you would like to write, please send your letter to:
KALORIK Consumer Service department
Team International Group of America Inc
1400 N.W 159th Street, Suite 102
Miami Gardens, FL 33169 USA
Or call:
Toll Free: +1 888-521-TEAM
Only letters can be accepted at this address above. Shipments and
packages that do not have a return authorization number will be
refused.
21
USK SIT 25803 - 080425
CONSEJOS DE SEGURIDAD
1. LEA TODAS LAS INSTRUCCIONES.
2. Use el aparato sólo para el uso al que está destinado.
3. Antes de utilizar el aparato, compruebe que el voltaje de la red
eléctrica coincide con el del aparato.
4. Para protegerse contra una descarga eléctrica, no sumerja el
aparato, el cable o el enchufe en agua o en otros líquidos.
5. Ponga siempre el interruptor en la posición “OFF” antes de
enchufar o desenchufar el aparato. Nunca tire del cable para
desconectarla de la toma de corriente, sujete el enchufe y tire
de él para desconectarla.
6. No permita que el cable toque superficies calientes. Deje enfriar
el aparato del todo antes de guardarlo.
7. Siempre desconecte el aparato de la toma de corriente cuando
esté llenando el depósito de agua o vaciándolo y también
cuando el aparato no esté en uso. Tenga cuidado de no
derramar agua en el aparato durante el llenado.
8. Es siempre necesaria la supervisión cercana cuando este
aparato esté utilizado cerca de niños. Este aparato no debe ser
usado por niños.
9. El aparato debe estar vigilado cuando está conectado a la red.
10. Los niños deben ser vigilados para asegurarse de que no jueguen
con el aparato.
11. Este aparato NO DEBE ser utilizado por niños o personas con
incapacidades salvo si están bajo la vigilancia de una persona
responsable de su seguridad.
12. Se pueden producir quemaduras por contacto con las partes de
metal calientes, el agua caliente o el vapor. Tenga cuidado
cuando da la vuelta al aparato, puede todavía tener agua
caliente en el aparato.
13. Para evitar una sobrecarga eléctrica, no utilice un aparato de
alto voltaje en el mismo circuito.
22
USK SIT 25803 - 080425
14. Si se precisa un alargador, debería utilizar un alargador de 10
amperios. Alargadores de menos de 10 amperios podrían
sobrecalentar. No permite que se pudiera tropezar con el cable.
15. Si el aparato no funciona normalmente, desconéctelo de la
toma de corriente y hágalo revisar por un centro de servicio
autorizado.
16. No utilice el aparato si el cable o el enchufe están dañados o si
el aparato se cayó o está dañado. Para evitar el riesgo de
choque eléctrico, no desarme el aparato. Llévelo a un centro de
servicio autorizado para que lo examinen y/o reparen. Si lo
vuelva a montar el aparato de forma incorrecta, podría
provocar de un choque eléctrico durante el uso.
17. No utilice ese aparato si falta cualquiera parte de ello.
18. No intente reparar el aparato por si mismo.
19. Ponga únicamente agua en el depósito.
20. La plancha debe ser utilizada y puesta en una superficie estable.
21. Cuando ponga la plancha en su soporte, asegúrese de que la
superficie en la cual está puesto el soporte es estable.
22. La plancha no debe ser utilizada si cayó, si lleva señales visibles
de daños o si el agua se sale de la plancha.
INSTRUCCIONES ESPECIALES
•
•
Para evitar una sobrecarga del circuito no haga funcionar
otro aparato de alto vataje en el mismo circuito.
Si resulta absolutamente necesario usar un cable de
extensión, se debe usar un cable de 10 amperios. Los cables
con tensiones nominales menores pueden sobrecalentarse.
Se debe cuidar de poner el cable de extensión de modo tal
que no pueda ser arrancado o provocar tropiezos.
GUARDE ESTAS INSTRUCCIONES
INFORMACIÓN SOBRE EL ENCHUFE POLARIZADO
Algunos aparatos están provistos con un enchufe polarizado (una
pata es más ancha que la otra). Para reducir el riesgo de choque
23
USK SIT 25803 - 080425
eléctrico, este enchufe calza en el tomacorriente polarizado de una
sola manera. Si el enchufe no cabe totalmente en el tomacorriente,
gire el enchufe. Si aún así no calza, consulte a un servicio técnico
cualificado. No intente anular esta característica de seguridad.
Para los aparatos provistos con un enchufe clásico, basta con
insertar el enchufe en la toma de corriente.
INSTRUCCIONES DEL CABLE
El cable de alimentación del aparato es un cable corto a fin de
disminuir el riesgo de accidentes (caídas al tropezar con él, etc.)
Puede utilizar un alargador si es necesario.
• Asegúrese de que el nivel eléctrico del cable es igual o
mayor que el indicado. Una extensión con un bajo nivel
eléctrico correría el riesgo de sobrecalentarse y de
estropearse.
• Para evitar riesgos colocar de forma tal que los niños no
puedan jalarlo o tropezar con él. Que no arrastre nunca por
el suelo.
24
USK SIT 25803 - 080425
PARTES
25
USK SIT 25803 - 080425
Estos accesorios están incluidos en su aparato. Compruebe que
tiene todas las partes que figuran abajo.
Accesorios
1. Gancho
2. Tubo
3. Prensa de planchar
4. Soporte del aparato
5. Cepillo para ropa
6. Soporte
7. Plancha de prensar
8. Soporte principal
9. Soporte articulado
10. Botón de ajuste del vapor
11. Tapa del depósito de agua
12. Testigo luminoso indicador del nivel de agua
13. Interruptor encendido / apagado
14. Botón de bloqueo
15. Tuerca de fijación del tubo
16. Botón de desbloqueo
17. Rueda de atrás
18. Caja
19. Recipiente
20. Embudo
21. Cepillo
22. Tuerca
23. Tuerca metálica
24. Protecciones del alojamientos del soporte
25. Capas del los tornillos
26. Capas del soporte
27. Ganchos para el cable
28. Ganchos para el cable
29. Filtro de la cartucha
30. Limpiador de joyas
26
USK SIT 25803 - 080425
Imagen 1: Saque el soporte principal con la
plancha de prensar fuera del embalaje. Primero
insierte las tuercas de fijación del tubo (parte 15)
en cada uno de los tubos. Luego deslize el
soporte dentro de los agujeros en la parte
trasera de la caja (Parte 18). Luego empuje
ambas tuercas para sujetar firmemente el
soporte
Imagen 2: Insierte ambas tubos del soporte
diagonal en los agujeros de la caja,
posicionándolos bien las partes negras. Empuje
para sujetar correctamente.
Imagen 3: Ponga ambas protecciones.
Imagen 4: Ajuste el soporte diagonal contra el
soporte principal, alinee los agujeros en ambos
soportes y utilice tornillos y tuercas metálicas
para aprietar ambos soportes juntos (parte 26).
Ponga las protecciones de tornillos. Utilice los
tornillos que no tienen junta de plástico.
Imagen 5: Toma ambas partes del la plancha y
júntelas.
Imagen 6: Soporte la plancha insertiendo el
soporte diagonal en el atadero.
Imagen 7a: Los pernos que mantienen el
soporte diagonal tienen una junta de plástico.
Ese junta debe estar puesta entre ambos
soportes.
Imagen 7b: Sortéelas dos por dos y ponga las
protecciones en los tornillos. La protección con
un agujero se pone del lado del perno, para
que el perno pueda entrar en el agujero.
27
USK SIT 25803 - 080425
Imagen 8: Sujetando el soporte del aparato:
Alinee los agujeros del soporte del aparato con los
agujeros en el lado del soporte y empuje para
fijar.
Imagen 9: Sujetando el soporte en la marca: tome
el soporte métálico asemblado (6), compruebe
que el soporte está frente a la plancha, y alinee
los conectores con los agujeros del soporte
principal y empuje para fijar.
Imagen 10: Asemblar el tubo
Insierte el tubo dentro del agujero a la cumbre del
soporte metálico.
Imagen 11: Sujetando el gancho: Ponga el
gancho cómo en la imagen 11, alinee el agujero
del gancho con la cumbre del tubo y empuje
firmemente hacia abajo.
Imagen 12: Colocar el aparato Ponga el aparato
en su soporte.
Imagen 13: Sujetando el cepillo para ropa: Gírelo
y ponga los pelos frente a Usted y alinéelo con el
gancho del cepillo en el soporte, luego deslize el
cepillo en su posición en el soporte del aparato.
Imagen 14: Deslize la
cobertura en la plancha de
prensar, empezando por la
parte estrecha. Sujétela.
Será arrugada, pero eso
desaparecerá
cuando
utilice el aparato por la
primera vez.
28
USK SIT 25803 - 080425
INSTRUCIONES POR EL USO
LLENAR EL DEPOSITO CON AGUA
Nota: Cuando el nivel de agua es bajo, el indicador de nivel de
agua se encenderá. Es normal oir un ruido de pompa procedente
del depósito de agua cuando el nivel de agua es bajo. Añadir agua
parará el ruido.
Cuidado: Compruebe que el interruptor está apagado y que el
aparato está desenchufado antes de llenar el depósito con agua.
Cuidado: Para alargar la vida de ese producto y asegurar que esté
optimado el funcionamiento del aparato, le recomendamos utilicen
agua destilada o agua resfriada, pero que ha hervida. No utilice
agua procedente de un pozo. Por una limpieza y mantenimiento
totales, vea el párrafo “mantenimiento” en este manual.
1. Gire la tapa del depósito en el sentido contrario a las agujas del
reloj para abrir y remover la tapa.
5
1
e
r
u
g
i
F
2. Utilizando la taza medidora y el embudo
provisto, llene el depósito de agua con no más
de 2500 ml de agua (como en la imagen 15).
No añade ningún detergente o otras
sustancias químicas en el depósito de agua.
Podría dañar el aparato.
3. Reemplace el depósito de agua y gire la
flecha en posición cerrada.
29
USK SIT 25803 - 080425
AJUSTES DEL VAPOR
Imagen16
Ambos botones pueden estar presionados manualmente o
bloqueados por un uso más fácil durante el planchado o si utiliza
vapor durante mucho tiempo. Para vapor ordinaria, presione y
mantiene o presione y bloquee el botón de izquierda.
Para el botón de vapor, presione y bloquee el botón vapor y
después presione y bloquee el botón de brote de vapor. Si quiere un
corto brote de vapor, puede mantener el botón de brote de vapor
durante unos segundos y utilizar el vapor normal al mismo tiempo.
Estos dos botones controlan el tipo de vapor que sale. Para regular
la fuerza de la salida de vapor, ajuste el botón en la cumbre del
depósito de agua.
REGULAR LA SALIDA DE VAPOR
El botón en la cumbre del depósito de agua puede girar para
controlar la salida de vapor en varios niveles entre el mínimo y el
máximo. Durante el uso, puede ajustar la potencia del vapor según
el espesor y el tipo de ropa.
Este botón también controla el nivel de humedad del vapor. Para
un vapor con más humedad, gire el botón en el sentido de las
agujas del reloj hasta el máximo. Para un vapor más seco, gire el
botón en el sentido contrario de las agujas del reloj hasta el mínimo.
Es posible que parte de la humedad se condense cuando el botón
está girado de un golpe hasta el máximo. Eso es la causa de
algunas gotas. Para evitar esto, gire el botón lentamente hasta el
mínimo.
30
USK SIT 25803 - 080425
Imagen 17
ATAR EL CEPILLO PARA ROPA EN EL APARATO
CUIDADO: Tenga cuidado cuando ata el cepillo para ropa, puesto
que la suela puede estar caliente. No intente atar el cepillo mientras
el aparato está emitiendo vapor. Como se ve en la imagen 18
abajo, deslize el cepillo en la suela hasta que se oiga un click. Une
vez puesto el cepillo, puede utilizar el vapor.
FUNCIONAMIENTO DE LA PLANCHA DE PRENSAR
1. NOTA: La primera vez que utiliza la plancha de prensar, gire el
botón de control de salida de vapor hasta el máximo, presione y
bloquee el botón de salida regular de vapor y deja que el aparato
funcione durante 2 minutos cómo máximo. Esto se requiere por el
primer uso únicamente. Por los usos siguientes, no es necesario
hacer funcionar el aparato 2 minutos, puede utilizarlo directamente.
Durante la primera hora de uso, la plancha puede funcionar no
contodas su capacidad. Esto se debe al tiempo de adaptación del
aparato. Después de esta primera hora, el funcionamiento mejorará.
31
USK SIT 25803 - 080425
2. Para impedir que el aparato mueva libremente durante el uso,
empuje el botón de bloqueo en la parte delantera para bloquear el
aparato.
Imagen 19
3. Enchufe el aparato en una toma eléctrica conveniente.
4. Ponga el interruptor luminoso ON/OFF en “ON” y compruebe que
el testigo esté encendido. El testigo luminoso de calentamiento se
encenderá, indicando que el calentador está activo.
5. Después de aproximadamente 30 o 40 segundos de tiempo de
calentamiento, el aparato estarálisto por el uso.
6. Dirige el tubo de salida de vapor (con el cepillo para ropa, si lo
desea) hacia lo que quiere tratar con vapor.
NOTA:
* Compruebe que el vapor esté dirigido de manera segura (fuera de
si mismo o de otras personas, animales y plantas) antes de persionar
el botón de vapor.
* Si agua caliente corre de la suela durante el uso, ajuste el botón en
la cumbre del aparato en el sentido contrario de las agujas del reloj
para regular la fuerza del vapor que sale.
7. Para aplicar vapor de manera vertical en la ropa
Presione y bloquee el botón izquierda de vapor. Después de unos
segundos, el aparato producirá un flujo de vapor. El aparato tiene
una percha por ropa integrada, primero cuelga su ropa en la
32
USK SIT 25803 - 080425
percha y ate el cepillo en el aparato. Dirija el flujo de vapor hacia la
ropa que quiere planchar. Haciendo movimientos suaves hacia
delante y hacia atrás encima de la zona que quiere tratar con
vapor permitirá un proceso más rápido. Si lo utiliza por un largo
périodo de tiempo, un poco de agua podría estar salpicada contra
la ropa, si lo utiliza de demasiado cerca.
8. Planchar su ropa con la prensa
Saque el cepillo y ponga la ropa de plano en la plancha, empuje y
bloquee el botón de izquierda de vapor y después presione la suela
en la ropa y haga movimientos por delante y por atrás, después de
varios movimientos, la ropa estará planchada.
CUIDADO: Antes de planchar de plato, haga un intento con ropa
vieja.
9. Por conveniencia y seguridad, siempre ponga el aparato en su
soporte cuando no lo utiliza o cuando da la vuelta a la ropa
durante el planchado.
10. Para obtener un chorro de vapor turbo para remover arrugas
tenaces, presione el botón de vapor regular y el botón de vapor
turbo.
11.Cuando haya terminado utilizar
el
aparato, ponga
inmediatamente el interruptor iluminado ON/OFF en posición OFF y
desenchufe el aparato.
33
USK SIT 25803 - 080425
UTILIZAR EL LIMPIADOR DE JOYAS
Ate la joya deseada en el lugar apropiado en el limpiador de joyas.
Utilizando la función chorro de vapor, dirija el vapor hacia la joya y
límpielo. Para evitar quemaduras, mantiene el limpiador de joyas por
su asa. El limpiador de joyas puede arreglarse bajo la plancha,
como se ve en la imagen abajo.
Imagen 20
ARREGLO
1. Ponga el interruptor en OFF y desenchufa el cable de la toma de
corriente.
2. Deje enfriar completamente el aparato (mínimo 30 minutos).
3. Remueva el cepillo de ropa del aparato (si esté atado, sigue las
instruciones para desatarlo).
4. Utiliza su dedo para empujar la parte atrás del cepillo para
desbloquearlo. (imagen 21).
5. Deslize suavemente el cepillo para ropa de la suela.
CUIDADO: No intente sacar el cepillo cuando el aparato esté
caliente.
1
2
e
r
u
g
i
F
6. Empuje hacia abajo en el botón de bloqueo de las ruedas para
que el aparato pueda moverse libremente.
34
USK SIT 25803 - 080425
7. Enjuague el agua que queda en el depósito de agua en un
lavabo o una bañera girando y removiendo la tapa en la prte
trasera del aparato, como se ve en la imagen 22. No olvide
poner de nuevo la tapa en su sitio después de haber enjugado.
p
a
C
n
i
a
r2
D2
e
r
u
g
i
F
8. Enrolle el cable de alimentación en la pinza del soporte principal,
como se ve en la imagen 23.
9. Coloque la planche en posición baja como se ve en la imagen
23.
10. Arregle el aparato en un lugar fresco y
seco.
Imagen 23
35
USK SIT 25803 - 080425
MANTENIMIENTO
CAMBIAR EL FILTRO DE LA CARTUCHA
El filtro de la cartucha está colocado dentro del depósito de agua.
El filtro de la cartucha debe estar cambiado cada tres meses. El no
respeto de esta consigna anula la garantía del aparato. Antes de
cambiar el filtro de la cartucha, compruebe queel aparato esté
apagado y desenchufado. Se recomienda que deje el aparato
enfriar. Note que al destornillar la tapa de drenaje para cambiar el
filtro de la cartucha, agua va a salir del depósito. Por eso le
recomendamos abrir eldepósito por encima de un lavabo. Una vez
destornillada la tapa, verá un objeto tubular dentro del depósito.
Sáquelo. Esto es el filtro de la cartucha. Cada nuevo aparato viene
con un nuevo filtro de cartucha ya dentro del depósito de agua y
una cartucha de reemplazamiento. Luego tendrá que contactar el
distribuidor para comprar filtros de cartucha de reemplazamiento.
El filtro de reemplazamiento de la cartucha se encuentra en el
espacio bajo la plancha como se ve en la imagen 25 abajo. Esto es
para impedir que el filtro de reemplazamiento de la cartucha esté
mal colocado.
Figure 25b
36
USK SIT 25803 - 080425
FUNCION DE AUTO LIMPIEZA EN 3 MINUTOS
Para obtener une eficacia máxima, utilice la función “auto limpieza
en 3 minutos” al menos una vez al mes. Durante el uso de esta
función es normal que agua fugue de los agujeros de la suela
puesto que hay una cantidad excesiva de vapor empujada fuera
de los agujeros por el vapor.
Gire el botón de fuerza de vapor hasta “Self-Clean”. Depresione y
enclique botón de vapor izquierda en el aparato. Deje enfriar el
aparato durante tres minutos o hasta que el vapor y el agua
emitidos estén claros. Se recomienda que ponga un recipiente o un
viejo pañuelo bajo el aparato para que la plancha no se vuelva
mojada.
NOTA: Esa función está hecha únicamente para limpiar la estructura
interna de este aparato. Esta función no puede utilizarse durante el
planchado porqué va a mojar la ropa y posiblemente dejará
manchas en la ropa a causa del residuo mineral que se va del
aparato durante la limpieza.
Imagen 26
Cuidado: el vapor emitido durante la auto limpieza es muy fuerte y
muy caliente. Tenga cuidado de no escaldarse.
37
USK SIT 25803 - 080425
4. RESOLUCION DE PROBLEMAS
PROBLEMA
El
aparato
no
calenta, el testigo
de calentamiento
no se enciende
El
aparato
calenta, pero no
emite vapor (nota:
deje al aparato el
tiempo para que
calente
y
produzca vapor)
La fuerza de salida
del vapor está
reducida
o
intermitente.
Fuerte ruido de
pompa
al
presionar el botón
vapor.
Suciedad/residuos
minerales salen de
los agujeros dónde
se emite el vapor.
CAUSA POSIBLE
SOLUCION
El aparato no está Enchufe el cable en
enchufado
la toma eléctrica
El
corta-circuito
Reinicializa
el
doméstico/interruptor
cortade tierra ha saltado o
circuito/interruptor
los
plomos
han
de
tierra,
o
saltado
reemplace
el
plomo. Si necesita
ayuda, contacte
un
electricista
cualificado.
El depósito de agua Llene de nuevo el
está vacía.
depósito de agua
de
la
manera
indicada.
El botón vapor no Presione
y
está presionado.
mantenga elbotón
vapor durante unos
segundos para que
el vapor empiece a
llegar.
Los
agujeros
de Utilice la función
chorro de vapor están “auto
limpieza”
bloqueados
por durante 3 minutos.
residuos minerales.
Nivel bajo de agua Llene de nuevo el
en el depósito.
depósito de agua
de
la
manera
indicada.
1. Uso de agua 1. Inmediatemente
inadecuada.
vacíe todo el agua
del
depósito
y
llénelode
nuevo
utilizando
agua
limpia. Utilice la
función
“auto
38
USK SIT 25803 - 080425
limpieza”
para
limpiar el sistema y
agujeros de salida
del
vapor
para
quitarles de agua
sucia y residuos
minerales.
2. No ha utilizado
frecuentemente
la
función
“auto
limpieza”.
2. Utiliza la función
“auto
limpieza”
durante
tres
minutos.
3. No ha cambiado la
cartucha del filtro con
intervalos sugeridos,
como se ve en las
instrucciones.
El testigo luminoso No
hay
agua
de nivel de agua suficiente
en
el
se ilumina.
depósito de agua.
3.
Cambie
la
cartucha del filtro
como indicado en
el
párrafo
“Mantenimiento”.
Llene de nuevo el
depósito
de
la
manera indicada.
TIRAR EL APARATO
Este aparato está marcado para mostrar que no puede estar tirado
con otros desechos clásicos en EEUU. Para prevenir posibles daños al
medio ambiente o a la salud humana por parte de residuos
incontrolados, les rogamos recíclenlos de manera responsable para
promover el reuso sostenible de materios. Para devolver su aparato
usado, por favor utilice los sistemas de recogida o contacte el
vendor dónde compró el producto. Este puede informarle dónde
puede devolver su producto para un reciclaje respetuoso del medio
ambiente.
39
USK SIT 25803 - 080425
GARANTÍA
Le sugerimos rellenen y nos envíen rápidamente la Tarjeta adjunta
de Registro de Producto adjunto para facilitar la verificación de la
fecha de compra. Por lo tanto, la devolución de esa Tarjeta de
Registro de Producto no es una condición imprescindible para la
aplicación de esa garantía. Puede también rellenar esa carta de
garantía en línea en la dirección siguiente : www.KALORIK.com
A partir de la fecha de compra, este producto KALORIK está
garantizado un año contra los defectos materiales y de fabricación.
Esta garantía no es transferable. Conserve la prueba de compra
original. Se exige una prueba de compra para obtener la aplicación
de la garantía.
Durante este périodo, si el producto KALORIK que, después de una
inspección por parte de KALORIK, se manifiesta defectuoso, será
reparado o reemplazado, según lo que decida KALORIK, sin gastos
para el consumidor. Si se envía un producto de reemplazamiento, se
aplicará la garantía que queda del producto original.
Esta garantía no se aplica a los defectos causados por una mala
utilización por parte del comprador o del utilizador, a una
negligencia, al no respeto del manual de instrucciones KALORIK, a
una utilización en un circuito eléctrico cuyo voltaje es diferente al
que figura en el producto, a un desgaste normal, a modificaciones
o reparaciones no autorizadas por KALORIK, o por un uso con fines
comerciales. No existe garantía por las partes de cristal, jarras de
cristal, filtros, cestos, hojas y accesorios en general. No existe
tampoco garantía por las piezas perdidas por el utilizador.
Toda garantía de valor comercial o de adaptabilidad a este
producto está limitada a un año también.
Algunos estados no ponen límites a la duración de la garantía tácita
o no autorizan la exclusión de daños y perjuicios accesorios o
indirectos, por lo que puede que las restricciones anteriormente
mencionadas no le sean aplicables a Usted. Esta garantía le otorga
derechos legales particulares, pero usted puede tener también otros
40
USK SIT 25803 - 080425
derechos que varían de un estado a otro y algunos derechos
pueden variar de un estado a otro.
Si el aparato tuviera un defecto durante el periodo de garantía y
más de 30 días después de que se compró, no devuelva el aparato
en la tienda donde le compró : a menudo, nuestro Servicio al
Consumidor puede ayudar a resolver el problema sin que el
producto tenga que ser reparado. Si hace falta una reparación, uno
de nuestros representantes puede confirmar si el producto está bajo
garantía y dirigirle al servicio post-venta lo más próximo.
Si fuera el caso, traiga el producto (o envíalo, correctamente
franqueado) con la prueba de compra que mencione el número de
autorización de devolución indicado por nuestro Servicio al
Consumidor, al servicio post-venta KALORIK lo más próximo. (Visite
nuestra web www.KALORIK.com o llame al Servicio al Consumidor
para obtener la dirección del Servicio post-venta KALORIK exclusivo
lo más próximo).
Si envía el producto, le rogamos añadan una carta explicando la
naturaleza del defecto.
Si tiene preguntas adicionales, por favor llame al Servicio al
Consumidor (véase abajo para los datos completos), de lunes a
viernes, de las 9 a las 18 (EST). Note que las horas pueden ser
modificadas.
Si quiere escribirnos, puede hacerlo a la dirección siguiente :
KALORIK Servicio al Consumidor
Team International Group of America Inc
1400 N.W 159th Street, Suite 102
Miami Gardens, FL 33169 USA
O llame gratuitamente al +1 888-521-TEAM
Las cartas se aceptan solamente en la dirección anteriormente
mencionada. Los envíos y paquetes que no tengan número de
autorización de devolución serán rechazados.
41
USK SIT 25803 - 080425
42
USK SIT 25803 - 080425
43
USK SIT 25803 - 080425
K080425
www.KALORIK.com
Back cover page (last page)
Assembly page 44/44