1
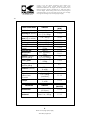
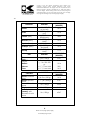
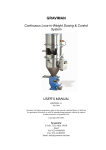
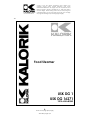
Fax +32 2 359 95 50
Copies of the I/B. Please reproduce them without any
changes except under special instruction from Team
International BELGIUM. The pages must be reproduced and
folded in order to obtain a booklet A5 (+/- 148.5 mm width x
210 mm height). When folding, make sure you keep the good
numbering when you turn the pages of the I/B. Don’t change
the page numbering. Keep the language integrity.
QUIGG TO 6
Food Steamer
USK DG 1
USK DG 16271
120V~60Hz 800W
Front cover page (first page)
Assembly page 1/12
Fax +32 2 359 95 50
Copies of the I/B. Please reproduce them without any
changes except under special instruction from Team
International BELGIUM. The pages must be reproduced and
folded in order to obtain a booklet A5 (+/- 148.5 mm width x
210 mm height). When folding, make sure you keep the good
numbering when you turn the pages of the I/B. Don’t change
the page numbering. Keep the language integrity.
PART DESCRIPTION
1.
2.
3.
4.
5.
6.
7.
Lid
Rice bowl
Top steaming basket #3
Center steaming basket #2
Bottom steaming basket #1
Drip tray
Heating element protection
8.
9.
10.
11.
12.
13.
Inside maximum water level
Water tank
Heating element
Exterior water level indicator
Display
Buttons (“Prog”, Time
increment“+/-“, “0/I”)
14. Control Light
2
Assembly page 2/12
USK DG1 – DG 16271
Fax +32 2 359 95 50
Copies of the I/B. Please reproduce them without any
changes except under special instruction from Team
International BELGIUM. The pages must be reproduced and
folded in order to obtain a booklet A5 (+/- 148.5 mm width x
210 mm height). When folding, make sure you keep the good
numbering when you turn the pages of the I/B. Don’t change
the page numbering. Keep the language integrity.
IMPORTANT SAFEGUARDS
READ ALL INSTRUCTIONS
Check that your mains voltage corresponds to that stated on the
appliance.
Close supervision is necessary when any appliance is used by or
near children.
Do not touch hot surfaces. Use handles or knobs.
To protect against electrical shock do not immerse cord, plugs, or
the appliance in water or other liquid.
Unplug from outlet when not in use and before cleaning. Allow to
cool before putting on or taking off parts.
Do not operate any appliance with a damaged cord or plug or
after the appliance malfunctions or has been damaged in any
manner. Return appliance to the nearest service facility for
examination, repair, or adjustment (*).
The use of accessory attachments not recommended by the
appliance manufacturer may cause injuries.
Do not use outdoors.
Do not let cord hang over edge of table or counter, or touch hot
surfaces.
Do not place on or near a hot gas or electric burner, or in a
heated oven.
Extreme caution must be used when moving an appliance
containing hot oil or other hot liquids.
Always attach plug to appliance first, then plug cord into the wall
outlet. To disconnect, put the switch in off position, then remove
plug from wall outlet.
Do not use appliance for other than intended use.
Never touch the hot parts of the appliance during cooking. The
translucent baskets are parts of the appliance with hot surfaces.
You must use their side handles when handling them.
Make sure nothing comes into contact with the heating element
of the appliance. Only water should be in the tank where the
heating element is. Never place food in it.
Never use this appliance without the drip tray.
Back cover page (last page)
Assembly page 3/12
Fax +32 2 359 95 50
Copies of the I/B. Please reproduce them without any
changes except under special instruction from Team
International BELGIUM. The pages must be reproduced and
folded in order to obtain a booklet A5 (+/- 148.5 mm width x
210 mm height). When folding, make sure you keep the good
numbering when you turn the pages of the I/B. Don’t change
the page numbering. Keep the language integrity.
After use and above all when the water hasn’t completely
evaporated, wait until the steam stops leaking through the hole
on the upper part of the lid then open the lid carefully in order
not to hurt you. Let the water drip into the food steamer. Slightly
move the lid so that the steam does not reach your hands or your
face. Caution: the condensation on the sides of the different
baskets may generate steam and burn you.
Be cautious while transporting your appliance filled with hot food,
water or other liquids. It is not recommended to move your
appliance when it has not completely cooled down.
after sales department of the producer or importer or any person
who is qualified and approved to perform this kind of repairs in order
to avoid all danger.
(*)
SAVE THESE INSTRUCTIONS
HOUSEHOLD USE ONLY
Back cover page (last page)
Assembly page 4/12
Fax +32 2 359 95 50
Copies of the I/B. Please reproduce them without any
changes except under special instruction from Team
International BELGIUM. The pages must be reproduced and
folded in order to obtain a booklet A5 (+/- 148.5 mm width x
210 mm height). When folding, make sure you keep the good
numbering when you turn the pages of the I/B. Don’t change
the page numbering. Keep the language integrity.
POLARIZED PLUG INSTRUCTIONS
This appliance is equipped with a polarized plug (one blade is wider
than the other). To reduce the risk of electric shock, this plug will fit
into the polarized outlet only one way. If the plug does not properly
fit into the outlet at first, reverse it. If it still does not fit, contact a
competent qualified electrician. Do not attempt to modify the plug in
any way.
SHORT CORD INSTRUCTIONS
A short power supply cord is provided to reduce the hazards resulting
from becoming entangled in, or tripping over a longer cord.
Extension cords may be used if care is exercised in their use.
• The electrical rating of the extension cord should be at least
that of the appliance. If the electrical rating of the extension
cord is too low, it could overheat and burn.
• The resulting extended cord should be arranged so that it will
not drape over the counter top or tabletop where it can be
pulled on by children or tripped over.
BEFORE FIRST USE
In order to eliminate any manufacturing residues, it is necessary to
clean the appliance and the accessories (Cf. "Care and cleaning ")
SETTING THE CLOCK
•
•
•
•
Plug in the appliance. The display will show
Press the “PROG” and “0/1” buttons at the same time & release
them. You’ll hear a beep.
To adjust the clock mode press on the “+” & “-” button. Each press
on “+” increases the time of 10 minutes & each press on “-”
decreases the time by one minute.
Once the clock is adjusted, press the “PROG” button again to end
the process.
Back cover page (last page)
Assembly page 5/12
Fax +32 2 359 95 50
Copies of the I/B. Please reproduce them without any
changes except under special instruction from Team
International BELGIUM. The pages must be reproduced and
folded in order to obtain a booklet A5 (+/- 148.5 mm width x
210 mm height). When folding, make sure you keep the good
numbering when you turn the pages of the I/B. Don’t change
the page numbering. Keep the language integrity.
COOKING IN YOUR FOOD STEAMER
•
•
•
•
•
•
Before using your food steamer, make sure it is OFF and cold. Fill
water tank with cold water. To do so, pour the water directly into
the water tank. The amount of water depends on the required
cooking time. However, it is very important to respect the minimum
and maximum level. Non-observance of this instruction could
damage your appliance. DO NOT add any herbs, spices or other
liquid such as wine or broth to the water in the water tank.
Make sure the bottom of the baskets is properly attached, and
place the food in the different steaming baskets. DO NOT add
seasoning, herbs etc. until cooking has been completed.
Make sure the heating element protection is positionned properly
around the heating element with the larger side downwards. Add
water. Make sure the water flows freely inside the element
protection.
Then place the drip tray onto the water tank and stack the
steaming baskets, paying attention always to put the basket with
the largest base on the highest level. The size of the basket base is
indicated by number on the handles of each basket. The smallest
is #1, the middle one is #2 and the biggest is #3.
To stack the baskets, make sure the pins on the bottom of the
baskets fit in the grooves foreseen on the lower basket. Caution:
always use the side handles to move the baskets. Pay attention
during the positioning of the baskets because if they are not
placed correctly, steam may escape through the side of your
appliance and may burn you.
Place the lid on the upper basket DO NOT OPERATE THIS
APPLIANCE UNCOVERED - STEAM IS GENERATED DURING USE.
SETTING THE STEAMING TIME
•
In clock mode, press the “0/I” button, then release it.
is
displayed. You will hear a beep and a red pilot light goes on,
meaning that the appliance has begun to count down. After the
beep you can adjust the cooking time by pressing “+” or “-“. Each
press increases or decreases the steaming time by 5 minutes. The
maximum steaming time is 90 minutes.
Back cover page (last page)
Assembly page 6/12
Fax +32 2 359 95 50
Copies of the I/B. Please reproduce them without any
changes except under special instruction from Team
International BELGIUM. The pages must be reproduced and
folded in order to obtain a booklet A5 (+/- 148.5 mm width x
210 mm height). When folding, make sure you keep the good
numbering when you turn the pages of the I/B. Don’t change
the page numbering. Keep the language integrity.
•
Once the steaming time is over, the appliance comes back
•
directly to “holding” mode. Time &
are displayed and a green
pilot light goes on. At the end of the steaming time, the holding
mode keeps the food warm (every 8 minutes the food is warmed
for two minutes)
Press “0/I” button to stop steaming and return back to clock mode.
PROGRAMMATION OF THE APPLIANCE
Press the “PROG” button.
is displayed. Press “+” or “-” to
set the moment when you want your appliance to start.
Caution: this setting determines at what time you want your
appliance to start. For example, it is 6 PM, you want your appliance
to start at 7 pm, you have to set the timer at 7:00 PM. Mind the
indication PM for the afternoon settings, there is no indication for
“AM” settings.
Each press increases or decreases the beginning of steaming time by
10 minutes. You can set your appliance up to 24 hours in advance.
is displayed. You
Press once again the “PROG” button.
can set the steaming time by pressing on the “+” or “-” button. Each
press on the “+” or “-” button increases or decreases the steaming
time by five minutes. Press once again on “PROG”. Time and “PROG”
are displayed. The timer is then set (NOTE : if you want to cancel the
programmation, press on “PROG” one more time, and the “PROG”
symbol on the display will go out.).
Now your appliance is in “programmation” mode. Once the set hour
has come, you hear a beep and a red pilot light goes on. The
appliance starts to steam according to your settings. If you want to
cancel the “programmation” during steaming, press the “0/I” button,
the appliance shuts down and comes back to clock mode.
Once the steaming is over, the appliance comes back to “holding”
mode, the symbol
is displayed and a green pilot light goes on.
Every 8 minutes, the holding mode warms the food for 2 minutes
after the end of cooking time.
Press “0/1” to come back to the clock mode.
Whatever the mode (steaming, programmation, holding…) the
appliance stops automatically once all the water has run out.
Back cover page (last page)
Assembly page 7/12
Fax +32 2 359 95 50
Copies of the I/B. Please reproduce them without any
changes except under special instruction from Team
International BELGIUM. The pages must be reproduced and
folded in order to obtain a booklet A5 (+/- 148.5 mm width x
210 mm height). When folding, make sure you keep the good
numbering when you turn the pages of the I/B. Don’t change
the page numbering. Keep the language integrity.
Hints:
•
•
•
When cooking rice, we advise you to cover it with hot water in
order to accelerate the cooking process.
It is possible to cook food with very different cooking times but this
needs frequent operations to take away the food that will be
ready. To avoid this, it is recommended to prepare food with
similar cooking time.
Frozen food does not need to be defrosted, but its cooking time
will be longer.
CARE AND CLEANING
•
•
•
•
•
Empty the water tank and clean it with a damp cloth
Descale the appliance every 8 times. To proceed, position the
ring upside down around the heating element (the largest side
up). Fill the water tank with cold water up to “max.” level, fill the
inside of the ring with vinegar up to the same level. Leave
overnight to descale. Rinse out the inside of water tank with warm
water several times.
The baskets, the drip tray, the lid and the rice bowl may be
washed with soapy water or in the dishwasher. Never use
abrasive cleaners to clean your appliance: it could damage the
surfaces.
The body of the appliance should be washed with a smooth
cloth or with a slightly damp towel.
Never immerse the body in water or any other liquid.
STEAMING TIME GUIDELINES
The steaming time indicated hereunder are approximative.
TYPE OF RICE
Brown
White
COMBINED IN RICE BOWL
Rice
Cold
water
½ cup
1 cup
½ cup
1 cup
2/3 cup
1 ¼ cups
3/4 cup
1 ¼ cups
Back cover page (last page)
Assembly page 8/12
APPROX.
TIME
(MINUTES
)
40-41
54-57
34-36
37-41
Copies of the I/B. Please reproduce them without any
changes except under special instruction from Team
International BELGIUM. The pages must be reproduced and
folded in order to obtain a booklet A5 (+/- 148.5 mm width x
210 mm height). When folding, make sure you keep the good
numbering when you turn the pages of the I/B. Don’t change
the page numbering. Keep the language integrity.
Fax +32 2 359 95 50
FRESH VEGETABLES
AMOUNT
Artichoke (whole)
Asparagus (spears)
Beans, green /
wax(cut or whole)
Broccoli (spears)
Cabbage
Carrots
Cauliflower (whole
head)
Corn on cob
Mushrooms
(whole)
Onions (whole),
before grilling
Peas, green
Peppers (whole),
before grilling
Potatoes (whole)
Spinach
Squash, summer
yellow and
zucchini
4 medium
½ - 1 lb.
+/- ½” ∅ / 500gr.
APPROX. TIME
(MIN)
37-40
13-15
1 lb. / 500 gr
25-28
1 lb. / 500 gr
1 lb. / 500 gr
1 lb. / 500 gr
2 ½ lbs. (medium) /
1250gr
Max. 8
½ lb. (medium) /
250gr
1 lb. (medium)
+/- 4” ∅ / 500 gr
1 ½ lbs. (in pod) /
1500gr
Max. 4 medium
12-14
17-19
15-17
1 lb. / 500gr or +/8 small
½ lb. / 250gr
14-16
17-19
10-11
7-9
14-16
9-11
17-19
10-12
1 lb. / 500gr
(medium)
11-13
1 lb. / 500gr or +/5 small
12-14
AMOUNT
APPROX. TIME
(MINUTES)
Frankfurters
Max. 1 lb. / 500 gr
(8-10 pcs)
12-14
Bratwurst
Max. 1 lb. / 500 gr
17-19
Turnips
SAUSAGES
Back cover page (last page)
Assembly page 9/12
Fax +32 2 359 95 50
Copies of the I/B. Please reproduce them without any
changes except under special instruction from Team
International BELGIUM. The pages must be reproduced and
folded in order to obtain a booklet A5 (+/- 148.5 mm width x
210 mm height). When folding, make sure you keep the good
numbering when you turn the pages of the I/B. Don’t change
the page numbering. Keep the language integrity.
SEAFOOD
Clams
Crab
Lobster (tails)
Mussels (fresh)
Oysters (fresh)
Scallops (fresh)
Shrimp
FISH
Filets:
Sole, …
Steaks:
Halibut
Salmon
Tuna
CHICKEN
Breast, boneless
fillets
Breast, split with
bone
Drumsticks, with
bone
Thighs, with bone
Poached chicken
(breast), splitboneless or with
bone
AMOUNT
½ - 1 lb. 250-500
gr (in shell)
1 lb./ 500 gr (+/- 6
pcs)
1 or 2 (7/8 ozs. /
200gr each)
1 lb. / 500gr (in
shell)
+/- ½ dozen
½ lb. /250 gr
(shucked)
1 lb. /500 gr(in
shell)
APPROX. TIME
(MINUTES)
10-12
15-18
18-20
12-14
11-13
10-12
11-12
AMOUNT
APPROX. TIME
(MINUTES)
½ lb. / 250 gr
8-10
½ - 1 lb. 250- 500
gr
+/- 1” / 2 cm thick
+/- 1” / 2 cm thick
13-14
18-21
14-19
AMOUNT
APPROX. TIME
(MINUTES)
½ lb. Pcs / 250 gr
14-16
1 - 1 ¼ lb. / 600 gr
37-41
1 lb. / 500 gr
32-36
1 lb. / 500 gr
34-37
1 lb. / 500 gr
45-47
Back cover page (last page)
Assembly page 10/12
Fax +32 2 359 95 50
Copies of the I/B. Please reproduce them without any
changes except under special instruction from Team
International BELGIUM. The pages must be reproduced and
folded in order to obtain a booklet A5 (+/- 148.5 mm width x
210 mm height). When folding, make sure you keep the good
numbering when you turn the pages of the I/B. Don’t change
the page numbering. Keep the language integrity.
WARRANTY
We suggest that you complete and return the enclosed Product
Registration Card promptly to facilitate verification of the date of
original purchase. However, return of the Product Registration Card is
not a condition of these warranties. You can also fill this warranty
card online, at the following address: www.KALORIK.com
This KALORIK product is warranted for 1 year from the date of
purchase against defects in material and workmanship. This warranty
is not transferable. Keep the original sales receipt. Proof of purchase
is required to obtain warranty performance.
During this period, the KALORIK product that, upon inspection by
KALORIK, is proved defective, will be repaired or replaced, at
KALORIK's option, without charge to the customer. If a replacement
product is sent, it will carry the remaining warranty of the original
product.
This warranty does not apply to any defect arising from a buyer's or
user's misuse of the product, negligence, failure to follow KALORIK
instructions noted in the user’s manual, use on current or voltage
other than that stamped on the product, wear and tear, alteration
or repair not authorized by KALORIK, or use for commercial purposes.
There is no warranty for glass parts, glass containers, filter basket,
blades and agitators, and accessories in general. There is also no
warranty for parts lost by the user.
ANY WARRANTY OF MERCHANTABILITY OR FITNESS WITH RESPECT TO
THIS PRODUCT IS ALSO LIMITED TO THE ONE YEAR LIMITED WARRANTY
PERIOD
Some states do not allow limitation on how long an implied warranty
lasts or do not allow the exclusion of incidental or consequential
damages, so the above limitations may not apply to you. This
warranty gives you specific legal rights, and you may also have other
rights which vary from state to state.
Back cover page (last page)
Assembly page 11/12
Fax +32 2 359 95 50
Copies of the I/B. Please reproduce them without any
changes except under special instruction from Team
International BELGIUM. The pages must be reproduced and
folded in order to obtain a booklet A5 (+/- 148.5 mm width x
210 mm height). When folding, make sure you keep the good
numbering when you turn the pages of the I/B. Don’t change
the page numbering. Keep the language integrity.
If the appliance should become defective within the warranty
period and more than 30 days after date of purchase, do not return
the appliance to the store: often, our Consumer Service
Representatives can help solve the problem without having the
product serviced. If servicing is needed, a Representative can
confirm whether the product is under warranty and direct you to the
nearest service location.
If this is the case, bring the product (or send it, postage prepaid),
along with proof of purchase and indicating a return authorization
number given by our Consumer Service Representatives, to the
nearest authorized KALORIK Service Center (please visit our website
at www.KALORIK.com or call our Customer Service Department for
the address of the nearest authorized KALORIK Service Center).
If you send the product, please include a letter explaining the nature
of the claimed defect.
If you have additional questions, please call our Consumer Service
Department (please see below for complete contact information),
Monday through Friday from 9:00am - 6:00pm (EST). Please note
hours are subject to change.
If you would like to write, please send your letter to:
KALORIK Consumer Service department
Team International Group of America Inc
1400 N.W 159th Street, Suite 102
Miami Gardens, FL 33169 USA
Or call :
Toll Free: +1 888-521-TEAM OR +1 888-KALORIK
Only letters can be accepted at this address above. Shipments and
packages that do not have a return authorization number will be
refused.
Back cover page (last page)
Assembly page 12/12