1
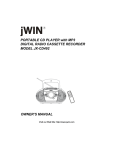
JX-CD4000
®
jWIN
!!
!"
!#
!$
!%
!&
" "
!'
$
"
!
"
#
$
%
&
'
% &
' ! ! !
#
! # %
" $
& ' !
REMOTE CONTROL LOCATIONS
$%
1.
POWER BUTTON
2.
3.
REPEAT/MEMORY UP BUTTON
TUNER BUTTON
4.
5.
BAND BUTTON
MUTE BUTTON
6.
7.
TUNING OR CD SKIP BACKWARD BUTTON
STOP BUTTON
8.
9.
CD BUTTON
PLAY/PAUSE BUTTON
!
"
#
'
&
!
"
10. TUNING OR CD SKIP FORWARD BUTTON
11. SLEEP BUTTON
12. PRESET EQ BUTTON (OPTIONAL)
13. RANDOM BUTTON
14. VOLUME BUTTON (DOWN/UP)
PUTTING THE BATTERIES INTO THE REMOTE CONTROL UNIT
1. Press down on the triangular mark of the compartment
cover, and slide the cover off to open the compartment.
2. Place the two accessory (UM4), (AAA), (RO3) batteries
in the remote control according to the polarity markings
( "+" and "−" ) inside the compartment and on the
batteries.
3. Place the cover over the compartment, press down
lightly, and push it upward until it snaps on.
Replace all batteries at the same time. Remove the batteries
the remote control is not in use for long periods, don’t
mix normal batteries with rechargeable batteries, when
the batteries become weak, remote control will be not
functioned, replace with new batteries if above happened.
** BATTERY NOT INCLUDED **
UK-2
CONTROL LOCATIONS
1.
2.
3.
4.
5.
6.
7.
8.
9.
10.
11.
12.
13.
14.
15.
16.
17.
18.
19.
20.
21.
22.
23.
24.
25.
26.
27.
28.
29.
30.
31.
WOODEN SPEAKER BOX
POWER ON / STAND-BY
HEADPHONE JACK
CD PLAY / PAUSE KNOB
CD STOP KNOB
M-UP / REPEAT KNOB
C.ADJ / MEMO. KNOB
PRESET EQ. KNOB
REMAIN MODE KNOB
STAND - BY LED
SKIP - / TUNER KNOB
VOLUME DOWN
VOLUME UP
SKIP +/ TUNER KNOB
MUTE LED
FM MODE
TAPE KNOB
BAND KNOB
TUNER KNOB
TIMER KNOB
CD KNOB
REMOTE SENSOR
CD OPEN / CLOSE KNOB
CD DOOR
LCD DISPLAY
CASS. RECORD KNOB
CASS. PLAY KNOB
CASS. REW KNOB
CASS. F.F. KNOB
CASS. STOP / EJECT KNOB
CASS. PAUSE KNOB
32.
33.
34.
35.
36.
37.
38.
39.
40.
41.
CASS. DOOR
BEAT CUT SWITCH
SPEAKER TERMINAL
FM TERMINAL (OPTIONAL)
AM ANT. TERMINAL (OPTIONAL)
AC MAIN SWITCH
DUAL VOLTAGE SWITCH (OPTIONAL)
BATTERY BACKUP
AC POWER CORD COVER
AC POWER CORD
Installation
*
*
*
Terminal for FM antenna
the antenna wire supplied with the unit can be connected to this terminal.
Adjust the position of the FM antenna for optimum reception.
Speaker connection
Connect the speaker to the main unit :
Extend the SPEAKER WIRES and connect then to the SPEAKERTERMINALS.
Disconnect the speaker from the main unit; Disconnect the SPEAKER WIRES from the SPEAKER TERMINALS.
Power cord connection
Do not connect the unit to the power without having checked whether the voltage given on the type plate
corresponds with the local AC outlet voltage. If not, please consult your dealer. The rating value is
locates on the rear of the unit.
Operation
When you first plug the unit into the AC outlet, the unit will be standby mode.You can press the POWER
button on the unit (or on the remote control) to switch the unit ON and OFF. Pull the AC plug out of the wall
socket if you want to switch off completely.
UK-3
To achieve the utmost in enjoyment and performance, please read this manually carefully before attempting
to operate the unit in order to became familiar with its features, and assure you years of faithful, trouble free
performance and listening pleasure.
Important Notes
*
*
Keep instructions the safety and operating instructions should be retained for future reference.
Avoid installing the unit in locations described below:
Please exposed to direct sunlight or close to heat radiating appliances such as electric heaters.
On top of other stereo equipment that radiate too much heat.
Places locking ventilation or dusty places.
Places subject to constant vibration.
Humid or moist places.
* Make sure not to obstruct the ventilation opening.
Operate turning controls and switches as instructed in the manual.
* Before turning on the power for the first time, make certain the power cord is properly installed.
* Store your tapes or CD in a cool area to avoid damage from heat.
For safety reasons, do not remove any covers or attempt to gain access to the inside of the product. Refer any
servicing to qualified personal.
Do not attempt to remove any screws, or open the casing of the unit; there are no user serviceable parts
inside, refer all servicing to qualified service personal.
CAUTION
RISK OF ELECTRIC SHOCK
DO NOT OPEN
CAUTION : TO REDUCE THE RISK OF ELECTRIC SHOCK DO NOT REMOVE COVER(OR BACK), NO
USER SERVICEABLE PARTS INSIDE, REFER SERVICING TO QUALIFIED SERVICE PERSONAL.
DANGEROUS VOLTAGE
Conductor dangerous voltage, that may be of sufficient magnitude to constitute a risk of electric
shock to persons is present within this product’s enclosure.
ATTENTION
The owner’s manual contains important operating and maintenance instructions, for your safety,
it is necessary to refer to the manual.
WARNING : TO PREVENT FIRE OR SHOCK HAZARD, DO NOT EXPOSE THIS APPLIANCE TO DRIPPING
OR SPLASHING.
Note:
This unit will become warm when used for a long period of time. This is normal and does not indicate a
problem with the unit.
This CD player includes micro-processors which may malfunction as s result of external electrical interference
or noise. If the CD player is not working properly, discount the power source and then reconnect it.
UK-1
Stopping play
*
*
Press STOP if you wish to stop play. The disc and track number which can be played will now appear
in the display.
Press PUSH OPEN on the unit to remove the CD.
PROGRAMMING
By programming the CD player, you can play up to 20 tracks in any desired order. (possible only when the
CD is in stop mode.)
* Place the disc to be programmed in the tray. Press MEMORY button.
* The display will show MEMORY TRACK and p-01.
* Use SKIP FORWARD or BACKWARD button to select the first track to be programmed.
* When the desired track appears on the display, press MEMORY button again.
* The display will show MEMORY TRACK and P-02.
* Repeat this procedure to select other tracks that you wish to program from the disc into the memory.
* In the radio MODE, when frequency is displayed, this key is use for setting of memory writing enable
state for 5 second.
Playing a program
*
*
*
Press PLAY/PAUSE.
Play starts with the first track of the program.
When all track have been played, the display shows the number of tracks and the playing time of the
CD song.
Erasing a program
A program is erased if you :
Press PROGRAM then STOP/CLEAR button in stop mode. Or Switch the unit OFF. Or Opening the CD
door.
Note : In setting a new program, the existing one will be cleared.
RANDOM PLAYING (for Remote Handset)
*
*
*
Press the RANDOM button once, and the RANDOM^indicator will light up.
Press PLAY/PAUSE button to start playing. The tracks will be played randomly.
Press STOP button to clear the random mode.
Listening to radio
*
*
*
*
Select the FUNCTION switch into RADIO function
The display will appear FM waveband
Select the desired waveband range with the BAND button. (Either AM or FM)
Using TUNING UP/DOWN button to select your desired station.
Automatic tuning
*
*
Press TUNING UP/DOWN for a second or more, then release the button. The tuner will automatically
for the first station of sufficient signal strength.
Press above procedure if you wish to select another station.
UK-5
Amplifier
*
*
*
*
*
Press POWER button to switch the unit on.
Required sound source (CD, Radio or Tape) can be selected by sliding the function switch to
desired location. The corresponding display will light up.
Adjust the volume with the VOLUME UP/DOWN button.
Set the tone with built in present equalizer (normal, classic, rock or pop) with the Preset EQ button. (for
Remote Control optional)
Press POWER button to switch off the unit.
LISTENING TO COMPACT DISC (CD)
The LCD indicator always shown the tracks of a disc or program which are still to be played. It works in all
modes, in stop modes, all tracks of the disc or the program are shown.
Loading the disc
*
*
*
Press FUNCTION switch to select CD mode.
Press PUSH OPEN button to open the CD door, display will show ) 0:0" load the CD with printed side
facing up.
Close the CD door, the CD-player starts and scans the contents list of CD.
After a few seconds, the total playing time and the number of tracks appear on the display.
Playing the entire disc
*
*
*
*
Playback will start by pressing PLAY/PAUSE, the indicator then appears.
Playback starts with the first track.
The display shown the current track number and its elapsed time.
To interrupt playback, press PLAY/PAUSE. The time elapse indicator will flash.
To resume playback, press PLAY/BACK again.
To stop playback, press STOP.
SELECTION A DIFFERENT TRACK DURING PLAY
*
*
Press SKIP FORWARD /BACKWARD button on the unit (or remote), the required track number appears in
the display.
Press PLAY/PAUSE button to starting playing.
Starting again with the track that is currently playing
*
*
Press SKIP BACKWARD once.
The track will be started again from the beginning.
Repeat play
*
*
*
*
During play, press REPEAT button on the remote control. The “REPEAT” indicator lights up.
The entire disc is played and then repeated.
Press REPEAT again, REPEAT will flash on the display. Current track in the disc is played and then repeated.
Press REPEAT three times, to stop the repeat function. The repeat indicator light goes out. Play continues
as normal.
In the radio MODE, the preset memory is called in order
UK-4
Manual tuning
*
*
To tune to weak stations, use manual tuning by pressing TUNING UP/DOWN button continuously until
you read the correct frequency or the reception is at its best.
When the STEREO appear on the display, you are receiving a FM stereo transmission. (FUNCTION switch
must be at RADIO/FM ST. position.)
STORING STATION
1.
2.
3.
4.
5.
6.
30 stations can be stored in memory, you can tune in the stored station directly by pressing M-UP button.
Set the FUNCTION switch to RADIO function
Select your desired band.
Tune in the desired station.
Press MEMORY button, LCD display “MEMORY”.
Select location number 1 to 30 of preset station by pressing the M-UP button and press “MEMORY”
button again.
7. Repeat above steps 2 to 5 for each station stored.
8. By listening back the Preset Station, Press M-UP button.
Note :
1. You can not erase a previously stored station, but storing a new station will exchange the previous one.
2. If no power supplied, then stored station are erased. Please store station again.
Cassette deck
Inserting a cassette
* Press STOP/EJECT button on deck, the cassette door opens.
* Insert a cassette tape into the compartment with the open side downwards and the full spool on the left.
* Close the cassette door.
Recording from other sound sources
*
*
*
*
*
*
Press TUNER/CD to select the sound source.
Place a cassette tape in DECK.
Press RECORD, in doing so, PLAY is pressed too, to start the recording. When the tape has reached its
end, the tape stops.
To interrupt a recording, press PAUSE.
To continue recording, press PAUSE again.
Press STOP/EJECT if you want to stop the recording before the end of the tape.
Playback of cassette
*
*
*
*
*
Set the unit to TAPE mode by sliding the FUNCTION Switch. TAPE will appear on the display.
Place the cassette tape in deck.
Press PLAY on the unit to start playback.
Playback stops when the tape reaches the end.
For brief interruptions, press PAUSE on the unit to continue playback, press PAUSE again.
Press STOP/EJECT if you want to stop playback the end of the tape.
Winding the tape
*
*
*
Press F.F to fast-forward the tape.
Press REW to fast-rewind the tape
Press STOP/EJECT to stop fast-forward or fast-rewind, before the end of the tape.
UK-6
SUPER BASS
Press SUPER BASS button, SUPER BASS sound is effect.
MODE/REMAIN
Press MODE button changing the display as shown below.
In the radio mode : Frequency display >> Clock display >> Time ON >> Time OFF.
In the CD mode :
(During play) Playing time display >> Remaining time display >> Clock display >>Time ON >> Time
OFF.
(During stop) All time display >> Clock display >> Time ON >> Time OFF.
In the TAPE mode : Clock display >> Time ON >> Time OFF.
CLOCK SETTING
A) Press POWER in standby MODE
* Press MEMORY/C-ADJ button, time display hour digit flash.
* Press TUNING button UP/DOWN to adjust hour digit.
* Press MEMORY/C-ADJ button again, time display minute digit flash, press tuning button UP/DOWN
to adjust minute digit.
* Each enable state as shown above is cleared when the key is not pushed for 10 second.
TIMER SETTING
*
*
Press POWER in standby MODE.
Press MODE button changing the display as shown timer on digit, press MEMORY/C-ADJ button &
TUNING UP/DOWN button to select timer on time, press MODE button changing the display as shown
timer OFF digit, press MEMORY/C-ADJ button & TUNING UP/DOWN button to select the time of the
timer off.
* Press TIMER button, the display timer shown. The time of the timer on is on the standby mode.
* Timer on for wake up radio or cassette. The inital volume level is equal to last turn off volume level.
Note : Except CD on the CD mode.
UK-7
SLEEP
*
When SLEEP button is pressed continuously, sleep time change as follows.
90
80
70
60
50
40
30
20
10
GRAPHIC EQUALIZER (for Remote Handset optional)
By means that set of independent frequency controls, you can get your favourite sound shape flexibly.
CLASSIC
ROCK
POP
NORMAL
SPECIFICATION
POWER SUPPLY :
OUTPUT POWER :
UNIT DIMENSION :
SPEAKER BOX DIMENSION :
N. W.:
AC 230V 50Hz
4.5 WATTS RMS x 2
145(L) x 220(W) x 230(H) mm
145(L) x 190(W) x 230(H) mm
kg
RADIO SECTION
FREQUENCY RANGE :
FM
MW
LW
87.5 - 108 MHz
522 - 1620 kHz
146 - 281 kHz (optional)
CASSETTE SECTION
TAPE SPEED :
FREQUENCY RESPONSE :
4.75 CM/SEC.
125Hz - 8KHz
COMPACT DISC SECTION
OPTAICAL PICKUP :
FREQUENCY RESPONSE :
3 - BEAM LASER
100Hz - 16KHz
SP EC I FI C A
T I O N S U B J E C T TTO
O CHANGE WITHOUT FUR THER NO
TICE.
AT
NOT
UK-8