1
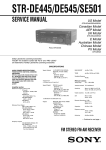
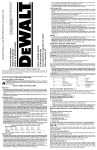
English
Français
Home Cinema DD Speaker System
Système d’enceinte Home cinéma DD
SX-XD33
Consists of SX-XDS33 and SX-XDC33
Se compose de SX-XDS33 et SX-XDC33
INSTRUCTIONS
MANUEL D’INSTRUCTIONS
For Customer Use:
Enter below the Model No. and Serial No.
which are located either on the rear, bottom or side of the cabinet. Retain this
information for future reference.
Model No.
Serial No.
LVT0953-002A
[J, C]
English
Contents
Warnings, Cautions and Others .............................................................. 2
Assembly ................................................................................................. 3
Additional information .............................................................................. 6
Specifications .......................................................................................... 7
Français
Contenus
Avertissements, précautions et autres .................................................... 8
Montage .................................................................................................. 9
Informations complémentaires ............................................................... 12
Spécifications ......................................................................................... 13
–1–
EN_SX-XD33[J/C].p65
1
03.3.11, 6:59 PM
Warnings, Cautions and Others
Precautions for installation
• Do not install the speakers on an uneven surface or in a
place subject to vibration; otherwise, they may fall over,
causing damage or injury.
– Take the occurrence of earthquakes or other
physical shocks into consideration when
selecting the installation place, and secure
the speakers thoroughly.
• To prevent deformation or discoloration of the
cabinet, do not install the speakers where they
are exposed to direct sunlight or high humidity,
and avoid installation near air conditioning
outlets.
• Speaker vibrations may cause howling. Place
the speakers as far away from the player as
possible.
• The speakers are magnetically shielded to avoid color
distortions on TVs. However, if not installed properly, it may
cause color distortions. So, pay attention to the following
when installing the speakers.
– When placing the speakers near a TV set, turn off the TV’s
main power switch or unplug it before installing the
speakers.
Then wait at least 30 minutes before turning on the TV’s
main power switch again.
Some TVs may still be affected even though you have
followed the above. If this happens, move the speakers
further away from the TV.
• Tuner reception may become noisy or hissing if a speaker is
installed near the tuner. In this case, leave more distance
between the tuner and the speakers or use an outdoor antenna
for better tuner reception without interference from the speakers.
Precautions for Daily Use
• To maintain the appearance of the speakers
Wipe with a dry, soft cloth if the cabinet or control panel
should become dirty.
If very dirty, apply a small amount of water or neutral detergent
to the cloth and wipe clean, then wipe with a dry cloth.
Checking the supplied Accessories
Check to be sure you have the following supplied accessories.
The number in parenthesis indicates the quantity of the piece
supplied.
• Speaker cords
Approx. 6 m (19.7 feet) (3: for satellite speakers placed in
front position and a center speaker)
Approx. 15 m (49.2 feet) (2: for satellite speakers placed in
rear position)
• Screws
M5 x 12 mm (M5 x 1/2 in.) (4)
M4 x 25 mm (M4 x 1 in.) (12)
• Washers
(4)
If any of the items above are missing, contact your dealer
immediately.
Speaker and Speaker cords—
to improve the sound quality
About DD (Direct Drive) speaker
DD (Direct Drive) technology improves sound localization
and transmits the powerful sounds.
About the OFC cord
The core wires of the supplied speaker cords are made of
OFC (Oxygen Free Copper). This OFC cord enables high
quality sound reproduction.
When connecting the speaker cords
Make sure to match the polarity (ª and ·); otherwise, the
sound will lose the surround effect.
After connecting, check that the exposed cores are fully
inserted into the terminal.
When using other speaker cords
Observe the following;
• Buy thick speaker cords rather than thin cords, and make
them as short as possible for connection.
• Use speaker cords of the same length for both left and
right speakers.
• Do not use long speaker cords; otherwise, the sound
quality may deteriorate.
• To improve the sound field
If the speakers are facing a solid wall or glass
door, etc., it is recommended to furnish the wall
with materials that absorb sounds, for example
by hanging up thick curtains, to prevent
reflections and standing waves.
Speaker
grille
• To use the speakers without any trouble
– Do not reproduce sounds at so high a volume that they are
distorted; otherwise, the speakers may be damaged by
internal heat buildup.
– When moving the speakers, do not pull the speaker cords;
otherwise, the speakers may fall over, causing damage or
injury.
– When holding a satellite speaker, do not grasp the speaker
(upper) portion, but always grasp the leg (lower) portion of
the satellite speaker.
Leg
Speaker
cord
Satellite speaker
–2–
EN_SX-XD33[J/C].p65
2
03.3.11, 6:59 PM
English
Thank you for purchasing a JVC speaker system.
Before you begin using these speakers, please read the
instructions carefully to be sure you get the best possible
performance. If you have any questions, consult your JVC
dealer.
English
Assembly
Assembling the satellite speakers
Each speaker (except the center speaker) has been divided into
three parts for shipment. Before using this speaker system,
assemble it first by following the procedure below.
2 Join the leg to the stand.
• Rotate either the leg or stand so that the
mark on the
mark on the stand are facing the same
leg and the
direction.
• Make sure to match the screw holes on the leg with those
on the stand so that they are aligned correctly.
mark
Leg
Speaker
section
Leg
Stand
Stand
• Prepare a Phillips screw driver.
Before assembling—
• Take care not to drop the stand while assembling;
otherwise, it may cause damage to the floor or injury.
• Ensure enough space for assembly and installation.
• Place a large, thick cloth on the floor where you
assemble the speaker, so you can protect the floor and
the speaker itself.
• Use the speaker only after assembly is fully and correctly
done.
mark
3 Fix the leg to the stand with three of the
supplied screws—long: M4 x 25 mm
(M4 x 1 in.).
Leg
Attaching the leg and the stand
1 Remove the terminal cover from the leg.
Stand
First remove the screw on the terminal cover, then detach
the cover by pulling it upward.
• You will need to use the removed screw in step 5 on page
4.
Terminal
cover
Screw
• Do not tighten each screw completely as you put them in
place.
First put all screws in, then tighten them evenly and firmly.
Screw
claws
grooves
It is recommended to place a cushion under the leg.
• You can tighten the screws easily by placing the leg
horizontally.
Leg
Cushion
–3–
EN_SX-XD33[J/C].p65
3
03.3.11, 6:59 PM
3) Insert the speaker cord into the speaker terminal
inside the leg.
1 Press and hold the clamp.
2 Insert the exposed core of the speaker cord fully
into the terminal.
terminal of the leg.
• Use the 6-meter (19.7 feet) speaker cords for front speakers
and 15-meter (49.2 feet) speaker cord for rear speakers.
• Connect the cord with the black stripe to the ·
terminal.
• Each speaker cord has its name tag attached to one end.
Attach the end without the name tag to the speaker
terminal.
3 Release your finger.
Tag
1
2
3
To the speaker
terminal of the leg
1) Insert the speaker cord inside the stand as illustrated
below.
• Pull the speaker cord out of the center of the stand by
about 50 cm (19 11/16 in.).
Leg
The cord with the
black stripe is on this
side, facing up.
The cord with
the black stripe.
5 Attach the terminal cover to the leg.
Push cords fully inside the leg. Then fix the terminal cover
using the screw you removed in step 1.
Stand
2) Insert the tips of the speaker cord into the leg and pull
Terminal
cover
them out as illustrated below.
Screw
Leg
grooves
claws
To be continued on the next page
–4–
EN_SX-XD33[J/C].p65
4
03.3.11, 6:59 PM
English
4 Connect the speaker cord to the speaker
English
Assembly (continued)
7 Join the speaker section and the leg.
Joining the leg and the speaker unit
Insert the speaker section to the leg, then fix the speaker
section and the leg with one of the washers and one of the
supplied screws—short: M5 x 12 mm (M5 x 1/2 in.).
6 Insert the speaker cord into the speaker
terminal inside the leg.
1 Press and hold the clamp.
2 Insert the exposed core of the speaker
cord fully into the terminal.
Speaker
section
• Connect the cord with black stripe to the ·
terminal.
3 Release your finger.
1
2
Joint here
without gap.
Push cords fully
inside the leg before
attaching the
speaker section.
3
Screw
Leg
Washer
Repeat the procedure from step 1 to assemble the other satellite
speakers.
Leg
Speaker
section
The cord with
the black stripe.
For disassembly:
Reverse Assembly procedure:
1) Remove the speaker section from the leg.
2) Remove the leg from the stand.
–5–
EN_SX-XD33[J/C].p65
5
03.3.11, 7:00 PM
Connecting the Center speaker
Connecting the speaker system to the amplifier
• To connect the center speaker, use the same type of speaker
cord (6 m (19.7 feet); tagged with “FRONT SPEAKER”) as
used for connecting the front speakers.
• Each speaker cord has its name tag attached to one end.
Attach the end without the name tag to the speaker terminal.
Insert the speaker cord into the speaker
terminal.
1 Press and hold the clamp.
2 Insert the exposed core of the speaker
cord fully into the terminal.
• Connect the cord with the black stripe to the ·
terminal.
3 Release your finger.
1
2
3
Before connecting—
• Turn off the power to the amplifier before connecting the
speaker system; otherwise, the speakers may be damaged.
• The impedance of each speaker is 8 Ω. Before connecting
them to your amplifier, check the speaker impedance range of
your amplifier. If the impedance of this speaker is out of the
speaker impedance range indicated on the amplifier, you
cannot connect this system to the amplifier.
• The maximum power handling capacity of the SX-XD33 is
100 W. Excessive input will result in abnormal noise and
possible damage.
• Be sure to turn down the volume level to prevent unwanted
noise before performing following operations:
– Turning on or off other components,
– Operating the amplifier,
– Tuning FM stations,
– Fast-forwarding a tape,
– Continuously reproducing high frequency oscillation or high
pitch electronic sounds.
• When using a microphone, do not aim it at the speakers or
use it near the speakers; otherwise, the howling which occurs
may damage the speakers.
• Before replacing the cartridge, always turn off the power to the
turntable; otherwise, the clicking noise may damage the
speakers.
Typical connection method to an amplifier
Connect the speakers to a “SPEAKER” terminal of the amplifier
with the speaker cords by referring to the diagram below.
• Make sure to match the polarity (ª and ·) when connecting
the speaker cords.
• The diagram below is an example of a typical connection
method.
The cord with the
black stripe.
Front right
speaker
Front left
speaker
Center speaker
Approx. 6 m
(19.7 feet)
Approx. 6 m
(19.7 feet)
Make sure to match the polarity (ª and ·); otherwise, the
sound will lose the surround effect.
After connecting, check that the exposed cores are fully
inserted into the terminal.
Rear right
speaker
FRONT
SPEAKERS
RIGHT
Approx. 6 m
(19.7 feet)
LEFT
CENTER
SPEAKER
RIGHT
LEFT
REAR
SPEAKERS
Rear left
speaker
CAUTION:
SPEAKER
IMPEDANCE
8 16
Speaker terminals
on the amplifier
Approx. 15 m (49.2 feet)
–6–
EN_SX-XD33[J/C].p65
6
03.3.11, 7:00 PM
Approx. 15 m (49.2 feet)
English
Additional Information
English
Additional Information (continued)
General layout of speakers
Place all speakers at the same distance from the listening position if possible.
• Usually place the center speaker close to the TV.
• When you place the center speaker on a TV, make sure the surface is level and stable.
Front left
speaker
Front right
speaker
Subwoofer
Center
speaker
Listening position
Rear left
speaker
Rear right
speaker
• For a subwoofer to be used with SX-XD33, it is recommended
to use SX-DW303. This combination gives you the best
possible high quality surround sounds.
Do not lean against the speakers, as the speakers could fall
down or break, possibly causing an injury. Especially be
careful that children do not lean against them.
Specifications
SX-XDS33 (Satellite speaker)
Type :
Speaker unit :
Frequency range
Input impedance
Power handling Capacity
Sound pressure level
Dimensions (W × H × D)
:
:
:
:
:
Mass :
SX-XDC33 (Center speaker)
1-way 2-speaker
Bass reflex type, magnetically
shielded type
Direct drive (9.5 cm × 1 cm)
(3 3/4 in. × 7/16 in.) × 2
120 Hz to 20 000 Hz
8Ω
100 W
82 dB/W•m
282 mm × 1108 mm × 282 mm
(11 1/8 in. × 43 5/8 in. × 11 1/8 in.)
(approx.)
3.0 kg (6.7 lbs) each (approx.)
Type :
Speaker unit
Frequency range
Input impedance
Power handling Capacity
Sound pressure level
Dimensions (W × H × D)
Mass :
–7–
EN_SX-XD33[J/C].p65
7
:
:
:
:
:
:
03.3.11, 7:00 PM
1-way 2-speaker
Bass reflex type, magnetically
shielded type
5.5 cm (2 3/16 in.) cone × 2
80 Hz to 20 000 Hz
8Ω
100 W
81 dB/W•m
200 mm × 78 mm × 120 mm
(7 7/8 in. × 3 1/8 in. × 4 3/4 in.)
(approx.)
0.85 kg (1.9 lbs) (approx.)
SX-XD33
Home Chinema DD Speaker System
VICTOR COMPANY OF JAPAN, LIMITED
EN, FR
© 2003 VICTOR COMPANY OF JAPAN, LIMITED
0303NSMMDWHCE
CAUTIONS / ATTENTION
For Unpacking and Assembling
Pour le démontage et le montage
Speaker grille
Grille d’enceinte
To prevent the deformation of the speaker
grille, do not hold the speaker grille
strongly.
Pour éviter la déformation des grilles
d’enceinte, ne tenez pas la grille trop
fortement.
Speaker section
Section de l’enceinte
Be sure to connect the cords to the
speaker terminals on the speaker section
before inserting the speaker section into
the leg.
Assurez-vous de connecter les cordons
aux prises d’enceinte de la section de
l’enceinte avant d’insérer la section de
l’enceinte sur le pied.
Speaker terminals
Prises d’enceinte
Leg
Pied
For Daily Use
Pour une utilisation quotidienne
When moving the speaker, always hold its
leg. If you hold the speaker grille or pull
the speaker cord, the speaker may fall
down, causing damage or injury.
Lors du déplacement des enceintes,
tenez-les toujours par leur pied. Si vous
tenez une enceinte par la grille ou par le
cordon d’enceinte, l’enceinte risque de
tomber et d’être endommagée ou de
blesser quelqu’un.
XD33_caution_f.p65
1
Cord
Cordon
Speaker grille
Grille d’enceinte
Leg
Pied
Speaker cord
Cordon d’enceinte
LV43246-003A
[J,C,UJ]
03.3.10, 6:30 PM