1
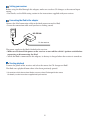
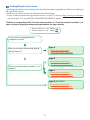
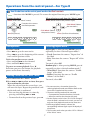
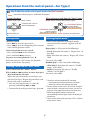
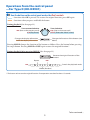
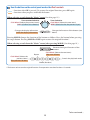
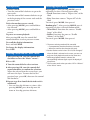
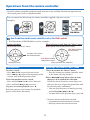
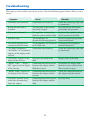
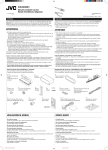
INTERFACE ADAPTER for iPodR
KS-PD100
Thank you for purchasing a JVC product.
Please read this manual carefully before operation, to ensure your complete
understanding and to obtain the best possible performance from the unit.
• iPod is a trademark of Apple Computer, Inc., registered in the U.S. and other countries.
• For installation and connections, refer to the separate manual.
INFORMATION (For U.S.A.)
This equipment has been tested and found to comply with the limits for a Class B digital device,
pursuant to Part 15 of the FCC Rules. These limits are designed to provide reasonable protection
against harmful interference in a residential installation. This equipment generates, uses, and can
radiate radio frequency energy and, if not installed and used in accordance with the instructions,
may cause harmful interference to radio communications. However, there is no guarantee that
interference will not occur in a particular installation. If this equipment does cause harmful
interference to radio or television reception, which can be determined by turning the equipment
off and on, the user is encouraged to try to correct the interference by one or more of the
following measures:
– Reorient or relocate the receiving antenna.
– Increase the separation between the equipment and receiver.
– Connect the equipment into an outlet on a circuit different from that to which the receiver is
connected.
– Consult the dealer or an experienced radio/TV technician for help.
Warnings and precautions
JVC bears no responsibility for any loss of data in the iPod while using this product.
Warnings
• USE WITH DC 12 V NEGATIVE GROUND VEHICLES.
If your vehicle does not have this system, a voltage inverter is required, which can be purchased at
a JVC car audio (IN-CAR ENTERTAINMENT) dealer.
• This adapter has been designed for exclusive use with JVC’s car receivers and the iPod. Do not use
this adapter with any other car receiver or player.
Precautions for safety
• Do not raise the volume level too much, as this will block outside sounds, making driving
dangerous.
• Do not perform complicated operations while driving; otherwise, it may result in an accident.
Precautions for handling the iPod
• Do not leave the iPod in a vehicle for a long time, as it may be damaged by direct sunlight, high
temperature, humidity, etc.
• Do not place the iPod on an uneven surface or in a place subject to vibration; otherwise, it may fall
over, obstructing safe driving.
2
Getting started
General information
• This adapter supports only JVC’s car receivers which meet the following conditions:
– An MP3-compatible CD changer control is equipped
– CD Text, MP3 folder/file names, or ID3 Tag is displayed
• By using this adapter, you can operate the iPod with your receiver as follows:
– Playing tracks stored in the iPod
– Selecting and playing tracks from “Playlists/Artists/Albums/Songs/Genres/Composers”
– Changing playback modes
• If your receiver shows “CD-CH (CD-Changer)” when the iPod is selected as the source:
– You cannot activate both Repeat and Random (Shuffle) at the same time.
– When connecting the iPod to this adapter while both “Repeat” and “Shuffle” are activated, only
the “Repeat” setting takes effect.
• While the iPod is connected to this adapter, all the buttons on the iPod do not function. Perform
all operations using the receiver.
• The text information of the tracks, categories, etc. is displayed on the receiver when operating the
iPod through this adapter.
– Text may not be displayed correctly depending on the characters, the condition of
communication between the iPod and the receiver, etc.
– The whole text may not be displayed if it is too long even if the receiver can scroll text
information. The maximum number of characters displayed is different according to the
receiver (up to a maximum of 40 characters).
Checking the type of your iPod
You can control the following types of iPods through this adapter.
• The iPod shuffle is not controllable.
Controllable iPod
Software Version
iPod with dock connector (3rd Generation)
iPod software version 2.3
iPod with Click Wheel (4th Generation)
iPod software version 3.1
iPod mini
iPod mini software version 1.4
iPod photo (5th Generation)
iPod photo software version 1.2
iPod nano*
iPod nano software version 1.0
You can check the software version of your iPod from “About” in the “Setting” menu on your iPod.
If your iPod software version is older than those mentioned above, update your iPod.
• For details about updating your iPod, check on the Apple web site <http://www.apple.com>.
* When you connect the iPod nano to this adapter, make sure to disconnect the headphones; otherwise, no sound
is played.
3
Setting your receiver
Before using the iPod through this adapter, make sure to select CD changer as the external input
setting.
• For details, see the PSM setting section in the instructions supplied with your receiver.
Connecting the iPod to the adapter
Connect the iPod connection cable to the dock connector on the iPod.
• Insert the connection cable until you hear a clicking sound.
KS-PD100
To the receiver
The power supply to the iPod is linked to the receiver.
• Make sure to turn off the power on the receiver or turn off the vehicle’s ignition switch before
connecting or disconnecting the iPod.
• While the iPod is connected to this adapter, its battery is charged when the receiver is turned on.
Starting playback
Turn on the power of the receiver and select the source for CD changer or iPod*.
The iPod starts playback from where it has been previously paused.
* For receivers which do not show iPod as a source, select CD changer for the source.
For details, see the instructions supplied with your receiver.
4
Checking the type of your receiver
Operating procedures on the control panel and from the remote controller are different according to
the type of the receiver.
Check the type of your receiver by referring to the chart below.
• If you are not sure about the type of your receiver, see the JVC web site <http://www.jvc-exad.com>
or consult your JVC car audio (IN-CAR ENTERTAINMENT) dealer.
Click the corresponding link (“From the control panel” or “From the remote controller”), so
you can jump to the pages of operating procedures for your receiver.
• If your answer is “yes,” follow
• If your answer is “no,” follow
.
.
Is your receiver equipped with a
navigation system?
Type A
• From the control panel
• From the remote controller
Does your receiver have 5 (up) and ∞
(down) buttons?
Type B
• From the control panel
• From the remote controller
Does your receiver have number (1 - 6)
buttons?
Type C
• From the control panel
• From the remote controller
Type D (KD-NX901)
• From the control panel
• From the remote controller
5
Operations from the control panel—For Type A
How the buttons on the control panel work as the iPod’s controls
•
: functions after MODE is pressed. To restore the original function, press MODE again.
During playback
When selecting a track from the “Music” menu
Functions the same as the iPod operation
MENU (Enters the “Music” menu)
Click Wheel (Selects the next items)
MENU (Moves back to the previous layer)
Functions the same as the iPod operation
38 (Play/Pause)
Click Wheel (Selects the previous items)
Select (Confirms the selection)
Repeat*1
Shuffle (Random)*1
Repeat*1
Shuffle (Random)*1
Selecting playback modes*3
Basic operation
Repeat play*4: After pressing MODE, press 5
repeatedly to select a desired repeat mode.*1
• Track: Functions the same as “Repeat One” of
the iPod.
• Disc: Functions the same as “Repeat All” of the
iPod.
To cancel, select Off.
To select a track:
• Press ¢ to go to the next tracks.
• Press 4 to go to the beginning of the current
track and the previous tracks.
To fast-forward or reverse a track:
• Press and hold ¢ to fast-forward.
• Press and hold 4 to reverse.
Random play*4: After pressing MODE, press 6
repeatedly to select a desired random mode.*1
• All or MAG: Functions the same as “Shuffle
Songs” of the iPod.
• Folder: Functions the same as “Shuffle
Albums” of the iPod.*5
To cancel, select Off.
To pause or resume playback: After pressing
MODE, press 4.
Each time you press 4 after pressing MODE,
the playback pauses and resumes alternately.
Selecting a track from the “Music” menu
1 After pressing MODE, press ¢ to enter the
“Music” menu.*2
2 Press MODE.
*1 For some receivers, the number buttons for
selecting playback modes are different. Refer to the
instructions supplied with the receiver.
*2 The menu selecting mode will be canceled;
– If no operations are done for about 5 seconds.
– When you confirm the selection of a track.
*3 For the receivers which show “CD-CH (CD-Changer)”
when the iPod is selected as the source, you can use
only one of the playback modes at the same time.
*4 While any playback mode is selected, the
corresponding indicator lights up on the display of
the receiver.
*5 This function works when you select “All” in “Albums”
of the “Music” menu.
3 Press ¢ or 4 to select an item.
4 After pressing MODE, press 4 to confirm
the selection.
When the selected item has a next layer, you will
enter the layer. To move back to the previous
layer, press ¢ after pressing MODE.
5 Repeat steps 2 to 4 until the desired track is
confirmed.
• You can also skip 10 items at a time by
pressing and holding ¢ or 4.
6
Operations from the control panel—For Type B
How the buttons on the control panel work as the iPod’s controls
•
: functions after MODE is pressed. To restore the original function, press MODE again.
During playback
When selecting a track from the “Music” menu
MENU (Enters the “Music” menu)
MENU (Moves back to the previous layer)
Functions the same as
the iPod operation
Click Wheel (Selects
the next items)
Click Wheel (Selects
the previous items)
38 (Play/Pause)
Repeat*1
Shuffle (Random)*1
Select (Confirms the selection)
Repeat*1
Shuffle (Random)*1
Selecting playback modes*3
Basic operation
Repeat play*4: After pressing MODE, press 5
repeatedly to select a desired repeat mode.*1
• Track: Functions the same as “Repeat One” of
the iPod.
• Disc: Functions the same as “Repeat All” of the
iPod.
To cancel, select Off.
To select a track:
• Press ¢ to go to the next tracks.
• Press 4 to go to the beginning of the current
track and the previous tracks.
To fast-forward or reverse a track:
• Press and hold ¢ to fast-forward.
• Press and hold 4 to reverse.
Random play*4: After pressing MODE, press 6
repeatedly to select a desired random mode.*1
• All or MAG: Functions the same as “Shuffle
Songs” of the iPod.
• Folder: Functions the same as “Shuffle
Albums” of the iPod.*5
To cancel, select Off.
To pause or resume playback: Press ∞.
Each time you press the button, the playback
pauses and resumes alternately.
Selecting a track from the “Music” menu
1 Press 5 to enter the “Music” menu.*2
2 Press ¢ or 4 to select an item, then press
∞ to confirm the selection.
When the selected item has a next layer, you
*1 For some receivers, the number buttons for
will enter the layer. Repeat the procedure until
selecting playback modes are different. Refer to the
the desired track is confirmed.
instructions supplied with the receiver.
• You can also skip 10 items at a time by
*2 The menu selecting mode will be canceled;
– If no operations are done for about 5 seconds.
pressing and holding ¢ or 4.
– When you confirm the selection of a track.
• To move back to the previous layer, press 5.
*3 For the receivers which show “CD-CH (CD-Changer)”
when the iPod is selected as the source, you can use
only one of the playback modes at the same time.
*4 While any playback mode is selected, the
corresponding indicator lights up on the display of
the receiver.
*5 This function works when you select “All” in “Albums”
of the “Music” menu.
7
Operations from the control panel—For Type C
How the buttons on the control panel work as the iPod’s controls
•
: functions when you press and hold the button.
During playback
When selecting a track from the “Music” menu
MENU (Enters the “Music” menu)
MENU (Moves back to the previous layer)
Functions the same as
the iPod operation
38 (Play/Pause)
Click Wheel (Selects
the next items)
Skips next 10 items
Click Wheel (Selects the
previous items)
Skips previous 10 items Select (Confirms the selection)
Selecting playback modes*2
Basic operation
To select a track:
• Press ¢ to go to the next tracks.
• Press 4 to go to the beginning of the current
track and the previous tracks.
• Refer to the operation of playback modes
section of the instructions supplied with the
receiver.
Repeat play*3: Select one of the followings:
• Track: Functions the same as “Repeat One” of
the iPod.
• Disc: Functions the same as “Repeat All” of the
iPod.
To cancel, select Off.
To fast-forward or reverse a track:
• Press and hold ¢ to fast-forward.
• Press and hold 4 to reverse.
To pause or resume playback: Press ∞.
Each time you press the button, the playback
pauses and resumes alternately.
Random play*3: Select one of the followings:
• All or MAG: Functions the same as “Shuffle
Selecting a track from the “Music” menu
Songs” of the iPod.
• Folder: Functions the same as “Shuffle
1 Press 5 to enter the “Music” menu.*1
Albums” of the iPod.*4
2 Press ¢ or 4 to select an item, then press
To
cancel, select Off.
∞ to confirm the selection.
When the selected item has a next layer, you
will enter the layer. Repeat the procedure until
the desired track is confirmed.
• You can also skip 10 items at a time by
pressing and holding ¢ or 4.
• To move back to the previous layer, press 5.
*1 The menu selecting mode will be canceled;
– If no operations are done for about 5 seconds.
– When you confirm the selection of a track.
*2 For the receivers which show “CD-CH (CD-Changer)”
when the iPod is selected as the source, you can use
only one of the playback modes at the same time.
*3 While any playback mode is selected, the
corresponding indicator lights up on the display of
the receiver.
*4 This function works when you select “All” in “Albums”
of the “Music” menu.
8
Operations from the control panel
—For Type D (KD-NX901)
How the buttons on the control panel work as the iPod’s controls
•
•
: functions after OK is pressed. To restore the original function, press OK again.
: functions when you press and hold the button.
During playback (See also page 11.)
Turn counterclockwise:
4 (Goes to the previous track)
38 (Play/Pause)
Turn clockwise:
¢ (Goes to the next track)
MENU (Enters the “Music” menu)
Changes the display information
Scrolls the display information
Changes the functions of the buttons (see
below)
Pressing MODE changes the function of the buttons as follows. Press the button before pressing
the target button. Pressing MODE or DISP again restores the original function.*
During playback (after pressing MODE) (See also page 11.)
Restores the original functions of the
buttons
¢
Repeat
4
Cancels the playback mode
Shuffle (Random)
* The buttons also restore the original functions if no operations are done for about 15 seconds.
To be continued....
9
How the buttons on the control panel work as the iPod’s controls
•
•
: functions after OK is pressed. To restore the original function, press OK again.
: functions when you press and hold the button.
When selecting a track from the “Music” menu (See also page 11.)
Turn counterclockwise:
Click Wheel (Selects the previous items)
Select (Confirms the selection)
Turn clockwise:
Click Wheel (Selects the next items)
MENU (Moves back to the previous layer)
Changes the display information
Scrolls the display information
Changes the functions of the buttons (see
below)
Pressing MODE changes the function of the buttons as follows. Press the button before pressing
the target button. Pressing MODE or DISP again restores the original function.*
When selecting a track from the “Music” menu (after pressing MODE) (See also page 11.)
Restores the original functions of the
buttons
Repeat
Click Wheel (Selects the next items)
Skips next 10 items
Click Wheel (Selects the
previous items)
Skips previous 10 items
Cancels the playback mode
Shuffle (Random)
* The buttons also restore the original functions if no operations are done for about 15 seconds.
To be continued....
10
Selecting playback modes*2
Basic operation
To select a track:
• Turn the control dial clockwise to go to the
next tracks.
• Turn the control dial counterclockwise to go
to the beginning of the current track and the
previous tracks.
To fast-forward or reverse a track:
• After pressing MODE, press and hold 4 to
fast-forward.
• After pressing MODE, press and hold 1 to
reverse.
To pause or resume playback:
After pressing OK, turn the control dial
counterclockwise to select pause or resume.
To scroll the display information:
Press and hold DISP.
To change the display information:
Press DISP.
Selecting a track from the “Music” menu
1 After pressing OK, turn the control dial
clockwise to enter the “Music” menu.*1
2 Press OK.
3 Turn the control dial to select an item.
Repeat play*3: After pressing MODE, press 2
repeatedly to select a desired repeat mode.
• Track: Functions same as “Repeat One” of the
iPod.
• Disc: Functions same as “Repeat All” of the
iPod.
To cancel, press MODE, then press 6.
Random play*3: After pressing MODE, press 3
repeatedly to select a desired random mode.
• All or MAG: Functions the same as “Shuffle
Songs” of the iPod.
• Folder: Functions the same as “Shuffle
Albums” of the iPod.*4
To cancel, press MODE, then press 6.
*1 The menu selecting mode will be canceled;
– If no operations are done for about 5 seconds.
– When you confirm the selection of a track.
*2 For the receivers which show “CD-CH (CD-Changer)”
when the iPod is selected as the source, you can use
only one of the playback modes at the same time.
*3 While any playback mode is selected, the
corresponding indicator lights up on the display of
the receiver.
*4 This function works when you select “All” in “Albums”
of the “Music” menu.
4 After pressing OK, turn the control dial
counterclockwise to confirm the selection.
When the selected item has a next layer, you
will enter the layer. To move back to the
previous layer, press OK, then turn the control
dial clockwise.
5 Repeat steps 2 to 4 until the desired track is
confirmed.
• You can also skip 10 items at a time. After
pressing MODE, press 4 to skip next 10
items or 1 to skip previous 10 items.
11
Operations from the remote controller
• From the remote controller, playback mode selection is not available. Perform the operation on
the control panel to select a playback mode.
You can control the iPod using the remote controller supplied with your receiver.
Examples:
RM-RK50
RM-RK300
RM-RK230
How the buttons on the remote controller work as the iPod’s controls
• The illustrations of RM-RK300 are used as examples.
During playback
When selecting a track from the “Music” menu
MENU (Enters the “Music” menu)
MENU (Moves back to the previous layer)
Click Wheel (Selects
the next items)
Functions the same as
the iPod operation
Click Wheel (Selects
the previous items)
38 (Play/Pause)
Select (Confirms the selection)
Selecting a track from the “Music” menu
Basic operation
To select a track:
• Press ¢ (or 3) to go to the next tracks.
• Press 4 (or 2) to go to the beginning of the
current track and the previous tracks.
To fast-forward or reverse a track:
• Press and hold ¢ (or 3) to fast-forward.
• Press and hold 4 (or 2) to reverse.
To pause or resume playback: Press ∞.
Each time you press the button, the playback
pauses and resumes alternately.
1 Press 5 to enter the “Music” menu.
• Now the buttons on remote controller work
as the menu selecting buttons.*
2 Press ¢/4 (or 3/2) to select an item,
then press ∞ to confirm the selection.
When the selected item has a next layer, you
will enter the layer. Repeat the procedure until
the desired track is confirmed.
• You can skip 10 items at a time by pressing
and holding ¢/4 (or 3/2).
• To move back to the previous layer, press 5.
* The menu selecting mode will be canceled;
– If no operations are done for about 5 seconds.
– When you confirm the selection of a track.
12
Troubleshooting
What appears to be trouble is not always serious. Check the following points before calling a service
center.
Symptoms
Causes
Remedies
• The iPod is not turned on.
Connections are incorrect.
Check the connecting cable and
its connection.
• Buttons do not work as
intended.
The functions of the buttons
have been changed.
Press MODE (or OK) before
performing the operation.
• The sound is distorted.
The equalizer is activated on
both the receiver and the iPod.
Deactivate the equalizer either
on the receiver or the iPod.
• Playback stops.
The headphones are
disconnected during playback.
Restart the playback operation
using control panel.
• No sound is played when
connecting the iPod nano.
The headphones are connected Disconnect the headphones
to the iPod nano.
from the iPod nano.
Connections are incorrect.
• “NO MAG (Magazine),”
“NO IPOD,” or “Disconnect”
appears on the display of the
receiver.
Check the connecting cable and
its connection.
• “NO FILES” appears on the
display of the receiver.
No tracks are stored in the
iPod.
Import tracks to the iPod.
• “RESET 1 (R1)” – “RESET 7
(R7)” appears on the display
of the receiver.
Communication failure occurs
between this adapter and the
iPod/the receiver.
Disconnect the adapter from
both the receiver and the iPod.
Then, connect it again.
• “RESET 8 (R8)” appears on
the display of the receiver.
Communication failure occurs
between this adapter and the
receiver.
Check the connection between
this adapter and the receiver.
• The iPod’s controls do not
work after disconnecting
from this adapter.
Communication failure occurs
between this adapter and the
iPod.
Reset the iPod.
13
Specifications
GENERAL
Power Requirement:
Operating Voltage: DC 14.4 V (11 V to 16 V allowance)
Grounding System: Negative ground
Current consumption: 18 mA (200 mA while charging the iPod)
Allowable Operating Temperature: 0°C to +40°C (32°F to 104°F)
Dimensions (W × H × D): 87 mm × 25 mm × 68 mm (3-7/16" × 1" × 2-11/16")
Mass (approx.): 320 g (0.71 lbs) (excluding accessories)
Design and specifications are subject to change without notice.
14
EN
© 2005 Victor Company of Japan, Limited