1
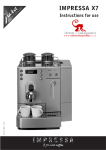
IMPRESSA F90/F9
Art. Nr. 65382
Instructions for use
3/05
JURA IMPRESSA F90/F9
Legend:
DISPLAY: serves as information.
DISPLAY: please follow the instructions shown.
= Note
= Important
= Tip
JURA Elektroapparate AG, CH-4626 Niederbuchsiten,
Internet http://www.jura.com
Fig. 1
Fig. 2
Fig. 3
Fig. 4
Fig. 5
Fig. 6
Fig. 7
Fig. 8
Fig. 9
Fig. 10
Fig. 11
Fig. 12
Fig. 13
Fig. 14
Fig. 15
Fig. 16
2
1
3
7
8
Control elements
9
A)
B)
C)
D)
E)
F)
G)
H)
I)
1
2
3
4
5
6
7
8
9
10
11
12
13
14
15
16
17
18
19
20
21
10
11
6
12
5
13
4
3
2
14/15
1
16
21
17
18
19
20
Display dialog system
Symbols
(navigation in programming mode)
Large cup
Coffee
Espresso
Start (to start the draw-off operation)
Coffee strength «mild»
Coffee strength «Normal»
Coffee strength «strong»
Programming key
Selection key for pre-ground coffee
Draw-off key 1 cup
Draw-off key 2 cups
ON/OFF key
Maintenance key
Connectivity socket
Control panel
Filler funnel key for pre-ground coffee
Bean tank cover
Water tank with handle
Water portion draw-off key
Steam portion draw-off key
2-stage frothing jet (Fig. 7)
Replaceable hot water jet
Height-adjustable coffee spout
Cup illumination (Fig. 10)
Coffee grounds container
Drip grate
Drip tray
Power switch
PROGRAMMATION
Sensitive Touch Screen Technology
B)
8
A)
8
C)
D)
E)
F)
G)
H)
I)
Contents
JURA IMPRESSA
1. Description of control panel ..............................page
2. Safety information ..........................................page
2.1 Warning.................................................page
2.2 Precautions .............................................page
2.3 Power Switch ..........................................page
3. Preparing the coffee machine for use...................page
3.1 Check the mains voltage.............................page
3.2 Check electrical fuse .................................page
3.3 Refill water.............................................page
3.4 Filling the bean tank .................................page
3.5 Adjusting the grinding gear.........................page
4. First use.......................................................page
4.1 Cup illumination.......................................page
5. Adjustment of water hardness ............................page
6. Installation of CLARIS plus filter cartridges .........page
6.1 Installing the filter....................................page
6.2 Replacing the filter ...................................page
7. Rinsing the coffee machine................................page
8. Drawing off coffee ..........................................page
8.1 Drawing off espresso .................................page
8.2 Drawing off a large cup of coffee .................page
8.3 Drawing off pre-ground coffee .....................page
9. Drawing off hot water......................................page
10. Drawing off steam ..........................................page
11 Drawing off steam with the
Professional-Cappuccino Frother ........................page
11.1 Connecting the Professional-Cappuccino
Frother to the F90/F9.............................page
11.2 Drawing off cappuccino and hot milk with
the Professional-Cappuccino Frother ..........page
11.3 Cleaning the Professional-Cappuccino
Frother ...............................................page
12. Switching off the coffee machine ........................page
6
6
6
6
7
7
7
7
7
7
7
7
8
8
9
9
9
10
10
10
10
11
11
12
12
12
12
13
13
13. Programming ................................................page
13.1 Programming the filter ...........................page
13.2 Programming the water hardness...............page
13.3 Programming the aroma INTENSIVE
or STANDARD......................................page
13.4 Programming the temperature ..................page
13.5 Programming the water quantity ...............page
13.6 Programming 1 cup ...............................page
13.7 Programming the steam portion ................page
13.8 Programming the water portion ................page
13.9 Programming the time ............................page
13.10 Programming the automatic switch-on
time ...................................................page
13.11 Programming the automatic switch-off
time ...................................................page
13.12 Cup counter..........................................page
13.13 Programming the language ......................page
13.14 Connectivity .........................................page
14. Maintenance..................................................page
14.1 Refilling water ......................................page
14.2 Emptying the coffee grounds container........page
14.3 No Drip tray.........................................page
14.4 Filling the bean tank ..............................page
14.5 Replacing the filter ................................page
14.6 Cleaning the coffee machine .....................page
14.7 Coffee machine calcified ..........................page
14.8 General cleaning instructions ....................page
14.9 Emptying the system ..............................page
15. Cleaning .......................................................page
16. De-scaling.....................................................page
17. Disposal .......................................................page
18. Tips for perfect coffee......................................page
19. Messages ......................................................page
20. Problems ......................................................page
21. Legal information ...........................................page
22. Technical data ...............................................page
13
14
14
14
14
14
15
15
16
16
16
16
17
17
18
18
18
18
18
18
18
19
19
19
19
19
20
21
21
22
23
24
24
5
E
Important information
Thank you very much for purchasing this IMPRESSA coffee
machine.
Before using your new coffee machine for the first time, carefully
read this operating manual and keep it for future reference.
Should you need more information or if you meet with particular
problems not specified in these operating instructions in sufficient
detail, either contact us directly or contact your local authorized
dealer.
You will also find useful tips on operation and maintenance
of your IMPRESSA on the website at www.jura.com.
Don’t forget to check out the Knowledge Builder our animated operating instructions. LEO, our assistant, will take
you through all the functions.
1. Description of control panel
A gentle push on the control panel will do, and the sensors will
read your wish from your fingertips. The IMPRESSA offers Café à
la Carte, coffee to the taste of everybody. You can select one of the
programmed coffee specialities at a gentle touch on the touch
screen.
As a result of high electromagnetic interference, the touch screen
may become inactive. All the remaining draw-off keys, the selection key for pre-ground coffee, draw-off key 1 cup, draw-off key 2
cups, can still be used.
2. Safety information
2.1 Warning
Children do not realize the dangers involved in using electric
appliances, for this reason always keep an eye on children when
they use electric appliances.
6
The coffee machine may only be used by instructed persons.
Never use a defective coffee machine or a machine with a
defective mains cable.
Never immerse the coffee machine in water.
Never repair or open the coffee machine yourself. Any repairs
may only be carried out by authorized service shops using original spare parts and accessories.
2.2 Precautions
Never expose the coffee machine to weather (rain, snow, frost),
never touch the machine when your hands are wet.
Place the IMPRESSA on a firm, level base that is resistant to
any water that may leak. Never stand on hot or warm surfaces
(oven hobs). Keep out of the reach of children.
If you don’t use the machine for a longer time (holidays, etc.)
always disconnect the mains cable.
Always disconnect mains cable before cleaning the machine.
When disconnecting the mains cable never pull on the mains
cable or the machine itself.
The coffee machine is connected to mains supply via a mains
cable. Make sure nobody can trip over the mains cable. Make
sure children and pets cannot reach the machine
Never put the coffee machine or individual parts of it into a
dishwasher.
Make sure to install the machine at a place with sufficient air
circulation, to prevent overheating of the machine.
2.3 Power switch
Actuate the power switch (21) on your IMPRESSA before
using the machine for the first time.
We recommend that you switch off your IMPRESSA with
the power switch (21) if you intend not to use the machine
for longer periods of time (e.g.during holidays)
3. Preparing the coffee machine for use
3.1 Check the mains voltage
The coffee machine is preset in the factory to the correct mains
voltage. Check if your local mains supply voltage complies with
the information given on the type plate on the underside of the
coffee machine.
3.2 Check electrical fuse
The coffee machine is designed for an electric current of 10
Ampères. Check if the electrical fuse has sufficient capacity.
3.3 Refill water
Only use fresh, cold water. Never fill in milk, mineral water
or other liquids.
Take out the water tank and thoroughly rinse it with cold tap
water (Fig. 1).
Then fill the water tank and re-install it in the coffee machine.
Make sure the tank is installed correctly and that it engages
properly.
3.4 Filling the bean tank
To ensure that your machine will work perfectly for a long
time and to avoid damage, please note that the grinding gear
of your JURA coffee machine is not suitable for coffee beans
which were treated, during or after roasting, with additives
(e.g. sugar). Such coffee blends may damage the grinding gear. Any repair costs resulting from the use of such blends are
not covered by warranty.
Open the cover of the bean tank (10).
Remove any dirt or foreign matter from the bean tank.
Fill coffee beans in the bean tank and close the cover.
3.5 Adjusting the grinding gear
You can adjust the grinding gear to the roast of your coffee. We
recommend that you use
a fine adjustment (the smaller the dots, the finer the
grinding is) for a light roast
a coarse adjustment (the bigger the dots, the coarser the
grinding is) for a dark roast
The grinding degree may only be adjusted while the grinding
gear is running.
Open the cover of the bean tank (10).
To adjust the grinding degree turn the rotary switch (Fig. 2) to
the required position.
4. First use
Fill coffee beans in the bean tank (10).
Fill water tank.
Switch on your coffee machine using the key
.
7
E
WWW.IMPRESSA-F-LINE.COM
HELLO, MACHINE HEATING UP
FILL SYSTEM / WATER PORTION
Place an empty cup under the hot water jet (15).
Press water portion draw-off key
SYSTEM FILLING
MACHINE HEATING UP
PRESS MAINTENANCE
MACHINE RINSING
PLEASE SELECT
Press symbol
.
COFFEE NORMAL
If FILL BEANS is displayed, touch the symbol
again. The mill was still empty.
To get an excellent froth, adjust the coffee spout (16) to the
size of your cup (Fig. 3 ).
4.1 Cup illumination
The cup illumination puts your coffee in a good light, making it a
treat for the eyes.
When you plug in or switch on the machine or press any key, the
cup illumination is activated for 1 minute. To switch on the cup illumination, with the machine switched off, press any key (Fig. 10).
5. Adjustment of water hardness
In the coffee machine water is heated up. As a result, calcification occurs during normal use and is indicated automatically. Before using the machine for the first time the
hardness of the water used must be adjusted. Use the supplied test sticks for this.
8
1° German hardness is equivalent to 1.79° French hardness.
The coffee machine has 5 hardness degrees which can be used and
are displayed while you are adjusting the water hardness.
The displayed information means the following:
WATER
HARDNESS –– Water hardness function switched off
WATER
German water hardness degree 1 to 7°
HARDNESS 1
French Water hardness degree 1.79 – 12.53°
WATER
German water hardness degree 8 to 15°
HARDNESS 2
French Water hardness degree 14.32 – 26.85°
WATER
German water hardness degree 16 to 23°
HARDNESS 3
French Water hardness degree 28.64 – 41.14°
WATER
German water hardness degree 24 to 30°
HARDNESS 4
French Water hardness degree 42.96 – 53.7°
When the machine leaves the factory it is adjusted to WATER
HARDNESS 3. You can adjust another hardness. To do this,
proceed as follows:
Pull out the mains cable from the cable box on the rear side of the
coffee machine and connect the machine to mains supply.
Press the key
to switch on the coffee machine.
WWW.IMPRESSA-F-LINE.COM
Your coffee machine is switched to start-up position.
HELLO, MACHINE HEATING UP
PRESS MAINTENANCE
MACHINE RINSING
PLEASE SELECT
Press programming key
until you hear an acoustic signal.
FILTER NO
Press symbol
until the following message is displayed:
WATER HARDNESS 3
Press symbol
, you will hear an acoustic signal and the
hardness degree flashes.
Now, press symbols
to adjust the required hardness
degree.
Press symbol
to confirm the new settings.
WATER HARDNESS 4
Press programming key
to leave Programming Mode.
PLEASE SELECT
6. Installation of CLARIS plus filter cartridges
If the CLARIS plus filter cartridge is installed properly, descaling of the coffee machine is no longer required. For
more information on the CLARIS plus filter cartridge refer
to brochure «CLARIS plus». Hard on limescale. Gentle on
your coffee machine.»
6.1 Installing the filter
Use the key
to switch on the coffee machine.
WWW. IMPRESSA-F-LINE.COM
HELLO, MACHINE HEATING UP
PRESS MAINTENANCE
MACHINE RINSING
PLEASE SELECT
Fold up the cartridge holder. Insert the filter cartridge in the
water tank (Fig. 4)
Close the cartridge holder until it engages audibly.
Fill the water tank with cold, fresh tap water and install it again.
Press Programming key
until you hear an acoustic signal.
NO FILTER
Press symbol
, NO flashes on the display.
Press symbol
until the following message is displayed:
FILTER YES (YES flashes)
Press symbol
.
INSTALL FILTER / WATER PORTION
Place a sufficiently large jug (approx 1 litre) under the hot water
jet (15) and press the water portion draw-off key .
FILTER RINSING. The water draw-off operation is
stopped automatically.
MACHINE HEATING UP
PLEASE SELECT
Now you have activated the filter. In Programming Mode the
water hardness selection function is no longer displayed.
E
6.2 Replacing the filter
REPLACE FILTER / PLEASE SELECT
Use the key
to switch off the coffee machine.
GOOD BYE
Press maintenance key
for some seconds, with the machine
switched off.
INSTALL FILTER / WATER PORTION
Fold up the cartridge holder. Insert the filter cartridge in the
water tank (Fig. 4)
Close the cartridge holder until it engages audibly.
Fill the water tank with cold, fresh tap water and reinstall it in
the coffee machine.
Place a sufficiently large jug (approx 1 litre) under the hot water
jet (15) and press the draw-off key .
9
FILTER RINSING. The water draw-off operation is
stopped automatically.
MACHINE HEATING UP
PLEASE SELECT
7. Rinsing the coffee machine
When the coffee machine was switched off and has cooled
down in the meantime, a rinsing operation is started when
the machine is switched on again. When the machine is
switched off, a rinsing operation is started automatically.
Use the key
to switch on the coffee machine.
WWW. IMPRESSA-F-LINE.COM
HELLO, MACHINE HEATING UP
PRESS MAINTENANCE
MACHINE RINSING
PLEASE SELECT
8. Drawing off coffee
You can change the selected product at any time by pressing
the symbols before starting the operation by pressing
. The selected product is displayed.
Use the key
to switch on the coffee machine.
WWW. IMPRESSA-F-LINE.COM
HELLO, MACHINE HEATING UP
PRESS MAINTENANCE
MACHINE RINSING
PLEASE SELECT
Place 1 cup under the adjustable coffee spout (16) and press
symbol
.
10
COFFEE NORMAL
Press symbols ( /
/ ) to select the strength of your coffee.
COFFEE STRONG
Press symbol
.
COFFEE STRONG Your product is being prepared.
PLEASE SELECT
8.1 Drawing off espresso
Use the key
to switch on the coffee machine.
WWW. IMPRESSA-F-LINE.COM
HELLO, MACHINE HEATING UP
PRESS MAINTENANCE
MACHINE RINSING
PLEASE SELECT
Place 1 cup under the adjustable coffee spout (16) and press
symbol .
ESPRESSO NORMAL
Press ( /
/
) to select the strength of your espresso.
ESPRESSO STRONG
Press symbol
.
ESPRESSO STRONG. Your product is being prepared.
PLEASE SELECT
8.2 Drawing off a large cup of coffee
Use the key
to switch on the coffee machine.
WWW. IMPRESSA-F-LINE.COM
HELLO, MACHINE HEATING UP
PRESS MAINTENANCE
MACHINE RINSING
PLEASE SELECT
Place 1 cup under the adjustable coffee spout (16) and press
symbol
.
LARGE CUP NORMAL
Press ( /
/
) to select the strength of your coffee.
LARGE CUP MILD
Press symbol
.
LARGE CUP MILD Your product is being prepared.
PLEASE SELECT
8.3 Drawing off pre-ground coffee
Never use instant coffee or quick-coffee. We recommend
that you always use powder from fresh coffee beans or, preground, vacuum-packed coffee. Never fill in more than 2
portions of powder. The pre-ground coffee tank is no storage
tank. Make sure that the pre-ground you use is not too fine.
This may cause blocking of the system. In this case the
coffee only drips out of the coffee spout.
If you press the draw-off key unintentionally, you can stop
the operation by pressing the maintenance key. Your coffee
machine will carry out a rinsing operation.
Use the key
to switch on the coffee machine.
WWW. IMPRESSA-F-LINE.COM
HELLO, MACHINE HEATING UP
PRESS MAINTENANCE
MACHINE RINSING
PLEASE SELECT
Press selection key
.
FILL IN POWDER / PLEASE SELECT
Now fill in 1 or 2 level dosing spoonfuls of pre-ground coffee in
the filler funnel for pre-ground coffee (Fig. 5).
Place 1 cup under the adjustable coffee spout (16) and press the
corresponding symbol (
/
/ ).
LARGE CUP POWDER
Press symbol
.
LARGE CUP POWDER Your powder coffee is
being prepared.
PLEASE SELECT
9. Drawing off hot water
You can adjust the water portion individually (see Chapter
12 Programming). Install the hot water jet (Fig. 7) to obtain
perfect water flow.
At the start of the water draw-off there can be splashing
Avoid direct contact with the skin!
Do not replace the replaceable hot water jet directly after
drawing off water, because the jet is hot after the draw-off
operation.
Place a cup under the hot water jet (15).
Press water draw-off key .
WATER PORTION
The programmed portion is being prepared. You can stop the
draw-off operation at any time by pressing the draw-off key .
PLEASE SELECT
11
E
10. Drawing off steam
To ensure perfect operation, clean the 2-stage frothing jet
(14) regularly. Screw the jet off as described. Hold the jet at
the top and at the bottom end and screw it apart (Fig. 9).
Thoroughly rinse the 3 parts under running water.
Make sure the nozzle has engaged properly. Il the nozzle is
clogged with dried milk or has not been attached properly, it
might suddenly come off during operation.
Steam can be used for heating liquids and frothing milk for
cappuccino. Make sure that the 2-stage frothing jet (14) is
pushed upwards when liquids are heated. To froth liquids,
push the 2-stage frothing jet downwards, turning it slightly
(Fig. 7).
If you do not draw off steam within 3 minutes, steam drawoff mode is terminated.
Install the 2-stage frothing jet (Fig. 7). This is included in
your Welcome Pack.
During frothing some water will escape the system before
the actual steam draw-off. This does not affect the result, e.g.
when frothing milk.
At the start of the water draw-off there can be splashing.
The 2-stage frothing jet becomes hot. Avoid direct contact
with the skin!
Use the key
to switch on the coffee machine.
WWW. IMPRESSA-F-LINE.COM
HELLO, MACHINE HEATING UP
PRESS MAINTENANCE
MACHINE RINSING:
12
PLEASE SELECT
Press steam portion draw-off key .
MACHINE HEATING UP
PLEASE SELECT
Place a cup under the 2-stage frothing jet (14) and immerse the
frothing aid in the milk to be frothed or the liquid to be heated.
Press steam draw-off key
again.
STEAM PORTION. Your product is being prepared.
You can stop the draw-off operation at any time by pressing the
steam draw-off key .
PLEASE SELECT
11. Drawing off steam with the
Professional-Cappuccino Frother (optional F90)
The Professional-Cappuccino Frother is optionally available.
Contact your authorized dealer.
11.1 Connecting the Professional-Cappuccino
Frother to the F90/F9
Disassemble the replaceable hot water jet or the 2-stage frothing
jet (Fig. 7).
Mount the Professional-Cappuccino Frother (Fig. 11).
Press one side of the hose into the opening behind the dial
(Fig. 13).
The optionally available milk container can be used for
sucking in milk. How to connect it (see Fig. 12).
11.2 Drawing off cappuccino and hot milk with
Professional-Cappuccino Frother
Fill the milk container with milk or immerse the hose in the milk
directly.
Place a cup under the Professional-Cappuccino Frother.
Press the steam portion draw off key (13)
MACHINE HEATING UP
PLEASE SELECT
Press the steam portion draw off key (13) again
STEAM PORTION
The frothing/heating time depends on the steam portion settings
you have programmed. (See “Programming steam portion”
Chapter 13.7)
For cappuccino turn the selector switch (1) (Fig. 16) to area
(2).
For hot milk turn the selector switch (1) (Fig. 16) to area (3).
Now place the cup with the cappuccino froth or the hot milk
under the coffee spout and draw of the product of your choice.
11.3 Cleaning the Professional-Cappuccino Frother
The Professional-Cappuccino Frother must be cleaned after
each draw-off operation. Daily cleaning is recommended.
Fill water in a container and immerse the hose in it.
Draw off steam until the water/steam mixture is clean.
If necessary, disassemble the Professional-Cappuccino Frother
and thoroughly rinse the flow regulation with water (Fig. 14 and
Fig. 15).
12. Switching off the coffee machine
To ensure perfect operation, please switch your IMPRESSA
to standby mode with the
symbol first. Then switch the
machine off with the power switch (21).
Use the key
to switch on the coffee machine.
PLEASE SELECT
Use
key to switch OFF your coffee machine.
GOOD BYE
The automatic rinsing operation is started.
13. Programming
When your coffee machine leaves the factory it is adjusted such
that you can draw off coffee without having to change any settings.
However, you can programme various parameters individually.
E
You can programme the following stages:
Filter
Water hardness
Aroma
Temperature
Water quantity for coffee
1 Cup
Steam portion
Water portion
Time
Automatic switch-on time
Automatic switch-off time
Draw offs
Language
For proper cleaning, use the JURA Auto Cappuccino Cleaning Agent which is available at your authorized dealer.
13
13.1 Programming the filter
13.4 Programming the temperature
Refer to Chapter 6.1 «Inserting the filter».
13.2 Programming the water hardness
Refer to Chapter 5 «Adjusting the water hardness».
13.3 Programming the aroma INTENSIVE or
STANDARD
The aroma for the powder quantities ( /
/
) was
adjusted to Intensive in the factory. If requested it can also
be set to Standard.
Use the key
to switch on the coffee machine.
WWW. IMPRESSA-F-LINE.COM
HELLO, MACHINE HEATING UP
PRESS MAINTENANCE
MACHINE RINSING:
PLEASE SELECT
Press programming key
until you hear an acoustic signal.
Touch symbol
until the following message is displayed:
AROMA INTENSIVE
Press symbol
, you will hear an acoustic signal, INTENSIVE flashes.
Use the symbols
to adjust the aroma to STANDARD.
Press symbol
to confirm the new settings.
AROMA STANDARD
Use the symbols
to reach the next programming stage or
press programming key
to quit Programming Mode.
14
Use the key
to switch on the coffee machine.
WWW. IMPRESSA-F-LINE.COM
HELLO, MACHINE HEATING UP
PRESS MAINTENANCE
MACHINE RINSING
PLEASE SELECT
Press programming key
until you hear an acoustic signal.
Touch symbol
until the following message is displayed:
TEMP. HIGH
Press symbol
, you will hear an acoustic signal and HIGH
flashes.
Use the symbol
to adjust the temperature to NORMAL.
Press symbol
to confirm your settings.
TEMP. NORMAL
Use the symbols
to reach the next programming stage or
press programming key
to quit Programming Mode.
13.5 Programming the water quantity
Use the key
to switch on the coffee machine.
WWW. IMPRESSA-F-LINE.COM
HELLO, MACHINE HEATING UP
PRESS MAINTENANCE
MACHINE RINSING:
PLEASE SELECT
Press programming key
until you hear an acoustic signal.
Press symbol
until the following message is displayed:
WATER QUANTITY
Press symbol
.
SELECT PRODUCT
Select the product, the water quantity of which you want to
programme (
/
/ )
COFFEE 90 ML
Press symbol
, the value flashes.
Use symbols
to change the value in 5 ml increments.
Press symbol
to save the water quantity for this product.
WATER QUANTITY
Use the symbols
to reach the next programming stage
or press programming key
to quit Programming Mode.
1 CUP STRONG
Press symbol
to save the new settings.
1 CUP 180 ML (for example)
Use the symbols
to reach the next programming stage or
press key
to quit Programming Mode.
These settings were taken over for the draw-off key for 2
cups.
13.7 Programming the steam portion
The programmable steam portion time is between 3 and 60
seconds.
13.6 Programming 1 cup
Now, you will program the draw-off key 1 cup (3). This has
no influence on the touch screen.
Use the key
to switch on the coffee machine.
WWW. IMPRESSA-F-LINE.COM
HELLO, MACHINE HEATING UP
PRESS MAINTENANCE
MACHINE RINSING:
PLEASE SELECT
Press programming key
until you hear an acoustic signal.
Press symbol
until the following message is displayed:
1 CUP 120 ML.
Press symbol
, the value flashes.
Use symbols
to change the value in 5 ml increments.
Press symbol
to save the water quantity for 1 cup.
1 CUP NORMAL
Press one of the symbols ( /
/
) to select the strength of
your coffee.
Use the key
to switch on the coffee machine.
WWW. IMPRESSA-F-LINE.COM
HELLO, MACHINE HEATING UP
PRESS MAINTENANCE
MACHINE RINSING:
PLEASE SELECT
Press programming key
until you hear an acoustic signal.
Press symbol
until the following message is displayed:
STEAM 20 SEC.
Press symbol
, the value 20 flashes.
Press symbols
to change the value.
Press symbol
to save the new value.
STEAM 40 SEC (Example)
Use the symbols
to reach the next programming stage or
press programming key
to quit Programming Mode.
15
E
13.8 Programming the water portion
Use the key
to switch on the coffee machine.
WWW. IMPRESSA-F-LINE.COM
HELLO, MACHINE HEATING UP
PRESS MAINTENANCE
MACHINE RINSING
PLEASE SELECT
Press programming key
until you hear an acoustic signal.
Press symbol
until the following message is displayed:
WATER PORTION
Press symbol
, you will hear an acoustic signal.
PRESS KEY
Press water portion draw-off key .
ENOUGH WATER? PRESS MAINTENANCE.
When the required water quantity is reached press key . The
water draw-off operation is stopped, the water portion is
programmed now.
Use the symbols
to reach the next programming stage or
press programming key
to quit Programming Mode.
13.9 Programming the time
You must programme the time if you want to use the
automatic switch-on function.
Use the key
to switch on the coffee machine.
WWW. IMPRESSA-F-LINE.COM
HELLO, MACHINE HEATING UP
PRESS MAINTENANCE
MACHINE RINSING:
PLEASE SELECT
16
Press programming key
until you hear an acoustic signal.
Press symbol
until the following message is displayed:
TIME —:—
Press symbol
, you will hear an acoustic signal and —:—
flashes.
Use symbols
to adjust the hours and confirm by pressing
.
Use symbols
to adjust the minutes and confirm by
pressing
. The time is now programmed.
Use the symbols
to reach the next programming stage or
press programming key
to quit Programming Mode.
If the machine is disconnected from mains supply, the time
must be programmed again.
13.10 Programming the automatic switch-on time
You must programme the time (Chapter 13.9) if you want to
use the automatic switch-on function.
Use the key
to switch on the coffee machine.
WWW. IMPRESSA-F-LINE.COM
HELLO, MACHINE HEATING UP
PRESS MAINTENANCE
MACHINE RINSING:
PLEASE SELECT
Press programming key
until you hear an acoustic signal.
Press symbol
until the following message is displayed:
MACHINE ON —:—
Press symbol
, you will hear an acoustic signal and —:—
flashes.
Use the symbols
to select the hours and confirm by
pressing
.
Use symbols
to adjust the minutes and confirm by
pressing
. The switch-on time is now programmed.
Use the symbols
to reach the next programming stage or
press programming key
to quit Programming Mode.
13.11 Programming the automatic switch-off time
You can programme your coffee machine such that it will
switch off automatically after a certain time. You can
programme the switch-off time in a range between 0.5 and 9
hours, or select –:– (i.e. function switched off).
Use the key
to switch on the coffee machine.
WWW. IMPRESSA-F-LINE.COM
HELLO, MACHINE HEATING UP
PRESS MAINTENANCE
MACHINE RINSING:
PLEASE SELECT
Press programming key
until you hear an acoustic signal.
Press symbol
until the following message is displayed:
OFF AFTER 5.0 HOURS
Press symbol
, you will hear an acoustic signal and 5.0
flashes.
Use the symbols
to select the hours and confirm by
pressing
.
Use the symbols
to reach the next programming stage or
press programming key
to quit Programming Mode.
13.12 Cup counter
This function is available with the following products:
In Aroma Select via symbols
,
,
and via the preground coffee draw-off key
, draw-off key for 1 cup
and draw-off key for 2 cups
.
Use the key
to switch on the coffee machine.
WWW. IMPRESSA-F-LINE.COM
HELLO, MACHINE HEATING UP
PRESS MAINTENANCE
MACHINE RINSING
PLEASE SELECT
Press programming key
until you hear an acoustic signal.
Press symbol
until the following message is displayed:
DRAW OFFS ....... (Total number of draw offs)
To learn how often a function was selected, press the corresponding key or symbol.
Use the symbols
to reach the next programming stage or
press programming key
to quit Programming Mode.
13.13 Programming the language
Use the key
to switch on the coffee machine.
WWW. IMPRESSA-F-LINE.COM
HELLO, MACHINE HEATING UP
PRESS MAINTENANCE
MACHINE RINSING
PLEASE SELECT
Press programming key
until you hear an acoustic signal.
Press symbol
until the following message is displayed:
SPRACHE DEUTSCH
17
E
Press symbol
, you will hear an acoustic signal and
DEUTSCH flashes.
Press symbols
to select the required language.
Press symbol
to save the new settings.
LANGUAGE ENGLISH
Use the symbols to reach the next programming stage or press
programming key
to quit Programming Mode.
Your coffee machine must be switched on.
Carefully take out the drip tray, it is filled with water.
NO TRAY
PLEASE SELECT
The red water level warning message appears when the
coffee drip tray is full.
13.14 Connectivity
With the Connectivity system it is possible for your IMPRESSA
F90 to communicate with your PC and the Internet. To use this
feature, you will need a kit which you can order at www.impressaf-Line.com or your local authorized dealer. Available as an
optional extra.
14. Maintenance
14.1 Refilling water
REFILL WATER
If this information is displayed, drawing off products is no
longer possible. Refill water as described in Chapter 3.3.
PLEASE SELECT
The water tank should be rinsed daily and refilled with fresh
water. Only fill in fresh, cold water. Never fill in milk,
mineral water or other liquids.
14.3 No Drip tray
NO TRAY
If this information is displayed, the drip tray is not installed
properly or was not installed at all.
PLEASE SELECT
14.4 Filling the bean tank
REFILL BEANS
We recommend that you clean the bean tank regularly before
refilling beans, using a dry cloth. Before doing this, switch off
the coffee machine.
Refill beans as described in Chapter 3.4.
The message REFILL BEANS will disappear after you draw
off your next cup of coffee.
14.5 Replacing the filter
14.2 Emptying the coffee grounds container
EMPTY COFFEE GROUNDS CONTAINER
If this information is displayed, drawing off products is no
longer possible and the coffee grounds container must be
emptied (Fig.8 ).
18
After drawing off 50 liters the filter cartridge will be used
up.
Refer to Chapter 6.2 «Replacing the filter».
14.6 Cleaning the coffee machine
After 200 draw-off operations or after 160 rinsing operations, the
coffee machine must be cleaned. A message appears on the display,
telling you to start the cleaning programme. You can still draw off
coffee or hot water/steam. However, we recommend that you
should clean the machine (Chapter 15) within the next few days.
CLEAN MACHINE / PLEASE SELECT
14.7 Coffee machine calcified
During normal use of the coffee lime scaling will occur. The
degree of calcification depends on the hardness of the water you
use. The machine will inform you when de-scaling is required. You
can still draw off coffee or hot water/steam. However, we recommend that you should de-scale the machine (Chapter 16) within the
next few days.
MACHINE CALCIFIED / PLEASE SELECT
14.8 General cleaning instructions
Never use scrapers, abrasive cloths, sponges or caustic chemicals
for cleaning.
Clean the inside and outside of the case using a soft, moist
cloth.
Clean the 2-stage frothing jet each time it was used.
Clean the control panel with a micro-fibre cloth.
After heating milk, draw off some water to clean the inside of
the 2-stage frothing jet.
You can disassemble the 2-stage frothing jet to clean it
thoroughly (Fig. 9).
The water tank should be rinsed daily and refilled with fresh
water.
If lime-scaling forms in the tank, remove it using a commercial de-scaling agent. Take out the water tank.
If you use a CLARIS plus filter cartridge, remove it before
de-scaling the tank.
14.9 Emptying the system
This is necessary to protect the coffee machine against
damage occurring during transport as a result of frost.
Use the
key to switch off the coffee machine.
Place a jug under the 2-stage frothing jet (15).
Press the steam portion draw-off key
until the following
message appears.
SYSTEM EMPTYING
The coffee machine is switched off.
15. Cleaning
The coffee machine features an integrated cleaning programme.
The procedure takes some 15 minutes.
JURA cleaning tablets which are specially designed for the
cleaning program of your IMPRESSA are available at your
authorized dealer. Please note that machine defects or
residues in the water cannot be excluded if you use inappropriate cleaning agents.
Once started, the cleaning operation must not be interrupted.
After each cleaning operation the filler funnel for the 2nd
coffee type should be cleaned.
CLEAN MACHINE / PLEASE SELECT
Press maintenance key
until the following message appears.
19
E
If acidic de-scaling agents are used, remove any splashes and
drops from sensitive surfaces, in particular surfaces made of
natural stone and wood, alternatively take appropriate preventive measures.
In any case wait until the de-scaling agent is used up and the
tank is empty. Never refill de-scaling agent.
EMPTY TRAY. Take out the tray, empty it and
reinstall it.
PRESS MAINTENANCE
Press maintenance key
.
MACHINE CLEANING
TABLET / PRESS MAINTENANCE (Fig. 6). You
will hear an acoustic signal.
MACHINE CLEANING
EMPTY TRAY. You will hear an acoustic signal.
PRESS MAINTENANCE
MACHINE CLEANING
EMPTY TRAY. You will hear an acoustic signal.
PLEASE SELECT
Wipe coffee powder tank with a dry cloth after the cleaning
program has finished.
Now the cleaning operation is complete.
16. De-scaling
The coffee machine features an integrated de-scaling programme.
The procedure takes some 30 minutes.
JURA de-scaling tablets which are specially designed for the
de-scaling program of your IMPRESSA are available at your
authorized dealer. Please note that machine defects or
residues in the water cannot be excluded if you use inappropriate de-scaling agents.
Your machine will inform you if it needs de-scaling.
You can still draw off coffee or hot water / steam and start
the de-scaling programme later.
Switch off the system before starting the de-scaling programme. Once started, the de-scaling programme must not
be interrupted.
20
MACHINE CALCIFIED / PLEASE SELECT
Use the key
to switch off the coffee machine.
GOOD BYE
Remove hot water nozzle / 2-stage frothing jet.
Take out the water tank.
Press maintenance key
until the following message appears.
EMPTY TRAY
AGENT IN TANK
Completely dissolve the content of one blister (3 tablets) in a
jug containing 0.5 liters of water, and fill the mixture in the
water tank. Reinstall the water tank.
Put a sufficiently large container under the hot water jet (15).
PRESS MAINTENANCE / AGENT IN TANK
Machine de-scaling
The de-scaling agent comes out of the hot water jet in intervals.
After some intervals the de-scaling agent is discharged directly
in the drip tray.
EMPTY TRAY. You will hear an acoustic signal.
REFILL WATER
Thoroughly rinse the water tank and fill it with fresh cold tap
water. Then reinstall it.
Put a sufficiently large container under the hot water jet (15).
PRESS MAINTENANCE / REFILL WATER
MACHINE DE-SCALING
The water comes out of the hot water jet in intervals. After some
intervals the water is discharged directly in the drip tray.
EMPTY TRAY. You will hear an acoustic signal.
PRESS MAINTENANCE
MACHINE RINSING:
PLEASE SELECT
After the de-scaling, clean the aluminium front using a
slightly moist cloth.
17. Disposal
Please return the coffee machine to your local dealer, the service
shop or to JURA for proper disposal (Fig. 3).
E
18. Tips for perfect coffee
Adjustable coffee spout
You can adjust the height of the coffee spout to the size of your
cups
Grinding degree
Refer to Chapter 3.5 «Adjusting the grinding gear».
Preheating cups
You can preheat the cups using hot water or steam. The smaller the
coffee you want to draw off, the more important preheating is.
Sugar and cream
Stirring coffee/tea will result in heat being released. Adding
refrigerated cream or milk will reduce the temperature of the coffee
significantly.
21
19. Messages
Cause
Remedy
Water tank is empty.
Refill water
Float defective
Rinse or de-scale water tank
Bean tank is empty.
Refill beans
Although you have refilled beans,
the message still appears.
Draw off a cup of coffee.
The message will disappear only after you have
drawn off a cup of coffee
Coffee grounds container full
Empty coffee grounds container
Tray reinstalled too early after emptying
Wait 10 sec. before reinstalling the tray
NO TRAY
Drip tray not installed properly or missing
Install tray properly
CLEAN MACHINE
Cleaning required
Start cleaning programme (Chapter 15)
MACHINE CALCIFIED
De-scaling required
Start de-scaling programme (Chapter 16)
REPLACE FILTER
Filter empty
Change filter (Chapter 6.2)
FAULT
General fault
1) –
–
–
–
REFILL WATER
REFILL BEANS
EMPTY COFFEE
GROUNDS CONTAINER
switch off
disconnect from mains supply
connect machine to mains supply
switch on machine
2) Have machine checked by JURA Service
22
20. Problems
Problem
Cause
Remedy
Very loud noise coming
from the grinding gear
Foreign body in grinding gear
Drawing off pre-ground coffee is still possible
Have machine checked by JURA Service
Too little froth when
frothing milk
Coffee only drips from
the coffee spout
2-stage frothing jet blocked
Clean 2-stage frothing jet
2-stage frothing jet in wrong position
Draw off steam (Chapter 10)
Grinding degree too fine
Coarser grinding gear adjustment
Pre-ground coffee too fine
Use a coarser pre-ground coffee
If the messages or problems are still present, please contact your local authorized dealer or JURA Elektroapparate AG.
E
23
21. Legal information
22. Technical Data
These operating instructions contain all the information required
for using, operating and maintaining the machine properly.
Knowledge of and compliance with the specifications contained in
these operating instructions is required for using the machine safely
as well as for operational safety and safety during maintenance.
These operating instructions cannot cover any conceivable application. The machine was designed for private household use.
Additionally we point out that the content of these operating
instructions does not form part of any previous or existing agreement, consent or al legal relationship nor does it constitute a
change of such a(n) agreement, consent or legal relationship. Any
obligations to be fulfilled by JURA Elektroapparate AG are stipulated in the corresponding purchase contract, which also contains
the full and solely applicable warranty stipulations. These contractual warranty stipulations are neither extended nor limited by
the specifications contained in these operating instructions.
The operating instructions contain information, protected by Copyright. Photocopying or translations into other languages shall not be
permissible without JURA Elektroapparate AG’s written approval.
Voltage:
230V AC
Power:
1450 W
Fuse:
10 A
Safety check:
Energy consumption Standby:
approx. 3.5 Wh
Energy consumption «Ready for
draw-off»:
approx. 11.5 Wh
Pump pressure:
static max. 15 bar
Water tank:
1.9 litres
Bean tank capacity:
200gr.
Coffee grounds container capacity: max. 16 portions
Length of mains cable:
approx. 1.1 m
Weight:
9.7 kg
Dimensions (WxHxD):
28 x 34,5 x 44,5cm
The machine complies with the following EU directives:
73/23/EWG dated 19/02/1973 “Low Voltage Directive” including
Modification Directive 93/336/EWG
89/336/EWG dated 03/05/1989 “EMC Directive” including
Modification Directive 92/31/EWG
24