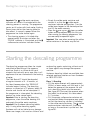
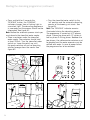
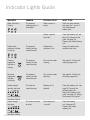
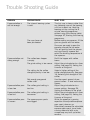
1
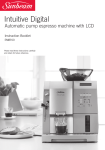
Café Barista™
Automatic 15 BAR pump espresso machine
Instruction Booklet
EM8800
Please read these instructions carefully
and retain for future reference.
Contents
Sunbeam’s Safety Precautions
2
About espresso coffee
3
Features of your Café Barista™
4
Secrets to the perfect cup
9
Preparing your Café Barista™
10
Filling of water and switching on your Café Barista™
11
Switching off your Café Barista™
12
Determining and adjusting the water hardness
13
Making an espresso with coffee beans
14
Making an espresso with pre-ground coffee
17
Milk frothing using the steam function
20
Easy steps for frothing milk
22
Hot water function
23
Changing and saving coffee pour volumes
and coffee strength settings
24
Grind setting selection and maintenance
26
Resetting the Café Barista™
27
Care and cleaning
28
Emptying coffee waste container
29
Cleaning the coffee brewing unit
29
Starting the cleaning programme
32
Starting the descaling programme
33
Indicator lights guide
36
Trouble shooting guide
37
Recipes
41
Sunbeam’s Safety Precautions
SAFETY PRECAUTIONS FOR YOUR SUNBEAM
ESPRESSO MACHINE.
• Always place the unit on a flat, level surface.
• Do not operate without water in reservoir.
Fill only clean and cold water into the water
reservoir. Observe the maximum filling
volume is 1.5 litres.
• Do not operate without the drip tray and cup
rest plate in position.
• The steam nozzle becomes very hot when
frothing milk or preparing hot water.
This may cause burns in case of contact,
•
•
•
•
•
•
•
•
Sunbeam are very safety conscious when
designing and manufacturing consumer products,
but it is essential that the product user also
exercise care when using an electrical appliance.
Listed below are precautions which are essential
for the safe use of an electrical appliance:
Read carefully and save all the instructions
provided with an appliance.
Always turn the power off at the power outlet
before you insert or remove a plug. Remove
by grasping the plug - do not pull on the cord.
Turn the power off and remove the plug
when the appliance is not in use and
before cleaning.
Do not use your appliance with an extension
cord unless this cord has been checked
and tested by a qualified technician or
service person.
Always use your appliance from a power
outlet of the voltage (A.C. only) marked
on the appliance.
Close supervision is necessary when your
appliance is being used near children or
infirm persons.
Never leave an appliance unattended while
in use.
Young children should be supervised to ensure
that they do not play with the appliance.
therefore avoid any direct contact with the
steam nozzle.
• Hot water or hot steam ejected by the
appliance can cause scalding. Only activate
the steam nozzle when holding a container
underneath.
• Always unplug the appliance from the power
outlet if there is any problem during the
coffee making process or prior to cleaning
and maintenance.
• Never put any part of this appliance into the
dishwasher. Never immerse the appliance in
water.
• Do not use an appliance for any purpose
other than its intended use.
• Do not place an appliance on or near a hot gas
flame, electric element or on a heated oven.
Do not place on top of any other appliance.
• Do not let the power cord of an appliance hang
over the edge of a table or bench top or touch
any hot surface.
• For safety reasons and to avoid maintenance
by unskilled persons, some appliances are
‘sealed’ using tamperproof screws. Such
appliances should always be returned to the
nearest Sunbeam Appointed Service Centre
for adjustment or repair if required.
• Do not operate any electrical appliance with a
damaged cord or after the appliance has been
dropped or damaged in any manner. If damage
is suspected, return the appliance to the
nearest Sunbeam Appointed Service Centre
for examination, repair or adjustment.
• For additional protection, Sunbeam
recommend the use of a residual current
device (RCD) with a tripping current not
exceeding 30mA in the electrical circuit
supplying power to your appliances.
• Do not immerse the appliance in water
or any other liquid unless recommended.
If you have any concerns regarding the performance and use of your appliance,
please visit www.sunbeam.com.au or contact the Sunbeam Consumer Service Line
Ensure the above safety precautions are understood.
2
About espresso coffee
Sunbeam’s extensive experience in designing
quality, long-lasting appliances has enabled
us to develop a range of pump espresso
machines that are as beautiful as they are
functional. As well as incorporating the
learnings from commercial machines to
ensure café quality coffee, ease-of-use was
an important dynamic in the design of the
Café Barista™.
The Sunbeam Café Barista™ is automatic,
completely removing any guesswork from
making espresso coffee. At the push of a
button the machine will grind the coffee
beans, place the correct dose of coffee grinds
into the filter, tamp it and pump the precise
amount of water needed to produce a shot of
espresso. As a result, each time you make an
espresso with the Sunbeam Café Barista™
you are assured a consistent taste every time.
As coffee continues to be an integral element
of Australian culture, the demand for the
perfect cup is ever increasing. A growing
favourite for coffee lovers in Australia, at
any time of the day is the Caffe Latte. To
accommodate these style of drinks, the
height of the espresso pour spouts are
adjustable. Ideal for all styles of cups – bring
the spouts down for espresso cups and for
those that prefer a Caffe Latte or a Long
Black raise the pour spouts for taller cups.
Drinking authentic café quality coffee at
home is guaranteed with a Sunbeam espresso
machine. The simple to use design of the
machine allows you to enjoy the sweet aroma
and taste of the perfect shot of espresso with
its signature golden crema every time.
What makes a good coffee?
Sunbeam has consulted with experienced
coffee makers and appreciators of coffee
through every stage of design, to ensure the
machine delivers a great espresso coffee
every time. There are many factors that
contribute to the perfect coffee. The words’
‘taste’ and ‘aroma’ are consistently used
when describing the perfect cup.
The sweet aroma and taste of the perfect
espresso coffee is largely due to the
correct combination of temperature and
pressure during the brewing process. The
‘thermoblock’ heating system ensures the
water is at the correct temperature, so that
the full coffee flavour is extracted. Secondly,
the Italian made 15 BAR pump ensures
the correct pressure at which the liquid
espresso is released from the pour spouts.
The pour should be steady and consist of
both liquid and cream. This cream is known
as the ‘crema’. The perfect ‘crema’ should
be a golden colour and be thick and stable,
preserving the coffee flavour, aroma and
temperature.
We hope you have many enjoyable coffee
experiences with the Sunbeam Café
Barista™.
Should you need any further assistance,
please don’t hesitate to contact the Sunbeam
coffee hotline on free call 1800 025 059.
3
Features of your Sunbeam
Café Barista™
Warming plate
Allows coffee cups to be warmed before use.
Steam/Hot water switch
Turn the switch to activate steam or hot water.
Steam nozzle
Dispenses steam or hot water.
Height-adjustable espresso pour spout
Fits any size cup. Lower the spout for espresso
cups to prevent splashing and raise it for Caffe
Latte or taller cups.
Coffee waste container
Holds the used coffee cakes as they are
dispensed from the coffee brewing unit.
4
Coffee bean hopper
The conical burr grinder holds up to 230g of
coffee beans.
Coffee grind selector
Select grind setting from fine to coarse.
Control panel
1.5 litre removable water reservoir
Simply slides out for easy filling.
Removable drip tray and cup resting grid
Pulls out for easy emptying and cleaning.
Also features a water level indicator that
floats through the cup resting grid indicating
how full the drip tray is.
Test strip for
determining the
water hardness
Cleaning tablets
Descaling tablet
Measuring spoon with
cleaning brush
5
Features of your Sunbeam Café Barista™ (continued)
TOP VIEW
Coffee bean hopper
release position
Position setting for
coffee bean hopper
when using whole
beans
Warming plate
Filling receptacle for
pre-ground coffee
Release switch for
grinding ring
Coffee grind selector
Position setting for
coffee bean hopper when
using pre-ground coffee
CONTROL PANEL
Temperature indicator
A constant light
indicates that the
temperature of the Café
Barista™ is correct,
when flashing it is
heating to the correct
temperature.
Water indicator
A constant light
indicates that the water
reservoir needs filling.
6
Coffee waste container
indicator
A constant light
indicates that the
coffee waste container
needs emptying.
Power - button and
indicator
1 cup coffee request button and indicator
Cleaning programme
– button and indicator
2 cup coffee request button and indicator
Descaling programme
– button and indicator
Steam pre-selection button and indicator
Coffee pour volume button and indicator
Coffee strength/quantity
- button and indicator
Features of your Sunbeam
Café Barista™
One touch operation
The Café Barista™ is an automatic espresso machine that takes the guess work out of making
espresso coffee. It grinds the coffee beans, dispenses the ground coffee into the filter, tamps
it and pumps water through to produce a consistent shot of espresso every time – all with the
touch of a button.
15 BAR pump – Italian designed & manufactured
Supplies the correct and essential pressure necessary for full extraction of oils from the
coffee grinds.
7
Features of your Sunbeam Café Barista™ (continued)
‘Thermoblock’ heating system
Ensures the precise temperature is achieved. As espresso is made with hot, rather than boiling
water, the ‘thermoblock’ heats the water to 92°C (just below boiling point) for optimum
extraction of oils from the coffee grinds. Temperatures above this will burn the coffee grinds.
8
Secrets to the perfect cup
With a Sunbeam pump espresso machine
and a little experience, you can create
café quality coffee at home. As there are a
number of possibilities for making coffee to
meet your personal taste, following are a few
helpful suggestions:
• The origin of the bean and roasting will
affect the taste of the espresso, so test
different brands of coffee to find the one
that you like best.
• The grind of the coffee is critical. Vary the
degree of grinding to find the right fineness
for the coffee beans being used.
• A regular shot of espresso, the base of all
café coffees is approximately 30mLs. The
shot of espresso is a concentrate; vary the
quantity of milk to determine the strength
and volume of the coffee. If you are using
a large coffee cup or mug you may require
a double shot of espresso, rather than just
a single shot depending on your taste.
• Always use the freshest beans or ground
coffee available and store in an airtight
container in a cool, dry, dark place.
• Whole coffee beans stay fresh longer than
pre-ground coffee.
• Pre-warm cups prior to making an
espresso, either by filling with hot water or
placing on the warming plate.
• Always use cold milk and a clean stainless
steel jug when texturing/frothing milk.
• Don’t boil the milk when steaming. The
ideal temperature is when the jug becomes
too hot to touch.
• Once prepared, serve coffee immediately.
• Keep the espresso machine clean.
Familiarise yourself with the ‘Care and
Cleaning’ section of this book.
9
Preparing your Café Barista™
• Position the espresso machine onto a
stable, flat, dry surface.
• Attach the coffee bean hopper onto the
espresso machine. With the hopper in
hand, align the arrow on the base of the
hopper with the ‘HOPPER RELEASE’
position. When the hopper is sitting flat,
push down and turn anti-clockwise so that
the arrow on the base of the hopper meets
with one of the other two positions;
whole beans or
pre-ground coffee. See
figures 1 and 2.
10
• Insert the drip tray. Simply slide the drip
tray into the base of the espresso machine
until it clicks into place on the right-hand
side below the water reservoir. See figure 3.
• Insert the power cord into a 230-240V AC
power outlet. Then open the flap of the
power cord compartment and stow away
the remaining cable. See figure 4.
Figure 1
Figure 3
Figure 2
Figure 4
Filling of water and switching on
your Café Barista™
Prior to switching on each time, check
whether the water reservoir is filled with
water. Every time the appliance is switched
on or off, it needs water for the Auto Clean
cycle.
Filling the appliance
• Slide out and remove the water reservoir
from the appliance. See figure 5.
• Fill the water reservoir always with fresh,
cold water. See figure 6.
Note: Fill only cold water into the water
reservoir. Never fill with other liquids, such
as mineral water or milk.
• Replace the water reservoir. Slide the water
reservoir in and press firmly into place to
ensure that the valve of the water reservoir
opens. See figure 7.
Note: If the water reservoir is not correctly
in position or if water needs to be refilled
while the espresso machine is in operation,
the water indicator
illuminates. Making
coffee will not be possible or the cycle will
be interrupted.
Switching on the appliance
• Turn the power on at the power outlet
and switch the espresso machine on by
briefly pressing the ‘POWER’ button on the
control panel. See figure 8.
Note: Please note that you only need to
briefly press the ‘POWER’ button and that
there is a slight delay until the light comes
on.
Figure 5
Figure 7
Figure 6
Figure 8
11
Filling of water and switching on your Café Barista™ (continued)
Figure 9
• When the espresso machine is turned on
it will go through an Auto Clean cycle.
This removes any old coffee grinds from
the coffee brewing unit.
• During the heating procedure the
temperature indicator flashes. When
the operating temperature is reached, the
temperature indicator will stop flashing
and remain constant. See figure 9.
• The espresso machine is now ready for
operation.
Switching off your Café Barista™
When the espresso machine is switched off
by briefly pressing the power button on the
control panel, another Auto Clean cycle is
carried out and the coffee waste container
indicator
will flash as a reminder for
approximately 1 minute.
If the espresso machine is switched off
during a function by pressing the ‘POWER’
button all functions are immediately
switched off.
12
Determining and adjusting the
water hardness
Prior to first use the Café Barista™ should
be adjusted to the relevant degree of water
hardness for your region. Water hardness refers
to the mineral content of your local water
supply. You may determine the hardness degree
using the supplied test strips.
• Dip the test strip into cold water for 1
second. Shake off the excess water and
the degree of water hardness is determined
according to the number of pink-coloured
squares.
• While holding down the ‘DESCALE’ button,
press the ‘coffee strength’ button once
and this will indicate the current setting
for water hardness. Continue to press the
‘coffee strength’ button until you have
reached the desired level of hardness. See
figure 11.
The hardness degrees are indicated as
follows:
Hardness 1
Hardness degree
1
soft
2
medium
3
hard
4
very hard
Hardness 2
Hardness 3
Test strips
Adjusting and saving the determined degree of
water hardness
Note: The Café Barista™ is factory set at a
hardness degree of 4.
• Press the ‘DESCALE’ button and keep it
depressed. See figure 10.
Figure 10
Hardness 4
• Once you have selected the degree of
water hardness, remove your finger from
the ‘DESCALE’ button and the machine is
ready for use.
Figure 11
13
Making an espresso with coffee
beans
It is possible to adjust the espresso machine
individually to suit your personal taste by
adjusting the grinding degree and the amount
of coffee beans to be ground.
Filling the coffee bean hopper
Note: Please ensure to fill the coffee bean
hopper only with coffee beans.
• Turn the hopper so that the arrow on the
base of the hopper is aligned with the
whole beans arrow. See figure 12.
• Open the lid of the hopper and fill with
fresh coffee beans. Then close the lid. See
figure 13.
Note: Make sure that no foreign matter, e.g.
stones or wood chips, get into the coffee
bean hopper as this can cause damage to the
grinding mechanism.
• Set the grinding degree. See figure 14.
Note: You may set the grinding degree of the
grinding mechanism by using the ‘coffee
grind’ lever. There are two ways in which the
grinding degree can be set. The first method
can only be used when filling the hopper
with beans for the first time and you simply
use the ‘coffee grind’ lever. Please note
that at this stage the grinding mechanism
is empty and at a standstill. At any other
time however, once the grinding mechanism
has been filled with beans you may only set
the grinding position during the grinding
procedure; otherwise the espresso machine
may be damaged.
Note: A medium grinding degree is factory set
on the Café Barista™.
14
Figure 12
Figure 13
Figure 14
Making an espresso with coffee beans (continued)
Placing cup(s) under the espresso pour spout
and choosing the coffee pour volume
• Place one or two cups under the espresso
pour spout. The height of the pour spout
can be adjusted to suit the size of the
cup by lifting or lowering the pour spout
to reduce heat loss and or prevent the
espresso from splashing. See figure 15.
• Press the ‘coffee pour volume’ button
as many times as needed to reach the
required pour length. See figure 16.
The Café Barista™ pour volumes are set as
follows:
Tip: The Café Barista™ is set to standard
volumes. If you want to adjust the respective
pour volumes, please refer to the instructions
in section ‘Changing and saving coffee pour
volumes and coffee strength settings’.
Figure 15
20mLs
30mLs
Figure 16
40mLs
15
Making an espresso with coffee beans (continued)
Selecting the strength of the coffee and pouring
the coffee
• Press the ‘coffee strength/quantity’ button
as many times as needed to select the
preferred strength of the espresso. See
figure 17.
The coffee strengths are indicated as follows:
• Press the
button if you want to pour one
cup of coffee, see figure 18, or the
button to pour 2 cups of coffee, see
figure 19.
Figure 17
Very mild
Mild
Regular
Figure 18
Strong
Extra strong
Figure 19
Tip: It is possible to save each of the ‘coffee
strength/quantity’ settings with reference to
the length of the ‘coffee pour volumes’, in
order not to have to choose the ‘coffee pour
volume’ every time the espresso machine is
switched on. For instructions please refer
to section ‘Changing and saving coffee pour
volumes and coffee strength settings’.
16
Making an espresso with coffee beans (continued)
Note: When choosing
2 cups of coffee,
the pre-set values for ‘coffee strength/
quantity’ to be ground and ‘coffee pour
volume’ are increased automatically.
Note: Before the actual coffee brewing
process, the ground coffee is dampened
by a small amount of water. Known as preinfusion, this helps in achieving maximum
extraction of oils from the coffee grinds.
After a short pause the actual brewing
process starts.
Note: You may stop the pour of coffee at any
time by briefly pressing the
1 cup button
or the
2 cup button, respectively, which
you pressed before.
• The espresso is made.
Making an espresso with
pre-ground coffee
Figure 20
Important: Please use only the supplied
measuring spoon. Never fill the receptacle
with more than 2 level measuring spoons of
pre-ground coffee.
Important: Do not fill the receptacle with
water-soluble or freeze-dried instant products
or any other drink powders.
Filling the pre-ground coffee receptacle
• Turn the hopper so that the arrow on the
base of the hopper is aligned with the
pre-ground coffee arrow. See Figure 20.
Note: Ensure that the pre-ground coffee
receptacle is dry. If it is moist from steam,
wipe dry before adding any pre-ground coffee.
• When the pre-ground coffee setting has
been selected all the indicators for the
‘coffee strength’ will illuminate. See figure
21.
Figure 21
17
Making an espresso with pre-ground coffee (continued)
Figure 22
Figure 23
Figure 24
gets into the receptacle. Never fill with
more than 2 level measuring spoons of preground coffee. The filling receptacle is not a
reservoir, so do not pre-fill. The pre-ground
coffee must pass through directly to the
coffee brewing unit.
• Leave the lid of the pre-ground coffee
receptacle open.
Note: Only leave the pre-ground coffee
receptacle lid open when using pre-ground
coffee. When using coffee beans ensure that
the lid to the pre-ground coffee receptacle is
closed.
Placing cup(s) under the espresso pour spout,
setting the ‘coffee pour volume’ and the
espresso pour
• Place one or two cups under the espresso
pour spout. The height of the pour spout
can be adjusted to suit the cup by lifting or
lowering the pour spout to reduce heat loss
and or prevent the espresso from splashing.
See figure 23.
• Press the ‘coffee pour volume’ button
as many times as needed to reach the
required volume of coffee. See figure 24.
The Café Barista™ coffee pour volumes are
set as follows:
20mLs
30mLs
• Open the lid of the pre-ground coffee
receptacle and fill with fresh pre-ground
coffee. See figure 22.
Important: Make sure that no powder is stuck
in the receptacle and that no foreign matter
18
40mLs
Making an espresso with pre-ground coffee (continued)
Figure 25
Tip: The Café Barista™ is factory set to
standard volumes. If you want to adjust the
respective length of coffee pour volumes,
please refer to the instructions in section
‘Changing and saving coffee pour volumes
and coffee strength settings’.
• Press the
button if you want to pour one
cup of coffee, see figure 25, or the
button to pour 2 cups of coffee, see figure
26.
Note: When choosing
2 cups of coffee,
the pre-set values for the ‘coffee strength/
quantity’ and ‘coffee pour volume’ are
increased accordingly.
Figure 26
Note: Before the actual coffee brewing
process, the ground coffee is dampened
by a small amount of water. Known as preinfusion, this helps in achieving maximum
extraction of oils from the coffee grinds. After
a short pause the actual brewing process
starts.
Note: You may stop the pour of coffee at any
time by briefly pressing the
1 cup button
or the
2 cup button, respectively, which
you pressed before.
• The espresso is made.
19
Milk frothing using the steam
function
The steam can be used for texturing/
frothing milk or for heating liquids. As the
temperature for generating steam must be
higher than for making coffee, the espresso
machine is equipped with an additional
steam mode.
Important: There is risk of scalding when
the steam nozzle is in use. Hot water or
hot steam can cause scalding. Only use the
steam nozzle when it is immersed in the
milk.
• When wanting to froth milk, press the
steam pre-selection button on the control
panel, see figure 27. The
steam preselection indicator illuminates and in
addition the indicator will start to flash,
indicating that the espresso machine is
heating. When heating is finished, the
20
indicator will stop flashing and remain
constant. The espresso machine is now
ready for texturing/frothing milk, see figure
28.
Note: If the steam function is not used for
more than 1 minute, the espresso machine
automatically switches back to coffee making
mode.
• Pour cold milk into a stainless steel jug to
no more than ¹/³ full.
Tip: For best results we recommend using
refrigerated milk and a stainless steel jug
that is well chilled. Be sure not to rinse the
jug with warm water before use.
• Swing the steam nozzle out to the side of
the machine and hold the jug under the
steam nozzle so that the nozzle opening is
completely immersed in the milk. Turn the
Figure 27
Figure 28
Figure 29
Figure 30
Milk frothing using the steam function (continued)
‘steam/hot water’ switch up to activate the
steam and commence frothing the milk.
See figure 29.
Tip: For instructions on how to froth milk
refer to the section ‘Easy steps for frothing
milk’.
Note: The nozzle must not touch the bottom
of the jug to ensure that the steam release is
not obstructed.
Figure 31
• To stop the frothing process, turn the
‘steam/hot water’ switch down into the
‘off’ position and then remove the jug. See
figure 30.
Important: There is risk of scalding by
splashing hot milk. Switch the steam off
before you remove the jug with the frothed
milk.
• Deselect the steam mode by pressing the
steam pre-selection button, the indicator
light will turn off and the appliance is now
ready again for making coffee. See figure
31.
Tip: After steaming and the steam mode has
been deselected on the control panel, turn
the ‘steam/hot water’ switch up and allow
hot water to run out for a couple of seconds.
This will help the temperature of the espresso
machine return to coffee making temperature
and also prevent milk remains from drying
inside the steam nozzle and therefore blocking
the nozzle. Be sure to place a cup of some
kind under the steam nozzle when doing this.
21
Easy steps for frothing milk
Milk texturing is the steaming of milk to heat
it and to create froth. Similar to making an
espresso, perfecting the art of milk texturing
takes time and practice.
• Use fresh, cold milk and fill a stainless
steel frothing jug to no more than ¹/³ full.
• The amount of milk you steam should be
adequate for the coffees you are preparing.
Keep in mind that the volume of milk will
increase or ‘stretch’ during the texturing
process.
• Once you have activated the steam and
inserted the steam nozzle into the jug,
position the steam arm 1½ cm from the
side of the jug with the tip of the nozzle
just below the surface of the milk. The
jug needs to be at a slight angle with the
steam arm resting on the spout of the jug.
This will create a whirlwind motion in the
milk.
Note: You should hear a hissing sound. If you
are creating large bubbles, raise the jug so
that the nozzle tip is lowered deeper into the
milk.
• As the steam heats the milk, the milk will
begin to rise. Follow the level of the milk
by lowering the jug, always keeping the tip
of the steam nozzle just below the surface.
• Once the milk has stretched to double its
original volume, lower the steam nozzle
further into the milk and continue to heat
the milk. This will give the milk a fine
texture and not a mass of large aerated
bubbles.
• Cease steaming when the frothing jug
becomes too hot to hold your hand against
it.
• With the frothing jug in hand, swirl and tap
the jug until the milk becomes shiny and
no bubbles remain, this ensures an even
consistency. Pour the textured milk into
your espresso as soon as possible.
22
Frothing with the frothing attachment
If you are just learning to texture/froth milk
you may find it initially easier using the
frothing attachment packed with the Café
Barista™. Once you have had some practice
in texturing/frothing milk, we recommend
not to use the frothing attachment as you
will have greater control of the texture and
temperature of the milk.
• Attach the frothing attachment to the
steam arm.
• Once you have activated the steam,
insert the steam arm with the frothing
attachment into the jug. Position the
steam arm 1½ cm from the side of the jug
with the frothing attachment completely
immersed in the milk, so the tip of the
frothing attachment is held just above the
base of the jug.
• Hold the frothing attachment in this
position until the milk has stretched to
double its original volume. Cease steaming
when the frothing jug becomes too hot to
hold your hand against it.
Important cleaning instructions for the steam
nozzle
The steam nozzle needs to be cleaned each
time you steam milk. To clean the steam
nozzle, wipe with a damp cloth.
Note: Should the steam nozzle become
blocked, using a pin or a thin wire, insert it
into the hole in the base of the steam nozzle.
Note: When using the frothing attachment,
after use remove from the steam arm and
clean with hot soapy water to prevent the
build up of dried milk.
Hot water function
The hot water function can be used for
making tea, hot chocolate or other hot water
drinks such as instant soups.
Important: There is risk of scalding when
the steam nozzle is in use. Hot water or
hot steam can cause scalding. Only use
the steam nozzle when holding a container
underneath.
Figure 32
• Place a cup or container under the steam
nozzle and turn the ‘steam/hot water’
switch up to activate the hot water. See
figure 32.
• As soon as you have dispensed the required
amount of hot water, turn the ‘steam/hot
water’ switch down into the ‘off’ position
and then remove the cup or container. See
figure 33.
Figure 33
23
Changing and saving coffee
pour volumes and coffee strength
settings
The Café Barista™ is set to standard
coffee pour volumes. These volumes can be
individually adjusted to your taste and stored.
Changing and saving coffee pour volumes
• Press the ‘length of coffee pour’ button
until the respective cup symbol illuminates
corresponding to the desired coffee pour
volume. See figure 34.
• Place a cup under the espresso pour spout.
See figure 35.
• Then press the
one cup coffee button
and keep it depressed until the desired
coffee pour volume is reached. See figure
36. Release the button and your desired
coffee pour volume has been saved.
Tip: Repeat this procedure if you want to
adjust the coffee pour volumes of the other
cup settings.
Note: The volumes saved remain valid even
if the espresso machine is switched off. If
the size of your cup or your taste changes,
you may individually adapt the coffee pour
volume at any time.
Figure 34
Figure 35
Figure 36
24
Changing and saving coffee pour volumes and coffee strength settings
(continued)
Changing and saving the set relationship
between each ‘coffee strength’ setting and the
‘length of coffee pour’ volumes
You may save a different ‘coffee strength’
setting for each ‘length of coffee pour’
setting.
• Press the ‘length of coffee pour’ button
as many times as needed to reach the
required cup symbol. See figure 37.
• Then press the ‘coffee strength selector’
button as many times as needed until the
indicator of the chosen coffee strength
illuminates and keep the button depressed.
See figure 38.
• After a few seconds of holding the
button depressed, all indicators are lit
permanently, except the one chosen. See
figure 39. Now let the button go.
Tip: Repeat this procedure if you want to
save the ‘coffee strength’ settings for the
remaining cup symbols too.
Note: The values saved remain even if the
espresso machine is switched off.
Figure 37
Figure 38
Figure 39
25
Grind setting selection and
maintenance
Important: Only adjust the fineness of
the grind during the grinding process.
Adjustments of the grind while not in use
may cause damage to the espresso machine.
Setting the fineness of the grind
• With a cup placed under the espresso pour
spout, press the
one cup coffee button.
While the grinding process is running,
adjust the fineness of the grind using the
‘coffee grind selector’ lever. See figure 40.
Figure 40
Figure 41
26
Removing foreign matter from the grinding
mechanism
Foreign matter in the grinder, e.g. small
stones or wood chips, may cause damage to
the grinding mechanism.
The Café Barista™ is designed with a ‘stone
safety device’ which, in case of foreign
matter, causes an even, loud rattling. If you
should hear this noise during grinding, switch
the espresso machine off immediately and
remove the foreign matter as follows:
Cleaning the grinding mechanism
• Switch the espresso machine off by
pressing the ‘POWER’ button and unplug
the power cord from the power outlet.
• Turn the ‘coffee bean hopper’ to the
position marked ‘HOPPER RELEASE’ and
take it off. See figure 41.
• Remove the any coffee beans in the
grinding mechanism. We suggest using
the cleaning brush supplied with the Café
Barista™ (or, possibly a vacuum cleaner
with a hose or nozzle). See figure 42. If
any foreign matter cannot be removed,
proceed with the next step.
• Slide the ‘grinding mechanism release’
button to the front in the direction of the
grinding mechanism. Hold this position
and turn the ‘coffee grind’ lever clockwise
by approximately 1 revolution up to the
stop. See figure 43.
• Now detach the grinding ring by lifting it
out and remove any foreign matter(s). See
figure 44.
Important: There is risk of injury by turning
grinding gear. Never switch the espresso
machine on while working with the grinding
mechanism. This may cause severe injury.
Always unplug the power cord from the power
outlet.
Grind setting selection and maintenance (continued)
• Replace the grinding ring.
• Slide the ‘grinding mechanism release’
button to the front in the direction of the
grinding mechanism. Hold this position
and turn the ‘coffee grind’ lever anticlockwise to the desired grind setting.
• Replace the ‘coffee bean hopper’ in
position ‘HOPPER RELEASE’ and turn it to
the
coffee beans position. Now test the
function of the grinding mechanism with a
small quantity of beans and make a cup of
coffee.
Figure 43
Figure 42
Figure 44
Resetting the Café Barista™
With this function, all previously changed
values can be reverted back to the original
settings for the Café Barista™.
• Press buttons ‘CLEAN’ and ‘DESCALE’
simultaneously. Hold the buttons depressed
until all the lights on the control panel
turn off (takes approximately 3 seconds).
Release the ‘CLEAN’ and ‘DESCALE’
buttons and the Café Barista™ is now
reset.
27
Care and cleaning
Note: When the espresso machine is turned
on it will go through an Auto Clean cycle.
This removes any old coffee grinds from the
coffee brewing unit.
The coffee making process involves extracting
oils out of coffee grinds to make espresso
coffee. Deposits of these oils build up over
time and affect the taste of the coffee and
operation of the espresso machine.
Regular cleaning of the Café Barista™
guarantees a constant coffee quality and a
trouble-free operation.
Regular cleaning
Important: Switch the espresso machine off
before cleaning. Let the espresso machine
cool down. Do not use scratching, scouring
or corrosive agents. Clean the housing inside
and outside with a damp cloth only.
Important: Never put the espresso machine
or parts of the espresso machine into the
dishwasher.
Important: Never pour water into the coffee
bean hopper as you will damage the grinding
mechanism.
Important: To prevent damage to the espresso
machine do not use alkaline cleaning agents
when cleaning, use a soft cloth and a mild
detergent.
28
• Clean the drip tray, cup resting grid,
coffee waste container and water reservoir
with warm soapy water. Rinse and dry
thoroughly, be sure to rinse the water
reservoir with fresh water.
• Remove the coffee bean hopper from time
to time, dispose of the coffee residue and
give it a wipe to remove the film of oil from
the coffee beans.
• Empty drip tray regularly. However be
sure to take note of the red floating level
indicator, once which appears through
the cup resting grid, empty the drip tray
immediately.
• The steam nozzle and frothing attachment
need to be cleaned after each frothing
process. To clean the steam nozzle, simply
wipe clean with a damp cloth. When using
the frothing attachment, after each use
remove it from the steam nozzle and clean
thoroughly in warm water to remove milk
remains. Additionally, should the air inlet
at the base of the steam nozzle become
blocked, open it using a pin or a thin piece
of wire.
After making approximately 16 coffees,
the
coffee waste container indicator will
illuminate to show that the container must be
emptied and cleaned.
Note: If the espresso machine is used
daily, the coffee waste container should
also be cleaned daily. You will always be
Cleaning the coffee brewing unit
We recommend that you clean the brewing
unit (depending on intensity of use)
regularly, however at the very latest, before
the cleaning programme is started. If your
espresso machine is left unused for long
periods of time (e.g. holidays), it is necessary
to empty the coffee waste container and
water reservoir and to thoroughly clean the
espresso machine, including the coffee
brewing unit.
• To remove the coffee brewing unit activate
the locking elements in the following
sequence:
1. Push the locking lever upwards, see figure
49.
2. Press the safety button and keep it
depressed, see figure 49.
3. Press the locking button down, keep it
depressed and pull the coffee brewing unit
out, see figures 49 and 50.
Removing the coffee brewing unit
• Switch the Café Barista™ off by pressing
the ‘POWER’ button and unplug the power
cord from the power outlet.
• Remove the coffee waste container from
the espresso machine. See figure 45.
• Press the release button on the top of the
service door. The service door opens to the
front. See figures 46 and 47.
• The coffee brewing unit is situated behind
the service door. The 3 red-coloured
elements serve for locking/unlocking. See
figure 48.
Cleaning the coffee brewing unit and inserting
the brewing unit
• Open the coffee brewing unit by turning
the white service lever downwards as far as
it will go. Both sieves are easily accessible
now and the ejection lever folds down. See
figure 51.
• Clean the coffee brewing unit under warm
running water, particularly the stainless
steel sieves must be well rinsed and
cleaned of coffee remains. See figure 52.
29
Cleaning the coffee brewing unit (continued)
• Dry the coffee brewing unit and turn the
service lever upwards again as far as it will
go. The ejection lever folds back again and
the brewing unit closes. See figure 53.
Figure 45
Figure 46
Figure 47
Figure 48
3
Figure 49
Figure 50
2
1
30
• Re-insert the coffee brewing unit as follows:
1. Place the coffee brewing unit onto the
guide bar and push the coffee brewing unit
into the appliance as far as it will go, see
figure 54.
Cleaning the coffee brewing unit (continued)
2. Press the locking button down and push
the coffee brewing unit further in for
approximately 1cm until the locking
button clicks into place, see figure 55.
3. Press the locking lever down as far as it
will go, see figure 55.
• Close the service door and re-insert the
coffee waste container.
Note: The Café Barista™ can only be switched
on if the service door is closed. After switching
on, the coffee brewing unit re-adjusts itself,
the normal heating process starts again.
Figure 53
Figure 51
Figure 54
1
Figure 52
Figure 55
2
3
31
Starting the cleaning programme
The cleaning programme allows complete
removal of coffee oils even in areas which are
not normally accessible. Start the cleaning
programme at the latest when the ‘CLEAN’
indicator begins to flash.
The cleaning process takes about 8 minutes
and should not be interrupted. If it is
interrupted the cleaning process has to be
started again.
Important: Prior to starting the cleaning
programme, clean the coffee brewing unit
and empty the coffee waste container. Refill
the water reservoir with approximately 1 litre
of fresh water.
Important: Use the Sunbeam ‘Cleaning’
tablets only. If using other cleaning agents,
Sunbeam will not be liable for any damage.
Sunbeam cleaning tablets are available from
selected appliance retailers or from Sunbeam
on 1800 025 059.
• Turn the coffee bean hopper to the
pre-ground coffee position. Wait until the
mechanism has adjusted itself and all the
indicators of the coffee strength settings
are illuminated. See figure 56.
• Pull the empty coffee waste container out
and position below the coffee pour spout.
It will serve as a collecting container for
the cleaning water. The coffee waste
container indicator will illuminate as long as
the container is pulled out. See figure 57.
• Drop a cleaning tablet into the pre-ground
coffee receptacle, press and hold for 3
seconds the ‘CLEAN’ button, the ‘CLEAN’
indicator changes from a flashing light to
a constant light. The cleaning programme
will commence, the process should not be
interrupted. See figure 58.
32
Figure 56
Figure 57
Figure 58
Starting the cleaning programme (continued)
Important: The
coffee waste container
indicator will remain illuminated while the
cleaning process is running. The programme
carries out 6 cycles with fresh water flushing.
Pause times are for the cleaning tablet to
take effect. In case of a power failure the
programme has to be started again.
• The cleaning process is finished after
approximately 8 minutes and when the
‘CLEAN’ indicator is illuminated and the
coffee waste container indicator flashes.
• Empty the coffee waste container and
reinsert it so that the
coffee waste
container indicator extinguishes. Turn the
coffee bean hopper to the desired position
and fill the water reservoir.
• Press the one cup or
two cup coffee
button and discard/pour away this first cup
after running the cleaning programme. You
are now ready for operation again.
Important: Take care when removing the coffee
waste container as the water may be hot.
Starting the descaling programme
The descaling programme allows for simple
and effective descaling of the espresso
machine. Scale is a surface build up of
minerals that naturally occur over time in all
appliances that are involved with the heating
of water.
The Café Barista™ should be descaled
at regular intervals of 4 – 6 months, at
the latest however when the ‘DESCALE’
indicator begins flashing. The descaling
process is carried out in 2 phases, takes 45
minutes and should not be interrupted. If
the programme is interrupted, the descaling
process has to be started again.
Important: Prior to starting the descaling
programme, clean the coffee brewing unit
and empty the coffee waste container.
Important: Use Sunbeam descaling tablets
only. If using other descaling agents,
Sunbeam will not be liable for any damage.
Never use vinegar, citric acid or sulfamic acid
or descaling agents containing sulfamic acid
as these agents may damage the espresso
machine.
Sunbeam descaling tablets are available from
selected appliance retailers or from Sunbeam
on 1800 025 059.
Phase 1: Descaling
• Fill the water reservoir with approximately
400mL of warm water until the level is just
below the grooves of the reservoir lid and
put a descaling tablet into the reservoir.
See figure 59. Re-insert the reservoir when
the tablet has dissolved, this takes about
5 -7 minutes.
• Pull the empty coffee waste container out
and position below the espresso pour spout
so that the descaling solution is collected
in the coffee waste container. The
coffee
waste container indicator will illuminate
as long as the container is pulled out. See
figure 60.
33
Starting the descaling programme (continued)
• Press and hold for 3 seconds the
‘DESCALE’ button, the ‘DESCALE’
indicator changes from a flashing light to
a constant light. The descaling programme
is now ready and the process should not be
interrupted. See figure 61.
Note: Before the automatic process starts you
must descale the steam/hot water nozzle.
• Place a container under the steam/hot
water nozzle. The container should hold
at least 200mL. Turn the steam/hot water
switch up. Leave the switch up until
the pump switches off and no descaling
solution emerges from the nozzle. See
figure 62.
34
• Turn the steam/hot water switch to the
‘off’ position and the automatic descaling
process of the brewing unit starts. See
figure 63.
Note: The ‘DESCALE’ indicator remains
illuminated during the descaling process.
The programme is carried out in 2 phases;
phase 1 descaling phase with 12 cycles as
well as phase 2 rinsing phase. Between the
two phases, the coffee waste container must
be emptied and the water reservoir must be
refilled with water. In case of power failure
the programme has to be restarted.
Figure 59
Figure 61
Figure 60
Figure 62
Starting the descaling programme (continued)
Figure 63
Figure 64
Preparing the appliance for phase 2
Phase 1 of the descaling process is finished
after approximately 36 minutes and is shown
by the
water and
coffee waste container
indicators flashing. The ‘DESCALE’ indicator
also flashes. See figure 64.
• Rinse the water reservoir and fill it with 1
litre of fresh water. Empty the coffee waste
container and push it into the espresso
machine only so far so that water from
the espresso pour spout can flow into the
coffee waste container. See figure 60.
Phase 2: Rinsing
• Place a container under the steam/hot
water nozzle. The container should hold
at least 200mL. Turn the steam/hot water
switch up. Leave the switch up until
the pump switches off and no descaling
solution emerges from the nozzle. See
figure 62.
• Turn the steam/hot water switch to the ‘off’
position. See figure 63.
• After this, the automatic fresh water rinsing
process of the coffee brewing unit starts,
this takes about 5 minutes.
• The rinsing process and thus the complete
descaling programme are finished when the
coffee waste container indicator is flashing.
• Empty the coffee waste container.
Thoroughly rinse the water reservoir and fill
it with fresh water. The Café Barista™ is
now ready for operation again.
Important: Take care when removing the
coffee waste container as the water may be
hot.
Note: We recommend pouring away the
first cup of coffee made after running the
descaling programme and discarding it.
35
Indicator Lights Guide
INDICATOR
PROBLEM
POSSIBLE CAUSE
WHAT TO DO
Water indicator is
flashing
The espresso
making process is
interrupted.
Water reservoir is
empty.
Refill the water reservoir
and press the 1 cup or 2
cup coffee request
button again.
Coffee is ground
too finely.
Clean the brewing unit and
adjust the fineness of the
grind. See page 29,
Cleaning the coffee brewing
unit.
Coffee waste
container indicator
is flashing
The espresso
making function
cannot be used.
Coffee waste
container is full.
Empty the coffee waste
container and rinse.
Cleaning
programme
indicator is
flashing
The espresso
making function
cannot be used.
The machine needs
cleaning.
See page 32, Starting the
cleaning programme.
Descaling
programme
indicator
is flashing
The espresso
making function
cannot be used.
The machine needs
descaling.
See page 33, Starting the
descaling programme.
Coffee strength
/quantity indicator
The machine
cannot be used.
Brewing unit is
blocked.
Clean the brewing unit. See
page 29, Cleaning the
coffee brewing unit.
Adjust the fineness of the
grind. See page 26, Setting
the fineness of the grind.
The machine cannot
be used.
The brewing unit
is too full.
Clean the brewing
unit. See page 29,
Cleaning the coffee
brewing unit.
and or
cup coffee request
indicators flashing
Coffee strength
indicators
36
and or
cup coffee request
indicators flashing
Trouble Shooting Guide
PROBLEM
POSSIBLE CAUSE
WHAT TO DO
Espresso/coffee is
not hot enough
The internal brewing system
is cold.
The first cup is always colder than
any following cups as the brewing
unit has to warm up. Heat the
brewing unit by running the 8
minute cleaning programme
without using the cleaning tablet.
See page 32, Starting the cleaning
programme.
Before making an espresso, fill the
glass or glasses with hot water.
Once you are ready to pour the
espresso discard the hot water.
This will quickly heat the glasses
and significantly improve and
retain the drinking temperature of
the espresso.
Refill the hopper with coffee
beans.
Adjust the grind selector to a finer
setting. See page 26, Setting the
fineness of the grind.
Select a higher setting of the
coffee strength/quantity. See page
16, Selecting the strength of the
coffee.
Use the correct amount of preground coffee – 2 level measuring
spoons.
Adjust the grind selector to a
coarser setting. See page 26,
Setting the fineness of the grind.
Adjust the grind selector to a finer
setting. See page 26, Setting the
fineness of the grind.
While the espresso is pouring
reposition the adjustable espresso
pour spout, down or up.
Alternatively remove the adjustable
espresso pour spout, rinse under
running water and with a pin
scrape away any built up coffee
remains.
The cups have not
been pre-heated.
Espresso/coffee not
strong enough
The coffee bean hopper
is empty.
The grind setting is too coarse.
The setting for the coffee
strength/quantity is too low.
Not enough pre-ground
coffee used.
Espresso/coffee pour
is too slow
The coffee grind setting is
too fine.
Espresso/coffee pour
is too fast
The coffee grind setting is
too coarse.
Espresso/coffee pour
is uneven
The espresso pour spouts
are clogged.
37
Heading
Trouble Shooting Guide continued
PROBLEM
POSSIBLE CAUSE
WHAT TO DO
No espresso/coffee,
only water is running
out
Foreign matter is caught in the
grinding mechanism stopping
the beans from moving through
the grinder.
Turn the machine off and remove
the hopper. Clean away any coffee
beans in and around the grinding
mechanism. Remove the grinding
ring and with the cleaning brush or
tweezers remove any foreign
matter. See page 26, Removing
foreign matter from the grinding
mechanism.
Coffee bean hopper is not
fitted correctly.
The grinder is working however
there is no sound of coffee beans
grinding. Remove the hopper and
empty the coffee beans into a
container. Replace the hopper onto
the grinding mechanism, check
that the lock on the base of the
hopper opens once it is in the
coffee bean position, if it remains
closed while turning the hopper,
remove the hopper and try
engaging it again. Therefore push
down on the hopper with pressure,
whilst turning.
Brewing unit is not
in the correct position.
Should the grinder be working
normally, remove the coffee waste
container after the espresso making
process and check to see if there
is any freshly ground coffee. In this
case turn the machine off, remove
and clean the brewing unit.
Coffee bean hopper is not in
the correct position.
Adjust the hopper so that the arrow
on the base of hopper is aligned
with the pre-ground coffee arrow.
The pre-ground coffee
receptacle was filled when the
machine was switched off.
When the machine is turned on
it will go through an Auto Clean
cycle, this will discard any
coffee grinds from the coffee
brewing unit. Therefore ensure the
machine is on and in the preground position before adding
coffee.
No espresso/coffee,
only water is running
out when using
pre-ground coffee.
38
Heading
Trouble Shooting Guide continued
PROBLEM
POSSIBLE CAUSE
WHAT TO DO
The coffee brewing unit has
not adjusted correctly and
remains closed, therefore the
coffee falls beside.
Ensure that when the hopper is
moved to the pre-ground coffee
position that prior to adding the
coffee you have waited for
the programmed mechanical
adjustment of the brewing unit.
The pre-ground coffee is stuck After the machine has been used
to the sides of the coffee shaft. the steam from the brewing
process will moisten the sides of
the pre-ground coffee shaft which
causes the coffee grinds to stick
to the sides. Use a piece of paper
towel or cloth to dry the pre-ground
coffee receptacle and shaft.
Alternatively use the cleaning brush
to push down the coffee.
No espresso/coffee
pours through
No water in the water reservoir.
Fill the reservoir with water.
The water reservoir is not
correctly engaged.
Slide the water reservoir in and
press firmly into place to ensure
the valve of the water reservoir
opens.
The steam pre-selection button
is activated.
Press the steam pre-selection
button to turn the steam function
off.
Prior to starting the espresso
brewing process, turn the steam/
hot water switch up and allow hot
water to run through the steam
arm/wand until there is a steady
flow of hot water and no large
amount of steam is present.
Espresso/coffee tastes Temperature of the heating
burnt
system is too hot.
No steam comes
from the steam
arm/wand
Type of coffee being used.
Experiment with different brands
and styles of coffee.
Steam arm/wand is blocked.
Using a pin or a thin wire, insert it
into the hole in the base of the
steam nozzle.
Not enough froth when Milk is too warm or too old.
texturing the milk
Ensure the milk is well refrigerated
before use and that the milk is
fresh.
39
Heading
Trouble Shooting Guide continued
Problem
Possible cause
Not enough froth when Frothing jug.
texturing the milk
40
What to do
For best texturing results use a
stainless steel jug and if possible
refrigerate or run the jug under
cold water before use.
During the texturing process
the milk has been over heated
and boiled.
Start again with fresh, chilled milk.
The brewing unit
cannot be removed
The brewing unit is not in its
normal position.
Leave the machine switched on
and adjust the coffee bean hopper
to the pre-ground coffee position.
Then switch off the machine and
remove the brewing unit. See page
29, Removing the coffee brewing
unit.
The brewing unit
cannot be inserted
Brewing unit is not closed
correctly.
Turn the white service lever
upwards as far as it will go. The
ejection lever will fold back and the
brewing unit closes. See page 29,
Inserting the brewing unit.
The locking lever behind the
service door is not in the up
position.
Push the locking lever upwards and
insert the brewing unit. See page
29, Inserting the brewing unit.
Heading
Recipes
ESPRESSO (SHORT BLACK)
Espresso is a concentrated, full bodied coffee
with a stable layer of cream on top – known
as ‘crema’. An espresso is the foundation of
all café coffee. Variations are achieved by
adding different amounts of milk and froth.
• 90mL espresso glass or demitasse cup
• single espresso (30-35mL)
MACCHIATO
Macchiato, Italian for ‘to stain or mark’.
Traditionally served as a standard espresso
with a dash of milk and a small dollop of
froth into the middle of the ‘crema’.
• 90mL espresso glass or demitasse cup
• single or double espresso
• marked with steamed milk froth
LONG BLACK
A standard espresso with hot water, served in
a regular coffee cup or mug. The hot water is
added first so that the ‘crema’ is maintained.
• 190mL cup
• hot water (to taste)
• single or double espresso
FLAT WHITE
Another old favourite, the Flat White is
an espresso with steamed milk, served in
a regular coffee cup or mug. The layer of
frothed milk on top should be 2mm to seal
the coffee.
• 190mL cup
• single or double espresso
• steamed milk
41
Heading
Recipes (continued)
CAFFE LATTE
An espresso with steamed milk, typically
served in a glass. The layer of frothed milk on
top should be 10mm to seal the coffee.
• 220mL glass or cup
• single or double espresso
• steamed milk
CAPPUCCINO
This delicious drink is an espresso with
steamed milk, topped with creamy froth and
a dusting of chocolate. The resulting drink is
approximately two-thirds milky coffee, onethird froth.
• 190-240mL cup
• single or double espresso
• two-thirds milky coffee, one-third froth
• dusted with chocolate
42
CAFFE MOCHA
Made in a similar way to a cappuccino but
with the addition of drinking chocolate.
Simply stir the chocolate into the espresso
prior to adding the steamed milk and froth.
• 190-240mL cup or tall glass
• single or double espresso
• two teaspoons of drinking chocolate
• two-thirds milky coffee, one-third froth
CON PANNA
A variation on the original Vienna coffee, this
delicious drink is made up of an espresso
topped with lightly whipped cream. It can
also be dusted with cinnamon or drinking
chocolate.
• 190mL cup
• single or double espresso
• lightly whipped cream
• dusted with cinnamon or chocolate
‘Sunbeam’ is a registered trademark of Sunbeam
Corporation. Café Barista is a trademark of Sunbeam
Corporation.
Made in China. Engineered in Australia. Due to minor
changes in design or otherwise, the product may
differ from the one shown in this leaflet. Backed by
Sunbeam‘s 12 Month Repair Guarantee and National
Service Network.
© Copyright. SUNBEAM CORPORATION LIMITED 2004.
(INCORPORATED IN N.S.W.) A.C.N. 000 006 771
For more information or advice on this or any
other Sunbeam appliance, visit www.sunbeam.
com.au or contact the Sunbeam Consumer Service
Line. Australia 1800 025 059 New Zealand 0800
786 232.
Consumer Hotline
Australia
1800 025 059
New Zealand
0800 786 232
Consumer information:
1800 025 059 or www.sunbeam.com.au
is a registered Trademark of Sunbeam
Corporation Limited. ACN 000 006 771.
© Sunbeam Corporation Limited 2004.