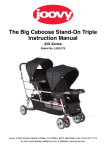
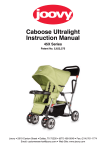
1
Instruction Manual
Style Numbers 320, 322
Joovy • 2919 Canton Street • Dallas, TX 75226 • (877) 456-5049 • Fax: (214) 761-1774
E-mail: [email protected] • Website: www.joovy.com
!
!
WARNINGS
Please read this instruction manual completely before using
this stroller. Keep these instructions for future reference.
• Failure to follow these instructions could result in serious injury or death.
• Never leave child unattended.
• Avoid serious injury from falling or sliding out.
• Always use safety harnesses and ensure that all children are positioned according
to these instructions.
• Be certain that the stroller is fully opened, BOTH primary locks are secured in
position, and the wheel brakes are on before allowing children near the stroller.
• The maximum weight of each child that can be seated in the stroller is 45 lbs.
• Use of the stroller with two children weighing more than 45 pounds each, or
children totaling more than 90 pounds will cause excessive wear and stress on
the stroller and may cause a hazardous unstable condition.
• Never allow a child to step on the leg support to get into or out of the stroller.
• Do not use the stroller on stairways or escalators.
• Hanging purses, shopping bags, parcels, diaper bags or other accessory items
from the handle bars or any other parts of the stroller may change the balance
of the stroller and cause a hazardous unstable condition.
• The maximum weight that can be carried in each storage basket is 5 pounds.
Excessive weight may result in a hazardous unstable condition.
• The total weight of contents in the zippered pockets and cup holders should
be less than 2 pounds. Excess weight may cause a hazardous unstable
condition.
• Never allow your stroller to be used as a toy.
• Discard all packaging materials properly. Do not allow children to play with
them.
• Check your stroller for loose rivets, snaps, worn parts, and torn material or
stitching on a regular basis.
• Discontinue use of the stroller should it malfunction or become damaged.
Please do not return this product to the store
If you experience any difficulty with the assembly or use of this product, or if you have a
question regarding these instructions, please contact our Customer Service Department
at (877) 456-5049 between the hours of 8:30 am and 5:00 p.m. Central Time.
Please note: Styles and colors may vary.
Page Groove 2 Instruction Manual
Assembling and Using your Stroller
! To ensure safe operation of your stroller, please
follow these instructions carefully
Unpacking the Product
• Carefully remove stroller and all parts from the box and plastic bag.
• Remove the cardboard packing materials from the ends of the frame.
• Identify the parts: stroller, canopy set, all season pad (already assembled onto
stroller), and documents with the pictures in Figure 1.
• Remove the plastic coverings from the foam handles and any other areas of the
product and discard.
• Discard all packaging materials properly. Do not allow children to play with them.
Figure 1
!
CAUTION
Adult assembly is required for this product.
No tools required.
Groove 2 Instruction Manual
Page Unfolding the Stroller
• Keep children away from stroller while unfolding.
• Orient the stroller with the handle bars closest to you.
• If necessary, release the locking latch located on the center leg of the folded
stroller by lifting the latch off of the stroller leg. See Figure 2. Then fold the
locking latch back onto itself and snap it onto the frame bar just underneath the
foam handle.
• Pull up on the handle bars of the stroller until it is upright. Then push down with
your foot on the lower knob of BOTH primary locks at the rear center of each
stroller seat to engage the lock. See Figure 3.
• Ensure that the stroller is completely opened and BOTH primary locks are secured
before ANY use of the stroller.
Figure 2
Figure 3
Front Wheel Locks
The front wheels can be either in swivel
mode or locked mode
• To put each front wheel set into its
locked mode, pull up on the locking
lever until an audible click is heard.
Rotate the wheel set until it locks
automatically, when in the straight
position, and another audible click is
heard. See Figure 4.
• To unlock the wheels and put them
into swivel mode, push down on the
lever until an audible click is heard to
disengage the lock.
Page Figure 4
Groove 2 Instruction Manual
Installing and Operating the Canopy Set
Once the canopy set is installed, you can operate each canopy independently.
• With the stroller open, clip BOTH sides and the center of the canopy set onto
the handle tubes just above the retaining blocks, taking care not to catch any
material underneath the clips. See Figure 5. Attach the hook and loop tabs at
the top of the canopy to the handle tubes.
• Place the rear aprons behind the seat backs and attach the female snap on the
bottom of each apron to the male snap on the top of each seat back.
• The canopy and visor can be adjusted into several positions ranging from fully
closed to fully extended, or any position in between.
• To open the canopy, pull forward on the front edge of the canopy until the canopy
is fully extended. Once the canopy is extended, push down on BOTH side hinges
to lock it in the open position. See Figure 6.
• The visor can be opened (or closed) by pulling (or pushing) it from under the canopy.
• NOTE that the top rear portion of the canopy has a roll back window. To open, pull the
forward edge up, roll the flap back, and secure using the elastic loop attachments.
• To close the canopy, unlock both side hinges and push the front edge of the
canopy toward the rear of the stroller. See Figure 7.
• To remove the canopy set, unsnap the snap on the top of each seat back.
Unfasten the hook and loop tabs from the handle tubes. Pull the clips on the
canopy away from the handle tubes. See Figure 8.
Figure 5
Figure 6
Figure 7
Figure 8
! WARNING
Possible pinching hazard - Be careful when closing and
opening the side hinges.
Groove 2 Instruction Manual
Page Rear Wheel Brakes
• Before placing any child into the stroller or removing them from the stroller, be
certain that the rear wheel brakes are engaged.
• To engage the rear wheel brakes, push down on any one of the brake levers
located on each of the rear wheels. See Figure 9. Whenever possible, use the
middle brake lever to operate the brakes. The stroller may require slight forward
or rearward movement in order to line up the teeth on each brake with each
wheel brake cluster.
• Check that ALL brakes are properly applied by attempting to push the stroller
backwards and forwards.
• To release the brakes, gently lift up any one of the brake levers. See Figure 10.
Figure 9
Figure 10
! WARNING
Always make sure ALL wheel brakes are engaged when the stroller is not
being pushed so that the stroller will not roll away. Never leave stroller
unattended, especially on a hill or incline, as the stroller may tip over or slide.
Seatback Positioning
The positioning of each seatback can be adjusted individually. Each seat has four
positions. The fully upright position should only be used for a child that is at least
6 months old.
• To place the seat in the upright
position, simply lift up on the seatback
until it locks into the highest position
• To recline either seatback, slowly
lift upward on BOTH sides of the
seatback adjusters for that seat.
The seatback adjusters are the large
plastic pieces on each side of the rear
of each seatback. While lifting these
adjusters up, use your forefinger
to pull each side of the seatback
downward to the desired position.
Always ensure that BOTH sides of
the seatback lock into place in these
adjusters. See Figure 11.
Figure 11
Page Groove 2 Instruction Manual
!
WARNING
ALWAYS ensure that the seatback is locked into position on BOTH adjusters.
Push down on the seatback to be sure it is secure.
NEVER adjust the seatback when the child is in the seat.
Securing the Child
• Note that there are three height adjustment positions for the shoulder harness
straps. For a younger child, the shoulder harness straps should be positioned
through the lower opening. For a taller child, the shoulder straps should be
positioned through the center or top openings to ensure a good fit.
• Make sure that both shoulder straps are attached to the waist strap buckles.
See Figure 12.
• Unlatch the waist/shoulder buckle by squeezing in on both sides of the buckle
latch and removing the male ends of each buckle.
• Carefully place the child in the stroller seat with the shoulder straps over their
shoulders and chest. Then place the crotch strap between the child’s legs.
• Bring the seat belt around the child’s waist and insert the male ends of the waist/
shoulder buckle into the female buckle. Make sure that they snap into place.
Tighten the waist belt to be snug around the child’s waist. See Figure 13.
• NOTE that when using the headrest for a younger child, the shoulder straps
may be positioned through the upper set of slots in the headrest. Unbuckle the
shoulder straps from the waist/shoulder buckle and feed these straps through
these slots, insuring that the straps are not twisted. Buckle the shoulder straps
onto the waist/shoulder buckle to secure them. When using the headrest for
a taller child, the shoulder straps may be positioned through the lower set of
slots.
• Both the shoulder straps and the waist/crotch straps may be adjusted using the
sliding buckles on these straps. See Figure 14.
Figure 12
Figure 13
Figure 14
WARNING
Avoid serious injury from falling or sliding out. Always use the safety
harness.
!
Groove 2 Instruction Manual
Page Folding the Stroller
• Keep children away from stroller while folding.
• Position the stroller with the handle bars closest to you.
• Place each canopy into its closed position and pull it all the way toward the
back of the stroller as far as it will go.
• To fold, pull UP on the lower knobs of BOTH primary locks in the rear center
of each seat. See Figure 15.
• Push down on the secondary locking lever on the right side of the stroller.
See Figure 16. Note that you need to push down on this lever forcefully to
disengage the lock.
• Push forward on the stroller using the handle bars.
• Once the stroller begins to fold, pull the front leg of the stroller upwards until
the stroller is completely folded. See Figure 17.
• To secure the stroller in the folded position, remove the LOWER section of
the locking latch from its position on the frame bar. Snap this
section of the locking latch onto the center leg of the stroller. See Figure 18.
Figure 15
Figure 16
Figure 17
Figure 18
Page Groove 2 Instruction Manual
Removing/Reversing the All-Season Pads
Each All-Season Pad has two sides, a warm fleece side for cold weather and a
moisture wicking side for warm weather.
• Unlatch the waist/shoulder buckle by squeezing both sides.
• Unhook the shoulder harness buckle from each waist strap buckle.
• Unthread the crotch buckle, each waist buckle and each shoulder buckle through the pad.
• Reverse (or remove) pad and rethread all straps and buckles, insuring that the straps are not twisted.
• Latch each shoulder harness buckle to each waist strap buckle.
Storage Basket
The maximum weight that can be carried in each storage basket is 5 pounds.
Excessive weight may result in a hazardous unstable condition.
Note that each basket can be removed if desired by unsnapping the two front and
two rear snaps.
Maintenance
All of the fittings, snaps, locks, rivets, and other hardware and plastic parts on the
stroller should be inspected periodically to ensure that they are secured properly
and not damaged or malfunctioning. The safety harnesses, as well as all other
straps and fabric items and their stitching should also be inspected periodically to
ensure that they are secured properly and not loose, torn or otherwise damaged.
All moving parts, such as wheels, brakes, and hinges should also be checked
periodically to ensure they are operating properly.
Any missing, broken, or worn components should be replaced immediately, and
the stroller should not be used until they are replaced. Only original manufacturer’s
components should be used. If needed, please contact Joovy at our toll-free
phone number.
Fabric fading may occur if the stroller is left in direct sunlight for long periods of
time. When not in use, store the stroller out of direct sun.
Cleaning
The fabric material on this stroller can be cleaned using mild household soap or
detergent and warm water on a sponge or clean cloth. Always allow the fabric to
completely air dry before using the stroller.
The frame and wheels should always be kept clean and free of dirt and foreign matter,
especially after operating the stroller in rain, snow, or other harsh environments.
Use a sponge or cloth dampened with warm water and a mild detergent cleaner to
clean the wheels after such use.
Groove 2 Instruction Manual
Page SATISFACTION GUARANTEED
We want you to be completely satisfied with your purchase of this product.
Should you experience any difficulty in assembling or using this product, or if
you have any questions, please contact our Customer Service Department at
(877) 456-5049 between the hours of 8:30 am and 5:00 p.m. Central Time.
Please log onto www.joovy.com to register your new Joovy product.
Page 10 Groove 2 Instruction Manual
Look for these other Joovy products
t!
r Doll Rides in the B
ack, or Sits in the Fron
You
Groove 2 Instruction Manual
Page 11
2919 Canton Street • Dallas, TX 75226 • (877) 456-5049 • Fax: (214) 761-1774
E-mail: [email protected] • Website: www.joovy.com
©Joovy 2007 • Document Version 1.0