1
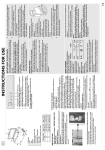
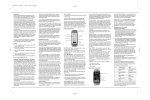
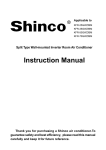
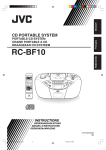
JMC-670
WALL MOUNTABLE FRONT
LOADING DUAL MP3 CD SYSTEM
WITH DIGITAL TUNER AND
REMOTE CONTROL
INSTRUCTION MANUAL
Please read and follow this instruction manual carefully before using
the unit and retain it for future reference
HX-1056M3 IB JENS 001 REV0.P65
1
7/20/2005, 2:50 PM
FCC INFORMATION
WARNING
TOPREVENTFIREORSHOCKHAZARD,DONOTUSETHISPLUGWITHANEXTENSIONCORD,RECEPTACLE
OROTHEROUTLETUNLESSTHEBLADESCANBEFULLYINSERTEDTOPREVENTBLADEEXPOSURE.TO
PREVENTFIRE OR SHOCK HAZARD, DO NOT EXPOSE THISAPPLIANCE TO RAIN OR MOISTURE.
IMPORTANT SAFETYINSTRUCTIONS
1.
2.
3.
4.
5.
6.
Read these instructions.
Keep these instructions
Heed all warnings.
Follow all instructions
Do not use this apparatus near water
Cleaning-Unplug this product from the wall outlet before cleaning, Do not use liquid cleaners or aerosol
cleaners. Use a dry cloth for cleaning
7. Do not block any ventilation openings. Install in accordance with the manufacturer’s instructions.
8. Do not place this product on an unstable cart, stand, tripod, bracket, or table .The product
may fall, causing serious injury to a child or adult, and serious damage to the product.
Use only with a cart, stand, tripod, bracket, or table recommended by the manufacturer,
or sold with the product. Any mounting of the product should follow the manufacturer’s
instructions, and should use a mounting accessory recommended by the manufacturer.
A Product and Cart Combination Should Be Moved with Care-Quick stops, excessive
force and uneven surfaces may cause the product and cart combination to overturn.
9. Do not install near any heat sources such as radiators, heat registers, stoves, or other apparatus
(Including amplifiers) that produce heat.
10.Do not defeat the safety purpose of the polarized or grounding-type plug. A polarized or groundingtype plug. A polarized plug has two blades with one wider than the other. A grounding type plug has
two blades and a third grounding prong. The wide blade or the third prong is provided for your safety.
If the provided plug does not fit into your outlet, consult an electrician for replacement of the obsolete
outlet.
11. Protect the power cord from being walked on or pinched particularly at plugs convenience receptacles,
and the point where they exit from the apparatus.
12. Only use attachments/accessories specified by the manufacturer.
13. Unplug this apparatus during lightening storms or when unused for long periods of time.
14. Refer all servicing to qualified service personnel. Servicing is required when the apparatus has been
damaged in any way, such as power-supply cord or plug is damaged, liquid has been spilled or
objects have fallen into the apparatus, the apparatus has been exposed to rain or moisture, does not
operate normally, or has been dropped.
15. This appliance shall not be exposed to dripping or splashing water and that no object filled with liquids
such as vases shall be placed on the apparatus.
16. Do not overload wall outlet. Use only power source as indicated.
17. Use replacement part as specified by the manufacturer.
18. The product may be mounted to a wall only if recommended by the manufacturer.
19. Upon completion of any service or repairs to this product, ask the service technician to perform safety
checks.
IMPORTANT NOTES
E-1
HX-1056M3 IB JENS 001 REV0.P65
2
E-2
7/20/2005, 2:50 PM
POWER SOURCE
TABLE OF CONTENT
WELCOME ................................................................................................................................................ 5
INDEX TO PARTS AND CONTROLS ..................................................................................................... 5
MAIN UNIT ..................................................................................................................................... 5
REMOTE CONTROL ...................................................................................................................... 6
DISPLAY SECTION ........................................................................................................................ 6
INSTALLATION .......................................................................................................................................... 7
FOR TABLE TOP USE ...................................................................................................................7
FOR WALL MOUNTING ............................................................................................................... 7
GETTING STARTED .................................................................................................................................. 8
SPEAKER CONNECTION.............................................................................................................. 8
LINE IN (AUX IN) CONNECTION (OPTIONAL) ........................................................................... 8
SUBWOOFER CONNECTION .......................................................................................................8
ANTENNA CONNECTION ..............................................................................................................8
POWER SUPPLY ........................................................................................................................... 8
AC POWER CONNECTION ......................................................................................................... 8
LINE IN (AUX IN) CONNECTION (OPTIONAL)............................................................................8
SUBWOOFER CONNECTION(OPTIONAL) .....................................................................................8
ANTENNA CONNECTION................................................................................................................8
POWER SUPPLY ............................................................................................................................8
AC POWER CONNECTION.............................................................................................................8
REPLACING BATTERY IN THE REMOTE CONTROL......................................................................8
CLOCK SETTING..........................................................................................................................................9
TO SET THE CURRENT TIME........................................................................................................9
COMPACT DISC OPERATIONS...................................................................................................................9
BASIC DISC(s) PLAY........................................................................................................................9
PROGRAMMING CD TRACKS...........................................................................................................10
PROGRAMMING MP3 TRACKS...........................................................................................................11
ID3 DISPLAY (FOR MP3-CD ONLY)....................................................................................................11
RADIO OPERATION....................................................................................................................................12
RADIO TUNING..................................................................................................................................12
TO PRESET CHANNELS......................................................................................................................13
TO RECEIVE PRESET STATIONS...................................................................................................13
AUX OPERATION........................................................................................................................................13
PRESET EQ (EQUALIZATION SYSTEM)....................................................................................................13
USING HEADPHONES (NOT INCLUDED)....................................................................................................13
SLEEP OPERATIONS..................................................................................................................................14
TIMER OPERATION....................................................................................................................................14
CARE AND MAINTENANCE.......................................................................................................................15
TROUBLESHOOTING GUIDE.....................................................................................................................15
RESETING THE UNIT...................................................................................................................................16
SPECIFICATION..........................................................................................................................................16
E-3
HX-1056M3 IB JENS 001 REV0.P65
3
E-4
7/20/2005, 2:51 PM
JMC-670 INSTRUCTION MANUAL
JMC-670 INSTRUCTION MANUAL
REMOTE CONTROL
WELCOME
Thank you for purchasing the JENSEN Wall Mountable Front Loading Dual MP3 CD system.
Before operating the unit, please read this manual thoroughly and retain it for future reference.
INDEX TO PARTS AND CONTROLS
MAIN UNIT
1). CD DOOR
2). CD DOOR OPEN / CLOSE BUTTON
3). FUNCTIONBUTTON
4). CD 1/2 FUNCTION BUTTON
5). ID3 BUTTON
6). FOLDER + / MEMO UP BUTTON
7). PROGRAM / MEMORY BUTTON
8). STOP/BAND BUTTON (
H1. ON/STANDBY BUTTON
H2. ID3 BUTTON
H3. FUNCTION BUTTON
H4. DISC 1 / 2 BUTTON
H5. PLAY/PAUSE ( ) - MONO - ST. BUTTON
H6. MEMO./PROGRAMBUTTON
H7. TUNING BUTTON
&
H8. FOLDER - BUTTON
H9. VOL+ & VOL- BUTTON
H10. CDDOOROPEN/CLOSEBUTTON
H11. STOP / BAND BUTTON ( )
H12.FOLDER+/MEMOUPBUTTON
H13.EQBUTTON
H14.TIMER/SLEEPBUTTON
H15.REPEATBUTTON
H16.MUTEBUTTON
)
9). PLAY / PAUSE BUTTON (
)
10).ON / STANDBY BUTTON
11).TUNING / SKIP (
/
) BUTTON
12).REPEATBUTTON
DISPLAY SECTION
13).TIMER/SLEEPBUTTON
D1. MP3 INDICATOR
D2. ID3 INDICATOR
D3. SLEEPINDICATOR
D4. MUTE INDICATOR
D5. AUX INDICATOR
D6. FREQUENCY / PLAY TIME / CLOCK DISPLAY
D7. BAND INDICATOR
D8. PLAYBACK INDICATOR
D9. CD INDICATOR
D10.FOLDERINDICATOR
D11.MEMORYINDICATOR
D12.REPEATINDICATOR
D13.TIMERINDICATOR
D14.RANDOMINDICATOR
D15.STEREOINDICATOR
14). EQ BUTTON
15). VOLUME UP / DOWN BUTTON
16). HEADPHONE JACK
17). MAIN UNIT STAND
18). MULTI - FUNCTION DISPLAY
19).REMOTESENSOR
20).RESETSWITCH
21).AUX IN JACK
22). FMANTENNA
23). AC LINE CORD
24). SUBWOOFER JACK
25).SPEAKERTERMINAL
26). SPEAKER BOX
27).SPEAKERWIRE
28). SPEAKER BOX STAND
E-5
HX-1056M3 IB JENS 001 REV0.P65
4
E-6
7/20/2005, 2:51 PM
JMC-670 INSTRUCTION MANUAL
INSTALLATION
JMC-670 INSTRUCTION MANUAL
G E TTING S TAR TE D
FOR TAB L E TOP US E
S PE AK E R CONNE CTION
Following the diagrams below, insert the stands into the base and attach the main unit and
speakers as shown.
1. Insert the speaker cables by pushing down the terminal lever of the Left S peaker Terminal and the R ight
Speaker Terminal (25).
2. C onnect the speaker to S peaker Terminals (25), with red wire to red terminals and black wire to black
terminals .
L INE IN (AUX IN) C ONNE C TION (OP TIONAL )
NOTE: A screwdriver is needed for attacking the stands to the main unit and stands.
1. C onnect the left and right channel R C A plug (not included) into the AUX IN J ack (21) and the other end
to your external player. Make s ure the polarity of the right and the left channel is correct, Red to Right, White to Left.
ON/STANDBY Button (10/H1) to switch on the unit.
2. P ress the
3. Press Function Button (3/H3). “AUX” Indicator (#D5) appears in the display (18).
4. Play the auxiliary input source.
SUBWOOFER CONNECTION (OPTIONAL)
FOR WAL L MOUNTING
1. Use the wall-mounting template supplied with the unit to make marks on the wall for the anchors. Make sure
the marks are level.
2. Drill 1/4" holes on the marks. P leas e refer to the appendix s heet attached with this ins truction manual
for details .
3. Ins ert the plas tic anchor s upplied with unit until it is flus h with the wall.
4. Insert the screw and tighten the screw 4mm away from the wall. (Approximately the width of 2 pennies)
Hang the main unit and s peakers to the s crew as indicated below:
1. Connect one end of a RCA plug (not included) into the Subwoofer Jack (24) and the other end to the
subwoofer (not included).
2. Turn on the unit and then your subwoofer.
ANTENNA CONNECTION
FM: Unwrap and fully extend the FM Antenna wire (22) for best reception. If stereo broadcasting is received,
Stereo Indicator (#D15) will light.
AM: The unit is built-in with a directional ferrite antenna, reposition the unit for best reception.
POWER SUPPLY
This Front Loading Dual CD System operates from AC120V~60Hz line power supply.
The remote control unit operates on one 3V “CR2025” lithium battery. To power up the remote control, remove the
plastic insulation tab sticking out of the battery compartment.
AC POWER CONNECTION
Connect the power cord to an AC120V~60Hz power source.
REPLACING BATTERY IN THE REMOTE CONTROL
1. Turn over the remote control, and remove the battery door.
2. Install 1 “CR2025” lithium battery according to the polarity diagram
on the battery compartment.
3. Replace the battery door.
E -7
HX-1056M3 IB JENS 001 REV0.P65
5
E -8
7/20/2005, 2:51 PM
JMC-670 INSTRUCTION MANUAL
JMC-670 INSTRUCTION MANUAL
Note: If no CD is inserted in the chosen CD location, “NO DISC” appears.
7.The CD indicator (#D9) appears with either “ ” or “ ”, indicating the current CD location.
8.Press Button (9/H5) to start playing.
CLOCK SETTING
Note: The clock has to be set the first time you use the unit.
TO:
Stop play
TO SET THE CURRENT TIME
For example to set the clock at 7:30 AM
1. In STANDBY Mode, press MEMORY Button (7/H6) once. Hour digit flashes to prompt for input.
2. Press the
/
PRESS:
(8/H11)
Pause play
Resume play after pause
Scan forward and backward
Skip tracks
Control the volume
Stop output from speakers
Resume speaker output
Button (11/H7) to adjust the hour.
(9/H5) once
(9/H5) again
And hold
/
(11/H7)
/
(11/H7)
± Volume Control (15/H9)
MUTE Button (H16) once
MUTE Button (H16) again
Multi-Function Display:
Total number of tracks and total play
time are shown
Playback Indicator (D8) blinks
Current playing track number and
elapsed play time are shown
Play time changed rapidly
Playing track number changed
Volume Level is shown
“MUTE” (#D4) lights
“MUTE” (#D4) off
Other CD/MP3-CD function
1) Repeat (12/H15) - Use this key can select different Play Mode between repeat one, repeat folder (MP3CD only), repeat current CD and random play.
a) Repeat current track - Press Repeat button once, the REPEAT indicator appears and current track
repeated continuously.
Note: Make sure the hour is set so that AM or PM is
correctly displayed.
3.Press MEMORY Button (7/H6) to confirm the selection
and minute position flashes to prompt for input.
:
b) Repeat Folder (MP3-CD only) - Press Repeat button until REPEAT FOLDER indicator shown on display, the
selected folder will repeated continuously.
4.Press the
/
Button (11/H7) to adjust the minute.
5.Press MEMORY Button (7/H6) again to complete setting.
:
c) Repeat current disc - Press Repeat button unitil REPEATALL indicator shown on display, the current CD
will repeat continuously.
:
COMPACT DISC OPERATIONS
d) Random play - Press Repeat button until RANDOM indicator appears on display and the current disc will
play randomly.
NOTE: This player plays not only commercial CDs but also self-complied CD-R/RW/MP3-CD discs.
BASIC DISC(s) PLAY
:
1.Press the
Button (10/H1) to turn on the unit.
2.Press the OPEN/CLOSE Button (2/H10) to open both the CD door.
3.Place the CD(s), with label side facing outward, inside the CD compart
ment. Press OPEN/CLOSE Button (2/H10) again to close the CD doors.
IMPORTANT: The CD doors are motorized doors. DO NOT PUSH WITH
HAND OR USE ANY OT HER MEANS TO OPEN OR CLOSE IT. THIS
COULD DAMAGE THE DOOR MECHANISM.
4.Press the Function Button (3/H3) to operate the unit in CD mode.
5. Press CD1/CD2 (4/H4) button to select the CD location.
6.The unit will scan the CD in selected CD compartments, the total number
of tracks and total play time of the CD in the chosen CD location appear
in the display (18). (Only Folder number and track number will shown
for MP3-CD)
H1
DISC ERROR
Note: If the disc is dirty, damaged or unreadable, the ‘NO DISC’ will appear in the display. If this occurs, clean
the disc, insert the disc correctly, or try another disc.
H5
H4
H3
PROGRAMMING CD TRACKS
With this function you can program up to 20 titles of selected disc in the order you desire.This function can
only be done in stop mode.
H10
1. Press the MEMORY Button to start programming tracks, “MEMORY” indicator, ‘
and
blinks.
E-9
HX-1056M3 IB JENS 001 REV0.P65
6
E-10
7/20/2005, 2:53 PM
‘ appear in the display
JMC-670 INSTRUCTION MANUAL
2. Select the desired track by pressing the
/
JMC-670 INSTRUCTION MANUAL
Button (11/H7) to select the track you want to program.
3. Press the MEMORY Button (7/H6) again to enter the selected track in program memory #1. The program
advances to.
number
4.Repeat steps 2 & 3 to program addiitonal tracks, 20 tracks can be memorized.
Button to start playing the tracks in your programmed order.
5.Press PLAY/PAUSE
6.To clear the programmed tracks, press STOP Button until the MEMORY indicator disappear.
Note: Random functions are disabled in program play.
PROGRAMMING MP3 TRACKS
With this function you can program up to 10 titles in the order you desire.This function can only be done
in stop mode.
’ blink, and ‘
’ / MEMORY
1.Press the MEMORY Button (7/H6),“ FOLDER” indicator and ‘
indicator appears in the display.
2. Select the desired folder by pressing FOLDER UP or DOWN button (6/H12,&H8).The selected folder
blinks.
Notes on CD-R/RW Discs
Because of non-standardized format definition/production of CD-R/RW/MP3-CD, playback quality and
performance are not guaranteed.
Manufacturer is not responsible for the playability of CD-R/RW/MP3-CD due to recording conditions
such as PC performance, writing software, media ability, etc.
Do not attach a label or seal to either side of the CD-R/RW/MP3-CD disc. It may cause a malfunction.
RADIO OPERATIONS
RADIO TUNING
3.Press the MEMORY Button (7/H6) again to enter the selected folder.Then press
(11/H7)to select your desired track.The selected track blinks.
/
Buttons
1. Press the Button (10/H1) to turn on the unit.
2. Press the Function Button (3/H3) to operate the unit in
radio mode.
4. Press the MEMORY Button (7/H6) again to enter the selected track.The program number advances to
‘
’.
11
E-11
7
E-12
7/20/2005, 2:55 PM
7
7
11 7
11 7
15 9
6
6
ID3 DISPLAY (FOR MP3-CD ONLY)
This unit can support ID3 display when play the MP3-CD (if the MP3-CD have this information in the disc).
Press button ID3(5/H2) once, the ID3 icon will appear on the LCD display, and the title of the song, artist and
the album will show on LCD display by rolling, press this button again to resume to show the folder and track
number, the ID3 icon will disappear.
HX-1056M3 IB JENS 001 REV0.P65
8 11
STOP
5. Repeat 2 to 4 to program additional tracks,10 tracks can be memorized.
Button to start playing the tracks in your programmed order.
6. Press PLAY/PAUSE
7.To clear the programmed tracks, press STOP Button until the MEMORY indicator disappear.
4
4
JMC-670 INSTRUCTION MANUAL
Note:
When listening to an FM station, fully extend the antenna to insure maximum reception.
Automatic tuning relies on the signal strength of the broadcasting station. Weaker stations are often
skipped when using automatic tuning. Manual tuning is suggested for locating and programming
weaker stations and also for fine tuning stations found during automatic scan.
For FM stereo reception, the unit provides FM MONO/STEREO selection. In stereo mode, the unit will
automatically switch to stereo when a FM stereo broadcast is received and the Stereo indicator
(#D15) will light.
To receive a weak (noisy) FM station, press the ST/MO Button (H5) to switch to MONO mode. The
reception may be improved, but the sound is monaural (MONO).
TOPRESETCHANNELS
This unit is equipped with 20 preset memories for both AM and FM (AM-10/
FM-10).
1.Press the Button (10/H1) to turn on the unit.
2.Press the Function Button (3/H3) to operate the unit in radio mode and
desired band.
3.Tune to a desired station.
4.Press the MEMORY Button (7/H6), “MEMORY” (#D11) & number of pre
set station appears.
5.Press the MEMO + Button (6/H12) to select the desired preset channel.
6.Press MEMORY Button (7/H6) again to complete.
7.Tune to another station and repeat steps 4 to 6 to store the station in
another preset channel.
JMC-670 INSTRUCTION MANUAL
SLEEP OPERATIONS
1.When the unit in ON, press the TIMER/SLEEP Button (13) to program the sleep time, SLEEP indicator will
appears and 90 wil blinks on display.
2.Press
&
button (9/H11) to select the sleep time between 90-60-30-15 minntes, then press SLEEP
button (13)again to store your desired sleep time.
3.The display shows the chosen sleeping time momentarily and then returns to the current function mode.
4.The unit will automatically turn off after the set time has elapsed.
5.To cancel the Sleep operation, press the SLEEP Button (13) again until SLEEP indicator disappear or
simply switch the unit to standby.
TIMER OPERATIONS
Your unit can be set to turn on at predetermined time in Radio/CD function mode for running 60 minutes unless
turn off the unit manually. This setting can only be done in standby mode. To set the TIMER as follows :
1.Press theTIMER/SLEEP Button (13/H14) once the ‘TIMER’ icon appear and the hour digit will blink to set the
timer on time during standby mode in the display.
2.Press the
/
Button (11/H7) to adjust the hour.
TO RECEIVE PRESET STATIONS
1. Press the Button (10/H1) to turn on the unit.
2. Press the Function Button (3/H3) to operate the unit in radio mode.
3. Press the MEMO + Button (6/H12) to select the preset channels.
3.Press the TIMER/SLEEP Button to (13/H14) confirm hour setting, minute position flashes.
AUX OPERATION
You can connect left and right audio outputs from a TV, VCR, DVD, MP3 player or other portable device to
the AUX IN Jacks (21) on the rear of the system. To use this Front Loading Dual CD System to amplify your
input audio signal:
1. Press the Function Button (3/H3) to operate the unit in AUX mode. “AUX” Indicator (#D5) appears in the
display.
2. Turn on and start playing the device that is plugged into the AUX Jack.
3. Adjust the Volume Control to obtain the desired sound level.
PRESET EQ (EQUALIZATION SYSTEM)
4.Press the
/
Button (11/H7) to adjust the minute.
5.Press the TIMER SLEEP Button (13/H14) to complete setting. The ‘TU’ blinks and volume level will show.
The sound equalization can be adjusted for optimum sound reproduction depending on style of music you
are playing. By pressing the EQ Button (14/H13), you can switch between FLAT, CLASS ROCK, POP .
USING HEADPHONES (NOT INCLUDED)
/
button (11/H7) to select the turn on function on volume level, press TIMER/SLEEP (13/
6.Press the
H14)button again to store the timer on function and the volume level will blink.
Inserting the plug of your headphones into the Headphone Jack (16) will enable you to listen in private.
When using headphones, the speakers will be disconnected.
NOTE: READ THIS IMPORTANT INFORMATION BEFORE USING YOUR HEADPHONES
1. Avoid extended play at very high volume as it may impair your hearing.
2. If you experience ringing in your ears, reduce the volume or shut off your unit.
3. Keep the volume at a reasonable level even if your headset is an open-air type designed to allow you to
hear outside sounds. Please note that excessively high volume may still block outside sounds.
7.Press the
/
button (11/H7) to select the volume level, press TIMER/SLEEP button (13/H14) again
to complete timer setting, the ‘TIMER’ icon and current time will appear on display, the unit will turn on
running 60 minutes once reach the time you set.
E-13
E-14
HX-1056M3 IB JENS 001 REV0.P65
8
7/20/2005, 2:55 PM
JMC-670 INSTRUCTION MANUAL
JMC-670 INSTRUCTION MANUAL
RESETING THE UNIT
CARE AND MAINTENANCE
1.Clean your unit with a damp (never wet) cloth. Solvent or detergent should never be used.
2.Avoid leaving your unit in direct sunlight or in hot, humid or dusty places.
3.Keep your unit away from heating appliances and sources of electrical noise such as fluorescent lamps
or motors.
4.If drop-outs or interruptions occur in the music during play, or if the disc fails to play
at all, its bottom surface may require cleaning. Before playing, wipe the disc from
the center outwards with a good soft cleaning cloth.
In case the unit display begins functioning erratic or random
characters are displayed, use a sharp tip to press the RESET Switch (20) to reset the unit.
Note: All the preset memories will be erased and the clock
has to be set again.
SPECIFICATION
TROUBLESHOOTING GUIDE
Should you experience difficulties in the use of this player please refer to the following chart or call
1-800-777-5331 for Customer Service.
Power source
AC120V ~ 60 Hz
DC 3V
,1 pc of “CR2025” lithium battery for remote handset
Power consumption
Dimension
28 Watts
Unit: 400 (W) x 116 (D) x 219 (H) mm
Speaker: 132 (W) x 116 (D) x 219 (H) mm
AM 520 ~ 1710kHz
FM 88 ~ 108MHz
Ball clip CD mechanisms
100 – 18,000 Hz
5 Watts RMS per channel
4 Ohms
8 – 32 Ohms
300 mV
Tuning range/sensitivity
Playback systems
Frequency response
Power output
Speaker impedance
Headphone impedance
AUX input sensitivity
SERVICE
Please refer to the instructions on the enclosed warranty card for returning your unit for service.
When returning the unit, please remove batteries to prevent damage to the unit in transit and/or from
possible battery leakage. We are not responsible for batteries returned with the product or for the
cost of replacement.
Distributed by:
Spectra Merchandising International, Inc.
Chicago Industry Tech Park
4230 North Normandy Avenue
Chicago, IL60634, U.S.A.
Please have model number ready, for Customer Service,
call 1-800-777-5331
Printed in China
E-15
HX-1056M3 IB JENS 001 REV0.P65
9
E-16
7/20/2005, 2:56 PM