1
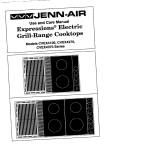
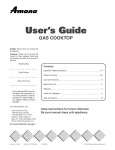
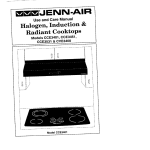
NN-AIR
Sealed
Gas Cooktop
Models CCG2421, CCG2521
Use and Care Manual
Model CCG2421
Printed in U.S.A.
@1999 Jenn-Air
Part No. 8111P394-60
AJ03/99
Read before operating your cooktop
All appliances - regardless of the manufacturer- havethe potential through improper
or careless use to create safety problems. Therefore the following safety precautions should be observed:
1.
Be sure your appliance is properly installed and grounded by a qualified
technician.
2.
Never use your appliance for warming or heating the room. This warning is
based on safety considerations.
3.
Children should not be left alone or unattended in area where appliance is in
use. They should never be allowed to sit or stand on any part of the appliance.
4.
Wear proper apparel. Loose-fitting or hanging garments should never be
worn while using the appliance.
5.
Do not repair or replace any part of the appliance unless specifically recommended in this manual. All other servicing should be referred to an authorized
Jenn-Air Servicer.
6.
Do not store combustible materials, gasoline or other flammable vapors and
liquid near cooktop, This also applies to aerosol sprays and aerosol spray cans.
7.
Do not use water on grease fires. Smother fire or flame or use dry chemical or
foam-type extinguisher.
8.
Use only dry potholders. Moist or damp potholders on hot surfaces may result
in burns from steam. Do not use a towel or other bulky cloth.
9. Select ceokware large enough to properly contain food and avoid boilovers or
spillovers. This will save on cleaning and prevent hazardous accumulations of
food, since heavy splattering or spillevers left on a cooktop can ignite. Pan size
is especially important in deep fat frying.
10, Never leave cooktop unattended at Hi heat settings. Boilover causes smoking
and greasy spillovers that may ignite.
11. TYPE OF COOKWARE - Avoid pans that are unstable and easily tipped. In
choosing pans, look for easily-grasped handles that will stay cool. Pans that
are too heavy when filled with food can also be a hazard. If pan handles twist
and cannot be tightened, discard the pan.
12. HANDLES - Always turn pan handles to the side or back of the cooktop - not
out into the room where they are easily hit. COOKWARE HANDLES SHOULD
BE TURNED INWARD AND NOT EXTEND OVER ADJACENT SURFACE
BURNERS to minimize burns, ignition of flammable materials, and spillage due
to unintentional contact with the cookware.
13. CAUTION - Do not store items of interest to children in cabinets above cooktopchildren climbing on the cooktop to reach items could be seriously injured.
14. Do not touch surface burner areas or any areas near burners. During and after
use, these areas may be hot enough to cause burns. Avoid contact with these
areas by clothing or other flammable materials until they have had sufficient
time to cool.
15. Do not heat unopened food containers. Build-up of pressure may cause
container to burst and result in injury.
16. Keep all controls "OFF" when unit is not in use.
17. GREASE - Grease isflammable and should be handled carefully. Never leave
any cooking operation unattended. Let fat cool before attempting to handle it.
Do not allow grease to collect around the cooktop. Wipe up spillovers
immediately.
18. If the cooktop is installed near a window, proper precautions should be taken
to prevent curtains from blowing over burners creating a FIRE HAZARD.
19. Do not use aluminum foil to line burner spillover bowl. Restriction of normal air
flow may result in unsafe operation.
20. Clean only parts listed in this manual and use procedures recommended.
21. Always allow hot pans to cool in a safe place out of the reach of small children.
22. A faint gas odor may indicate a gas leak. If a gas odor is detected, shut off the
gas supply to the cooktop. Call your installer or local gas company to have the
possible leak checked. Never use a match or other flame to locate a gas
leak.
23. Flame size should be adjusted so it does not extend beyond the edge of the
cookware. This instructionis based on safetyconsideration.
24. This appliance has been tested for safe performance using conventional
cookware. Do not use any devices or accessories that are not specifically
recommended inthismanual. Do not useeyelid coversforthe surface burners
or stovetop grills. The use of devices or accessories that are not expressly
recommended in this manual can create serious safety hazards, result in
performanceproblemsand reducethelifeof thecomponentsof the appliance.
25. Beforeservicingand whennecessarybeforecleaning,followtheseprocedures
to remove appliance: a. shut off gas supply to appliance; b. disconnect
electricalsupply and gas supply tubing; c. remove screws that secure appliance to cabinet. Reverse these proceduresto install. If gas line has been
disconnected, check for gas leaks after reconnection. (See Installation
Instructionsfor gas leak test method.) Note: A trained serviceman should
make the gas installation,disconnectionand reconnectionof gas supplytothe
appliance.
26. Never cover controlarea with dishtowel, potholders,etc., or aluminum foil
which couldobstructcoolingand combustionair from enteringthe appliance
at the control knob area.
27. Do not letcooking grease or otherflammable materialsaccumulate in or near
the appliance,hoodor vent fan. Clean hoodfrequentlyto preventgrease from
accumulating on hood or filter. When flaming foods underthe hood turn the
fan on.
- SAVE THESE INSTRUCTIONS
FOR FUTURE
REFERENCE-
IMPORTANT SAFETY NOTICE AND WARNING
,
The California Safe Drinking Water and Toxic Enforcement Act of 1986
(Proposition 65) requires the Governor of California to publish a list of substances
known to the State of California to cause cancer or reproductive harm, and
requires businesses to warn customers of potential exposures to such substances.
Users of this appliance are hereby warned that burning of gas can result in lowlevel exposure to some of the listed substances, including benzene, formaldehyde
and soot, due primarily to the incomplete combustion of natural gas or liquid
petroleum (LP) fuels. Properly adjusted burners will minimize incomplete
combustion. Exposure to these substances can be minimized by properly
venting the burners to the outdoors.
WARNING
Electrical Grounding Instructions
The appliance is equipped with a three-prong grounding plug for your protection
against shock hazard and should be plugged directly into a properly grounded
three-prong receptacle. Do notcut or remove the grounding prong from this plug.
Congratulationson your choice of a Jenn-Air sealed gas cooktop. The chart below
describes the difference between models.
1
I CCG2521
Cooktop
30" cooktepwith4 sealedburners
36" cooktopwith 5 sealed burners
Beforeyou begin cookingwith your newcooktop, pleasetake a few minutesto read and
becomefamiliarwith the instructionsin this book. Shouldyou haveany questionsabout
usingyour Jenn-Airgas cooktop, write to us. Be sure to providethe model number.
Jenn-Air Customer Assistance
Attn: CAIRsMCenter
P.O. Box 2370
Cleveland,TN 37320
1-800-688-1100
(Men. - Fri., 8 am-8pm EasternTime)
Internet: http://www.jennair.com
5
Whenthe control knobis turned ON, gas will flow intothe burner. The solid state igniter
will click as long as the knob is in the Lite position. (Note: All burner igniters will spark
regardlessof which burner is being operatedwhen a knob isturned to the Iite position.)
A properly adjusted burner with clean ports will light within a few seconds. On natural
gas, the flame will be blue with a deeper blue inner core. There should be no trace of
yellow in theflame. A yellowflame indicatesan impropermixtureof air/gas. This wastes
fuel, so havea servicemanadjust the mixtureif a yellow flame occurs. On LP gas, some
yellow tipping is acceptable. This is normal and adjustment is not necessary.
The infinite surface controls provide flexibility in heat setting selection. (See page 7,)
In case of prolonged powerfailure, youcan manuallylight the surfaceburner by holding
a lightedmatchnearthe burnerportsand slowlyturningthe controlknobcounterclockwise
(after depressing) to the LJte setting.
CAI,ITION: When lightingthe surface burner, be sure all of the controlsare in the OFF
position. Strike the matchfirst and hold it in position beforeturning the knobto the Lite
position.
Note: Becauseyour overhead hood fan is electricit will notwork during a power failure
so smoke and condensationcan gather.
COUNTERCLO£;KWlSE
The Lo setting should produce a stable flame
when turning the knob from Hi to Io. The
flame should extend to the outer edge of the
lip of theburner capon the Lo settingand must
be stable on all ports on Lo setting.
To adjust" Operate burner on Hi for about 5
minutes to preheat burner cap. Turn knob
back to Lo; remove knob, and insert a small
screwdriver into the center of the valve stem.
Adjust flame size by turningadjustment screw
in eitherdirection while holdingthe valve stem
securely.
t TO,NCREASE
_LAME
_
_1SLzE
CLOCKW,SE.IIII
A
TO REDUCE
FLAME
SIZE
STEM
,
,
VALV
W
Flame must be of sufficientsize to be stable on all burner ports. If flame adjustment is
needed,adjust ONLY on the Lo setting. Never adjust flame size on a higher setting.
Note: All gas adjustments should be done by a qualified servicer only.
6
•
Since the controls are a push-turn type, they must be pushed
down before turning. To set (from the OFF position), push down
on control knob and immediately turn counterclockwise to the
Life setting. After the burner lights, turn the knob to the desired
flame size.
•
Igniter wil_ spark until knob is turned counterclockwise
past the Hi position.
CAUTION: If flame should go out during a cooking operation, turn the burner off. If gas
has accumulated and a strong gas odor is detected wait 5 minutes for gas to dissipate
before relighting burner.
5
1. Left rear(11,000 BTUs)
3
2
3. Right rear(1t ,O00BTUs)*
4. Rightfront (9.200BTUs)*
2. Center
5.
Leftfront
rear(9,200
(9,200BTUs)
BTUs)
4
*l_ledel CCG2421: Right front burner BTU rate is 12,000 and right rear is 9,200.
Note: Use the surface burners with the higher BTU rate on Hi for large quantity cooking and
canning.
The controls offer flexibility in heat setting selection. An
between Hi and Lo. At the Hi setting, a detent may be
I-li, simply adjust your flame for best results. The size
amount and type of food being cooked will influence the
Suggested settings are provided as guidelines.
_
Hi_
A fast heat to start cooking quickly, to
bring liquids to a boil, to preheat oil for
deep fat frying.
(Medium High) For fast frying or browning of foods, to
maintain rapid boil of large amounts of _
food, tO maintain oil temperature for
deep fat frying.
Meal=
For most frying, sauteing, and slow boil
of large amounts of food.
(Medium Lo)
Forsimmering, maintaining boil ofsmall _
amounts of food.
Le:
Maintaining serving temperatures of
foods, melting butter or chocolate.
infinite number of settings exist
felt. For all settings other than
and type of cookware and the
setting needed for best results.
._^^_,
U
O
7
U
.^,,_,kk,k_tz_^_.
_,_,.,_-___
To achieve optimum cooking performance, use cookpots with flat bottoms,tight fitting
covers, and sized for the surface burner.
• Flame size should be adjusted so it does not extend beyond the edge of the
cookware. This instruction is based on safety considerations. Adjusting the size
of the flame to fit the size of the cookwarealso helps to save fuel.
• Cookpotswhich extend morethan two inches beyondthegrate or touch the cooktop
may cause heat to build up, resulting in damage to the burner grate, burner or
cooktop.
• Speciality items such as woks with a support ring, which restrict air circulation
aroundthe burnerwill cause heatto build up and may result in damageto the burner
grate, burner or cooktop.
• Aluminum cookware heats evenly and quickly. A slightly larger flame size can be
used. The flame canbe adjustedso it comesto theedge of the cookware. However,
the flame should NEVER be adjusted so that it extends beyond the bottom of the
cookware.
• Stainless steel cookware with copper or aluminum cores heat evenly and fairly
quickly. The flame size shouldbe adjusted to extend only halfway between center
and edge of the cookware bottom for best results.
• Cast iron cookware heats slowly.
• Check manufacturer'srecommendationsbefore usingporcelainon steel,porcelain
on cast iron, glass, glass/ceramic, earthenware,or other glazed cookpots.
If the cookware is covered, less fuel will be needed; therefore, a lower flame size can
be used. Note; Foodwill notcook anyfaster whenmorethan the amountof heat needed
to maintain a gentle boil is used.
• Acceptable water-bath or pressure canners Should not be oversized and should
have a flat bottom. The following are not recommended:oversized canners or a
very large canner that rests on two surface burner grates.
• When canning, use the Hi setting just until the water comes to a boil or pressure
is reached in the pressure canner, then reduce to the lowest flame setting that
maintainsthe boil or pressure.
• Prolongeduse of the Hi settingor the use of incorrectcanning utensilswill produce
excessiveheat. Excessive heat can cause permanent damage to the appliance.
Check the following list to be sure a service call is really necessary.
If surface burner fails to light:
• check to be sure unit is properly connectedto power supply.
• check for a blown circuit fuse or a tripped main circuit breaker.
• check to be sure burner is correctly rated for your type of gas.
• check to be sure burner ports or ignition ports are not clogged.
• check to be sure igniter is clicking, If igniter doesn't click, turn control knob OFF,
If the flame is uneven:
• burnerportsmay be clogged.
• flame setting may need to be adjusted.
If surface burner flame lifts off the ports:
• contactan authorizedJenn-AirServiceContractor.
If surface burner flame is yellow in color:
• contact an authorizedJenn-Air ServiceContractor.
Be sure all controls are OFF and all cooktop parts are cool before cleaning.
The cooktopisdesignedwith contouredwells which containspills untilthey canbe wiped
up. Neverwipe a warm or hot porcelainenamel surfacewith a dampcloth. For general
daily cleaning and light soil, wash with warm soapy water, rinse, and dry. To remove
greasespatters, spray with cleaners such as Fantastikor 409. DO NOT use abrasive
or caustic cleaning agents which may permanently damage the finish.
The surface burner grates are made of porcelain on
cast iron. Therefore,the grates can be washed in the
sink with mild detergents and a plastic scrubber or
washed in the dishwasher.
_,
Burner grates must be properly positioned before
cooking. Do not operate the burnerswithout a pan on
the grate. The porcelain finish on the grate may chip
j
without a pan to absorb the intense heat.
I_
When reinstalling square grates, place indented sides
together so straight sides are at front and rear.
_
Although the burner grate is durable, it will gradually
lose its shine and/or discolor, regardless of the care
you take of it. This is due to its exposure to the high
temperature of gas flames.
j
#,
,_
_.
All
f
%.
To preserve the porcelain enamel finish as long as possible, have a pan on the grate
before you turn on the burner, and lower the flame when food reaches the desired
cooking temperature.
lO
• The sealed burners are secured to the cooktop and are NOT designed to be
removed.Since the four burners are sealed into the cooktop, boilovers won't seep
underneathto the burner box area. Thus, there are no hidden spills in the burner
box area to clean.
• Clean with warm soapy water and a sponge or dishcloth. Burned on grease can
be removedwith a householdcleaner, such as Fantastikor 409, and a sponge. To
prevent scratching,do not use abrasive cleaners or scrubbing pads.
Note: Be careful not to get water or spray into burner ports.
When cleaningaroundthe surfaceburner,use
care to prevent damage to the spark igniter
which is locatedatthe backsideofeachburner.
If a cleaning cloth should catch the igniter, it
could damage or break it. If the igniter is
damagedor broken,the surfaceburnerwill not
light.
/_,
_
Igniter
REARVIEWOFSEALEDBURNER
The knobs on the control panel can be removed with the controls in the OFF position.
Pull each knobstraightfrom the shaft. Wash knobs in warm soapywater or dishwasher;
do not use abrasive cleansers or materials. To replace each knob, match flat part of
knob opening with the flat on the shaft, returning in OFF position.
Important: Never use a metal blade to pry knoboff. If knobcannot be easily removed,
tuck the folds of a cloth dishtowel under the knob skirt and pull the towel upward with
steady, even pressure.
Important- Be careful to replace the knobs with gentle pressure. Never hit the knob
on the shaft with your hand or any other object.
Wipe with a damp cloth. Dry thoroughly. Do not use cleaning sprays, large amounts
of soap and water, abrasives, or sharp objects on the panel. They can damage it.
11
Model Number
Serial Number
(Serial Plate is located on the bottom side of the cooktop.)
Date Purchased
JENN-AIR DEALER FROM WHOM PURCHASED
Address
city.
Phone
AUTHORIZED JENN-AIR SERVICE CONTRACTOR
Address
City_
Phone
Important: Retain proof of purchase documents for warranty service.
BBmLIENN-AIR
403 WEST FOURTH STREET NORTH • NEWTON_ IA 50208