1
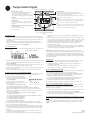
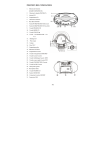
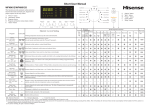
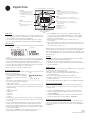
Digital Timer
DISPLAY SHOWN IN STANDARD “CLOCK” MODE DISPLAY.
HOUR (RND)
- While holding CLOCK button, press to set hour (time).
- While in programming mode, press to set hour for ON/OFF times.
- While in clock mode, press and hold (3 sec.) to activate random
security feature.
CLOCK (DST)
- To set time/day, hold down CLOCK and
press HOUR>MINUTE>DAY buttons.
- In clock mode, hold down for 5 sec. to
move forward or back an hour (Daylight
Savings Adjust).
PROGRAM
Press to enter timer programming mode.
MINUTE
- While holding CLOCK button, press to set minute (time).
- While in programming mode, press to set minute for ON/OFF times.
DAY
- While holding CLOCK button, press to set day of week.
- While in programming mode, press to scroll through options
for days of the week.
RESET
RCL
In programming mode, press to cancel or
restore ON/OFF time shown.
ON/OFF (push to scroll)
ON= Always ON
Auto ON/OFF = Timer is active
OFF = Always OFF
PRESS AND HOLD TO RESET ALL THE
PROGRAMS PERMANENTLY
Figure 1
Initial Set Up:
1. If the LCD screen is displaying numbers, you are ready to program, please
proceed to step 2. If the screen is blank plug in the timer and leave for two
hours to charge internal battery before programming.
2. Use a toothpick or sharp pencil to push the RESET button. Once pushed,
the screen will go blank briefly and then display 12:00 AM. See Figure 2.
Setting the Time:
1. Press and hold down the “CLOCK” button through the time and day setting
Figure 2
LCD display
Ready to set
process.
2. Holding “CLOCK” button down, press the “HOUR” button until the current
hour is found. Take note of AM/PM in bottom right of display. See Figure 1.
3. Press the “MINUTE” button, keeping the “CLOCK” button depressed.
Continue to press the “MINUTE” button until the current minute is found.
4. Press the “DAY” button, keeping the “CLOCK” button depressed. Continue to
press the “DAY” button until the current day is found.
5. When current day is found release "CLOCK" button.
Programming ON/OFF Times:
Note: While programming, if no button is pushed for 10 seconds the timer will
Figure 3
return to the clock display.
1. Press & release the “PROGRAM” button to
start programming. The screen will show
1ON and all of the days of the week. See
Figure 3
2. Press ”DAY” to scroll through the options for
the days of the week you want to program:
• MO TU WE TH FR SA SU
• MO>TU>WE>TH>FR>SA>SU (to show every single day of the week one by
one, which means the on/off setting is only activated on this selected day)
• MO TU WE TH FR
• SA SU
• MO TU WE TH FR SA
• MO WE FR
• TU TH SA
• MO TU WE
• TH FR SA
3. Find the days that you would like the timer to function and stop pushing
the “DAYS” button leaving the days you want the timer to function showing
on the display.
4. Press the “HOUR” button until the hour you want the timer to activate is
showing on the display. (The AM and PM is displayed in the lower right
hand corner of the display. Make sure it is correct when setting the time).
5. Press the “MINUTE” button until the minute you want the timer to activate
is showing on the display.
6. Press & release “PROGRAM” to set the 1OFF time. Repeat steps 1 -5 to
program when you want the timer to turn OFF for program 1.
7. Press "PROGRAM" to move onto Program 2 (P2ON) and repeat steps
1-6 if you want to program additional ON/OFF times, or press "CLOCK"
(at anytime) to finish programming. You can prgram up to 20 ON/OFF
programs to run simultaneously!
8. Once programming is complete, pressing "CLOCK" returns you
to "clock mode."
9. Once all programming is complete make sure lamp or device is set in the
ON position. Plug the light or device into the timer and plug the timer into
the wall. Your timer is ready to use!
Note: The lamp or device will not come on until the next ON time is triggered.
To manually turn the device ON and start the program, cycle the ON/OFF
button until the light/device turns on and the display reads AUTO ON. You can
also use the ON/OFF button to override the timer and set to ON (always on) or
OFF (always off).
Remarks:
1. While in programming mode, the programmed time can be cancelled or
resumed by pressing the “RECALL” (RCL) button. 2. ON/OFF time becomes effective immediately once the setting is done.
3. Light/Device must be turned ON when plugged into timer or timer will not
control the appliance.
ON/OFF Options:
There are 4 settings for the timer; Press the “ON/OFF” button to scroll through
the options and stop at the option desired.
a. ON – Timer outlet is always ON (Overrides Programming).
b. AUTO ON – Timer outlet is currently ON and will turn OFF at next
programmed OFF time.
c. OFF – Timer outlet is always OFF (Overrides Programming).
d. AUTO OFF – Timer outlet is currently OFF and will turn on at the next
programmed ON time.
The timer program will control the appliance if set to AUTO ON or AUTO OFF.
Random Security Option (RND):
This program option will turn lights ON and OFF using the programmed
times + or - 30 minutes, giving the home a more lived in appearance while
occupant is away.
1. Press the “HOUR” (RND) button for 5 seconds to activate the random
feature. The display will show the RND icon above the seconds on the
display. See Figure 1.
2. Press the “HOUR” (RND) button for 5 seconds to deactivate the random
feature. The display will not show the RND icon. See Figure 1.
Daylight Savings Time (DST) Easy Adjust Feature:
Push the “CLOCK” button for 5 seconds to advance the current time 1 hour,
+1h icon should appear on the lower left corner of the display. Repeating
this process will decrease the time by 1 hour and the +1h icon will disappear.
See Figure 1.
15089
4-2011
www.jascoproducts.com
Temporizador Digital
ESTA PANTALLA SE MUESTRA EN EL MODO “RELOJ” ESTÁNDAR.
RELOJ (DST - Horario de verano)
- Para configurar la hora y el día mantenga apretada la tecla
CLOCK y presione las teclas HOUR>MINUTE>DAY.
- En el modo reloj, mantenga presionada esta tecla por 5 segundos
para adelantar o atrasar una hora (Ajustar horario de verano).
HORA (RND - Aleatoria)
- Mientras presiona CLOCK, apriete esta tecla para configurar la hora.
- Mientras está en el modo programación, presione esta tecla para configurar la
hora de los horarios de APAGADO y ENCENDIDO.
- Mientras está en el modo reloj, mantenga presionada esta tecla (3 segundos) para
activar la función aleatoria de seguridad.
PROGRAMA
Presione para ingresar el modo programación del temporizador.
RCL (RESTAURAR)
En el modo programación, presione esta tecla para cancelar
o restaurar la hora de ENCENDIDO y APAGADO que aparece
en pantalla.
MINUTOS
- Mientras presiona CLOCK (reloj), apriete esta tecla para configurar los minutos.
- Mientras está en el modo programación, presione esta tecla para configurar los
minutos de los horarios de APAGADO y ENCENDIDO (ON/OFF).
RESET
DÍA
- Mientras presiona CLOCK, apriete esta tecla para configurar el día de la semana.
- Mientras está en el modo programación, presione esta tecla para seleccionar
entre las opciones de los diferentes días de la semana.
ON/OFF (ENCENDIDO y APAGADO) (presionar para seleccionar)
ON= siempre ENCENDIDO
Auto ON/OFF = temporizador activado
OFF = siempre APAGADO
MANTENGA PRESIONADA ESTA TECLA PARA RESTABLECER
TODOS LOS PROGRAMAS DE MANERA PERMANENTE
Figura 1
Programación inicial:
1. Si aparecen números en la pantalla LCD se puede comenzar con la programación.
Continúe con el paso número 2. Si la pantalla está en blanco conecte el temporizador
y aguarde dos horas hasta que la batería interna se cargue antes de comenzar con
la programación.
2. Utilice un mondadientes o un lápiz puntiagudo para empujar el botón RESET
(REINICIO). Una vez desplazado este botón, la pantalla se pondrá en blanco por un
instante y luego mostrará las 12:00 AM. Ver Figura 2.
Cómo configurar la hora:
1. Mantenga presionada la tecla “CLOCK” mientras dura el proceso de configuración de
la hora y el día.
Figura 2
Pantalla LCD
Listo para comenzar la configuración
2. Mientras presiona “CLOCK”, apriete la tecla“HOUR” hasta que aparezca la hora actual.
Observe que las palabras AM y PM aparezcan en la parte inferior derecha de la
pantalla. Ver Figura 1.
3. Presione la tecla “MINUTE”, mientras oprime la tecla “CLOCK”. Continúe presionando
la tecla “MINUTE” hasta que aparezcan los minutos actuales.
4. Presione “DAY”, mientras oprime la tecla “CLOCK”. Continúe presionando la tecla “DAY”
hasta encontrar el día actual.
5. Una vez que haya aparecido el día actual en la pantalla suelte la tecla "CLOCK".
Programación de los horarios de ENCENDIDO y APAGADO:
Observación: Si no se presiona ninguna tecla por el término de 10 segundos mientras se
realiza la configuración, el temporizador volverá a mostrar la pantalla del reloj.
1. Presione y suelte la tecla “PROGRAM” para
Figura 3
comenzar con la configuración. La pantalla
mostrará la indicación 1ON y todos los días de la
semana. Ver Figura 3.
2. Presione ”DAY” para seleccionar entre las
opciones de los diferentes días de la semana que
desea configurar:
• MO (LUNES) TU (MARTES) WE (MIÉRCOLES) TH
(JUEVES) FR (VIERNES) SA (SÁBADO) SU (DOMINGO)
• MO (LUNES)>TU (MARTES)>WE (MIÉRCOLES)>TH (JUEVES)>FR (VIERNES)>SA
(SÁBADO)>SU (DOMINGO) (para mostrar uno a uno cada día de la semana, esto
significa que la configuración de encendido y apagado solo está activa para el día
que ha sido seleccionado)
• MO (LUNES) TU (MARTES) WE (MIÉRCOLES) TH (JUEVES) FR (VIERNES)
• SA (SÁBADO) SU (DOMINGO)
• MO (LUNES) TU (MARTES) WE (MIÉRCOLES) TH (JUEVES) FR (VIERNES) SA (SÁBADO)
• MO (LUNES) WE (MIÉRCOLES) FR (VIERNES)
• TU (MARTES) TH (JUEVES) SA (SÁBADO)
• MO (LUNES) TU (MARTES) WE (MIÉRCOLES)
• TH (JUEVES) FR (VIERNES) SA (SÁBADO)
3. Encuentre los días en los que desearía que el temporizador funcione y deje de
presionar la tecla “DAYS”. De esta forma permitirá que aparezcan en la pantalla los
días en que quiere que el temporizador funcione.
4. Presione la tecla “HOUR” hasta que aparezca en la pantalla el horario en que usted
desea que el temporizador se active. (Las palabras AM y PM aparecen en la esquina
inferior derecha de la pantalla. Asegúrese de que sean correctas cuando configure
el horario).
5. Presione la tecla “MINUTE” hasta que aparezcan en la pantalla los minutos en que
usted desea que el temporizador se active.
6. Presione y suelte la tecla“PROGRAM” para configurar el horario de 1OFF (apagar).
Repita los pasos 1 al 5 si desea que el temporizador se APAGUE para el programa
número 1.
7. Presione "PROGRAM" para ir al Programa número 2 (P2ON) y repita los pasos 1 al 6 si
desea configurar horarios adicionales de ENCENDIDO y APAGADO o presione "CLOCK"
(en cualquier momento) para finalizar la configuración. ¡Puede configurar hasta 20
programas de ENCENDIDO y APAGADO para que se ejecuten simultáneamente!
8. Una vez que haya terminado la configuración, puede volver al "modo reloj"
presionando la tecla "CLOCK" .
9. Una vez que haya terminado toda la configuración, asegúrese de que la lámpara o
el dispositivo esté en la posición ON. Conecte la luz o el dispositivo al temporizador y
este último a la pared. ¡El temporizador está listo para usarlo!
Observación: La lámpara o el dispositivo no se encenderán hasta que se active el
próximo horario de ENCENDIDO. Para ENCENDER el dispositivo de manera manual y dar
inicio al programa, vuelva a presionar la tecla ON/OFF hasta que la luz o el dispositivo
se enciendan y en la pantalla aparezca la indicación AUTO ON. También puede utilizar
la tecla ON/OFF para anular el temporizador y configurarlo en ON (siempre encendido) u
OFF (siempre apagado).
Observaciones:
1. Mientras está en el modo programación, se puede cancelar o restablecer el horario
programado presionando la tecla “RECALL” (RCL, por su sigla en inglés).
2. El horario de ENCENDIDO y APAGADO se hace efectivo de inmediato una vez
terminada la configuración.
3. La luz o el dispositivo deben estar ENCENDIDOS cuando se los conecte al
temporizador o, de lo contrario, este último no podrá controlarlos.
Opciones de ENCENDIDO y APAGADO:
Hay 4 configuraciones diferentes para el temporizador. Presione la tecla “ON/OFF” para
seleccionar entre las opciones y para detenerse en la opción deseada.
a. ON – La salida del temporizador está siempre ENCENDIDA (Anula la programación).
b. AUTO ON – La salida del temporizador está ENCENDIDA en este momento y se
APAGARÁ en el próximo horario programado de APAGADO.
c. OFF – La salida del temporizador está siempre APAGADA (Anula la programación).
d. AUTO OFF – La salida del temporizador está APAGADA en este momento y se
ENCENDERÁ en el próximo horario programado de ENCENDIDO.
El temporizador contralará el aparato si se lo programa en AUTO ON o AUTO OFF
Opción de seguridad aleatoria (RND, por su sigla en inglés):
Esta opción del programa ENCENDERÁ o APAGARÁ las luces por medio de los horarios
establecidos de + o - 30 minutos y de esta forma la vivienda parecerá estar ocupada
mientras sus dueños están fuera.
1. Presione la tecla “HOUR” (RND) por 5 segundos para activar la función aleatoria. En la
pantalla aparecerá la indicación RND arriba de los segundos. Ver Figura 1.
2. Presione la tecla “HOUR” (RND) por 5 segundos para desactivar la función aleatoria.
En la pantalla no aparecerá la indicación RND. Ver Figura 1.
Función para modificar de manera sencilla el horario de verano (DST, por su sigla en
inglés):
Presione la tecla “CLOCK” por 5 segundos para adelantar 1 hora el horario actual. En la
esquina inferior izquierda de la pantalla debe aparecer la indicación de 1h. Si se repite
este proceso el horario disminuirá en 1 hora y desaparecerá la indicación +1h. Ver
Figura 1.
15089
4-2011
www.jascoproducts.com