1
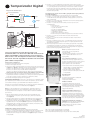
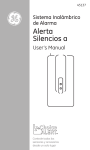
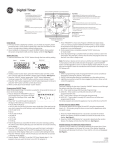
Digital Timer
Typical Wiring Schematic
= Wiring Nut
Black
Blue
Green
Line
Black
Timer
Load
Ground
White
White
Figure 1
Black
(Line)
Blue
(Load)
Black
Programming On/Off Events: (up to 4 ON/OFF program)
1. Push “Setup/PGM” twice. “P1” will flash on screen.
2. Push + or - to choose the desired program to change, or start at “P1 ON.”
Push enter to confirm which program P1, P2, P3, or P4 you are setting.
3. Push + or - to choose between “set” or “del” program. Push enter to confirm.
4. Push + or - to choose the desired days you would like the timer to activate.
The options are;
• S, M, T, W, Th, F, S (All days)
• S, S (Weekend)
• M, T, W, Th, F (Weekdays)
• M through S: (Individual days)
• T, Th
• M, W, F
Push enter to confirm the days of week setting.
5. Push + or - to choose the desired hour. Push enter to confirm.
6. Push + or - to choose the desired minute. Push enter to confirm.
7. After completion of steps 1 to 6 the ON time and days selected are
complete. Repeat steps 4 to 6 to set the OFF time for the program.
8. Once ON and OFF for a program is chosen the timer will ask you to “save”
- push enter to save program, then continue to set other programs. When
finished programming push Setup. Note: The display will show “AUTO” to alert you a program is running.
*When done programming, close door. You cannot exit during a program cycle.
Using Random Feature: The random feature will turn lights on and off using
the programmed times + or - 30 minutes. This gives your house a more lived in
appearance.
Black
1. Push the random button to activate random feature. The screen will change
from “AUTO” to random. Screen will display “RDM”
2. Push the auto button to deactivate random mode. Screen will display “AUTO”
Green
Ground
Figure 2
Ratings:
120VAC 60Hz
Incandescent (Tungsten): 5A/600W
Resistive: 15A/600W
Maximum Temperature: 40°C
If you are unsure or unclear about this installation, contact
a qualified licensed electrician. Not for use with CFL or
fluorescent bulbs. Use with incandescent, xenon, halogen.
Safety ground (green) must be connected for proper
operation.
Manual Override:
Manual override will not effect programing.
Pressing the door will override the timer
setting and will manually turn the switch ON
and OFF.
Installation Instruction
1. Turn OFF the main power at the circuit breaker.
2. Remove the existing switch.
3. Connect the wires of the timer to the wall box as shown in Figure 1 and
Figure 2 using the wire nuts provided.
a) Connect the line wire to the black wire from Timer.
b) Connect the load wire to the blue wire from Timer.
c) Connect the ground wire to the green wire from Timer.
Note: Be sure that all wire nuts are secure.
4. Tuck the wires into the wall box leaving room for the timer. Using the screws
provided, mount the timer to the wall box being careful not to crush any
wires.
5. Turn main power ON at the circuit breaker.
POWER-UP SEQUENCE: If you don’t see the numbers on the screen you will
want to verify the unit is wired correctly, the unit is getting power, and the bulb
in the fixture is good.
Memory Back Up: This timer is equipped
with memory back up that will protect the
settings for up to 60 minutes. You never have
to replace batteries. The internal backup
requires about 12 hours to fully charge.
ON - OFF Slide Switch: Turns power to the
timer ON or OFF. In “OFF” position timer will
not function manually or automatically.
ON = Power to timer & fixture.
OFF = No power to timer or fixture.
For normal operation leave in the on
position.
Figure 3
Verify the Power slide switch inside the button is set to the ON position. See
Figure 3.
Note: If the timer has no display check the bulb first to make sure the light bulb
is screwed in tight and not burned out. A working light bulb must be installed
to complete the circuit.
1. Open the door by inserting a fingernail or screwdriver in the space provided
at the top of the door and pulling forward. See Figure 4.
2. Position the Power switch to ON (To Right Side). Display will not appear until
switch is on. See Figure 3.
3. Push and hold the RESET button for 3 seconds. The word Reset will appear
on the screen. NOTE: When adjusting settings on timer, always use a nonmetallic, insulated tool such as a toothpick or wooden pencil.
4. The display should flash 12:00 am.
Setting Current Day & Time:
1. Push Setup/PGM once, date will appear on screen.
2. Push the + or - to move the arrow under the current day of the week (S, M, T,
W, T, F, S). Press enter to confirm. See Figure 5. Hour will appear on screen.
3. Push the + or - to scroll through the Hours. Press enter when the correct
hour is found, minutes will appear on screen. Press the + or - to scroll
through the minutes. Press enter when the correct minute is found to
confirm setting. Be sure (AM/PM) is correct. This is located in the lower left
portion of the display.
Figure 4
Figure 5
15313
03-10-2011
www.jascoproducts.com
Temporizador Digital
Esquema de cableado típico
Negro
Verde
Línea
Tierra
Temporizador
= Tuerca para alambre
Azul
Negro
Carga
Blanco
Blanco
Figura 1
Negro
(Línea)
Azul
(Carga)
Negro
Negro
Verde
A tierra
Figura 2
3. Presione + o - para desplazarse por las horas. Presione Enter cuando
encuentre la hora correcta; aparecerán los minutos en la pantalla. Presione
+ o - para desplazarse por los minutos. Presione Enter cuando encuentre
los minutos correctos para confirmar la selección. Asegúrese de que está
correcto la parte del día: a.m./p.m. Esto se encuentra en la parte inferior
izquierda de la pantalla.
Programación de eventos de encendido y apagado: (hasta 4 programas de
encendido/apagado)
1. Presione Setup/PGM dos veces. Parpadeará “P1” en la pantalla.
2. Presione + o - para elegir el programa que desea cambiar o comenzar
con P1 ON. Presione Enter para confirmar cuál programa P1, P2, P3 o P4
está configurando.
3. Presione + o - para elegir entre configurar (“set”) o borrar (“del”) programa.
Presione Enter para confirmar.
4. Presione + o - para seleccionar los días que desea que se active
el temporizador.
Las opciones son;
• S, M, T, W, Th, F, S (Todos los días)
• S, S (Fin de semana)
• M, T, W, Th, F (Días hábiles)
• M through S: (Días individuales)
• T, Th (Martes y jueves)
• M, W, F (Lunes, miércoles, viernes)
Presione Enter para confirmar el ajuste de los días de la semana.
5. Presione + o - para seleccionar la hora deseada. Presione Enter
para confirmar.
6. Presione + o - para seleccionar los minutos deseados. Presione Enter
para confirmar.
7. Después de realizar los pasos 1 a 6, se completarán los días y la hora de
encendido seleccionados. Repita los pasos 4 a 6 para ajustar la hora de
apagado del programa.
8. Una vez que haya seleccionado el encendido y apagado de un programa,
el temporizador le pedirá que “guarde” la configuración. Presione Enter
para guardar el programa y luego continúe configurando más programas.
Cuando termine de programar, presione Setup.
Nota: La pantalla mostrará “AUTO”
para avisarle que un programa se
está ejecutando.
* Al terminar de programar, cierre la tapa.
Usted no podrá salir durante un ciclo
de programa.
Si no está seguro o tiene poco claro acerca de esta
instalación, llame a un electricista calificado con licencia. No
utilizar con bombillas compactas fluorescentes o lámparas
fluorescentes. Usar con lámparas incandescentes, halógenas
o de xenón. Tierra de seguridad (verde) debe estar conectado
para realizar esta operación.
Uso de la función aleatoria: La función
aleatoria encenderá y apagará las luces a
las horas programadas más o menos treinta
minutos. Esto le dará a su vivienda una
mejor apariencia de estar habitada.
Instrucciones de instalación
1. Apague el interruptor principal en el disyuntor.
2. Retire el interruptor existente.
3. Conecte los cables del temporizador a la caja de pared como se muestra en
la figura 1 y la figura 2, utilizando las tuercas para alambre que se incluyen.
a) Conecte el cable de línea al cable negro del temporizador. b) Conecte el cable de carga al cable azul del temporizador. c) Conecte el cable de conexión a tierra al cable verde del temporizador. Nota: Asegúrese de que todas las tuercas para alambre estén apretadas.
4. Introduzca los cables en la caja de pared dejando espacio para el
temporizador. Mediante los tornillos que se incluyen, instale el temporizador
en la caja de pared, teniendo cuidado de no aplastar los cables.
5. Encienda el interruptor principal en el disyuntor.
1.Para activar la función aleatoria, presione
el botón RDM. La pantalla cambiará de
“AUTO” a “RDM” (modo aleatorio).
2.Para desactivar el modo aleatorio,
presione el botón AUTO. Aparecerá “AUTO”
en la pantalla.
Especificaciones:
120 VCA 60 Hz
Incandescente (tungsteno): 5 A/600 W
Resistiva: 15 A/600 W
Temperatura máxima: 40° C
SECUENCIA DE ENCENDIDO: Si usted no ve los números en la pantalla, tendrá
que comprobar que la unidad esté conectada correctamente, que la unidad
esté recibiendo energía y que la bombilla de la lámpara esté buena.
Verifique que el interruptor deslizante de encendido en el interior del botón se
encuentre en la posición de encendido (ON). Vea la figura 3.
Figura 3
Nota: Si no hay visualización en el temporizador, compruebe primero la
bombilla para asegurarse de que la bombilla está bien enroscada y que
no está quemada. Para completar el circuito deberá instalar una bombilla
que funcione.
1. Abra la tapa mediante la inserción de una uña o destornillador en el
espacio provisto en la parte superior de la tapa y hale hacia adelante.
Vea la figura 4.
2. Coloque el interruptor de encendido en ON (lado derecho). No aparecerá
visualización hasta que el interruptor esté encendido. Vea la figura 3.
3. Mantenga presionado el botón RESET durante tres segundos. Aparecerá
la palabra “Reset” en la pantalla. NOTA: Al ajustar las configuraciones del
temporizador, utilice siempre una herramienta aislante, no metálica, como
un palillo de dientes o un lápiz de madera.
4. En la pantalla deberá parpadear 12:00 a.m.
Configuración del día y la hora actuales:
1. Presione Setup/PGM una vez; aparecerá la fecha en la pantalla.
2. Presione + o - para desplazar la flecha debajo del día de la semana actual:
S (domingo), M (lunes), T (martes), W (miércoles), T (jueves), F (viernes), S
(sábado). Presione Enter para confirmar. Vea la figura 5. Aparecerá la hora
en la pantalla.
Figura 4
Figura 5
Anulación manual:
La anulación manual no afectará la
programación. Al presionar la puerta se
anulará la configuración del temporizador
y el interruptor se podrá encender y
apagar manualmente. Copia de seguridad de memoria: Este
temporizador cuenta con una copia de
seguridad de memoria que protegerá las
configuraciones hasta por sesenta minutos.
Usted nunca tendrá que reemplazar las pilas.
La copia de seguridad interna requiere unas
doce horas para cargarse completamente.
Interruptor deslizante de encendido y
apagado: Enciende y apaga el temporizador.
En la posición de apagado (“OFF”), el
temporizador no funcionará de forma
manual ni automática.
ON = Con energía al temporizador y a la unidad.
OFF = Sin energía al temporizador ni a la unidad.
Para funcionamiento normal, deje en la posición de encendido (ON).
15313
03-10-2011
www.jascoproducts.com