1
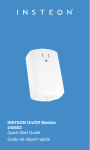
INSTEON On/Off Switch
2477S
Quick Start Guide
INSTEON On/Off Switch
On LED
On
Status LED
Off
Set Button
For the complete Owner’s Manual and
more, visit: insteon.com/support
Tools Needed for Installation
Phillips Screwdriver
Flathead Screwdriver
Voltage Detector
Wire Cutter / Stripper
Disconnect Power
Always disconnect power before
installation. Contact INSTEON
Support when uncertain about
installation.
1-866-243-8022
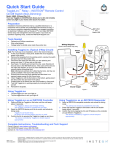
Basic Installation
1
Turn off power to your switch at the
electrical service panel.
ON
ON
ON
ON
OFF
ON
ON
or
ON
ON
ON
Circuit Breakers
Power is ON
Fuse Panel
Power is OFF
2
Remove the old switch and disconnect
the wires. If your box lacks neutral wires,
stop and contact support.
!
1
2
½”
Neutral
Wire
3
Turn on power at the circuit breaker and
use a voltage detector or multi-meter
to identify line and load. Line will be
energized.
4
Turn off power at the circuit breaker. Connect
the junction box. Verify that the wire nuts are s
except for the bare ground wire.
Load
Line
the On/Off Switch wires to the identified wires in
secure and that no exposed copper wire is visible
Neutral
Ground
5
Mount the On/Off Switch into the
junction box with the LED bar on the left
and turn power on to the switch at the
circuit breaker panel.
6
Test your On/Off Switch by tapping the
paddle to turn On and Off.
Installation complete. You can now link
your On/off Switch to the Hub.
Linking to the Hub
Follow the on-screen instructions to add
your On/Off Switch to the INSTEON Hub.
+
When prompted, press and hold the
On/Off Switch’s set button.
!
If not using the Hub, refer to the
instructions that came with your product.
Device Control
Turn on, turn off, set schedules and
create scenes for your On/Off Switch
using the INSTEON Hub and App.
On/Off Switch
Protected under U.S. and foreign patents (see www.insteon.com/patents)
©2014 INSTEON
RAW-1292 Rev 03.13.14