1
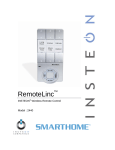
Status LED
Quick Start Guide
RemoteLinc™ 2 - INSTEON® Wireless Keypad
Model: 2444A2WH4
Introduction
4 Scene Buttons
(Left=Off/dim,
Right=On/brighten)
Conveniently control your home’s INSTEON network with the compact and
versatile RemoteLinc 2 wireless keypad controller.
What's Included
•
RemoteLinc 2
Charging LED
(inside case)
Getting Started
Fully charge RemoteLinc 2 prior to programming (or anytime the unit is not
responding) using a Type A to Micro-B USB cable (sold separately). The
red Charging LED will turn off once the battery is fully charged
Power
(approximately one hour). Slide the power switch to the ON position.
Switch
(Left=Off,
Note: RemoteLinc 2 requires an INSTEON dual-band or RF device to
Right=On)
communicate with other devices on your INSTEON network.
RemoteLinc 2 uses a subtle beeper sound to assist setup. It is
recommended that you program the unit in a quiet area.
Micro-USB
Charging
Jack
Set button
Add RemoteLinc 2 (Button) as an INSTEON Controller
1) Tap ^ on the RemoteLinc 2 scene button of choice
2) Adjust the responder to the state you want when the scene is activated from RemoteLinc 2
1
3) Press and hold RemoteLinc 2's Set button until RemoteLinc 2 beeps
RemoteLinc 2’s Status LED will begin blinking green
4) Press and hold the responder’s Set button until the responder beeps or its LED flashes
RemoteLinc 2 will double-beep and its LED will stop blinking
Responder’s LED will stop blinking (it may also double-beep)
5) Confirm that scene addition was successful by tapping on/off on the programmed RemoteLinc 2 button
The responder will toggle between the scene’s preset on-level and off
1
If the responder is a multi-scene device such as a KeypadLinc, tap the scene button you wish to control until its LED is in the desired state (on or off)
Using RemoteLinc 2
RemoteLinc 2 contains four on/off button pairs (a-d). Each pair controls its own scene, sending commands to
devices linked specifically to that on/off button pair. Dimmable responders may behave differently, depending on
whether you tap, double-tap or press and hold a button to activate/deactivate a scene. Non-dimming responders
will only turn full-on or full-off, no matter what method you use.
Tap
Ramp to preset on-level or
off
Double-tap
Full-on or full-off instantly
Press and hold
Brighten or dim until
released
The RemoteLinc 2 Status LED will flash green once for each on/brighten command
sent and red once for each off/dim command sent.
Warning: RemoteLinc 2 is permanently sealed. Do not attempt to open case. Doing so will damage the remote
and void the warranty.
Owner’s Manual and Tech Support
Owner’s Manual and current Quick Start Guide: http://www.insteon.com/support
Call: INSTEON Support Line at 800-762-7845
2444A2xx4 Rev. 7/16/2012 10:08 AM / See Owner’s Manual for Warranty Information, Patented
© Copyright 2012, INSTEON, 16542 Millikan Ave., Irvine, CA 92606, 800-762-7845
RemoteLinc 2 Accessories
•
•
•
•
•
Wall Mount Bracket
(2444B4)
Wall mount your RemoteLinc 2 anywhere
Gang two or more together for more control
Can be installed adjacent to existing wired-in switches
Easily remove RemoteLinc for portability or recharging
Use with any decorator wallplate
Pair the Wall Mount Bracket with any decorator-style
wall plate (sold separately) for the perfect wireless
wall switch solution
•
Tabletop Stand
(Available in the 2444Bxx kit)
Perfect for a nightstand, kitchen counter or
coffee table
USB Charging Cable (Type A to Micro-B)
(2444B5)
•
Works with RemoteLinc 2 and any other
device that uses USB Type A to Micro-B
•
•
•
Visor Clip
(Available in the 2444Bxx kit)
Control your home from your vehicle
Turn lights on when you arrive and off
when you leave
USB Power Adapter
(2444B6)
For use with RemoteLinc 2 USB
Charging Cable and any other device
that charges via USB cable
This device complies with FCC Rules and Industry Canada license-exempt RSS standard(s). Operation is subject to the following two conditions: (1) this device may not cause harmful
interference, and (2) this device must accept any interference, including interference that may cause undesired operation of the device.
Ce dispositif est conforme aux règlements de la FCC et aux normes CNR exemptes de licence d’Industrie Canada. Son fonctionnement est assujetti aux deux conditions suivantes: (1) ce
dispositif ne doit pas causer d’interférences nuisibles, et (2) ce dispositif doit accepter toute interférence qu’il reçoit, y compris les interférences pouvant nuire à son fonctionnement.
2444A2xx4 Rev. 7/16/2012 10:08 AM / See Owner’s Manual for Warranty Information, Patented
© Copyright 2012, INSTEON, 16542 Millikan Ave., Irvine, CA 92606, 800-762-7845