1
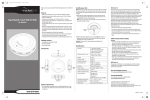
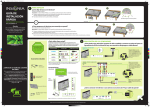
Setup Guide NS-LTDVD19-09CA
TM
Remote control / Télécommande
AAA batteries (2) / Piles AAA (2)
AC power cord / Cordon d’alimentation CA
Pedestal stand with screws / Socle avec vis
User Guide / Guide de l’utilisateur
Quick Setup Guide / Guide d’installation rapide
Disc Slot
Logement pour disques
Prev Button
Touche Précédent
Next Button
Touche Suivant
Stop Button
Touche Arrêt
Play/Pause Button
Touche Lecture/Pause
Disc Indicator
Témoin de disque
Étape 1 Identification des fonctionnalités de ce téléviseur LTDVD de 19 po
Identifier tout d'abord les touches de commande et les options de connexions situées à l'avant, sur les côtés
et à l'arrière du téléviseur. Voir le Guide de l’utilisateur pour plus d’informations sur la façon d’utiliser toutes
les possibilités de ce téléviseur LTDVD de 19 po.
MENU
Disc O
cm
INPUT
PREV
NEXT
STOP
PLAY/
PAUSE
Disc label towards front
Package Contents / Contenu de la boîte
Check out the front, side, and back panels to familiarize yourself with
button controls and connection options. Refer to the User Guide for
more information about how to get the most out of your 19” LTDVD TV.
nly
Félicitations d’avoir acheté ce produit
Insignia de haute qualité. Ce téléviseur
ACL de 19 po avec lecteur DVD a été
conçu pour des performances et une
fiabilité exceptionnelles. Utiliser ce
guide pour la première mise en service
du téléviseur. Pour toutes questions ou
informations, consulter le Guide de
l’utilisateur.
Step 1 Getting to know your 19” LTDVD TV
12
Congratulations on your purchase of a
high-quality Insignia product. Your 19”
LCD TV/DVD is designed for reliable
and trouble-free performance. Use this
guide for initial setup of your TV. If you
have questions, see your User Guide for
more information.
VOL
CH
DISC IN
CH+/CH +/-
OPEN/
CLOSE
POWER
Open / Close
Ouvrir/Fermer
Power
Marche/Arrêt
IR sensor / Capteur infrarouge
Step 2 Install remote control batteries
Remove the cover from the back of the remote control. Insert the batteries as
indicated, then replace the cover.
Étape 2 Installation des piles de la télécommande
08-1155 NS-LTDVD19-09CA QSG
Volume+/Volume +/-
CH
Power/Standby Indicator
Témoin Marche-Arrêt/Attente
Screwdriver / Tournevis
Input
Entrée
VOL
Headphone jack
Prise de casque d'écoute
Tools Required / Outils nécessaires
Menu
Menu
Retirer le couvercle du compartiment des piles au dos de la télécommande.
Insérer les piles tel qu’illustré, puis replacer le couvercle.
Step 3 Connecting your components / Étape 3 Connexion de composants
Connect your components using the diagram below as a guide. Press the INPUT button on your remote control to switch between components.
Connecter les composants en se référant au schéma ci-dessous. Utiliser la touche INPUT (Entrée) de la télécommande pour alterner entre les périphériques.
HDMI input / Entrée HDMI
Connect a DVD player or set-top box with an HDMI port
(audio cable not required). If using an HDMI-DVI cable,
you must also connect an audio cable.
Connecter un lecteur DVD ou un décodeur avec port
HDMI (un câble audio n’est pas nécessaire). En cas
d’utilisation d’un câble HDMI-DVI, il est nécessaire de
connecter également un câble audio.
Video2 input / Entrée Vidéo 2
PC/VGA input / Entrée PC/VGA
Connect a DVD player, VCR, or other component
with Video and L/R analog audio. Connecter un lecteur DVD,
un magnétoscope ou un autre composant avec vidéo
et audio analogique G/D (L/R).
Connect to a computer's VGA and audio ports.
Connecter aux ports VGA et audio d’un ordinateur.
RF input / Entrée RF
Connect an off-air (VHF/UHF) antenna or
cable to watch standard TV programming.
Connecter une antenne (VHF/UHF) ou le
câble pour visualiser des émissions télévisées
standard.
C
Component input
Entrée à composantes
PB
C
PR
Video1 input / Entrée Vidéo 1
Connect a DVD player, VCR, or other
device with component video
and L/R analog audio.
Connecter un lecteur DVD, un magnétoscope
ou un autre périphérique avec vidéo
à composantes et audio
analogique G/D (L/R).
L
L
Connect a DVD player, VCR, or other
component with Video and L/R analog
audio.
Connecter un lecteur DVD, un magnétoscope ou
un autre composant avec vidéo et audio
analogique G/D (L/R).
FOR
SERVICE
ONLY
S-Video input / Entrée S-Vidéo
Connect a DVD player, VCR, or othercomponent with S-video and L/R analog audio.
Connecter un lecteur DVD, un magnétoscope ou un autre composant avec S-Vidéo
et audio analogique G/D (L/R).
Step 4 Connect power
Connect the AC power cord to the power jack
on the TV and to a wall outlet. Press the power
button on the side of your TV or POWER
on your remote control to start the TV.
Étape 4 Connexion de l’alimentation
~ 100-240V 50/60Hz
Connecter le cordon CA à la prise d'alimentation
du téléviseur et à la prise secteur. Mettre le téléviseur
en marche en appuyant sur la touche marche sur le
côté du téléviseur ou POWER de la télécommande.
AC INPUT
Step 5 Scan for channels / Étape 5 Recherche des canaux
Note: You must connect an antenna or cable before proceeding with this step.
Press TV MENU on the remote control, then press to highlight the Tuning icon.
The Tuning menu opens on the right. Press
or ENTER to enter the Tuning menu.
Press
to select Auto Scan, then press
or ENTER to start the auto scan.
Remarque: Il est nécessaire de connecter une antenne ou le câble avant d’effectuer
cette étape. Appuyer sur TV MENU (Menu TV) de la télécommande, puis sur
pour mettre en
surbrillance l'icône Tuning (Syntonisation).Le menu syntonisation (Tuning menu) s’affiche sur la
droite. Appuyer sur
ou sur ENTER (Entrée) pour accéder au menu syntonisation (Tuning).
Appuyer sur pour sélectionner Auto Scan (Recherche automatique), puis sur ou sur ENTER
(Entrée) pour commencer la recherche automatique.
Tuning
TV Source
CATV
Auto Scan
Skip
Off
DNR
On
______
Channel Label
Select
Adjust
Exit
Step 6 Play a DVD / Étape 6 Lecture d’un DVD
Press POWER to turn on your TV. Press DVD on the remote control. Insert a DVD into the disc slot, with the label facing
forward. The DVD player begins playing the DVD. Appuyer sur POWER (Marche/Arrêt) pour mettre le téléviseur sous tension.
Appuyer sur DVD de la télécommande. Insérer un DVD dans le logement des disques, avec l’étiquette tournée vers l'avant.
Le lecteur DVD commence à lire le DVD.
Distributed by/ Distribué par Best Buy Purchasing, LLC 7601 Penn Avenue South, Richfield, MN USA 55423-3645 www.insignia-products.com 877-467-4289
08- 1155