1
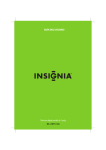
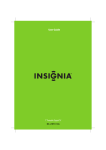
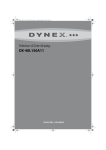
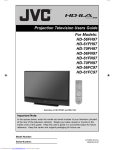
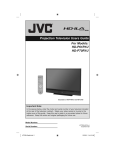
Quick Setup Guide
NS-L7HTV-10A TV
Congratulations on your purchase of a high-quality
Insignia product. Your TV is designed for reliable and
trouble-free performance. Use this guide for initial
setup of your TV. See your User Guide for more
information on using your TV.
Step 1 Getting to know your TV and connecting your devices
Check out the front, side, and back panels to familiarize yourself with button controls and connection options.
Connect your devices using the diagram below as a guide. Press INPUT on your remote control to switch between devices.
Package contents
• Remote control with battery
• AC adapter
• Vehicle adapter
• AV cable
• User Guide
• Quick Setup Guide
Antenna jack
In TV mode, connect an antenna, cable TV, or
satellite TV to this jack. In radio mode, connect
the supplied antenna to scan for radio stations.
Note: The supplied antenna will be attached
with the portable TV when you receive the
product. The antenna is detachable. If you
want to connect an external antenna, you can
detach the antenna and connect other
external antenna.
AC adapter
Actual product may vary from image shown.
Frame Stand
Open up the frame stand and
use it for supporting your TV.
Volume
Adjust the volume.
Remote control
Service port
Do not use.
VIDEO IN
Connect a standard
video device to this jack.
AV cable
Vehicle adapter
PHONE1 and 2 jacks
Connect a pair of
headphones to these jacks.
DC IN 9V jack
Connect the AC
adapter to this jack.
Power switch
Power On/Charge indicator
Displays the power status.
When the TV is on, the indicator
is green. When the battery is
charging, the indicator is orange.
Step 2 Install the remote control battery
Remove the battery holder from the back of the remote control by inserting a fingernail into the groove and
pulling out the holder. Place a CR2025 battery with the + side up on the holder. Insert the holder into the
remote control.
Step 4 Charging the built-in battery
Note: There is no standby mode for this TV, because it runs on a rechargeable battery.
Turn off your TV before charging the battery. Connect the supplied AC adapter. Charging starts, and the POWER
ON/CHG indicator is red. When the charging is completed, the indicator turns off.
Note: On initial use of the TV, charge the battery for 6 hours.
Step 5 Establish a signal
1
2
Note: The coin-shaped battery is already in the remote control. The first time you use the remote
control, remove the plastic sheet from the bottom of the battery to activate the remote.
Step 3 Connect the AC adapter
Connect the AC adapter into the DC IN jack on the right
side of your unit, then connect the AC adapter to a
100-240V power outlet.
Make sure that the included rod antenna or a stronger HDTV antenna (not included) is attached to the input at the
top of the TV. Extend the antenna rod and move the TV to a location where it can receive the strongest signal, free
of obstructions and interference from other devices. Press TV on your remote control to ensure you are in TV mode.
Step 6 Scan for channels
Note: See your User Guide for more information on connecting your TV
directly to cable or satellite service and for scanning for radio stations.
To scan for channels when the TV signal source is Antenna
Antenna/Cable
Antenna
Press MENU on the remote control, using the
buttons to
Auto Channel Search
highlight
(channel icon). The Channel menu opens. Press
Add/Skip Channels
OK/ENTER or to enter the Channel menu. Press the
buttons Favorites
80.3
to select Auto Channel Search, then press OK/ENTER or to enter Channel No.
Channel Label
PBS1DTV
the Auto Channel Search menu. Start to Scan is highlighted. Press
Select
OK:Enter
Menu:Exit
OK/ENTER or to start the scan.
If the Automatic Channel Search does not locate the channels you were expecting, try moving the TV to a location
where you can pick up a stronger signal, then try rerunning the search.
© 2009 Best Buy Enterprise Services, Inc. All rights reserved. INSIGNIA is a trademark of Best Buy Enterprise Services, Inc. Registered in some countries. All other products and brand names are trademarks of their respective owners.
ENGLISH 09-0339