1
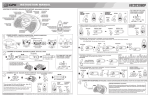
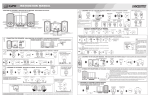
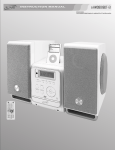
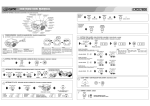
M A N UA L
D E
I N S T R U C C I O N E S
BOUTON DE iPod
PRISE DES CASQUES
TOMA DE AURICULARES
HEADPHONE JACK
FENTE DE CD
CAJÓN DEL CD
CD SLOT
To DC 12V Jack
AC IN ~
DC ADAPTOR
(Not Included)
AC 120V ~ 60Hz
To Cigarette Lighter
AUX
(Not Included)
8 X “D”-SIZE BATTERIES
PRESS AND HOLD
MEMORY/
CLOCK ADJ.
1
OR
DOWN
2
TO SELECT
24HR OR 12HR
UP
TUNER UP/DN/
REV/FWD
MEMORY/
CLOCK ADJ.
AM
I2:00
3
UP
OR
1
FUNCTION
2
STOP/BAND
3
UP
OR
TUNING DN
SKIP/REV
DOWN
TUNING UP
SKIP/FWD
UP
OR
2
3
Press and hold
MEMORY
CLOCK ADJ.
UP
OR
TUNING DN
SKIP/REV
REPEAT TO STORE ADDITIONAL STATIONS
DOWN
TUNING UP
SKIP/FWD
DOWN
TUNING UP
SKIP/FWD
Vous pouvez mémoriser jusqu' à 10 FM/10 AM stations :
Puede programar hasta 10 FM/10 AM estaciones:
You can store up to 10 FM/10 AM stations :
1
TUNING DN
SKIP/REV
MÉMORISER DES STATIONS
4
MEMORY
CLOCK ADJ.
PROGRAMACIÓN DE ESTACIONES EN LA MEMORIA
PROGRAMMING STATIONS INTO MEMORY
POWER ON
FM
MHz
DOWN
OR
Rote la unidad para mejor recepción de AM.
Rote l'unité pour meilleure réception d'AM.
Rotate the unit for better AM reception.
POUR AMÉLIORER LA RÉCEPTION:
PARA MEJORAR LA RECEPTIÓN:
TO IMPROVE RECEPTION:
88.0
4
UP
VOLUME
DOWN
TUNER UP/DN/
REV/FWD
4
6:00
AM
AM:
iPOD
SHUFFLE
1
CLASSIC/JAZZ
ROCK/POP
EQ
BOUTON PRESET EQ
BOTÓN PRESET EQ
2
FUNCTION
PRESET EQ BUTTON
POWER ON
AUX
· CD label should always
face the LCD display.
· La etiquette de CD debe
de estarsiempre miraudo la
exhibición de LCD.
· L' étiquette de CD devrait
touyours faire à l' affinchage
de LCD
iPOD
SHUFFLE
INSERT
CD
PLAY MODES / MODOS DE REPRODUCCIÓN / MODES DE LECTURE
3
4
DOWN
OR
UP
VOLUME
STOP
FM:
CLASSIC/JAZZ
ROCK/POP
EQ
BOUTON PRESET EQ
6:30
AM
OR
DOWN
CANCELAR:
PLAY/PAUSE
PLAY/PAUSE
ANNULER:
TO CANCEL:
PAUSA:
FAIRE UNE PAUSE:
PAUSE:
PRESS
UP
TUNING
RECHERCHE AUTOMATIQUE
AUTO SEEK / BÚSQUEDA AUTOMÁTICA /
OR
ÉCOUTE D' UNE STATION MÉMORISÉE
PLAY/PAUSE/M-UP
REP/M-DN
ESCUCHE UNA ESTACIÓN PROGRAMADA
LISTENING TO A PRESET STATION
DOWN
6
MEMORY/
CLOCK ADJ.
POWER OFF
This unit plays CD, CD-R and CD-RW discs. Note: CD-R/CD-RW discs must first
be finalized.
Este aparato reproduce discos CD, CD-R y CD-RW. Nota: Los discos CD-R/CDRW tienen que haber terminado de tocar.
Cet appareil lit des disques CD, CD-R et CD-RW. Remarque: Les disques CDR/CD-RW auront fini.
PLAY/PAUSE
AUX
Extienda y rote la antena
Étendez et rote l'antenne
OR
BOTÓN PRESET EQ
UP
PRESET EQ BUTTON
5
TUNER UP/DN/
REV/FWD
Extend and Rotate the antenna.
VOL I5
MEMORY/
CLOCK ADJ.
POWER ON
Baissez le volume avant d'utiliser les casques. Réglez le volume graduellement jusqu'à atteindre le niveau
d'écoute souhaité. S'il-vous-plaît, ne mettez pas le volume trop fort pendant longtemps.
Baje el volumen antes de utilizar los auriculares. Gradualmente ajuste el volumen a un nivel de
escucha confortable. Por favor no coloque el volumen muy alto durante largos periodos de
tiempo.
LISTENING TO THE RADIO / ESCUCHA DE LA RADIO / ÉCOUTE DE LA RADIO
NOTE:
MAKE SURE THE
UNIT IS IN POWER
OFF MODE.
Not Included
Set the Volume to a low level before putting on the headphones. Gradually adjust
the Volume to a comfortable listening level. Please do not play the volume too
loudly for extended periods of time.
SETTING THE TIME / PARA COLOCAR LA HORA DEL RELOJ / POUR RÉGLER L' HEURE DE L' HORLOGE:
AUX
iPOD
SHUFFLE
E M P LO I
CAUTION / ADVERTENCIA / AVERTISSEMENT
D '
LISTENING TO A CD / ESCUCHE UN DISCO COMPACTO Ó CD / ÉCOUTE D’UN DISQUE COMPACT OU CD
4
3
2
1
PRISE D’ENTRÉE AUXILIAIRE
TIMER BUTTON iPod BUTTON iPod DOCKING
AUX IN JACK
BOTÓN DE iPod
STATION
TOMA DE ENTRADA AUXILIAR BOTÓN TIMER
BOUTON TIMER
ÉJECTEZ LE BOUTON POUR LE CD
BOTÓN DE SACAR EL CD
EJECT BUTTON FOR CD
COMMUTATEUR MARCHE/ ARRÊT DE DBBS
BOTÓN DE PRENDER/ APAGAR EL DBBS
DBBS ON/OFF SWIITCH
BOUTON PRESET EQ
BOTÓN PRESET EQ
PRESET EQ BUTTON
TOUCHE VOLUME DN
BOTÓN VOLUME DN
VOLUME DN CONTROL
TOUCHE VOLUME UP
BOTÓN VOLUME UP
VOLUME UP CONTROL
RÉPÉTITION/M-DN
REPERTIR/M-DN
REPEAT/M-DN
M O D E
POWER SOURCES / FUENTES DE ALIMENTACIÓN / SOURCES D’ALIMENTATION
FUNCTION SWITCH
iPod shuffle
INTERRUPTOR FUNCTION BOTÓN DE REVOLER iPod
INTERRUPTEUR FUNCTION BOUTON DE iPod DE BATTAGE
BOUTON DE PLAY/PAUSE/ MEM-UP
BOTÓN DE TOCAR/PAUSAR/ MEM-UP
PLAY/PAUSE/MEM UP BUTTON
BOUTON TUNING UP/SKIP/FWD
BOTÓN TUNING UP/SKIP/FWD
TUNING UP/SKIP/FWD BUTTON
BOUTON TUNING DN/SKIP/REV
BOTÓN TUNING DN/SKIP/REV
TUNING DN/SKIP/REV BUTTON
BOUTON STOP/BAND
BOTÓN STOP/BAND
AUX
BOUTON DE SOMMEIL
AFFICHAGE DELCD
INTERRUPTEUR POWER
iPOD
SHUFFLE
BOTÓN DE DORMIR
EXHIBICIÓN DE LCD
INTERRUPTOR POWER
STOP/BAND BUTTON
BOTÓN MEMORY/CLOCK ADJ.
BOUTON MEMORY/CLOCK ADJ.
MEMORY/CLOCK ADJ. BUTTON
SLEEP BUTTON
LCD DISPLAY
POWER SWITCH
/
INSTRUCTION MANUAL
LOCATION OF FEATURES / UBICACION DE LOS BOTONES / EMPLACEMENT DES BOUTONS
TM
UP
CANCEL
REP/M-DN
POUR ANNULER LA LECTURE DU PROGRAMME
STOP/
BAND
/ ANNULER
PLAY/PAUSE
TO CANCEL /CANCELAR
13:00 1
PARA CANCELAR LA REPRODUCCIÓN DEL PROGRAMA
CANCELING THE PROGRAM
OR
PROG
0I 00:0I
x2
OR
OR
DOWN
CANCELAR:
PLAY/PAUSE
ANNULER:
TO CANCEL:
PLAY/PAUSE
FAIRE UNE PAUSE:
PAUSA:
PLAY/PAUSE
PRESS AND HOLD
TO STOP
AUX
1
VIDEO IN
AUX
AUX IN
JACK
iPOD
SHUFFLE
AUXILIARY LINE-IN CORD
(INCLUDED)
LINE OUT
JACK
2
VOL
VOL
/ ÉCOUTER VOTRE D'AUTRES DISOSITIFS AUDIO
/ESCUCHANDO OTROS APARATOS DE AUDIO
POWER OFF
1
POWER OFF
Video cable
(not included)
2
iPOD
SHUFFLE
AUX
3
AC IN ~
2
3
3
· CD label should always
face the LCD display.
· La etiquette de CD debe
de estarsiempre miraudo la
exhibición de LCD.
· L' étiquette de CD devrait
touyours faire à l' affinchage
de LCD
PLAY/PAUSE
POWER ON
4
POWER ON
iPod
4
5
iPod
PLAY/PAUSE
5
PLAY/PAUSE
6
VOLUME
BOTÓN PRESET EQ
CLASSIC/JAZZ
ROCK/POP
EQ
BOUTON PRESET EQ
PRESET EQ BUTTON
DOWN
OR
UP
NOTA: Asegurese que la característica de “TV OUT” de su iPod Video
está activada.
NOTE: Asegurese que la caractéristique "de TV OUT" de son iPod Vidéo
est activée.
NOTE: Make sure your iPod Video “TV OUT” setting is turned
ON.
JEU DE PROGRAMME DE RÉSUMÉ
13:00 1
PROG
NOTE:
• Vous pouvez éditer les
mélodies programmées ou
ajouter des mélodies
supplémentaires
programmées en suivant les
points. Le programme peut
être édité pendant le réglage du
programme.
4
FUNCTION
AUX
6:30
AM
5
DOWN
OR
UP
VOLUME
CLASSIC/JAZZ
ROCK/POP
EQ
BOUTON PRESET EQ
BOTÓN PRESET EQ
PRESET EQ BUTTON
NOTE: You must use the controls on the portable device in
this mode. The remote will not work with these devices.
POWER ON
VIDEO OUT
VIDEO OUT
4
PLAY/PAUSE
JUEGO DEL PROGRAMA DEL CURRICULUM VITAE
RESUME PROGRAM PLAY
VIEWING YOUR iPod VIDEO FROM A EXTERNAL DEVICE
iPOD
SHUFFLE
peel the backing off
the rubber cushion
and place it in the
open rails
13:00 0
PROG
• Puede editar los temas
programados o añadir temas
adicionales programados
siguiendo estos pasos. El
programa solo puede ser editado
durante la colocación del
programa..
REPEAT 2-3 TO ADD UP TO 20 TRACKS
3
MEMORY
CLOCK ADJ.
• Yo u c a n e d i t t h e
programmed tracks or add
additional programmed tracks
by following these steps. The
program can only be edited
during program set.
/MIRANDO SU VIDEO iPod CON UN APARATO EXTERNO
/VISIONNEMENT DE VOTRE iPod À LÀIDE D' UN DISPOSITIF EXTERNE
Rubber cushion for
regular iPods
(including Video, & photo).
For all other iPods
(including iPod Video,
& photo) there are
rubber cushions for
better hold.
PAUSE:
BRACKET FOR
iPod Nano
BRACKET FOR
iPod Mini
Extra brackets included
for iPod Mini and iPod Nano.
LISTENING TO OTHER PORTABLE AUDIO DEVICES
6
1
REPEAT ALL
13:00 I
REP
ALL
LISTENING TO YOUR iPod/ ESCUCHANDO SU iPod/ ÉCOUTER VOTRE iPod
SKIP/SEARCH
UP
/ FAIRE UNE PAUSE:
DOWN
SKIP/SEARCH
PROG
13:00 0
PLAY/PAUSE
PAUSE: / PAUSA:
13:00 17
PROG
MEMORY
CLOCK ADJ.
5
2
1
I
REP/M-DN
NOTE / NOTA / REMARQUE
The repeat modes can be used while playing programmed tracks (see
the "Program Play" section for details on programming tracks.
Los modos de repetición pueden ser usados mientras toca los temas
programados (vea la sección "Program Play" para más detalles en
programación de temas.
Si vous sélectionnez Les modes de lecture peuvent être utilisés
pendant que les mélodies programmées jouent (veuillez consulter la
section "Program Play" pour plus de détails.
IBCD3816DTBLK
You can program up to 20 tracks. / Usted puede programar hasta 20 temas. / Vous pouvez mémoriser jusqu' à 20 mélodies.
• In the Stop Mode: / En modo stop: / Dans le mode d'arrêt:
NOTA:
NOTE:
13:00
REP
PROGRAM PLAY / REPRODUCCIÓN DEL PROGRAMA / LECUTRE DU PROGRAMME
REPEAT ONE
REP/M-DN
IN THE PLAY MODE / En modo reproducción: / Dans le mode lecture:
iPod not included.
iPod is a trademark of Apple Computer, Inc. registered in the U.S. and other countries.
MODEL#
D E
2
iPOD
SHUFFLE
AUX
3
TIMER ON
6:00
LOW
2
5
OR
UP
6
UP
DOWN
OR
3
OR
UP
TUNING DN
SKIP/REV
VOLUME
NOTE: You must
have to use the
iPod shuffle controls
in this mode. The
remote will not work
for this device.
TIMER
ANNULER
CANCELAR
TO CANCEL
DOWN
TUNING UP
SKIP/FWD
4
HIGH
TIMER
TIMER ON
0:00
TUNING DN
SKIP/REV
MID
DOWN
TUNING UP
SKIP/FWD
AUX
EQ
CLASSIC/JAZZ
ROCK/POP
6:30
AM
BOTÓN PRESET EQ
BOUTON PRESET EQ
PRESET EQ BUTTON
/
D '
iPOD
SHUFFLE
iPOD
SHUFFLE
AUX
iPOD
SHUFFLE
AUX
AL
IC
EM
CH
AUX
Use a soft, clean cloth moistened with plain,
luke-warm water to clean the exterior of the
unit.
Utilice un paño suave ligeramente
humedecido en agua tibia para limpiar el
exterior de la unidad.
Utilisez un chiffon doux et propre imbibé d'eau
tiède pour nettoyer l'extérieur de l'appareil.
Never use solvents such as benzene or other
strong chemical cleaners since these could
damage the unit's finish.
No use ningún solvente como benzole u otros
limpiadores químicos fuertes, ya que pueden
dañar el acabado de la unidad.
N'utilisez jamais des solvants comme le
benzène ou d'autres produits de nettoyage
chimiques puissants car ils peuvent
endommager l'apprêt de l'appareil.
It is important that no liquid reaches the inside
of the unit.
No permita que entre líquido dentro de la
unidad.
Ne versez pas du liquide à l'intérieur de
l'appareil.
•
•
•
GENERAL / GENERAL / GÉNÉRALE
E M P LO I
12
10
90
SLEEP
/COURROIE D’ÉPAULE
AUX
1.
2.
3.
4.
5.
Calypso Collection
Emerald Mist Collection
B:i-2 Collection
Soft Metallics
Outdoor Collection
6.
7.
8.
9.
10.
Karaoke
Media Center
Roommates
Home & Go
Walkarounds
Avoid exposure to direct sun light, temperature extremes, and moisture.
Evite la exposición directa a la luz del sol, a las temperaturas extremas y a la humedad.
N'exposez pas le CD directement au soleil, aux températures extrêmes et à l'humidité.
•
CAUTION: Do not use any solvent (eg: record sprays, thinner, benzene, etc.) to clean a CD.
ATENCIÓN: No utilice ningún solvente (ej.: aerosoles para discos, diluyentes, benzole, etc.) para limpiar
un CD.
ATTENTION: N'utilisez pas des solvants (ex: aérosols, diluants, benzène, etc.) pour nettoyer un CD.
If the lens is still dirty, use a cotton swab. Start in the middle of the lens and work to the outside edge.
Si no puede limpiar los objetivos con un cepillo, utilice un palillo de cabeza de algodón. Comience en
el medio de los objetivos y continue hacia los costados.
Si vous ne pouvez pas nettoyer les optiques avec une brosse, utilisez un coton-tige. Passez-le
doucement sur les optiques en procédant du centre vers l'extérieur.
A dirty CD may not play correctly. If a CD becomes dirty, wipe it with a soft cloth in a straight line from
center to edge.
Un CD sucio no functionary correctamente. Si el CD se ensucia, límpielo con un paño suave en línea
derecha, desde el centro y hacia los costados.
Un CD sale ne sera pas lu correctement. Si le CD est sale, nettoyez-le avec un chiffon doux en
procédant du centre vers l'extérieur.
•
•
Place the CD into the tray with the label facing up.
Coloque el CD en las bandeja con la etiqueta hacia arriba.
Mettez le CD dans le plateau avec l'étiquette ver le haut.
•
A dirty lens will cause sound skipping and, if the lens is very dirty, the CD may not work. Open the CD
door and clean using a camera lens brush/blower. Blow on the lens a couple of times and wipe the
lens with the brush to remove dust. Blow on the lens once more.
Los objetivos sucios pueden causar sonido irregular y, si los objetivos están muy sucios, el CD
puede no funcionar. Abra la tapa del compartimiento del disco y limpie los objetivos con un cepillo
para objetivos. Sople los objetivos varias veces y límpielos con el cepillo para remover la suciedad.
Si les optiques sont sales, le son sera irrégulier et si les optiques sont trop sales, le disque compact
ne fonctionnera pas. Ouvrez le couvercle du disque compact et nettoyez les optiques avec une
brosse. Soufflez les optiques plusieurs fois et utilisez la brosse pour nettoyer la poussière.
Do not touch the shiny surface of the CD or bend the CD.
No toque la superficie brillante del CD o doble el mismo.
Ne touchez pas la partie reluisante du CD et ne le pliez pas.
•
•
Remove the CD from the case by holding it at the edges while pressing the center hole lightly.
Tome el CD de los costados y presione ligeramente en el agujero del centro cuando retire el CD de su
caja.
Prenez le CD par les côtés et par le trou du centre pour retirer celui-ci de sa boîte.
From 10 min
press SLEEP
again to power
off.
SLEEP
•
COMPACT DISCS / DISCOS COMPACTOS / DISQUES COMPACTS
iPOD
SHUFFLE
Press repeatedly until you have
desired time from 90 to 10 min.
SHOULDER STRAP
/CORREA DE HOMBRO
SLEEP
/ MINUTERIE D' ARRÊT
/ TEMPORIZADOR PARA DORMIR
SLEEP
NOTE: Please make sure you’re using the correct insert for
your iPod and make sure its porperly docked into the unit
When you dock your iPod it will go into standby
mode then turn off. While the iPod is docked
it recharges until its fully charged
/ REMPLISSAGE DE VOTRE iPod
/ CARGANDO SU iPod
CHARGING YOUR IPOD
M O D E
POWER
8
I N S T R U C C I O N E S
CARE AND MAINTENANCE / CUIDADO Y MANTENIMIENTO / SOINS ET ENTRETIEN
11
TIMER
0:00
TIMER ON
DBBS/ BAJO / BASSE
4
1
TIMER
/ MINUTERIE D' ARRÊT
TIMER
FUNCTION
/ TEMPORIZADOR PARA DORMIR
TIMER
POWER ON
/ECTOUTER AU REMPLISSAGE VITRE iPod shuffle
/ESCUCHANDO Y CARGANDO SU iPod shuffle
9
1
7
M A N UA L
INSTRUCTION MANUAL
LISTENING AND CHARGING YOUR iPod shuffle
TM
CD PLAYER
VOLUME Control is set
to minimum.
Power is not on.
GENERAL
POSSIBLE CAUSE
Adjust the VOLUME
Control.
Press the Power Button.
SOLUTION
Use a new disc.
Wipe clean with soft cloth.
Skip over scratched
sections; otherwise,
replace the disc.
Wipe clean with soft
Cloth.
Take out the CD and leave
the CD player open for
about an hour to dry.
Connect the equipment into an outlet on a circuit different from that to which the
receiver is connected.
•
Visit us at www.iLive.net
When placing your unit on a lacquered or natural finish, protect your
furniture with a cloth or other protective material.
Special Note
Consult the dealer or an experienced radio/TV technician for help.
Increase the separation between the equipment and receiver.
•
•
Reorient or relocate the receiving antenna.
•
NOTE: This equipment has been tested and found to comply with the limits for a Class B
digital device, pursuant to Part 15 of the FCC Rules. Receiver complies with Part 15 of FCC
rules when manufactured.These limits are designed to provide reasonable protection
against harmful interference in a residential installation. This equipment generates, uses,
and can radiate radio frequency energy and, if not installed and used in accordance with
the instructions, may cause harmful interference to radio communications. however, there
is no guarantee that interference will not occur in a particular installation. If this equipment
does cause harmful interference to radio or television reception, which can be determined
by turning the equipment off and on, the user is encouraged to try to correct the
interference by one or more of the following measures:
WARNING: Changes or modifications to this unit not expressly approved by the party
responsible for compliance could void the user's authority to operate the equipment.
TO REDUCE THE RISK OF ELECTRIC SHOCK, DO NOT REMOVE COVER (OR BACK).
THERE ARE NO USER-SERVICEABLE PARTS INSIDE. PLEASE REFER ANY SERVICING
TO QUALIFIED SERVICE PERSONNEL.
CAUTION: TO PREVENT ELECTRIC SHOCK, MATCH WIDE BLADE OF PLUG TO WIDE
SLOT, FULLY INSERT.
Any use of the controls or an adjustment to the procedures other than those specified
herein may result in hazardous radiation.
This product utilizes a Class 1 laser to read Compact Discs. This laser Compact
Disc Player is equipped with safety switches to avoid exposure when the CD door
is open and the safety interlocks are defeated. Invisible laser radiation is present
when the CD Player's lid is open and the system's interlock has failed or been
defeated. It is very important that you avoid direct exposure to the laser beam at all
times. Please do not attempt to defeat or bypass the safety switches.
This symbol is intended to alert the user to the presence of important operating
and maintenance (servicing) instructions in the literature accompanying the
appliance.
This symbol, located on back or bottom of the unit, is intended to alert the user to
the presence of uninsulated “dangerous voltage” within the product's enclosure
that may be of sufficient magnitude to constitute a risk of electric shock to
persons.
TO PREVENT FIRE OR SHOCK HAZARDS, DO NOT EXPOSE THIS UNIT TO RAIN OR
MOISTURE.
WARNINGS AND PRECAUTIONS
Certains sections of the Disc is dirty.
disc are not played
normally.
Disc is scratched.
Moisture has formed
inside the CD deck.
Disc is seriously warped. Use a new disc.
Disc is scratched.
Disc is dirty.
Disc is inserted but
Disc is inserted upside- Insert disc correctly
tracks are not displayed. down.
(label up).
No sound is heard.
PROBLEM
REPRODUCTOR CD
El botón VOLUME está en
mínimo.
El aparato está apagado.
GENERAL
CAUSA POSIBLE
Límpielo con un paño
suave.
Salte las secciones
rayadas o cambie el disco
Disco sucio.
Disco rayado.
Vuelva a orientar la antena o cambie su lugar de instalación.
Aumente la separación entre el equipo y el receptor.
Conecte el equipo a una toma de corriente cuyo circuito no sea el mismo que aquél
al que ha conectado el receptor.
Consulte al concesionario o a un técnico de radio/televisión con experiencia.
Cuando coloque la unidad sobre un mueble con acabado laqueado o natural,
proteja su mueble con un paño u otro material protector.
Nota Especial
•
•
•
•
NOTA: Este equipo ha sido probado y ha demostrado cumplir con los límites establecidos
para los aparatos digitales de Clase B, de acuerdo con el Apartado 15 de las Normas de la
FCC. El receptor se forma de laparte 15 en las reqlas FCC cuando fabricado. Estos límites
han sido designados para proveer una protección razonable contra las interferencias
perjudiciales en una instalación residencial. Este equipo genera, utiliza y puede irradiar
energía radioeléctrica y, si no se instala y utiliza de acuerdo con las instrucciones, puede
causar interferencias perjudiciales en las radiocomunicaciones. Sin embargo, no existe
garantía de que no se produzcan interferencias en una instalación en particular. Si este
aparato causa interferencias en la recepción de radio o de televisión, lo que puede
determinarse desconectando y conectando el aparato, se recomienda tratar de corregir la
interferencia de la siguiente manera:
ADVERTENCIA: El usuario puede perder el derecho de utilizar este aparato si efectua
cambios o modificaciones que no han sido expresamente aprobados por la autoridad
responsable.
PARA REDUCIR EL RIESGO DE SACUDIDAS ELÉCTRICAS, NO RETIRE LA TAPA (O LA PARTE
POSTERIOR) DEL APARATO. DENTRO DEL APARATO NO HAY PARTES QUE PUEDAN SER
REPARADAS POR EL USUARIO. LOS TRABAJOS DE REPARACIÓN DEBEN SER EFECTUADOS
POR PERSONAL DE SERVICIO CALIFICADO.
AVISO: PARA EVITAR UNA DESCARGA ELÉCTRICA, INTRODUZCA LA HOJA MÁS ANCHA
DEL ENCHUFE EN LA RANURA CORRESPONDIENTE DE LA TOMA Y EMPUJE HASTA EL
FONDO.
Usted puede recibir una radiación peligrosa si utiliza los botones o aplica los procedimientos
de manera diferente a la que ha sido indicada en este documento.
Este producto utiliza un láser de Clase 1 para reproducir discos compactos. Este
reproductor de discos compactos láser posee interruptores de seguridad que
impiden la exposición a los rayos láser cuando la puerta del disco compacto está
abierta y cuando los dispositivos de seguridad han sido anulados. Hay radiación
láser invisible cuando la tapa del reproductor de discos compactos está abierta y
cuando el sistema de seguridad falla o es anulado. Evite la exposición directa a los
rayos láser. Por favor no intente anular o eludir los interruptores de seguridad.
Este símbolo indica la presencia de instrucciones de operación y de mantenimiento
(reparación) en el material impreso que acompaña el aparato.
Este símbolo, localizado detrás o en la parte de abajo de la unidad, indica la
presencia de "tensiones peligrosas" sin aislar en el interior de la caja del producto
que pueden ser de suficiente magnitud como para constituir un riesgo de sacudida
eléctrica para las personas.
PARA REDUCIR EL RIESGO DE INCENDIOS O DE SACUDIDAS ELÉCTRICAS, NO
EXPONGA ESTE APARATO A LA LLUVIA O A LA HUMEDAD.
ADVERTENCIAS Y PRECAUCIONES
El aparato no
reproduce
ciertas secciones del
disco correctamente.
Coloque un nuevo disco.
Disco doblado.
Ha entrado humedad en Saque el disco compacto
la platina del disco
y deje el aparato abierto
compacto.
durante una hora para
que se seque.
Coloque un nuevo disco.
Límpielo con un paño
suave.
Coloque el disco
correctamente (etiqueta
hacia arriba).
Ajuste el botón VOLUME.
Presione el botón Power.
SOLUCIÓN
Disco rayado.
Disco sucio.
Ha insertado el disco
Disco colocado al
pero no puede ver los
revés.
temas en el visualizador
No hay sonido.
PROBLEMA
GENERAL
Appuyez sur le bouton
Power.
Disque a des
égratignures.
Disque sale.
Il y a de l’humidité à
l’intérieur de la platine
du disque compact.
Disque déformé.
Disque a des
égratignures.
Disque sale.
Le disque a été mis à
l’envers.
LECTEUR CD
Sautez les sections
avec des égratignures
ou changez le disque.
Nettoyez-le avec un
chiffon doux.
Enlevez le disque compact
et laissez l’appareil ouvert
pendant une heure pour
que l’humidité s’évapore
Insérez un nouveau
disque.
Insérez un nouveau
disque.
Nettoyez avec un chiffon
doux.
Insérez le disque
correctement (étiquette
vers le haut).
Le bouton VOLUME est sur MIN. Réglez le bouton VOLUME.
L’appareil est éteint.
SOLUTION
Printed in China / Imprimido en China /
Imprimé en Chine
En plaçant votre unité sur une finition laquée ou normale, protégez vos meubles
avec un tissu ou autre protecteur matériel.
Note Spéciale
POUR PRÉVENIR TOUT RISQUE D'INCENDIE OU D'ÉLECTROCUTION, NE PAS EXPOSER
CET APPAREIL À LA PLUIE OU À L'HUMIDITÉ.
Ce symbole, situé dérrière ou dessous de l' appareil, est destiné à avertir l'usager
de la présence d'une "tension dangereuse" non isolée dans le boîtier de l'appareil,
dont l'intensité pourrait être suffisante pour constituer un risque d' électrocution
pour les personnes.
Ce symbole est destiné à avertir l'usager de la présence d'instructions
importantes pour le fonctionnement et l'entretien (réparation) de l'appareil, dans la
brochure qui accompagne celui-ci.
Ce produit lit des disques compacts à l'aide d' un laser de Catégorie 1. Ce lecteur
de disques compacts possède des interrupteurs de sécurité qui protègent les
individus contre les rayons laser lorsque la porte du disque compact est ouverte
et lorsque les dispositifs de sécurité sont annulés. Ce produit émet des rayons
laser lorsque le couvercle du compartiment à disques est ouvert et lorsque le
système de sécurité est en panne ou est annulé. Évitez l'exposition directe aux
rayons laser. S'il-vous-plaît, n'essayez pas d' annuler ou de contourner les
interrupteurs de sécurité.
Vous pourriez subir des radiations dangereuses si vous utilisez les commandes ou si
vous appliquez les procédures d'une manière différente de celle indiquée dans ce mode
d'emploi.
ATTENTION: POUR ÉVITER LES CHOCS ÉLECTRIQUES, INTRODUIRE LA LAME LA
PLUS LARGE DE LA FICHE DANS LA BORNE CORRESPONDANTE DE LA PRISE ET
POUSSER JUSQU'AU FOND.
POUR PRÉVENIR TOUT RISQUE D'ÉLECTROCUTION, NE RETIREZ PAS LE COUVERCLE
(OU LA PARTIE POSTÉRIEURE) DE L'APPAREIL. VOUS NE DEVEZ PAS RÉPARER DES
PIÈCES SE TROUVANT À L' INTÉRIEUR DE L'APPAREIL. LES RÉPARATIONS DOIVENT
ÊTRE EFFECTUÉES PAR DU PERSONNEL QUALIFIÉ.
AVERTISSEMENT: Tout changement ou modification apporté(e) à cet appareil sans
autorisation, peut entraîner l’interdiction d’utilisation de ce dernier.
REMARQUE: Cet appareil a été testé et il a été constaté qu'il respecte les limites fixées pour
les appareils numériques de la Catégorie B, par la Section 15 des Normes FCC. Le récepteur
est conforme á la partie 15 de réqles de FCC une fois construit. Ces limites ont été fixées afin
de fournir une protection raisonnable contre les interférences nocives dans un logement
résidentiel. Cet appareil produit, utilise et peut émettre de l'énergie radioélectrique et, s'il n'est
pas installé et utilisé suivant le mode d'emploi, il peut produire des interférences nocives sur
les radiocommunications. Cependant, il peut y avoir des interférences nocives dans des
logements particuliers. Si l'appareil produit des interférences sur la réception radio ou
télévision (ce qu'on peut constater lorsqu'on débranche ou lorsqu'on raccorde celui-ci),
nous vous recommandons de corriger ce problème de la manière suivante:
•
Réorientez l'antenne ou changez l'appareil de place.
•
Séparez davantage l'appareil du récepteur.
•
Branchez l'appareil à une prise de courant faisant partie d'un circuit différent de
celui auquel est branché le récepteur.
•
Consultez le vendeur ou un technicien de radio/télévision expérimenté.
AVERTISSEMENT ET PRÉCAUTIONS
L’appareil ne lit pas
certaines sections du
disque correctement.
Le numéro de mélodie
n’est pas affiché quand
le disque est en place.
Il n’y a pas de son.
PROBLÈME
CAUSE PROBABLE
IBCD3816DTBLK
TROUBLESHOOTING GUIDE / GUÍA DE RESOLUCIÓN DE PROBLEMAS / EN CAS DE PROBLÈMES
READ THIS PAGE FIRST BEFORE OPERATING THE UNIT
MODEL#