1
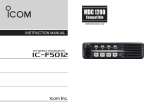
INSTRUCTION MANUAL UHF FM REPEATER iFR6100 IMPORTANT R E A D T H I S I N S T RU C T I O N M A N UA L CAREFULLY before attempting to operate the repeater. SAVE THIS INSTRUCTION MANUAL– This manual contains important safety and operating instructions for the IC-FR6100 uhf fm repeater. EXPLICIT DEFINITIONS WORD DEFINITION RWARNING Personal injury, fire hazard or electric shock may occur. CAUTION NOTE Equipment damage may occur. If disregarded, inconvenience only. No risk of personal injury, fire or electric shock. PRECAUTIONS R WARNING HIGH VOLTAGE! NEVER at- tach an antenna or internal antenna connector during transmission. This may result in an electrical shock or burn. R WARNING HIGH VOLTAGE! NEVER in- stall the antenna at any place that person touch the antenna easily during transmission. This may result in an electrical shock or burn. R WARNING! NEVER apply AC to the DC power receptacle on the repeater rear panel. This could cause a fire or damage the repeater. R WARNING! NEVER apply more than 16 V DC, such as a 24 V battery, to the DC power receptacle on the repeater rear panel. This could cause a fire or damage the repeater. R CAUTION! NEVER let metal, wire or other objects touch any internal part or connectors on the rear panel of the repeater. This may result in an electric shock. Place the repeater in a secure place to avoid inadvertent use by children. BE CAREFUL! The heatsink will become hot when operating the repeater continuously for long periods. BE CAREFUL! If a linear amplifier is connected, set the repeater’s RF output power to less than the linear amplifier’s maximum input level, otherwise, the linear amplifier will be damaged. Use Icom microphones only (optional). Other manufacturer’s microphones have different pin assignments, and connection to the repeater may damage the repeater. Icom optional equipment is designed for optimal performance when used with this repeater. We are not responsible for the repeater being damaged or any accident caused when using non-Icom optional equipment. R CAUTION! NEVER expose the repeater to rain, snow or any liquids. DO NOT use or place the repeater in areas with temperatures below –25°C or above +55°C. Be aware that temperatures can exceed +80°C, resulting in permanent damage to the repeater if left there for extended periods. DO NOT place the repeater in excessively dusty environments or in direct sunlight. DO NOT put anything on top of the repeater. This will obstruct heat dissipation. Icom, Icom Inc. and the logo are registered trademarks of Icom Incorporated (Japan) in the United States, the United Kingdom, Germany, France, Spain, Russia and/or other countries. i FORWARD SUPPLIED ACCESSORIES Thank you for purchasing this Icom repeater. The IC-FR6100 uhf fm repeater is designed and built with Icom’s state of the art technology and craftsmanship. With proper care, this product should provide you with years of trouble-free operation. The following accessories are supplied. We want to take a couple of moments of your time to thank you for making the IC-FR6100 your repeater of choice, and hope you agree with Icom’s philosophy of “technology first.” Many hours of research and development went into the design of your IC-FR6100. Handles For handles attachment Spacers Screws Function name stickers* DC power cable KEY SEAL D FEATURES mUp to 2 channels operation You can install a channel extension module (optional UR-FR6100) into a repeater. 2 channels can be operated as the repeater when a channel extension module is installed. * Used for labelling the programmable function keys according to their assinged functions. mBuilt-in 5-Tone, DTMF encoder & decoder Multiple signaling systems are equipped as standard. These systems are fully compatible with Icom F-series radios. mDTMF remote control capability You can control the repeater from a remote location over the air or over a phone line with DTMF. mD-Sub 25 pin ACC port equipped You can use the optional equipment via the D-sub 25 pin ACC port equipped on the repeater’s rear panel. mOther features - Wide frequency coverage (400 to 470 MHz) - PC programmable - 19 inch rack mount - O ptional Voice Scrambler Unit (UT-109R/ UT-110R) for base operating mode VOICE CODING TECHNOLOGY The AMBE+2™ voice coding Technology embodied in this product is protected by intellectual property rights including patent rights, copyrights and trade secrets of Digital Voice Systems, Inc. This voice coding Technology is licensed solely for use within this Communications Equipment. The user of this Technology is explicitly prohibited from attempting to extract, remove, decompile, reverse engineer, or disassemble the Object Code, or in any other way convert the Object Code into a human-readable form. U.S. Patent Nos. #5,870,405, #5,826,222, #5,754,974, #5,701,390, #5,715,365, #5,649,050, #5,630,011, #5,581,656, #5,517,511, #5,491,772, #5,247,579, #5,226,084 and #5,195,166. TABLE OF CONTENTS IMPORTANT................................................................ i EXPLICIT DEFINITIONS............................................. i PRECAUTIONS........................................................... i FORWARD................................................................. ii VOICE CODING TECHNOLOGY............................... ii SUPPLIED ACCESSORIES...................................... ii TABLE OF CONTENTS............................................. ii 1 PANEL DESCRIPTION..................................... 1–3 n Front panel......................................................... 1 D Function display............................................. 2 n Rear panel.......................................................... 2 D Accessory connector..................................... 3 2 INSTALLATION AND CONNECTIONS............. 4–6 n Unpacking.......................................................... 4 n Selecting a location............................................ 4 n Antenna connection........................................... 4 n Front panel connection....................................... 5 n Rear panel connection....................................... 5 n Power supply connection................................... 6 n Mounting the repeater........................................ 6 D Using the supplied handle.............................. 6 3 OPERATION.......................................................... 7 n Receiving and transmitting................................. 7 D Repeater operation........................................ 7 D Base station operation................................... 7 4 MAINTENANCE.................................................... 8 n Troubleshooting.................................................. 8 n Fuse replacement.............................................. 8 D Line fuse replacement.................................... 8 5 OPTIONS............................................................... 9 6 ABOUT CE.................................................... 10–12 ii 1 PANEL DESCRIPTION ■ Front panel q Function display w P0 P1 P2 o qINTERNAL SPEAKER Monitors received signals. wVOLUME CONTROL [VOLUME] (p. 7) Adjusts the audio output level. eSELECTOR DIAL [SELECT] Rotate to adjust the squelch threshold level, select the operating channel. (Depending on the preprogrammed condition.) tTRANSMIT INDICATOR [TX] Lights red while transmitting. yBUSY INDICATOR [BUSY] Lights green while receiving a signal or when the noise squelch is open. About [PWR], [TX] and [BUSY] indicators: ‘A’ and ‘B’ modules indicators are available for these indications. ‘A’ module's indicator correspond to the original module, and ‘B’ module's indicator correspond to an extended module. 1 e P4 i u uMICROPHONE CONNECTOR [MIC] This 8-pin modular jack accepts the optional microphone. K EEP the [MIC] connector cover attached to the repeater when the optional microphone is not used. i q rPOWER INDICATOR [POWER] ➥Lights green at ‘A’ module's indicator while the repeater power is turned ON. When a channel extension module is installed: ➥Lights green at the selected module indicator (‘A’ or ‘B’) while the repeater power is turned ON. ➥Lights orange at the un-selected module indicator (‘A’ or ‘B’) while the repeater power is turned ON. P3 r t y q +8 V DC output (Max. 15 mA) w Output port for PC programming e NC r M PTT (Input port for TX control) t Microphone ground y Microphone input u Ground i Input port for PC programming iPOWER SWITCH [POWER] ➥Push to turn the repeater power ON. ➥P ush and hold for 3 sec. to turn the repeater power OFF. When a channel extension module is installed: ➥While the repeater power is turned ON, push to select the desired module to operate the repeater as the base station. • The power indicator of the selected module unit lights green. oDEALER-PROGRAMMABLE KEYS D esired functions can be programmed independently by your dealer. Ask your dealer for details. • Because these keys are programmable, the functions of these keys are unique to each unit. PANEL DESCRIPTION 1 D Function display q w e ICOM r t Inc. y qSIGNAL STRENGTH INDICATOR Indicates relative signal strength level. rCOMPANDER INDICATOR Appears when the compander function is activated. wLOW POWER INDICATOR Appears when low output power is selected. tSCRAMBLER/ENCRYPTION INDICATOR Appears when the voice scrambler/encryption function is activated. eAUDIBLE INDICATOR Appears when the channel is in the ‘audible’ (unmute) condition. 1 2 3 yALPHANUMERIC DISPLAY Shows a variety of text or code information. 4 5 ■ Rear panel q w e r 6 t 7 8 9 10 11 The optional channel extention module can be installed. Ask your dealer for details. qEXTERNAL SPEAKER CONNECTOR [SP] Connect the optional SP-22. wRECEIVE ANTENNA CONNECTOR [RX] Connects a receive antenna (impedance: 50 ˘) and inputs receiving signals. 12 rDC POWER RECEPTACLE Connects the supplied DC power cable from this connector to an external 13.2 V DC power supply. 13 14 tTRANSMIT ANTENNA CONNECTOR [TX] Connects a transmit antenna (impedance: 50 ˘) and outputs transmit signals. 15 eACCESSORY CONNECTOR [ACC] Connects to the accessory connector. 16 17 • See pgs. 3 for accessory connector information. 18 19 20 21 1 PANEL DESCRIPTION D Accessory connector !4 @5 q Pin No. !3 Description Pin Name Specification 1 NC No connection — 2 TXD Output terminal for serial communication data. — 3 RXD Input terminal for serial communication data. — 4 RTS Output terminal for request-to-send data. — 5 CTS Input terminal for clear-to-send data. — 6 NC No connection — 7 GND Serial/digital signal ground — 8 MOD IN 9 DISC OUT 10 EXT. D/A 11 VCC 12 EXT. A/D 13 NC 14 GND 15 EXT.I/O 15 16 EXT.I/O 16 17 EXT.I/O 17 18 EXT.I/O 18 19 EXT.I/O 19 20 DATA IN 21 EXT.I/O 21 22 AF OUT 23 EXT.I/O 23 24 EXT.I/O 24 25 EXT.I/O 25 Modulator input from an external terminal unit. Output terminal for AF signals from the AF detector circuit. Output level is fixed, regardless of [AF] control. The desired function can be assigned.* Input level: 300 mV rms Output level: 300 mV rms — (Default: Null) 13.2 V DC output Output current: Less than 1 A Customize A/D input (Not used) — No connection — Ground — The desired function can be assigned.* (Default: Null) The desired function can be assigned.* (Default: P0 Monitor Output) The desired function can be assigned.* (Default: Busy Output) The desired function can be assigned.* (Default: Null) The desired function can be assigned.* (Default: EPTT Input) Input terminal for data. The desired function can be assigned.* (Default: Analog Audible Output) The AF detector Output. The desired function can be assigned.* (Default: Mic Mute Output) The desired function can be assigned.* (Default: Null) The desired function can be assigned.* (Default: Mic Hanger Output) +5 V pull up, Active=L +5 V pull up, Active=L +5 V pull up, Active=L +5 V pull up, Active=L +5 V pull up, Active=L — +5 V pull up, Active=L — +5 V pull up, Active=L +5 V pull up, Active=L +5 V pull up, Active=L * The desired function can be assigned using the optional CS-FR5000 cloning software. Ask your dealer for details. 3 INSTALLATION AND CONNECTIONS 2 ■ Unpacking ■ Antenna connection After unpacking, immediately report any damage to the delivering carrier or dealer. Keep the shipping cartons. For radio communications, the antenna is a critical component, along with output power and sensitivity. Select antenna(s), such as a well-matched 50 ˘ antenna, and feedline. 1.5:1 or better of Voltage Standing Wave Ratio (VSWR) is recommended for desired band. Of course, the transmission line should be a coaxial cable. For a description and a diagram of accessory equipment included with the repeater, see ‘SUPPLIED ACCESSORIES’ on p. ii of this manual. ■ Selecting a location Select a location for the repeater that allows adequate air circulation, free from extreme heat, cold, or vibrations, and away from TV sets, TV antenna elements, radios and other electromagnetic sources. AUTION: Protect repeater from lightning by using C a lightning arrestor. NOTE: There are many publications that describe proper antennas and their installation. Check with your local dealer for more information and recommendations. 1 2 3 TYPE-N CONNECTOR INSTALLATION EXAMPLE q Nut Rubber gasket 15 mm 4 5 Slide the nut, flat washer, rubber gasket and clamp over the coaxial cable, then cut the end of the cable evenly. 6 Washer w Clamp 3 mm e r Center conductor 7 Strip the cable and fold the braid back over the clamp. 8 6 mm Solder hole 9 Soft solder the center conductor. Install the center conductor pin and solder it. 10 No space 11 Carefully slide the plug body into place aligning the center conductor pin on the cable. Tighten the nut onto the plug body. 12 Be sure the center conductor is the same height as the plug body. 13 15 mm (19⁄32 in) 6 mm (1⁄4 in) 3 mm (1⁄8 in) 14 15 16 17 18 19 20 21 2 INSTALLATION AND CONNECTIONS ■ Front panel connection P0 HM-152 HAND MICROPHONE (optional) P1 P2 P3 P4 MICROPHONE CONNECTOR (Front panel view) SM-25 DESKTOP MICROPHONE (optional) q i q +8 V DC output (Max. 10 mA) w Output port for PC programming e NC r M PTT (Input port for TX control) t Microphone ground y Microphone input u Ground i Input port for PC programming CAUTION: DO NOT short pin 1 to ground as this can damage the internal 8 V regulator. DC voltage is applied to pin 1 for microphone operation. Only Icom microphones are recommended. ■ Rear panel connection SP-22 EXTERNAL SPEAKER ACC CONNECTOR (p. 3) Used for external equipment control. Connect a 4 ˘ external speaker. [TX ANT] (p. 4) [RX ANT] (p. 4) 20 A fuses R CAUTION! NEVER remove the fuse-holder from the DC power receptacle. AC outlet DC power supply 13.2 V; at least 20 A Red Black + _ R When you disconnect the DC power cable, take care no crack of your fingernail. AC cable w q Push Supplied DC power cable Red Black INSTALLATION AND CONNECTIONS ■ Power supply connection ■ Mounting the repeater Make sure the repeater’s power is turned OFF when connecting a DC power cable. D Using the supplied handle AUTION: Voltages greater than 16 V DC will damC age the repeater. Check the source voltage before connecting the power cable. 2 The supplied handles are available for mounting the repeater into a 19 inch rack. The handles can be installed to the repeater’s front panel. q Attach the supplied handles to both sides of the repeater’s front panel with the spacers, then tighten the screws as below. 1 P0 P1 P2 P3 2 P4 Screw 3 Handle Spacer 4 wT he completed installation should look like as below. 5 6 P0 P1 P2 P3 7 P4 8 9 10 11 12 13 14 15 16 17 18 19 20 21 6 3 OPERATION ■ Receiving and transmitting D Repeater operation Ask your dealer for details of the repeater’s programming. ➥When the power is turned ON, the [PWR] indicator lights green. (p. 1) ➥The [TX] and [BUSY] indicators light simultaneously while transmitting/receiving a signal. • The [TX] indicator lights red. • The [BUSY] indicator lights green. D Base station operation Receiving qPush [POWER] to turn the power ON. wSet the audio and squelch levels. ➥ Rotate [SELECT]*1 fully counterclockwise in advance. ➥ R otate [VOLUME] to adjust the audio output level. ➥ R otate [SELECT]* 1 clockwise until the noise disappears. ePush [CH Up]*2 or [CH Down]*2 to select the desired channel. • When receiving a signal, the [BUSY] indicator lights green and audio is emitted from the speaker. • Further adjustment of [VOLUME] to a comfortable listening level may be necessary at this point. *1 When the [SQL Level Up/Down] key function is assigned to [SELECT]. *2 W hen the [CH Up]/[CH Down] key functions are assigned. Transmitting qTake the microphone off hook. wWait for the channel to become clear. ePush and hold [PTT] to transmit, then speak into the microphone at your normal voice level. rRelease [PTT] to receive. IMPORTANT: To maximize the audio quality of the transmitted signal: (1) Pause briefly after pushing [PTT]. (2) Hold the microphone 1 to 2 inch (2.5 to 5 cm) from your mouth, then speak into the microphone at a normal voice level. MAINTENANCE 4 ■ Troubleshooting The following chart is designed to help correct problems which are not equipment malfunctions. PROBLEM If you are unable to locate the cause of a problem or solve it through the use of this chart, contact the nearest Icom Dealer or Service Center. POSSIBLE CAUSE SOLUTION Power does not come • DC power cable is improperly connected. on when [POWER] is pushed. • Fuse is blown. REF. • Re-connect the DC power cable correctly. pgs. 5, 6 • Check the cause, then replace the fuse with p. 8 a spare one. • R otate [VOLUME] clockwise to obtain a p. 7 suitable listening level. • While in base operating mode, rotate [SE- p. 7 LECT] to counterclockwise to open the squelch. (When the [SQL Level Up/Down] key function is assigned to [SELECT].) •P ush [MONI] (if assigned) to the audio • The audio mute function is activated. – mute function OFF. •A selective call or squelch function is acti- • Turn the appropriate function OFF. – vated such as 5 tone call or tone squelch. N o s o u n d s f r o m t h e • Volume level is too low. speaker. • The squelch is closed. • The front speaker is set to OFF. • Turn the front speaker ON using the optional CS-FR5000 cloning software. Ask your dealer for details. 1 2 3 4 5 – 6 7 Sensitivity is low and • Antenna feedline or the antenna connector • Check and re-connect (or replace if neces- p. 5 only strong signals are has a poor contact or is short-circuited. sary), the antenna feedline or antenna conaudible. nector. Received signal cannot • Optional voice scrambler is turned OFF. be understood. • Scrambler code is not set correctly. • Turn the optional voice scrambler ON. • Reset the scrambler code. – – Output power is too low. • Output power is set to Low. • Push [HIGH/LOW] (if assigned) to select the High power. – • Turn the tone squelch function ON. No contact possible with • The other station is using tone squelch. et the repeater to simplex, when other • W hile in base operating mode, the re- • S another station. peater is set to duplex. transceiver is set to simplex. – – 8 9 10 11 12 13 14 ■ Fuse replacement If a fuse blows or the repeater stops functioning, try to find the source of the problem, and then replace the damaged fuse with a new, rated fuse. 15 CAUTION: DISCONNECT the DC power cable 16 from the repeater. Otherwise, there is danger of electric shock and/or equipment damage. 17 D Line fuse replacement 18 19 20 21 Fuse rating: 20 A USE the 20 A fuse only. 5 OPTIONS • SP-22 external speaker Compact and easy-to-install. Input impedance : 4 ˘ Max. input power : 5 W • HM-152 hand microphone • SM-25 desktop microphone • UR-FR6100 channel extension module • UT-109R voice scrambler unit Non-rolling type (max. 32 codes). • UT-110R voice scrambler unit Rolling type (max. 1020 codes). * T he scrambler systems of the UT-109R and UT110R are not compatible with each other. Some options may not available in some countries. Please ask your dealer for details. ABOUT CE 6 INSTALLATION NOTES • Compliance of base station transmitter installations with EN50385 The installation of this equipment and it’s associated antenna should be made in such a manner as to respect the EC recommended electromagnetic (EM) field exposure limits. (1999/519/EC) In order not to exceed these exposure limits it is necessary to determine the ‘Compliance Boundary,’ that means the volume within which the EM field radiated by the transmitter/antenna installation may exceed the 1999/519/EC limits. You will then need to ensure that members of the general public do not have access within this area. The actual Compliance Boundary for this repeater will be totally dependant on the antenna, feeder, RF amplifier and other passive or active devices used in the installation. The RF output power of this repeater is 25 watts. The figures contained in this guide are based on the recommended limits for the general public and are obtained by ‘worst case’ numerical analysis. For a definitive evaluation of any given installation, measurements should be made with an EM field meter and a broadband calibrated probe. • Installation The antenna should be installed as high as possible for maximum efficiency and minimum EM field at ground-level. The evaluation of radiated field should take into account any additional RF amplifiers used, any loss in the antenna feeder cable and the gain of the antenna used as well as its polar radiation pattern. If there are any objects or structures larger than half a wavelength close to the antenna, or within the clearance distances specified, then these can cause reflections which will have an effect on the overall radiation pattern. For any installation you need to consider ‘height clearance’ (i.e. the height above any place where persons may have access) and ‘front clearance’ (i.e. the distance in front of the antenna where the radiated field may exceed the recommended limits). Normally with an antenna installed on a reasonably high mast or tower, there will not be any access point directly in front but care should be exercised when there are other buildings higher than the antenna within the vicinity. • Installation with a vertical type antenna at VHFUHF You need to consider the distances between the antenna and any point where persons may have access. Allowing an average height of 1.8 m for a person in the vicinity of the antenna the clearance distances can be evaluated as follows. For the antenna a forward gain of 1.6 and downward gain of unity has been assumed. Height Front Power EIRP Distance clearance clearance 1 watt 1.6 watts 0.32 m 2.1 m 0.4 m 10 watts 16 watts 1 m 2.8 m 1.3 m 25 watts 40 watts 1.6 m 3.4 m 2m 100 watts 160 watts 3.2 m 5 m 4m 1 kW 1600 watts 10 m 12 m 13 m • Installation with a yagi or directive type antenna Exposure distance assumes that the predominant radiation pattern is forwards and that radiation vertically downwards is at unity gain (sidelobe suppression is equal to main lobe gain). This is true of almost every gain antenna today. Exposed persons are assumed to be beneath the antenna array and have a typical height of 1.8 m. The figures assume the worst case emission of constant carrier. RF power Clearance heights by frequency band 13 cm Watts 10–2 m 70 cm 23 cm and above 1 2.1 m 2 m 2 m 2m 10 2.8 m 2.7 m 2.5 m 2.3 m 25 3.4 m 3.3 m 2.7 m 2.5 m 100 5 m 4.7 m 3.6 m 3.2 m 1000 12 m 11.5 m 7.3 m 6.3 m Forward clearance, EIRP by frequency band 13 cm Watts 10–2 m 70 cm 23 cm and above 100 2 m 2 m 1.1 m 0.7 m 1000 6.5 m 6 m 3.5 m 3m 10,000 20 m 18 m 11 m 7m 100,000 65 m 60 m 35 m 29 m EIRP 1 2 3 4 5 6 7 8 9 10 11 12 13 14 15 16 17 18 19 20 21 10 6 ABOUT CE • Typical installation example A UHF base station transmitter is to be installed on the roof of an office. The transmit power is 25 watts, there is 20 m of RG-213 coaxial cable and the antenna is vertically polarised dipole. The specification of the RG-213 cable gives a loss of 1.5 dB/10 m. There will be 3 dB loss for the 20 m length used. • Operating Notes All of the above comments on RF safety assume that the radio is transmitting continuously in a constant carrier mode such as FM or RTTY etc. The RF exposure limits recommended by the EC are based on the mean power averaged over a 6 minute period. Therefore if the total transmit time during any 6 minute period is reduced, then the installation will be even further within the recommended limits. The RF power at the antenna input will be 12.5 watts. The dipole antenna has a forward gain of 0 dBd or 1.6, giving an EIRP of 20 watts. CE Versions of the IC-FR6100 which display the “CE” symbol on the serial number seal, comply with the essential requirements of the European Radio and Telec o m m u n i c a t i o n Te r m i n a l D i r e c t i v e 1999/5/EC. Referring to the table above for VHF/UHF vertical antennas, this gives a front clearance distance of approx. 1.5 m and a height clearance of 3 m. The antenna installation needs to ensure that the lowest part of the antenna is at least 3 m above any point where the general public may gain access and that they cannot pass within 1.5 m in front of the antenna. If there is no general public access to the roof in question then the antenna could be mounted on a short stub mast. If there is such access to the roof then the antenna could be mounted on top of a short mast of 3.2 m high. The mast position should be such that the antenna can radiate clearly i.e. no other object or structure is within 1.5 m (preferably more). It should be relatively easy to fulfil all these recommendations. If for any reason such minimum distances are impossible to guarantee then some type of access control fence or barrier around the antenna installation should be provided. Should a Yagi type antenna be used then you will have to obtain a 3 dimensional polar plot of the radiation characteristic from the manufacturer and evaluate the clearance distances in both vertical and horizontal planes. 11 This warning symbol indicates that this equipment operates in non-harmonised frequency bands and/or may be subject to licensing conditions in the country of use. Be sure to check that you have the correct version of this radio or the correct programming of this radio, to comply with national licensing requirement. • List of Country codes (ISO 3166-1) 1 2 3 4 5 6 7 8 9 10 11 12 13 14 15 16 17 Country Austria Belgium Bulgaria Croatia Czech Republic Cyprus Denmark Estonia Finland France Germany Greece Hungary Iceland Ireland Italy Latvia Codes AT BE BG HR CZ CY DK EE FI FR DE GR HU IS IE IT LV 18 19 20 21 22 23 24 25 26 27 28 29 30 31 32 33 Country Liechtenstein Lithuania Luxembourg Malta Netherlands Norway Poland Portugal Romania Slovakia Slovenia Spain Sweden Switzerland Turkey United Kingdom Codes LI LT LU MT NL NO PL PT RO SK SI ES SE CH TR GB ABOUT CE 6 DECLARATION OF CONFORMITY We Icom Inc. Japan 1-1-32, Kamiminami, Hirano-ku Osaka 547-0003, Japan Declare on our sole responsibility that this equipment complies with the essential requirements of the Radio and Telecommunications Terminal Equipment Directive, 1999/5/EC, and that any applicable Essential Test Suite measurements have been performed. Kind of equipment: UHF REPEATER Type-designation: iC-fr6100 Version (where applicable): 400–470 MHz 6.25 kHz/12.5 kHz/25 kHz 400–470 MHz 6.25 kHz/12.5 kHz/20 kHz 0168 Düsseldorf 17th Dec. 2007 Place and date of issue 1 Authorized representative name H. Ikegami General Manager This compliance is based on conformity with the following harmonised standards, specifications or documents: i) EN 301 489-1 v1.4.1 (August 2002) ii) EN 301 489-5 v1.3.1 (August 2002) iii) EN 300 086-2 v1.2.1 (March 2001) iv) EN 301 166-2 v1.1.1 (February 1999) v) EN 300 219-2 v1.1.1 (March 2001) vi) EN 300 113-2 v1.3.1 (December 2003) vii) EN 60950-1: 2001 viii) EN 50385: 2002 2 3 4 5 Signature 6 7 8 9 10 11 12 13 14 15 16 17 18 19 20 21 12 < Intended Country of Use > AT FI IT PL GB RO BE FR LV PT IS TR CY DE LT SK LI HR A-6636H-1EU Printed in Japan © 2008 Icom Inc. Printed on recycle paper with soy ink. CZ GR LU SI NO DK HU MT ES CH EE IE NL SE BG 1-1-32 Kamiminami, Hirano-ku, Osaka 547-0003 Japan