1
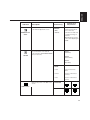
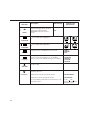
ENGLISH
T541 Flat Panel Monitor
User Guide
First Edition (September / 2002)
Note : For important information, refer to the Monitor Safety and Warranty manual that comes with this monitor.
This publication could contain technical inaccuracies or typographical errors. Changes are made periodically to the information
herein; these changes will be made in later editions. IBM may make improvements and/or changes in the product(s) and/or
program(s) at any time.
It is possible that this publication may contain reference to, or information about, IBM products (machines and programs),
programming, or services that are not announced in your country.
Requests for copies of this publication and for technical information about IBM products should be made to your IBM Authorized
Dealer or IBM Retailer.
No part of this publication may be reproduced or distributed in any form or by any means without prior permission in writing from
the International Business Machines Corporation.
© Copyright International Business Machines Corporation 2002. All rights reserved.
Note to U.S. Government Users -- Documentation related to restricted rights -- Use, duplication or disclosure is subject to
restrictions set forth in GSA ADP Schedule Contract with IBM Corp.
Notices
References in this publication to IBM products, programs, or services do not imply that IBM intends to make these available in all
countries in which IBM operates. Any reference to an IBM product, program or service is not intended to state or imply that only
IBM’s product, program, or service may be used. Any functionally equivalent product, program, or service that does not infringe
any of IBM’s intellectual property rights or other legally protectable rights may be used instead of the IBM product, program, or
service. Evaluation and verification of operation in conjunction with other products, programs, or services, except those expressly
designated by IBM, are the user’s responsibility.
IBM may have patents or pending patent applications covering subject matter in this document. The furnishing of this document
does not give you any license to these patents.
Trademarks
The following terms, used in this publication, are trademarks or service marks of the IBM Corporation in the United States, other
countries, or both:
HelpCenter
IBM
ENERGY STAR is a U.S. Govt. registered trademark.
Microsoft, Windows, and Windows NT are trademarks of Microsoft Corporation in the United States, other countries, or both.
Other company, product, and service names may be trademarks or service marks of others.
i
ENGLISH
T541 Flat Panel Monitor User Guide
Contents
Setting up the monitor ...............................................................................................2
System Hardware Requirements .........................................................................2
Handling Instructions ...........................................................................................2
Desk Top Use.......................................................................................................3
Monitor Installation ....................................................................................................4
Connecting your Monitor......................................................................................4
Switching on your Monitor....................................................................................5
Monitor Driver Installation .........................................................................................6
Driver installation for Windows 95 or Windows 98...............................................6
Driver installation for Windows 2000 or Windows Me..................................................7
Driver installation for Windows XP ................................................................................8
Image Setup for Analog Input ..................................................................................9
Auto Setup ...........................................................................................................9
AutoSetup for Windows 3.1, Windows 95, Windows 98, Windows 2000,
Windows Me, Windows XP or Windows NT ..............................................................10
Adjusting the image settings in DOS..................................................................11
Manually adjusting the image settings ...............................................................12
Ergonomic Considerations......................................................................................13
Workplace preparation .......................................................................................13
Working Practices ..............................................................................................13
Adjusting the Monitor Position ...............................................................................14
Caring for your Monitor ......................................................................................14
Adjusting Your LCD Monitor ...................................................................................15
User controls......................................................................................................15
On-screen display (OSD) controls .....................................................................16
Further Information ..................................................................................................19
Display modes ...................................................................................................19
Power Management...........................................................................................20
Troubleshooting .......................................................................................................21
Specifications ...........................................................................................................23
1
Setting up the monitor
System Hardware Requirements
This monitor requires a computer with a suitable on-board sub-system or
Video Adapter card that can support XGA 1024 x 768, SVGA 800 x 600, or
VGA 640 x 480 at 60Hz.
Handling Instructions
1. Do not support the monitor within the screen area. The Liquid Crystal
Display is glass and can be damaged by rough handling or excessive
pressure.
2. Before using your monitor for the first time, remove the clear protective
film from the front of the screen.
2
ENGLISH
Desk Top Use
- Remove the clip on stand models
Before adjusting your monitor for the first time, remove the locking clip on
rear of the stand. Carefully hold the screen of the monitor and then sqeeze
at arrows shown to remove(figure A).
(A)
3
Monitor Installation
Connecting your Monitor
1. Turn off your computer and all attached devices. Next, unplug the
power cord(s) to your computer and all attached devices.
2. Connect the signal cable.
The analog signal cable is already connected to your monitor.
The
analog connector is the blue connector.
When connecting the analog signal cable (Figure A)
Connect the free end of the attached signal cable to the 15-pin Monitor
port on the computer and tighten screws.
(Figure A)
If connecting a DVI-D digital signal cable (Figure B)
Connect one end of the monitor signal cable to the white connector
on the rear panel of the monitor. Connect the other end to the white
connector on the rear panel of the computer and tighten the screws.
Cable not supplied
(Optional)
4
(Figure B)
ENGLISH
3. Connect the power cord to the monitor and then plug the power cord into a
properly grounded outlet. Next, reconnect the power cord(s) to your computer
and all attached devices.
Switching on your Monitor
1. Switch on your monitor by pushing and releasing the power switch marked [
at the front of the bezel.
[To switch off your monitor, push and release the power switch again.]
]
2. Switch on your computer.
3. If you are using the analog connector, run AUTO SETUP by following the
instructions in the Auto Setup section on page 9.
5
Monitor Driver Installation
Driver installation for Windows 95 or Windows 98
This section must be
completed before
continuing with the
Windows95 or Windows98
Auto Setup on page 10.
i
On LCD monitors, unlike
CRTs, a faster refresh rate
does not improve display
quality. IBM recommends
using either 1024 x 768 at a
refresh rate of 60Hz or 640 x
480 at a refresh rate of 60Hz.
6
To use the Plug and Play feature in Microsoft®Windows®95 or Windows
98, files should be loaded from the IBM Monitor CD.
1. Turn off the computer and all attached devices.
2. Ensure that the monitor is connected correctly.
3. Turn on the monitor and then the system unit. Allow the system to boot
into Windows95 or Windows98.
Your computer’s Plug and Play code may warn you that your system
hardware has changed. This means that it has detected your new
monitor for the first time.
4. Open the DISPLAY PROPERTIES window by clicking START, SETTINGS,
CONTROL PANEL and then double - clicking on the DISPLAY icon.
5. Click the SETTINGS tab.
• In case of Windows 95 :
6 - 1. Click the CHANGE DISPLAY TYPE button.
2. Click the CHANGE MONITOR TYPE button.
• In case of Windows 98 :
6 - 1. Click the ADVANCED button.
2. Click the MONITOR tab.
3. Open the UPGRADE DEVICE DRIVER WIZARD window by clicking on
CHANGE button and then select the NEXT button.
4. Click the “Display a list of the known drivers for this device so that
I can choose a specific driver” and then select the NEXT button.
7. Insert the Setup CD into the CD driver: and click the HAVE DISK button.
8. Click OK.
9. Ensure that the CD drive letter is selected, and then select the ‘Drivers’
folder.
10.Choose IBM T541 monitor and Click OK. The files will be copied from
the CD to your hard disk drive.
11.Close all open windows and remove the CD.
12.Restart the system.
The system will automatically select the maximum refresh rate and
corresponding Color Matching Profiles.
ENGLISH
Driver Installation for Windows 2000 or Windows Me
This section must be
completed before
continuing with the
Windows2000 ,Windows Me
Auto Setup on page 10.
i
On LCD monitors, unlike
CRTs, a faster refresh rate
does not improve display
quality. IBM recommends
using either 1024 x 768 at a
refresh rate of 60Hz or 640 x
480 at a refresh rate of 60Hz.
To use the Plug and Play feature in Microsoft Windows 2000 or Microsoft
Windows Millennium Edition(Me) files should be loaded from the IBM
Monitor CD.
1. Turn off the computer and all attached devices.
2. Ensure that the monitor is connected correctly.
3. Turn on the monitor and then the system unit. Allow the system to boot
into Windows 2000 or Windows Me.
4. Open the DISPLAY PROPERTIES window by clicking START, SETTINGS,
CONTROL PANEL and then double-clicking the DISPLAY icon.
5. Click the SETTINGS tab.
6. Click the ADVANCED button.
7. Click the MONITOR tab.
8. Click the PROPERTIES button.
9. Click the DRIVER tab.
10.Open the UPGRADE DEVICE DRIVER WIZARD window by clicking on UPDATE
DRIVER and then Click the NEXT button.
11.Select the “Display a list of the known drivers for this device so that I can
choose a specific driver” and then Click the NEXT button.
12.Insert the Setup CD into the CD drive : and click the HAVE DISK button.
13.Click OK.
14.Ensure that the CD drive letter is selected, and then select the ‘Drivers’
folder.
15.Choose IBM T541 monitor and Click OK. The files will be copied from
the CD to your hard disk drive.
16.Close all open windows and remove the CD.
17.Restart the system.
The system will automatically select the maximum refresh rate and
corresponding Color Matching Profiles.
7
Driver Installation for Windows XP
This section must be
completed before
continuing with the
Windows XP Auto Setup on
page 10.
i
On LCD monitors, unlike
CRTs, a faster refresh rate
does not improve display
quality. IBM recommends
using either 1024 x 768 at a
refresh rate of 60Hz or 640 x
480 at a refresh rate of 60Hz.
8
To use the Plug and Play feature in Microsoft Windows XP files should be
loaded from the IBM Monitor CD.
1. Turn off the computer and all attached devices.
2. Ensure that the monitor is connected correctly.
3. Turn on the monitor and then the system unit. Allow the system to boot
into Windows XP.
4. Open the DISPLAY PROPERTIES window by clicking START, SETTINGS,
CONTROL PANEL and then double-clicking the DISPLAY icon.
5. Click the SETTINGS tab.
6. Click the ADVANCED button.
7. Click the MONITOR tab.
8. Click the PROPERTIES button.
9. Click the DRIVER tab.
10.Open the Hardware Update Wizard window by clicking on UPDATE
DRIVER and then Click the NEXT button.
11.Select the “Install from a list or Specific location(Advanced)” and then
Click the NEXT button.
12.Insert the Setup CD into the CD drive : and click the HAVE DISK button.
13.Click OK.
14.Ensure that the CD drive letter is selected, and then select the ‘Drivers’
folder.
15.Choose IBM T541 monitor and Click OK. The files will be copied from
the CD to your hard disk drive.
16.Close all open windows and remove the CD.
17.Restart the system.
The system will automatically select the maximum refresh rate and
corresponding Color Matching Profiles.
ENGLISH
Image Setup for analog input
Auto Setup
Before carrying out this
section, it is very important
that the correct monitor
drivers have been
installed.(See pages 6 and 8)
i
The Setup Utility included
on the setup CD displays a
test pattern of dots. It does not
replace or modify the display
drivers.
i
The Auto Setup instructions
require the monitor to be
warmed up for 15 minutes.
This is not required for normal
operation.
i
If your computer does not
run with the setup CD
shipped with the monitor, refer
to Manual Setup on page 12.
i
The AUTO SETUP process
only applies to the current
screen mode. When a new
mode is selected, repeat this
section to reset the monitor.
For digital input, image setup is not required.
When you first use your monitor, you must perform Auto Setup for analog
input. If you are using digital input, continue with the instructions on page
13. This procedure sets up your monitor to process the video signals from
your computer without image discoloration or smearing. After you perform
Auto Setup, the settings are stored and used each time you turn on the
monitor.
In order to optimize the displayed image a set-up utility is provided on the
IBM Monitor CD. Operation of this utility is dependent on the operating
system on your computer. You may choose to run AUTO SETUP for each
operating system that you use. This means that if you sometimes use your
monitor while running any version of Windows and sometimes also use it
from within DOS (not a DOS window), you must run AUTO SETUP for both
Windows and DOS. You may run versions of AUTO SETUP in any order.
Before you begin AUTO SETUP for your computer, make sure the
computer video mode is set in the range of the supported screen
resolution shown in the table on page 19.
You should perform AUTO SETUP for each screen mode you use.
9
AutoSetup for Windows 3.1, Windows 95, Windows 98, Windows 2000,
Windows Me, Windows XP or Windows NT
i
If the monitor is in standby
mode (STANDBY ON), it
may automatically turn off while
you are waiting for it to warm up.
1. Turn on the monitor first; then the computer.
If the message CHECK VIDEO CABLE is displayed, or if nothing is
displayed, check:
• that the video interface cable is not connected properly.
• the correct video adapter card is not installed.
2. Wait approximately 15 minutes, until the monitor warms up.
3. Ensure that the icon bar and tool bar, if displayed are at the bottom of
the screen.
4. Insert the CD labelled ‘IBM Monitor CD’ into the CD drive.
i
The size and diversity of the
dot pattern varies with the
screen resolution.
5. Check the operating system installed on your computer and follow the
instructions from the table below.
Operating
System
Step1
Step2
Windows 3.1
Open
PROGRAM
Manager
Select
RUN
Windows 95
Windows 98
Windows 2000
Windows Me
Windows XP
Microsoft Windows NT®4.0
i
Position the mouse pointer at
the bottom center of the
screen. This allows AUTO
SETUP to run properly
Select
START
Select RUN
Step3
Type
‘E:\TESTPAT’
and press
ENTER
6. When the test pattern appears, press the Image Setup direct access
button
at the bottom of the monitor to run the image setup.
7. To clear the Image Setup test pattern, press the ESC key on your
keybord.
You have completed the monitor setup for Windows. If you use other
operating systems, perform the appropriate AUTO SETUP for those systems
and also see Adjusting the image settings in DOS on page 11.
10
ENGLISH
Adjusting the image settings in DOS
i
If the monitor is in standby
mode (STANDBY ON), it
may automatically turn off while
you are waiting for it to warm
up. If this happens, switch off
the monitor and switch it on
again after a few seconds.
1. Turn on the monitor first; then the computer.
i
2.
3.
4.
5.
6.
7.
If you are using PC-DOS/V,
change to U.S. mode by
typing ‘CHEV US’ and pressing
ENTER at the command
prompt.
You must use when you run
DOS Auto Setup.
i
i
The size and diversity of the
dot pattern varies with the
screen resolution.
If the screen flickers,
repeat the setup several
times until the flicker is
minimised, or adjust it manually
by following refer to
Manual Setup on page 12.
If the message CHECK VIDEO CABLE is displayed, or if nothing is
displayed, check:
• that the video interface cable is not connected properly.
• the correct video adapter card is not installed.
Wait approximately 15 minutes, until the monitor warms up.
Insert the CD labelled ‘IBM Monitor CD’ into the CD drive.
Display the command prompt screen of the DOS full-screen display.
At the command prompt, type the CD drive letter, and press ENTER.
Type ‘TESTPATD’ and press ENTER.
Select from the screen the number for the color or text mode you want
to setup.
8. Select from the screen the number for the video mode you want to
setup.
You may repeat this process for as many of the color and video modes
as you need.
9. When the test pattern appears, press the Image Setup direct access
button
at the bottom of the monitor to run the image setup.
10. To clear the Image Setup test pattern, press the ESC key on your
keybord.
11. Type ‘Exit’ at the command prompt to return to Windows.
If you use other operating systems, perform the appropriate Image Setup
for those systems and also see
Image Setup Windows 3.1, Windows 95, Windows 98, Windows 2000,
Windows Me, Window XP or Windows NT workstation on page 10.
11
Manually adjusting the image settings
i
If the monitor is in standby
mode (STANDBY ON), it
might automatically turn off
while you are waiting for it to
warm up.
Normally, you can complete the setup procedure using Image Setup, however,
if your screen image is still distorted after you perform Image Setup or the setup
CD does not run on your system, perform MANUAL SETUP.
1. Have your monitor turned on for about 15 minutes, until the monitor
warms up.
2. Display the image you most frequently use on the screen.
3. Press the OSD Enter button
the initial OSD menu.
at the botton of the monitor to display
4. Use an Arrow button (
or
) to select the IMAGE SET-UP icon
and press the OSD Enter button
to access the function.
5. Using an Arrow button (
or
), select MANUAL, press
and then
press
once to select COARSE. Left and right arrow adjustment
indicators become illuminated (see page 17).
6. Use the Arrow buttons to manually adjust to correct (as much as
possible) for jitter or noise in the image, then press
to save the
changes.
7. Use an Arrow button to select FINE and press the
button.
8. Use the Arrow buttons again to tune the image to your liking.
9. When finished, press the Exit button
OSD.
You have completed the monitor setup.
12
four times to exit from the
ENGLISH
Ergonomic Considerations
Workplace Preparation
i
This section gives advice
on what you should
consider before you set up
your monitor.
Height
Position the monitor so that the top of the screen is slightly below your eye
level when you sit at your workstation.
Orientation
- Choose a position that gives the least reflection from lights and windows,
usually at a right angle to any windows.
- Positon the monitor directly in front of you so that you do not have to twist
your body to use it.
- Tilt the monitor to a comfortable viewing angle.
Working Practices
i
This section gives advice
on how you can work
comfortably and reduce
fatigue.
Rest
Take regular breaks. Vary your posture, stand up and stretch occasionally
as prolonged use of computer workstations can be tiring.
Back
Sit back in your chair and use the backrest.
Hands
Use a light touch on the keyboard, keeping your hands and fingers relaxed.
Allow a space in front of the keyboard to rest your wrists when not typing.
Consider using a wristpad.
Eyesight
Working with monitors, in common with any prolonged close work, can be
visually demanding. Look away from the screen periodically and have your
eyesight checked regularly.
Screen settings
Set the screen brightness and contrast to a comfortable level. You may
have to adjust these settings as the lighting changes during the day. Many
application programs let you select color combinations which can help you
to view in comfort. See the User controls section on page 15 for more
information.
13
Adjusting the Monitor Position
i
With the IBM Flat Panel
Monitor, you can adjust its
position in various ways for
maximum comfort.
Viewing Angle
You can tilt the screen forward and backward as shown below(figure A).
Swivel
You can swivel the screen leftward and rightward as shown below(figure A).
Height
You can adjust height of the screen(figure B).
1
(Figure A)
2
(Figure B)
Caring for your Monitor
Be sure to turn off the power before you perform any maintenance on the
monitor. Clean your monitor as follows:
• Gently wipe the covers and the screen with a soft cloth.
• Remove finger marks and grease with a damp cloth and mild detergent.
• Never use flammable cleaning materials to clean your IBM monitor or
any other electrical apparatus.
14
ENGLISH
Adjusting Your LCD Monitor
User controls
1
2
USER CONTROL FEATURES
Icon
Monitor controls
Switches the monitors on and off.
Display main OSD menu and selects highlighted menu item.
and
Moved the cursor to highlight icons or make adjustments.
Exits from current OSD menu.
i
The image is already
optimized for many display
modes, however the user
controls can be used to adjust
the image to your liking.
Icon
Direct Access Functions
Bring up Brightness adjustment.
Bring up auto image setup.
i
The settings are saved
after adjustment and
when exiting the OSD and
will be effective thereafter.
CONTROLS LOCK / UNLOCK
This feature allows you to secure the current control settings,
while allowing the user to adjust Brightness or Contrast, so that
they cannot be inadvertently changed. Push and hold the enter
button[ ] for 10 seconds; the message “Controls Locked”
appears.
You can unlock the OSD controls at any time by pushing the enter
button[ ] for 10 seconds; the message “Controls Unlocked” will
appear.
1
2
Switch between input signals.
15
On-screen display (OSD) controls
i
The LCD monitor needs
time to become thermally
stable the first time you turn it
on each day. Thus, to achieve
more accurate adjustments for
parameters, allow the LCD
monitor to warm up (be On) for
at least 15 minutes before
making any screen adjustment.
The settings adjustable with the user controls are viewed through the On Screen Display (OSD). Press the enter button [ ] to display the main OSD
menu.
Initial appearance of OSD
main menu;
Analog Signal input
Digital Signal input
sub menu;
OSD functions
OSD Icon
Description
sub-menu(s)
Control and
Adjustments
Adjusts brightness
BRIGHTNESS
Adjusts contrast
CONTRAST
IMAGE SET-UP
The IMAGE SET-UP function is used
to adjust the level of noise in the video
signal which causes horizontal lines or
areas on the screen where the image
appears to be unstable and jitters or
shimmers. This can be done
automatically or manually.
It is not applicable to digital input.
16
AUTO
If AUTO is selected the
image will automatically
adjust
ENGLISH
OSD Icon
Description
If manual is selected, the user will go
to the manual adjustment screen.
Sub-menu(s)
MANUAL
• Fine
• Coarse
IMAGE SET-UP
CONT
Select the COLOR MODE you find
most comfortable or fine tune the
colors using the USER COLOR MODE
menu, if necessary.
COLOR MODE
COLOR
Controls and
Adjustments
To adjust the focus of the
display. This item allows
you to remove any
horizontal noise and clear
or sharpen the image of
characters.
Fine adjustments should
be done after adjusting the
Coarse .
Preset 1
(Pink White)
Preset 2
(Normal White)
Preset 3
(Blue White)
USER COLOR
MODE-
Changes the position of the OSD on the
screen.
• Red
Increases or decreases
redness
• Green
Increases or decreases
greenness
• Blue
Increases or decreases
blueness
H-POSITION
OSD Position
V-POSITION
17
OSD Icon
RESET
Description
Sub-menu(S)
Controls and
Adjustments
Reset should return all available functions • YES
(apart from language which should not
change unless adjusted via the
• NO
LANGUAGE menu) fo their factory
presets.
Moves the screen left and right .
Is not availible with a digital input
H-POSITION
Moves the screen up and down.
Is not availible with a digital input
V-POSITION
Changes the size of the OSD menu on the screen.
OSD SIZE
Language
• SMALL
• MEDIUM
• BIG
The language chosen affects only the language of the OSD. • ENGLISH
• FRANCAIS
Select one of the five language to use for the OSD.
• DEUTSCH
It has no effect on any software running on the computer.
• ITALIANO
• ESPANOL
To select OSD display duration time.
(5 - 60 seconds)
OSD TIME
Information
18
Display model name, serial number, year of manufacture
and microcode level.
• INFORMATION
Display all preset modes stored in the monitor.
• PRESET MODES
Display all user modes stored in the monitor.
• USER MODES
The current display mode will be shown at the base of all
information screens.
Use the
and
buttons to move between
information screens.
ENGLISH
Further Information
Display modes
i
If your computer has
previously been used with
a CRT monitor and is currently
configured to a display mode
outside the range that the Flat
Panel monitor can display, you
may need to re-attach the CRT
monitor temporarily until you
have reconfigured the
computer, preferably to 1024 x
768 at 60Hz.
The display mode the monitor uses is controlled by the computer. Therefore,
you should refer to your computer documentation for details on how to
change display modes.
The image size, position and shape may change when the display mode
changes. This is normal and the image can be readjusted using AUTO SETUP
and the monitor controls.
Unlike CRT monitors, which require a high refresh rate to minimize flicker,
TFT technology is inherently flicker-free. If possible, configure your computer
for 1024 x 768 addressability at 60Hz vertical refresh rate.
For the display modes listed below, the screen image has been optimized
during manufacture.
Factory Set Display Modes
Refresh Rate
Horizontal
Frequency
640 x 480
60 Hz
31.5 kHz
640 x 480
66 Hz
35.0 kHz
640 x 480
75 Hz
37.5 kHz
640 x 350
70 Hz
31.5 kHz
720 x 400
70 Hz
31.5 kHz
800 x 600
56 Hz
35.2 kHz
800 x 600
60 Hz
37.9 kHz
800 x 600
72 Hz
48.1 kHz
800 x 600
75 Hz
46.9 kHz
832 x 624
75 Hz
49.7 kHz
1024 x 768 †
60 Hz
48.4 kHz
1024 x 768
70 Hz
56.5 kHz
1024 x 768
75 Hz
60.0 kHz
Addressabillty
† Recommended
Note : VESA timings are as detailed in the VESA “Display Monitor Timing
Specification”. Version 1.0, Revision 0.8, Dated 09/17/98.
19
Power Management
To benefit from power management, the monitor must be used in
conjunction with a computer that implements the Video Electronics
Standards Association (VESA) Display Power Management Signaling
(DPMS) Standard.
The power management feature is invoked when the computer recognizes
that you have not used your mouse or keyboard for a user-definable period.
There are several states as described in the table below.
As an ENERGY STAR 2000® Partner, IBM has determined that this product
meets the ENERGY STAR 2000® guidelines for energy efficiency.
IBM recommends that you switch off your monitor at the end of each
working day, or whenever you expect to leave it unused for long periods
during the day.
Power
Indicator
Screen
On
Steady green
Normal
Active off
Steady amber
Blank
State
Restoring
Operation
ENERGY
Press a key or
move the mouse.‡ STAR 2000®
‡ There may be a slight delay before the picture reappears.
20
Compliance
ENGLISH
Troubleshooting
If you have a problem setting up or using your monitor, you may be able
to solve it yourself. Before calling your retailer or IBM, try the suggested
actions that are appropriate to your problem.
Problem
Possible
Cause
Suggested Action
Reference
Connecting
your
Monitor
section on
page 4.
Screen is
blank and
power
indicator is off.
No power to
monitor.
• Ensure that the electrical outlet
and the monitor are both
switched on.
• Check that the power cord
is firmly plugged into the
electrical outlet and the power
supply unit.
• If the power cord plug has
a removalble fuse, replace it.
• Try another power cord.
• Try another electrical outlet.
• Check the power connection at
the back of the panel.
Screen is blank
and power
indicator is
steady green.
Brightness
and Contrast
may be too
low.
• Adjust brightness and contrast. User
controls
section on
page 15.
Screen is blank
and power
indicator is
steady amber.
The monitor is • Press any key on the keyboard
in the Power
or move the mouse to restore
Management
operation.
Standby state. • Check the Power Management
software on your computer.
• Press the
to switch between
analog and digital mode. If the
panel is the wrong mode for
the signal being provided, the
monitor appears to go into
sleep mode.
Power
Management
section on
page 20.
21
Problem
Screen is blank
and power
indicator is
flashing green
every 0.5
second
Possible
Cause
Suggested Action
Display mode of • Reconfigure key on the
the computer is
computer to use a supported
outside the
display mode.
range of the
monitor
CHECK VIDEO The monitor is
CABLE
not receving a
message is
video signal
shown and
power indicator
is steady amber.
• Check that the signal cabel
is firmly connected to the
computer.
• Check that no pins are bent
in the signal cable connector.
Image appears
There are noises • Select IMAGE SET-UP menu
to be smeared
in the OSD. Then select
in the video
MANUAL to adjust FINE /
signal
COARSE settings.
i
For image problems, you
Image appears
may want to run AUTO
to be discolored
SETUP again before
consulting to this section. In
most cases, AUTO SETUP
can fix the problems. See
Auto Setup for the computer A few dots are
missing,
on page 9 for details.
discolored, or
inappropriately
lighted.
22
The color setting • Adjust the Color settings.
may be incorrect.
Reference
Further
Information
section on
page 19.
Connecting
your monitor
section on
page 4.
User
Controls
section on
page 15.
User
Controls
section on
page 15.
The LCD contains over 2,300,000 thin-film transistors (TFTs).
A small number of missing, discolored, or lighted dots may be
present on the screen, which is an intrinsic characteristic of the
TFT LCD technology and is not an LCD defect.
ENGLISH
Specifications
This color monitor (Type-model 9512-Hxx) uses a 15-inch TFT LCD.
Height:
13.37 inch(339.5 mm) - Min
18.29 inch(464.5 mm) - Max
W
H
Width:
14.38 inch(365.2 mm)
Depth:
10.19 inch(259.0 mm)
D
i
Power consumption figures
are for the monitor and the
power supply combined.
Weight
With Stand:
5.3 kg (11.68 lbs)
Image
Viewable Image Size:
Maximum Height:
Maximum Width:
Pixel Pitch:
15-inch (381.0 mm)
304.1 mm
228.1 mm
0.297 mm (H) x 0.297 mm (V)
Power Input
Supply Voltage:
Rated Current:
100 - 240 Vac 60/50 ± 3Hz
0.6A
Power
Consumption
Normal Operation:
Active off:
Off:
< 35 W
< 3W
< 1W
Video Input
Input Signal:
Analog-75 ohm 0.7V
Digital-DVI 1.0
Horiz. Addressability:
Vert. Addressability:
Clock Frequency:
1024 pixels (max)
768 lines (max)
80 MHz (Digital)
80 MHz(Analog)
Sync Input
Type
Analog - Separate, Composite,
SOG
Digital-DVI 1.0
Communications
VESA DDC:
E-DDC
Supported Display
Modes
Standard modes :
IBM, VESA, MAC
Horiz / Vert Freq:
See Factory Set Display
Modes on page 19.
See Display Mode Ranges on
page 24.
Environment
Temperature:
Operating:
Storage:
Shipping:
Humidity:
Operating:
Storage:
Shipping:
10 to 35° C
- 20 to 60° C
- 20 to 60° C
10 to 80%
5 to 95%
5 to 95%
23
Display Mode Ranges
24
Addressabillty
Refresh Rate /
Range ( + / - 3%)
Horizontal Frequency /
Range ( + / - 3%)
640 x 480
58.2 ~ 61.8 Hz
30.56 ~ 32.45 kHz
640 x 480
64.0 ~ 68.0 Hz
33.95 ~ 36.05 kHz
640 x 480
72.8 ~ 77.3 Hz
36.38 ~ 38.63 kHz
640 x 350
67.9 ~ 72.1 Hz
30.56 ~ 32.45 kHz
720 x 400
67.9 ~ 72.1 Hz
30.56 ~ 32.45 kHz
800 x 600
54.3 ~ 57.7 Hz
34.14 ~ 36.26 kHz
800 x 600
58.2 ~ 61.8 Hz
36.76 ~ 39.04 kHz
800 x 600
69.8 ~ 74.2 Hz
46.66 ~ 49.54 kHz
800 x 600
72.8 ~ 77.3 Hz
45.49 ~ 48.31 kHz
832 x 624
72.8 ~ 77.3 Hz
48.21 ~ 51.19 kHz
1024 x 768
58.2 ~ 61.8 Hz
46.95 ~ 49.85 kHz
1024 x 768
67.9 ~ 72.1 Hz
54.81 ~ 58.20 kHz
1024 x 768
72.8 ~ 77.3 Hz
58.20 ~ 61.80 kHz