1
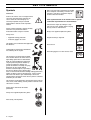
Operator′s manual Manual d’utilisation Manual de instrucciones
Hedge Trimmer Attachment HA 110 HA 850
Complément Taille-haie HA 110 HA 850
Tijeras cortasetos (suplemento) HA 110 HA 850
.
EnFR
glisES
h
GB
KEY TO SYMBOLS
Symbols
WARNING!
Incorrect or careless use of a hedge trimmer
can turn it into a dangerous tool that can
cause serious or even fatal injury. It is
extremely important that you read and
understand the contents of this operator’s
manual.
Please read the operator’s manual carefully
and make sure you understand the
instructions before using the machine.
Noise emission to the environment according
to the European Community’s Directive. The
machine’s emission is specified in chapter
Technical data and on label.
Other symbols/decals on the machine refer to special
certification requirements for certain markets.
Switch off the engine by moving the stop
switch to the STOP position before carrying
out any checks or maintenance.
Always wear approved protective gloves.
Always wear:
•
Approved hearing protection
•
Protective goggles or a visor
Regular cleaning is required.
This product is in accordance with applicable
EC directives.
Visual check.
Cutting tool. Do not touch the tool without
first switching off the engine.
Protective goggles or a visor must be worn.
This machine is not electrically insulated.
If the machine touches or comes close to
high-voltage power lines it could lead to
death or serious bodily injury. Electricity
can jump from one point to another by
arcing. The higher the voltage, the
greater the distance electricity can jump.
Electricity can also travel through
branches and other objects, especially if
they are wet. Always keep a distance of at
least 10 m between the machine and high-voltage power lines
and/or any objects that are touching them. If have to work
within this safe distance you should always contact the
relevant power company to make sure the power is switched
off before you start work.
This machine can be dangerous! The operator of the machine
must ensure, while working, that no persons or animals come
closer than 15 metres.
Arrows which show limits for handle
positioning.
Always wear approved protective gloves.
Wear sturdy, non-slip boots.
2 – English
CONTENTS
Contents
KEY TO SYMBOLS
Symbols .......................................................................
CONTENTS
Contents ......................................................................
Note the following before starting: ................................
SAFETY INSTRUCTIONS
Machine′s safety equipment ........................................
Checking, maintaining and servicing the machine′s
safety equipment ..........................................................
Safety instructions when using the hedge trimmer ......
WHAT IS WHAT?
What is what on the hedge trimmer attachment? (HA
110)...............................................................................
What is what on the hedge trimmer attachment? (HA
850)...............................................................................
ASSEMBLY
Fitting the hand guard and loop handle (HA 110) .........
Fitting the cutting head ................................................
STARTING AND STOPPING
Check before starting ...................................................
MAINTENANCE
Gear housing ...............................................................
Cleaning and lubrication ..............................................
Maintenance schedule .................................................
TECHNICAL DATA
Technical data ..............................................................
Note the following before starting:
2
Husqvarna AB has a policy of continuous product
development and therefore reserves the right to modify the
design and appearance of products without prior notice.
3
3
Long-term exposure to noise can result in permanent hearing
impairment. So always use approved hearing protection.
4
4
5
!
7
8
9
9
10
!
WARNING! Under no circumstances may the
design of the machine be modified without
the permission of the manufacturer. Always
use genuine accessories. Non-authorized
modifications and/or accessories can result
in serious personal injury or the death of the
operator or others.
WARNING! This accessory may only be used
together with the intended clearing saw/
trimmer, see under heading ”Approved
accessories” in chapter Technical data in the
machine’s Operator’s Manual.
The machine is only designed for cutting branches and twigs.
11
11
11
11
English
–3
SAFETY INSTRUCTIONS
Machine′′s safety equipment
This section describes the machine′s safety equipment, its
purpose, and how checks and maintenance should be carried
out to ensure that it operates correctly. See the ”What is
what?” section to locate where this equipment is positioned
on your machine.
Checking, maintaining and servicing
the machine′′s safety equipment
!
The life span of the machine can be reduced and the risk of
accidents can increase if machine maintenance is not carried
out correctly and if service and/or repairs are not carried out
professionally. If you need further information please contact
your nearest service workshop.
!
WARNING! Never use a machine that has
faulty safety equipment! Carry out the
inspection, maintenance and service
routines listed in this section.
!
WARNING! Never use a machine with faulty
safety equipment. The machine’s safety
equipment must be checked and maintained
as described in this section. If your machine
fails any of these checks contact your
service agent to get it repaired.
WARNING! Always stop the engine before
doing any work on the cutting attachment.
This continues to rotate even after the
throttle has been released. Ensure that the
cutting attachment has stopped completely
and disconnect the HT lead from the spark
plug before you start to work on it.
Hand guard
Hand guard
(HA 110)
The hand guard prevents hands from coming into contact with
the moving blades, for example, if the operator loses grip on
the front handle.
(HA 110)
•
Check that the hand guard is fitted correctly.
•
Check that the hand guard is undamaged.
Blade guard
(HA 110)
The blade guard (A) is intended to protect against any part of
the body coming into contact with the blades (B).
Blades
A
B
To ensure good cutting results it is important that the contact
pressure between the blades is correct. The contact pressure
is adjusted by turning the screws on the underside of the bar
clockwise as far as they will go. Then turn the screws
anticlockwise a 1/4 turn. Lock the screws using the locking nut
on the top of the bar. Check that the screws are loose enough
to allow the washers under the screw heads to slide sideways.
When the blades are correctly adjusted the play between the
blades should be 0,2–0,4 mm, measured at the screws.
The edges of the blades are too hard to be filed. Dull blades
should be sharpened using a grinder.
Replace the blades if they are bent or damaged.
4 – English
SAFETY INSTRUCTIONS
Blade guard
Safety instructions regarding the
surroundings
(HA 110)
•
Check that the blade guard is not damaged or distorted.
•
Replace the blade guard if it is bent or damaged.
•
Never allow children to use the machine.
•
Ensure that no-one comes closer than 15 m while you are
working.
•
Never allow anyone else to use the machine without first
ensuring that they have understood the contents of the
operator’s manual.
•
Never work from a ladder, stool or any other raised
position that is not fully secured.
A
B
Gear housing
•
The gear housing gets hot when the machine has been in
use. To avoid burning yourself do not touch the gear
housing.
Safety instructions while working
Safety instructions when using the
hedge trimmer
!
!
•
Always ensure you have a safe and stable working
position
•
Always use both hands to hold the machine. Hold the
machine at the side of your body.
•
Use your right hand to control the throttle setting.
•
Make sure that your hands and feet do not come near the
cutting attachment when the engine is running.
•
When the engine is switched off, keep your hands and feet
away from the cutting attachment until it has stopped
completely.
WARNING! The machine can cause serious
personal injury. Read the safety instructions
carefully. Learn how to use the machine.
WARNING! Cutting tool. Do not touch the
tool without first switching off the engine.
CAUTION! Please read the operator’s manual carefully and
make sure you understand the instructions before using the
machine.
Personal protection
•
Always wear boots and other equipment described under
the heading Personal protective equipment.
•
Always wear working clothes and heavy-duty long
trousers.
•
Watch out for stumps of branches that can be thrown out
during cutting.
•
Never wear loose clothing or jewellery.
•
•
Make sure your hair does not hang below shoulder level.
Always lay the machine on the ground when you are not
using it.
English
–5
SAFETY INSTRUCTIONS
•
Do not cut too close to the ground. Stones and other
objects can be thrown out.
•
Check the working area for foreign objects such as electricity
cables, insects and animals, etc, or other objects that could
damage the cutting attachment, such as metal items.
•
If any foreign object is hit or if vibrations occur stop the
machine immediately. Disconnect the HT lead from the
spark plug. Check that the machine is not damaged.
Repair any damage.
•
If anything jams in the blades while you are working,
switch off the engine and wait until it has stopped
completely before cleaning the blades. Disconnect the HT
lead from the spark plug.
•
Make sure that the tip does not touch the ground.
•
Do not rush the work, but work steadily until all the
branches have been cut back cleanly.
Changing the hedge trimmer angle
(HA 110)
•
Undo the knob.
•
Press the cutting head against the ground or some other
solid object until the desired angle has been obtained.
•
Tighten the knob.
Safety instructions after completing work
•
The transport guard should always be fitted to the cutting
attachment when the machine is not in use.
•
Make sure the cutting attachment has stopped before
cleaning, carrying out repairs or an inspection.
Disconnect the HT lead from the spark plug.
•
Always wear heavy-duty gloves when repairing the cutting
attachment. This is extremely sharp and can easily cause
cuts.
•
Store the machine out of reach of children.
•
Use only original spare parts for repairs.
Basic working techniques
•
Work with a swinging action from the bottom upwards
when trimming sides.
•
Adjust the throttle setting to suit the load.
•
When trimming a hedge the engine should always face
away from the hedge.
•
Hold the machine as close to your body as possible to get
the best balance.
6 – English
(HA 850)
•
Undo the knob.
•
Grasp the handle on the angle stop, adjust to the desired
angle and then tighten the knob.
!
WARNING! Do not hold the cutting head
when you adjust the angle. The blades are
sharp and you could easily cut yourself.
WHAT IS WHAT?
4
7
2
1
2
2
3
11
6
12
9
5
8
10
What is what on the hedge trimmer attachment? (HA 110)
1
Cutter
7
Angle adjustment knob
2
Grease nipples (3)
8
Hand guard
3
Bevel gear
9
Operator′s manual
4
Blade guard
10 Transport guard
5
Front handle
11 Shaft coupling
6
Hand guard mounting screw
12 Shaft (110 mm)
English
–7
WHAT IS WHAT?
6
2
1
2
2
10
3
9
4
5
7
8
What is what on the hedge trimmer attachment? (HA 850)
1
Cutter
6
Angle adjustment knob
2
Grease nipples (3)
7
Operator′s manual
3
Bevel gear
8
Transport guard
4
Front handle
9
Shaft coupling
5
Shaft (829 mm)
10 Handle
8 – English
ASSEMBLY
Fitting the hand guard and loop
handle (HA 110)
1
2
Loosen the clutch sleeve’s two mounting bolts and
dismantle the clutch sleeve.
Fitting the cutting head
It is important that the hedge trimmer is laid on a flat surface
when you fit the cutting head. Otherwise the cutting head may
not be fitted straight.
1
Fit the cutting head to the shaft. CAUTION! Make sure the
drive shaft inside the shaft engages with the recess in the
cutting head.
2
Tighten the lower screw first, then the upper screw.
Assemble the hand guard and loop handle by screwing
them together. Take care to align the holes in both parts.
3
Slide the loop handle and hand guard onto the shaft.
4
Slide the spacer into the slot in the loop handle.
5
Fit the nut and screw. Do not overtighten.
6
Now make a final adjustment to give yourself a
comfortable working position. Tighten the screw.
CAUTION! The loop handle and hand guard must not be
fitted behind the arrow marked on the shaft.
7
Fit the clutch sleeve and tighten the two mounting bolts.
English
–9
STARTING AND STOPPING
Check before starting
•
Inspect the working area. Remove any objects that could
be thrown out.
•
Check the cutting attachment. Never use blades that are
dull, cracked or damaged.
A
B
•
Check that the machine is in perfect working order. Check
that all nuts and screws are tight.
•
Check that the blade guard is not damaged or distorted.
(HA 110)
•
Replace the blade guard if it is bent or damaged. (HA 110)
•
Make sure the gear housing is lubricated correctly. See
instructions under the heading Gear housing.
•
Check that the cutting attachment always stops when the
engine is idling.
•
Only use the machine for the purpose it was intended for.
•
Make sure that the handle and safety features are in good
working order. Never use a machine that lacks a part or
has been modified outside its specifications.
10 – English
MAINTENANCE
Gear housing
Maintenance schedule
Below you will find some general maintenance instructions. If
you need further information please contact your service
workshop.
There are three grease nipples on the gear housing. Use a
grease gun to top up with grease. This should be carried out
approximately every 20 working hours. Use Husqvarna
special grease, part no. 503 98 96-01.
Daily maintenance
1
2
A
B
CAUTION! The gear housing must not be filled completely
with grease. The grease expands as the machine heats up
during operation. If the gear housing was completely filled
with grease it could damage the seals and lead to leakage of
grease.
1
Check that the blades do not move when the engine is
idling or when the choke is in the start throttle position.
2
Check that the hand guard is not damaged. Replace the
guard if damaged. (HA 110)
Weekly maintenance
2
1
The grease in the bevel gear does not normally need to be
changed except if repairs are carried out.
Cleaning and lubrication
After you have used the machine clean any resin and plant
residue from the blades using cleaning agent 531 00 60-75
(UL22).
1
Fill the gear housing with grease. This should be carried
out approximately every 20 working hours.
2
Check that the screws that hold the blades together are
correctly tightened.
Always lubricate the blade bars with special grease, part no.
531 00 60-74 (UL 21) before use.
Technical data
Technical data
HA 110
HA 850
2,0
2,3
Length, mm
550
550
Blade speed, cuts/min
4184
4184
Weight
Weight, Lbs/kg
Blades
English
– 11
1140026-20
´®z+H"^¶0G¨
´®z+H"^¶0G¨
2003-12-23
We hope you find the links below useful. For further gardening information visit
www.GardenResources.co.uk
Blower Vacs
Cultivators
Electric
chainsaws
Garden tractors
Hover mowers
Lawn scarifiers
Petrol hedge
cutters
Ryobi strimmers
Brush cutters
Cylinder lawn
mowers
Fertiliser
spreaders
Garden vacuums
Husqvarna
chainsaws
Lawn tractors
Ride on lawn
mowers
Scarifiers
Brushcutters
Cylinder mowers
Chainsaws
Echo chainsaws
Chain saws
Echo Strimmers
Garden blowers
Garden rollers
Garden shredders
Hayter lawn
mowers
Kawasaki brush
cutters
Leaf blowers
Ride on mowers
Hedge cutters
Hedgecutters
Kawasaki
strimmers
Leaf vacuums
Rotary mowers
Lawn mowers
Petrol chainsaws
Rotavators
Westwood lawn
tractors
Blower Vacs
Westwood ride on
mowers
Chain Saws
Strimmers
Westwood
tractors
Chainsaws
Brush Cutters
Brushcutters
Cultivators
Echo Chainsaws
Echo Strimmers
Electric
Chainsaws
Garden
Shredders
Hedgecutters
Fertiliser
Spreaders
Garden Tractors
Cylinder Lawn
Mowers
Garden Blowers
Garden Rollers
Lawn Rollers
Garden Vacuums
Hedge Cutters
Lawn Mowers
Petrol Chainsaws
Scarifiers
Petrol Hedge
Cutters
Ryobi Strimmers
Hayter Lawn
Mowers
Kawasaki Brush
Cutters
Leaf Blowers
Ride on Mowers
Rotovators
Patio Heaters
Gas Greenhouse
Heaters
Christmas
Gardening Gifts
Hover Mowers
Patio Heater
Covers
Stainless Steel
Patio Heaters
Garden Tractors
Husqvarna
Chainsaws
Lawn Tractors
Ride on Lawn
Mowers
Garden Patio
Heaters
Garden Heaters
Table Top Patio
Heaters
Ride on Lawn
Mowers
Outdoor Patio
Heaters
Greenhouse
Heaters
Patio Heaters UK
Ride on Mowers
Also See
Gardening Tools Direct, for lawn mowers, brush cutters, chainsaws
Gardening Supply for patio heaters, lawn mowers, chainsaws
Garden Tractor, for lawn tractors and ride on mowers
Kawasaki
Strimmers
Leaf Vacuums
Rotary Mowers
Gas Patio Heaters
Green House
Heaters
Patio Heaters with
Covers