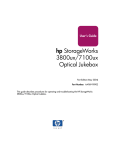
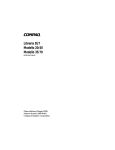
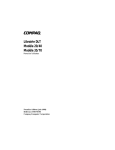
1
Using UDO media
Using HP StorageWorks
Library and Tape Tools
hp
StorageWorks
Optical
1000ux/1900ux/
2300ux
Getting
Started
A
H
HP UDO media meets HIPPA and federal
archival regulations and offers customers both
WORM and ReWritable formats. By using
HP UDO media in your HP StorageWorks
UDO jukeboxes and drives, you safeguard
your investment by preserving the integrity of
your data. HP develops, designs, qualifies and
exhaustively tests both hardware and media
together to ensure the highest level of media
quality and reliability.
To order HP UDO media, contact your local
area HP Authorized Reseller or buy online from:
http://www.hp.com/go/storagemedia.
For HP UDO 30GB Write Once media, order
part number Q2030A. For HP UDO 30GB
ReWritable media, order part number Q2031A.
G
HP StorageWorks Library and Tape Tools (L&TT) is
a robust diagnostic tool for tape mechanisms, tape
automation, magneto-optical and UDO products.
L&TT provides functionality for firmware downloads,
verification of device operation, maintenance
procedures, failure analysis, corrective service
actions and some utility functions.
Seamless integration is provided with HP’s
hardware support organization by generating and
emailing support tickets. The support ticket delivers
a snapshot, or an in-depth view, of the storage
system.
L&TT is a free download from the web and
deploys in less than five minutes. It is ideal for
customers who want ensured product reliability,
self-diagnostics and faster resolution of device
issues.
For more information, visit
http://www.hp.com/support/tapetools.
2
A
B
1
4
val
Remo
3
B
D
C
Accessories:
A. Power cord (U.S.)
B. Terminator
C. UDO media
D. Documentation CD
E
C
F
D
E. Getting Started poster
F. Setup Guide
G. Warranty information
H. Safety Guide
I
J
Not Included:
I. LVD SCSI adapter
for host system
K
J. LVD SCSI cable
K. Non-U.S. power cord
A.
B.
C.
D.
• HP product information:
http://www.hp.com/go/udo
• HP technical support and phone numbers:
http://www.hp.com/support
• HP StorageWorks Library and Tape Tools
(L&TT) diagnostic software:
http://www.hp.com/support/tapetools
Active bus indicator
SCSI ports
Power receptacle
Back access panel
First Edition (May 2004)
Part Number: AA966-96001
AA966-96001
Control panel
Power switch
Mailslot
Front access panel
Note: See the HP StorageWorks Optical
1000ux/1900ux/2300ux User’s Guide
for detailed information regarding these
features.
B
© 2004 Hewlett-Packard Development Company, L.P.
*AA966-96001*
A.
B.
C.
D.
Caution: Components can be damaged
by electrostatic discharge. Make sure you
are properly grounded when touching staticsensitive components.
Back panel view:
Getting Help
Front panel view:
D
A
C
Note: The following is an overview of
the installation procedure. For detailed
information, refer to the HP StorageWorks
1000ux/1900ux/2300ux Setup Guide
that shipped with this product.
1
2
Getting connected
Note the environmental
considerations.
Sufficient
clearance is
necessary to
ensure adequate
air circulation.
100-240V
50-95°F
10-35°C
6
Remove the back
side access panel
(side opposite
the mailslot) by
lifting up on the
bottom of the panel
and then pulling it away.
7.5 cm
(3 in)
3
Warning: This product can only be used
with an HP approved power cord for your
specific geographic region. Use of a nonHP approved power cord may result in:
1) noncompliance with individual,
country-specific safety requirements;
2) insufficient conductor ampacity that
could result in overheating with potential
personal injury and/or property damage;
and 3) a fractured power cord, which
could cause the internal contacts to be
exposed, which potentially could subject
the user to a shock hazard. HP disclaims
all liability when HP-approved power
cords are not used.
Connect the
jukebox to
your host
computer
and
terminate
the last
device in
the SCSI
chain.
7
Configure the jukebox for your host operating
system.
Note: Refer to the jukebox setup guide
for detailed procedures.
Navigating the menu
PREV/NEXT
PSWD 000 000 000
Note: See the HP
StorageWorks Optical
1000ux/1900ux/2300ux
User's Guide for detailed
information on using the
menu.
2
3
PREV/NEXT
TEST*
REVISION
INIT MECHANICS
JUKEBOX*
PRODUCT #
SN ###
FWTYPE xxx
DRIVES #
SLOTS ##
MAGAZINE IO
DRIVE IO
MAILSLOT IO
PICKER TEST
JKBX ODOMETERS*
HOURS
MOVES
FLIPS
XLATES
ROTATES
FIND PLUNGE HOME
DRIVE LOADS*
VERTICAL TEST
TRANSLATE TEST
1
Connect power to the jukebox. Power on the
jukebox and then power on the host system.
FINF VERT HOME
FIND XLATE HOME
EMPTY PICKER
FILL PICKER
EXERCISE MECH
WELLNESS TEST
CLEAR SOFT LOG
CLEAR HARD LOG
PLUNGE FULL SPD
PLUNGE 1/2 SPD
PLUNGE 1/4 SPD
MAILSLOT SENSORS
STARWARS
BOTTOM THUMB
TOP THUMB
TRANSLATE SENSOR
PREV/NEXT
ENTER
ENTER
PREV/NEXT
EXCHANGE DEMO
INIT ELEM STATUS
EJECT SLOT #
PREV/NEXT
INFO*
(service use)
EMPTY DRIVES
Note: The default administrative password
is “000 000 000”.
Note: The default SCSI IDs are:
Jukebox = 6
Drive 3 = 3
Drive 1 = 5
Drive 4 = 2
Drive 2 = 4
EJECT*
LOAD SLOT #
ENTER
VERTICAL ENCODER
If necessary, set
the jukebox and
drive SCSI ID’s by
selecting READY >
ADMIN * > SCSI
ID’S * from the jukebox menu. Ensure that there
are no SCSI ID conflicts with existing devices.
PREV/NEXT
LOAD*
ENTER
PREV/NEXT
5
PREV/NEXT
ADMIN*
READY
FLIP TEST
4
Load a disk
into the jukebox
by inserting it
gently but firmly
into the mail
slot, shutter end
first, with the side you
want to access facing
up (A or B).
DRIVE #
•
DRIVE FW*
D# REV x.
•
DRIVE SN*
D# ####
•
HARD ERRORS*
HARDWARE ERR #
FRU 1-3 #
MOTION <NAME>
SOURCE#
DESTINATION 1 #
DESTINATION 2 #
ODOMETER #
MICROMOVE 1-6 #
MICRONOVE ER #
TOP/BOTTOM PICKER
NORTH/SOUTH THUMB
SOFT ERRORS*
(same logs available as
under "HARD ERRORS")
RECOVERY ERRORS*
(same logs available as
under "HARD ERRORS")
CONFIG*
SCSI IDS*
RECOVERY ON/OFF
JKBX ID #
RESTORE DEFAULTS
DRV 1 ID #
CLEAR ODOMETERS
DRV 2 ID #
DUAL PICKER ON/OFF
.
STARWARS ON/OFF
.
NEW PASSWORD
SCSI LOG ON/OFF
SECURE ON/OFF
SECURE MAIL OUT/IN
POWER SECURE
ON/OFF
REP RECOVERED
ON/OFF
CONF40 ON/OFF
.
UPDATE