1
HP OfficeJet T Series Quick Setup Sheet for U.S. and Canada
1
2
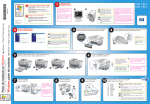
Unpack your HP OfficeJet.
3
Install paper trays.
Load blank paper.
a
Push the tray in fully.
4
Remove packing tape first.
5
Insert print cartridges.
b
a
c
b
c
d
Plug in the phone/fax connector.
Make sure power is not connected.
Arrow
goes
on top.
Connect your HP OfficeJet
to a telephone wall jack.
Snap firmly into place.
Remove the cardboard insert.
6
Insert both the black and color cartridges.
Connect your office equipment.
If you will not connect other office equipment to the same line as your HP OfficeJet, skip this step.
• Use this diagram if you connect other office
equipment to the same phone line as your HP
OfficeJet. Cross off any equipment you won't
connect.
7
Connect printer cable.
If you will not connect to a PC, skip this step.
a
b
Connect a bidirectional parallel cable (IEEE-1284 compliant)
directly to your PC. Do not use any intermediary devices such as a switchbox.
c
Lock the clips.
Turn PC on and
let it boot up fully.
• Remove one or both plastic tabs from the
phone/fax connector.
Shut down Windows and turn off your PC.
• If you connect a PC modem, turn off its faxreceive feature.
PC
Answering Machine
• Refer to your User ’s Guide for information on
touch-tone versus rotary pulse dialing and on
special features such as distinctive ring or voice
mail service through your phone company.
(or external modem)
8
Turn on your HP OfficeJet.
Turn your HP OfficeJet on.
9
a
b
Select your country and language.
United States users please skip this step.
Select your country from the list.
Press 3 for Canada
3
Canada
1=Yes, 2=No
1
10
a
Tighten the screws.
Align print cartridges.
Press Enter to
Align Print Cartridges
b
Your HP OfficeJet prints an alignment test page.
Follow the instructions on the page.
Select your language.
Press 1 for English
1
English
1=Yes, 2=No
1
Turn page over for additional setup.