1
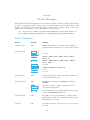
HEWLETT-PACKARD
HP 82160A
OWNER'S MANUAL
This page is blank in original manual.
(Second cover page)
Disclaimer
This document is rebuilt from scanned JPEG pages of the
HP original manual (freely available on Internet), using an
OCR program and manually reformatting its output (and
retyping some parts !). The result may thus differ from
original book in either format or content : even if I did it
with the best attention, some errors (OCR miss-recognition,
typing, formatting, …) could occur in this manual process.
Any remarks/errors discover are welcome.
I make no warranty
as to the accuracy or completeness of this document and
hereby disclaim any responsibility therefore.
This document is not reviewed; neither approved by Hewlett-Packard Company.
Mail to: [email protected]
Web site: http://users.swing.be/id-phy/
Note :
The fee I ask is for the reformatting work of a publicly available document (on Internet in JPEG format).
I’ve done this because the original manual is not available anymore form HP, and more difficult to find than
the HP-IL module itself. I did this for myself first, and propose it as a “Service”.
This manual and any part of it may not be copied, resold or transferred, either in electronic
or paper format. The license is granted to the “Service” buyer for its personal use only.
Rebuilt version 1.1, dated March 2008.
© Pierre Hardy.
HP 82160A
HP-IL Module
Owner's Manual
February 1981
82160-90001
Printed in U.S.A.
© Hewlett-Packard Company 1981
Contents
Section 1: Getting Started ...................................................................................................... 5
The Hewlett-Packard Interface Loop ...................................................................................................... 5
Connecting the Interface Loop ................................................................................................................ 6
Installing the Interface Module ........................................................................................................... 6
Connecting Peripheral Devices ........................................................................................................... 6
Disconnecting the Interlace Loop ........................................................................................................ 7
Using This Manual ................................................................................................................................. 7
Section 2: Printer Operations ................................................................................................................ 9
Flags and the Printer ............................................................................................................................. 9
Standard Printing Operations ............................................................................................................... 11
Using Calculator Functions That Print .............................................................................................. 11
Printing the Display .......................................................................................................................... 12
Printing Registers ............................................................................................................................. 12
Printing Programs ............................................................................................................................ 13
Printing Status and Key Assignments ............................................................................................... 14
Accumulating Printer Output ................................................................................................................ 15
Accumulating Characters ................................................................................................................. 15
Accumulating Spaces ....................................................................................................................... 18
Printing the Contents of the Print Buffer ........................................................................................... 18
Formatting the Printed Output .......................................................................................................... 19
Graphics (HP 821 62A Thermal Printer Only) ...................................................................................... 20
Specifying a Column of Dots ............................................................................................................ 20
Accumulating Columns .................................................................................................................... 20
Skipping Columns ............................................................................................................................ 21
Building Special Characters ............................................................................................................. 21
Plotting (HP 821 62A Thermal Printer Only) ......................................................................................... 23
Printer Plots ..................................................................................................................................... 23
Plotting with Special Characters ....................................................................................................... 24
Interactive Plotting ........................................................................................................................... 24
Programmable Plotting ..................................................................................................................... 26
Plotting a y-Axis
.............................................................................................................................. 26
Plotting a Function Value ................................................................................................................. 27
Disabling the Printer Operations .......................................................................................................... 28
Programming and the Printer Operations .............................................................................................. 28
Printing During Program Entry ......................................................................................................... 28
Printing During Program Execution
................................................................................................. 28
Further Programming Information .................................................................................................... 29
Section 3: Mass Storage Operations ..................................................................................... 31
The Storage Medium ........................................................................................................................... 31
Storing and Retrieving Programs ......................................................................................................... 33
Storing a Program ............................................................................................................................ 33
Retrieving a Program ....................................................................................................................... 33
Storing and Retrieving Data .................................................................................................................. 34
Storing Data in a File ........................................................................................................................ 35
Reading Data from a File ..................................................................................................................... 35
2
6
Section 1: Gelling Started
Connecting the Interface Loop
The interface loop consists of your calculator, the HP 82160A HP-IL Module, and up to 30 peripheral
devices. These should he connected according to the instructions below.
CAUTION
Be sure the calculator is turned off before connecting or disconnecting the module and cable
connectors. If this is not done, the calculator may be damaged or the system's operation may
be disrupted.
Installing the Interface Module
The HP 82160A HP-IL Module plugs into any of the calculator's
ports. (If any HP 82106A Memory Modules are also plugged in, the
interface module must be in a higher-numbered port than the
memory modules.) Push in the module until it snaps into place. The
module's switch should face down.
Connecting Peripheral Devices
The peripheral devices in the interface loop may be connected to the
interface module in any order—but all of the interface cables must
form a continuous loop. All connections are designed to ensure
proper orientation.
To connect a peripheral device, first turn off the calculator. Then
merely disconnect the loop in one place and connect the new device
into the loop at that place. All devices must be turned on for the
interface to operate properly.
Note: If a plug-in HP 82143A Printer is connected to the calculator system, the Print Function
Switch on the interface module must be set to DISABLE. Otherwise, the operation of the calculator
could be disrupted. With this setting, primer operations will be executed by the plug-in printer only.
If you want to print using the HP-IL print functions and an HP-IL printer, the Print Function Switch
on the interface module must be set to ENABLE and a plug-in HP 82143A Printer must not be
connected.
Section 2
Printer Operations
The HP 82160A HP-IL Module permits the calculator to generate printed output by connecting a printer to
the interface loop. The interface module adds powerful printing, graphics, special character, and plotting
capabilities to your system. To use the printer, all you do is follow the directions given in section 1 for
installing the interface module and connecting the HP-IL printer to the loop. Be sure the Print Function
Switch (located on the bottom of the interface module) is set to ENABLE and a plug-in HP 82143A Printer
is not connected. Refer to the owner's manual for the printer to determine any additional preparations
required for that device. The system is then ready to perform the operations described in this section. *
The printer functions described in thin section include all of the functions available on the HP82143A
Printer, an earlier, plug-in accessory. Throughout this section, printer operations are illustrated using the HP
82162A Thermal Printer, an HP-IL peripheral. The operation of the interface module and the HP 82162A
Thermal Printer is almost identical to the operation of the HP 82143A Printer. In fad, programs written to
use the HP 82143A Printer will operate normally using the HP 82162A Thermal Printer.†
Flags and the Printer
When you start using the printer operations discussed in thia section, you will find it helpful to know how
the calculator flags influence the operations.
The calculator uses up to six flags to control a printer-type device. Five of these flags (flags 12, 13,15,16,
and 21) are user flags—that is, you can set, clear, and test them. The other flag (flag 55) is a system flag—
it can only be tested. The effects of these flags are summarized below.
FLAG
†
CLEAR
Flag 55:
Printer Existence
Indicates a printer is
connected to system.
Indicates no primer is
connected to system.
Flag 21:
Printer Enable
Performs printer operations
normally.
Ignores printer operations in
programs only.
Flag 12:
Double Wide
Prints and accumulates
characters double width.
Prints and accumulates
characters normal width.
Flag 13:
Lowercase
Prints and accumulates
letters in lowercase.
Prints and accumulates letters
in uppercase (except a through
e ).
Flags 15 and 16:
Print Mode
(not used for
HP82162A Thermal
Printer)
*
SET
Flag 15
Flag 16
clear
clear
set
set
clear
set
clear
set
Print Mode
MAN (manual)
NORM (normal)
TRACE
TRACE with stack option
Refer to the owner's manual for the printer to determine which types of operations, if any. cannot be performed by your printer. Other
printer-type (output) devices, such as video displays, may generate output using the printer operations described in this section.
The few operational differences between the HP 82162A Thermal Printer and the HP 82143A Printer will he noted throughout this
section.
9
Section 2: Printer Operations
13
bbb.eee
where bbb is the beginning data storage register address and eee is the ending data storage register
address. The bbb portion can be one to three digits; the calculator uses the first three digits of the eee
portion, which follows the decimal point. For example, specify registers R03 thru R 07 using 3.007 in the
X-register.
PR
RΣ 1
data
RΣ 6
data
The PR Σ (print statistics registers) function enables you to print the contents of the currently defined
statistics registers. (Refer to the owner's handbook for your calculator for information about ΣREG and
how statistics registers are defined.) PR Σ prints the contents of all six statistics registers.
Example of printing registers:
Keystrokes
SIZE 017
CLRG
2 STO 5
1.005
PRREGX
SF 12
ALPHA STRECTH
Allocates 17 storage registers.
Clears all storage registers.
Stores 2.0000 in R05 .
Specifies R01 through R 05 .
Prints registers
Sets double-wide flag.
Enters ALPHA string.
ALPHA
PRA
CF 12
Prints ALPHA register.
Specifies normal width
Printing Programs
Two functions print programs that are stored in program memory: PRP and LIST . The print mode
determines the format in which program lines are printed. You can terminate the printing operation at any
time by pressing R/S . These two functions are not programmable.
PRP name
The PRP (print program) function prints a specific program stored in program memory. When you
execute PRP , the calculator prompts you for the name of the program you wish to print. Simply key in the
name of the program (by pressing ALPHA name ALPHA ) and printing will begin at the first line of the
named program. If you press ALPHA ALPHA (do not specify a program name) in response to the prompt,
the printer will print the program to which the calculator is presently positioned—beginning at its first line.
LIST name
The LIST function prints a specified number of lines of a program. First, position the calculator to the
desired program and then to the line where you wish printing to begin. Then execute LIST . When
prompted, key in a three-digit number specifying the number of lines you wish to print.
Section 3
Mass Storage Operations
The mass storage operations available in the HP 82160A HP-IL Module permit you to store and retrieve
information conveniently. By connecting a mass storage device to your Hewlett-Packard Interface Loop,
you greatly expand the storage capacity of your calculator system. Follow the directions given in section 1
for installing the interface module and connecting the HP-IL mass storage device. Refer to the owner's
manual for that device to determine any additional preparations that may be needed. The system is then
ready to perform the operations described in this section.**
Throughout this section, mass storage operations are illustrated using the HP 82161A Digital Cassette Drive.
The Storage Medium
A mass storage device typically stores and retrieves information on a removable, interchangeable storage
medium—such as a tape cassette. Each collection of information that is recorded on the storage medium is
given an ALPHA name and is called a file. Because this information is generally transferred between the
medium and registers in the calculator, the basic unit of information within a file is called a register. A
record is a unit of storage capacity that is equal to from 32 to 37 registers, depending upon the type of
information stored.
File names can be any string of up to seven ALPHA characters. If longer strings are used, only the first
seven characters will be recognized and used by the calculator. No two files on a medium can have the
same file name.
NEWM nnn
The NEWM (new medium) function initializes the storage medium. Each medium must be initialized at
least once to establish on the medium a directory space and a format in which information will be
recorded. When you execute NEWM , the calculator prompts you for the number of file entries you want to
allocate to the directory space on the medium—any number up to 447. Each file that you record on the
medium requires one entry in the directory. The directory space created by NEWM consists of an integral
number of records, with each record containing eight entries. However, the last entry in the directory is
reserved for the system and is not available. As a result, the directory always accomodates one less than a
multiple of eight file entries—and at least as many entries as you specify. In addition, two records on the
medium are reserved for system use. All remaining space on the medium is available for information
storage.
Note: A smaller directory space permits faster access to files stored on the medium.
Any information previously stored on the medium will be erased when this command is executed. NEWM
is not programmable.
* Refer to the owner's manual for the mass storage device to determine which types of operations, if any, cannot be performed by that
device.
31
Section 3: Mass Storage Operations
34
ALPHA
READSUB
filename
The READSUB (read subroutine) function operates similarly to the READP function, except that the
program is placed in program memory after the last program. This function is particularly useful in a
program that copies a subroutine program from a mass storage device, executes that subroutine, and then
continues the main program. READSUB does not change the position of the calculator in program
memory.
Example of storing and retrieving a program: After entering a program into your calculator, store it on
the medium, clear it from program memory, and then recall it from the medium.
Keystrokes
Display
0.0000
GTO
Creates new program space. (Display assumed
cleared.)
PRGM
LBL
01 LBL AREA
02 X 2
03 PI
04 ×
0.0000.
,ML_
0.0000
0.0000
AREA_
0.0000
ML_
0.0000
0.0000
ALPHA AREA ALPHA
x2
×
PRGM
ALPHA ,ML
ALPHA
WRTP
CLP
ALPHA AREA
ALPHA
ALPHA ML
ALPHA
READSUB
GTO
GTO AREA_
0.0000
01 LBL AREA
0.0000.
ALPHA AREA
ALPHA
PRGM
PRGM
}
.
. Sample program AREA
.
.
X-register
Specifies current program and filename ML.
Program AREA stored in file ML.
Clears program AREA.
Specifies filename ML.
Copies program AREA at end of program
memory.
Positions calculator to AREA.
First line of retrieved program
Storing and Retrieving Data
A collection of data can conveniently be stored on the medium and recalled when needed. Using the
functions described below, the entire collection—or any portion—can be stored or recalled.
CREATE
X
filesize
ALPHA
filename
The CREATE function allocates a portion of the medium for a data file and fills all registers with zero
values. The number in the X-register specifies the number of registers to be allocated in the new data file.
The contents of the ALPHA register specify the name of the file. (If a file with the specified name exists
on the medium, DUP FL NAME is displayed and no new file is created.)
SEEKR
X
registger
ALPHA
filename
The SEEKR (seek register) function positions the storage medium to a specific register within a data file.
This permits data to be stored and retrieved from individual registers within a file using the WRTRX and
Section 4
Interface Control Operations
You have seen that the HP 82160A HP-IL Module gives you the capability to perform printer and mass
storage operations by using functions specifically designed for these applications. However, the HewlettPackard Interface Loop is a general-purpose interface. A third set of functions—the interface control
functions—is designed to give you more complete control of interface activity—for any types of HP-IL
devices connected in the loop.
It will be helpful to digress for a moment to give a brief explanation of the operation of the interface loop.
This information should give you additional insight into how the devices interact and allow you to work
with the loop more effectively—especially when you use the interface control operations described in this
section.
Operation of the Hewlett-Packard Interface Loop
When you execute any of the functions described in this manual, the interface module translates the
function into a sequence of HP-IL instructions. It then sends them around the interface loop to each device,
one at a time. In the discussion that follows, you will learn how the calculator and peripherals
communicate using the HP-IL instructions.
Roles of Devices
In order for the interface loop to operate in an orderly manner, the devices in the loop must operate
according to their assigned roles. The role of each device is changed to suit the operation being performed.
Three different roles are defined for HP-IL devices: controller, talker, and listener. Any device not
assigned one of these roles is inactive.
The controller is the one device in the loop that can designate the roles of devices and control the loop's
operation. The system controller (the calculator) is the device that controls and initializes the loop when it
is first turned on. It can transfer control to another device, which then becomes the controller of the loop—
the active controller. Similarly, an active controller can transfer control to another device. For all
operations provided by the HP 82160A HP-IL Module, the calculator is always the system controller and
the active controller.
A talker is a device that sends information to the interface loop. It is designated and enabled by the
controller. At any time, there can be no more than one talker. The controller may be a talker. Examples of
talkers are a mass storage device sending data from a stored file and a voltmeter sending voltage
measurements.
A listener is a device that receives information on the interface loop. There may be more than one listener
in the loop at the same time. Listeners are designated by the controller. The controller may be a listener.
(A device cannot be a listener and a talker at the same time, although it can have these roles at different
times.) Examples of listeners are a mass storage device receiving and storing data in a file and a printer
receiving and printing information.
Device Addresses
In order to distinguish between devices in the loop, each device must have an address—a number from 1
to 30. The controller uses the addresses to specify and control the devices.
43
Section 4: Interface Control Operations
47
In both Auto and Manual modes, the interface control functions are performed in the same way. Singledevice operations are carried out by the primary device—except for the LISTEN function, which requires
an address. Loop-control operations affect all devices, regardless of the interface mode.
The following table illustrates how Auto and Manual modes affect the operation of the interface loop:
Operation
Auto Mode
Manual Mode
Printer Operations
Performed by first printer-type
device in loop starting with primary
device.
Performed by primary device, if
possible.
Mass Storage
Operations
Performed bv combination of all
mass storage devices in loop
Performed by primary device, if
possible.
starling with primary device.
Interface Control
Operations
Single-device operations
performed by primary device, if
possible.
Single-device operations
performed by primary device, if
possible.
As an example, device #2 is selected as the primary device in the interface loop shown below. The loop
operates this way:
Auto Mode with Primary Device #2
Appendix B
Error Messages
This appendix contains a list of messages and errors that are related to interface operations. The messages
and errors are grouped into printer, mass storage, and general interface control categories. Errors in the
interface control category may occur during printer or mass storage operations. (Refer to the owner's
handbook for your calculator for a list of all standard errors and messages.)
Note: For most error conditions, the function being attempted is not performed. However, for
those conditions and functions indicated by ∗ below, the operation may be partially performed.
Printer Operations
Display
Function
Meaning
ALPHA DATA
-all-
ALPHA characters are in a register where a number is
required—either a stack register or a data storage register.
DATA ERROR
ACCHR
ACCOL
BLDSPEC
}
PRAXIS
∗
PRAXIS
PRREGX
REGPLOT
STKPLOT
SKPCHR
}
SKPCOL
|x|
128.
YMAX YMIN, AXIS > YMAX, AXIS < YMIN, or
|nnn| > 168.
XMAX XMIN, YMAX YMIN, AXIS > YMAX, or
AXIS < YMIN
|x| > 999.
YMAX
|x|
|x|
YMIN, nnn =0 or |nnn| > 168.
24.
128.
NO PRINTER
-all-
A standard printer-type device is not in the interface loop.
(Occurs in Auto mode only.)
NONEXISTENT
-all-
Print Function Switch set to DISABLE. Set switch to
ENABLE.
PRP
∗
∗
∗
PRINTER ERR
PRIVATE
PRPLOT
PRPLOTP
PRREG
}
Specified program or function program does not
exist. Check program name
Specified registers exceed highest numbered data storage
register. Check bbb.eee format in X.
∗ -all-
The printer is out of paper, jammed, or requires service.
Reload paper (if required) or turn printer off and on, then
check whether error recurs.
-all-
An attempt was made to list, trace, edit, or view a private
program.
65
Function Index
The operations listed below are active while the HP 82160A HP-IL Module is plugged into the calculator
(and the Print Function Switch is set to ENABLE). These operations and programs containing these
operations are executable only when appropriate peripherals are connected to the interface loop.
Printer Operations:
ACA
ACCHR
ACCOL
ACSPEC
ACX
ADV
BLDSPEC
FMT
LIST
PRA
PRAXIX
PRBUF
PRFLAGS
PRKEYS
PRP
PRPOLT
PRPLOTP
PRREG
PRREGX
PR Σ
PRSTK
PRX
REGPLOT
SKPCHR
SKPCOL
STKPLOT
Accumulate ALPHA register into print buffer.
Accumulate character into print buffer.
Accumulate column into print buffer.
Accumulate special character into print buffer.
Accumulate X-register into print buffer.
Advance paper, print the print buffer right-justified.
Build special character in X- and Y-registers.
Accumulate format specifier into print buffer.
List program lines. Not programmable.
Print ALPHA register.
Print and label y-axis.
Print the print buffer left-justified.
Print flag status and other calculator information.
Print list of reassigned keys.
Print program. Not programmable.
Plot function interactively.
Plot function noninteractively.
Print contents of all storage registers.
Print contents of specified registers.
Print contents of statistics registers.
Print contents of X-, Y-, Z-, and T-registers.
Print contents of X-register.
Plot single function value using storage registers.
Accumulate skipped characters into print buffer.
Accumulate skipped dot columns into print buffer.
Plot single function value using stack registers.
Page
Page
Page
Page
Page
Page
Page
Page
Page
Page
Page
Page
Page
Page
Page
Page
Page
Page
Page
Page
Page
Page
Page
Page
Page
Page
15
17
20
22
16
18
21
19
13
12
26
18
15
14
13
24
26
12
12
13
12
12
27
18
21
27
Page
Page
Page
Page
Page
Page
Page
Page
Page
Page
Page
Page
Page
34
32
31
38
37
36
33
35
35
37
34
38
37
Mass Storage Operations:
CREATE
DIR
NEWM
PURGE
READA
READK
READP
READR
READRX
READS
READSUB
RENAME
SEC
Create new data file with zero values.
Display or print a directory of stored files.
Prepare new medium for storing files. Not programmable.
Remove file from medium.
Read "write-all" file and set calculator.
Read key-assignment file and reassign keys.
Copy program file, replacing last program in memory.
Copy data file into calculator registers.
Copy part of data file according to X-register.
Read status file and set calculator status.
Copy program file after last program in memory.
Rename stored file.
Make a stored file secured.
73