1
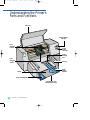
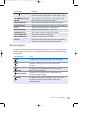
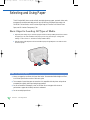
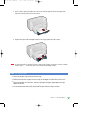
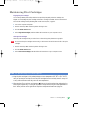
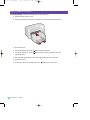
WW US eng. Manual
21.07.1997 03.28 pm
Page a1
HP DeskJet 890C Printer
Professional Series
User’s Guide
User Guide Number
C5876-90025
WW US eng. Manual
21.07.1997 03.28 pm
Page a2
Acknowledgments
Adobe™ and Adobe Type Manager™ are trademarks of Adobe Systems Incorporated.
Arial®, Gills Sans®, Monotype®, and Times®, are U.S. registered trademarks
of The Monotype Corporation.
CG Times is a product of Agfa Corporation based on Times New Roman under license from
The Monotype Corporation plc. and scalable outlines are licensed from Agfa Division of Miles, Inc.
Graphite™ is a trademark of David Siegel.
ITC Bookman® is under license from and a registered trademark of International Typeface Corporation.
Lucida® is a U.S. registered trademark of Bigelow & Holmes, Inc.
Microsoft® is a U.S. registered trademark of Microsoft Corporation.
Milestones™ is a trademark of The Monotype Corporation.
PL™ is a trademark of Photolettering Inc.
Scalable type outlines are licensed from Agfa Division of Miles, Inc.
TrueType™ is a U.S. trademark of Apple Computer, Inc.
Windows® is a registered trademark of Microsoft Corporation in the U.S. and other countries.
IBM® and OS/2® are registered trademarks of International Business Machines Corporation.
UNIX® is a registered trademark of the U.S. and other countries, licensed exclusively through
X/Open Company Limited.
Notice
The information contained in this document is subject to change without notice.
Hewlett-Packard makes no warranty of any kind with regard to this material, including, but
not limited to, the implied warranties of merchantability and fitness for a particular purpose.
Hewlett-Packard shall not be liable for errors contained herein or for incidental or consequential
damages in connection with the furnishing, performance, or use of this material.
No part of this document may be photocopied, reproduced, or translated to another language
without the prior written consent of Hewlett-Packard Company.
Printing History
Edition 1, June 1997
© Copyright 1997 by Hewlett-Packard Company
WW US eng. Manual
21.07.1997 03.28 pm
Page 1
Table of Contents
Section 1 – Printing Basics
Understanding the Printer’s Parts and Functions . . . . . . . . . . . . . . . . . . . . . . . 2
Selecting and Using Paper . . . . . . . . . . . . . . . . . . . . . . . . . . . . . . . . . . . . . . . . . 4
Replacing and Maintaining Print Cartridges . . . . . . . . . . . . . . . . . . . . . . . . . . 6
Using Your Printer Software . . . . . . . . . . . . . . . . . . . . . . . . . . . . . . . . . . . . . . . . 8
Sharing Your Printer on a Network . . . . . . . . . . . . . . . . . . . . . . . . . . . . . . . . . 10
Printing from DOS Software Programs . . . . . . . . . . . . . . . . . . . . . . . . . . . . . . 14
Section 2 – Support
Troubleshooting . . . . . . . . . . . . . . . . . . . . . . . . . . . . . . . . . . . . . . . . . . . . . . . . . 16
Customer Support . . . . . . . . . . . . . . . . . . . . . . . . . . . . . . . . . . . . . . . . . . . . . . . . 20
Ordering Parts and Accessories. . . . . . . . . . . . . . . . . . . . . . . . . . . . . . . . . . . . 23
Section 3 – Specifications
Specifications . . . . . . . . . . . . . . . . . . . . . . . . . . . . . . . . . . . . . . . . . . . . . . . . . . . 25
Additional Symbol Sets and Fonts . . . . . . . . . . . . . . . . . . . . . . . . . . . . . . . . . . 28
Regulatory Notice. . . . . . . . . . . . . . . . . . . . . . . . . . . . . . . . . . . . . . . . . . . . . . . . 29
Declaration of Conformity . . . . . . . . . . . . . . . . . . . . . . . . . . . . . . . . . . . . . . . . . 30
WW US eng. Manual
21.07.1997 03.28 pm
Page 2
Understanding the Printer’s
Parts and Functions
Top Cover
Resume Button
and Light
Print
Cartridge
Latches
Power
Button
and Light
Single
Envelope
Slot
Print
Cartridge
Cradles
Out Tray
Paper
Length
Adjuster
IN Tray
Paper Width Adjuster
Tray Removal Latch
(Underneath IN Tray)
2
Section 1 – Printing Basics
WW US eng. Manual
21.07.1997 03.28 pm
Page 3
Printer Parts
Functions
Resume
Clears miscellaneous printer problems. The light indicates a
printer problem has occurred. Also see “Printer Lights,” below.
Power
Button and Light
Button and Light
Turns the printer on and off. Also see “Printer Lights,” below.
OUT Tray
Receives paper as it comes out of the printer.
Paper Length Adjuster
Slides out and in to fit the length of the paper in the IN tray.
Tray Removal Latch
Releases the IN and OUT trays for cleaning, or clearing paper jams.
IN Tray
Holds the stack of paper used for normal printing.
Paper Width Adjuster
Slides to fit the width of the paper in the IN tray.
Single Envelope Slot
Holds a single envelope for feeding into the printer.
Print Cartridge Cradles
Hold the black and color print cartridges.
Print Cartridge Latches
Lock the print cartridges securely in place.
Top Cover
Protects the inner workings of the printer from dust and debris.
The top cover must be closed for the printer to operate.
Printer Lights
The lights on the front of the printer indicate if the printer is off or on, in the process of receiving
data or printing, or in an error state. The following table describes how the lights appear during
normal printing.
If the lights are...
Then...
Off
Off
The printer is off. Press the power button to turn on the printer.
Off
On
The printer is ready to print. You can send a document to
the printer.
Off
Blinking
The printer is receiving data from the computer or is printing.
Wait for the document to print.
Blinking Alternately
The printer is in an error state. See the “Troubleshooting” tab
in the HP DeskJet 890C Toolbox.
Blinking
On
This indicates one or more of the following: The top cover is open;
the printer is out of paper; a print cartridge is missing or not
functioning properly.
Section 1 – Printing Basics 3
WW US eng. Manual
21.07.1997 03.28 pm
Page 4
Selecting and Using Paper
The HP DeskJet 890C printer works well with most plain photocopy paper, postcards, index cards,
transparencies, envelopes and labels, and will print on 100% recycled papers that comply with
DIN 19 309. For best results, use HP Premium Inkjet Paper, HP Premium or HP Deluxe Photo
Paper, and HP Premium Transparency Film.
Basic Steps for Loading All Types of Media
1 Adjust the print settings in your software program and the HP DeskJet 890C printer driver to match
the paper type, size, and orientation of the paper you are using. (See the topic “Change Print
Settings” on the “How Do I?” tab in the HP DeskJet 890C Toolbox).
2 Slide the paper width adjuster to the left and slide the paper length adjuster out to make room for
the stack of paper..
TI PS
4
for Selecting Paper
◆
Always use paper that conforms with those listed under “Recommended Media Weight and Sizes”,
in the Printer Specifications section of this user’s guide.
◆
Test a sample of a particular paper to ensure that it is compatible with the printer and produces
acceptable print quality, before purchasing large quantities.
◆
Do not use media that is damaged, curled, or wrinkled. Do not use paper with cutouts or
perforations or paper that is heavily textured or embossed.
◆
Do not use multiple-part forms.
Section 1 – Printing Basics
WW US eng. Manual
21.07.1997 03.28 pm
Page 5
3 Place a stack of paper print side down in the IN tray with the right side of the stack against the
right side of the tray and push it in until it stops.
4 Readjust the paper width and length adjusters to fit snugly against the papers’ edges.
NOTE
TI PS
For more information on printing on paper or other types of media, see the topic “Print on a Variety
of Paper Types, . . .” on the “How Do I?” tab in the HP DeskJet 890C Toolbox.
for Using Paper
◆
Load only one paper type at a time into the IN tray.
◆
Before inserting a stack of paper into the IN tray, tap the edges on a flat surface to even it out.
◆
Always insert paper print side down, with the right edge of the paper aligned against the right
edge of the IN tray.
◆
Do not load more than about a 5/8” (16mm) stack of paper into the IN tray at one time.
Section 1 – Printing Basics
5
WW US eng. Manual
21.07.1997 03.28 pm
Page 6
Replacing and Maintaining
Print Cartridges
Replacing A Print Cartridge
NOTE
Do not remove an empty print cartridge until you are ready to replace it. If one print cartridge
is empty, the other cartridge will still print. However, the printer will not print unless both
cartridges are in place. See “Ordering Parts and Accessories” in this User’s Guide for print
cartridge part numbers and ordering information.
1 Turn on the printer, and then open the top cover.
The print cartridge cradles move to the center of the printer, and the resume
light flashes.
2 Lift up the print cartridge latch, grasp the top of the print cartridge, and pull it up and out of its cradle.
Caution Keep new and used print cartridges out of the reach of children.
3 Remove the new print cartridge from its package and gently remove any
tape covering the ink nozzles, being careful not to touch the ink nozzles
or the gold-colored contacts.
NOTE
To get the best print quality, make sure the print cartridges are at
room temperature before you install them.
4 Push the new cartridge down firmly into its cradle slot and close the print cartridge latch.
5 Close the printer’s top cover.
The cartridges return to their “home” position on the right side of the printer, and the
resume light stops flashing.
6
Section 1 – Printing Basics
WW US eng. Manual
21.07.1997 03.28 pm
Page 7
Maintaining Print Cartridges
Aligning the print cartridges
Your HP DeskJet 890C printer will provide the best possible print quality when the cartridges are
aligned. You should align the print cartridges whenever a cartridge is installed. This insures that black
and color inks will align when printed together on the same text, line, or graphic.
1 Turn on the computer and printer.
2 Run the HP DeskJet 890C Toolbox by double-clicking its icon.
3 Click the Printer Services tab.
4 Select Align Print Cartridges, and then follow the instructions on your computer screen.
Cleaning Print Cartridges
Clean the print cartridges when you notice lines or dots missing from printed text or graphics.
NOTE
Do not clean the print cartridge unnecessarily, as this wastes ink and shortens the life of the print
cartridge.
1 Run the HP DeskJet 890C Toolbox by double-clicking its icon
2 Click the Printer Services tab.
3 Select Clean Print Cartridges, and then follow the instructions on your computer screen.
TI PS
for Maintaining Good Print Quality
◆
Keep the print cartridges in their sealed packages, at room temperature (60˚–78˚F or 15.6˚–26.6˚C),
until you are ready to use them. Do not use print cartridges that were recently stored in a very hot
or very cold environment until they return to room temperature.
◆
When turning off your printer, use the power button on the printer rather than unplugging it or
switching off a power strip. Turning off the power at the printer lets the print cartridges return to
their “home” position on the right side of the printer and prevents them from drying out.
Section 1 – Printing Basics
7
WW US eng. Manual
21.07.1997 03.28 pm
Page 8
Using Your Printer Software
The printer software that came with your HP DeskJet 890C printer makes printing from Windowsbased programs faster and easier than ever. This section is an overview of the components and
functions of your printer software.
Printer Software Components
■
The HP DeskJet 890C printer driver with exclusive HP ColorSmart II technology, featuring:
– Enhanced Internet and multimedia printing
– sRGB color matching for consistent color output
– MMX compatibility for faster color processing
■
The HP DeskJet 890C Toolbox software program which includes:
– Tutorials for basic printer usage
– Step-by-step troubleshooting
– Printer status information
– Access to printer services
Selecting Your Printer
To use your HP DeskJet 890C printer, make sure it is selected as the default printer.
To select your printer as the default printer—Windows 95 and Windows NT 4.0
1 Click Start, and then select Printers from the Settings menu.
2 Click the icon for your HP DeskJet 890C printer to select it.
3 From the File menu, select Set As Default, then close the window.
To select your printer as the default printer—Windows 3.1
1 In the Program Manager, open the Main program group.
2 Double-click Control Panel to open it, then double-click Printers.
3 Select your HP DeskJet 890C printer from the Installed Printers list, and then click
Set As Default Printer.
4 Click Close and exit the Control Panel.
8
Section 1 – Printing Basics
WW US eng. Manual
21.07.1997 03.28 pm
Page 9
Using The HP DeskJet 890C Toolbox
The HP DeskJet 890C Toolbox is a software program that provides access to all the information
you’ll need when using your printer. Information is divided into three main categories:
■
How Do I? – Tutorials of common printing tasks.
■
Troubleshooting – Step-by-step printing problem solutions.
■
Printer Services – Provides printer status and easy service steps.
To run the HP DeskJet 890C Toolbox – Windows 95 and Windows NT 4.0
◆
Double-click the HP DeskJet 890C Toolbox icon on your Windows desktop.
To run the HP DeskJet 890C Toolbox – Windows 3.1
◆
Double-click the HP DeskJet 890C Toolbox icon in the HP DeskJet Utilities program group.
Changing Print Settings
The basic print settings you will need are usually selected within your software program.
These settings include the number of copies, paper size, and paper orientation.
Selecting Custom HP Print Settings
HP’s print settings dialog box allows you to select settings that are not provided by the software
program. These settings include:
■
Paper Type – HP provides special settings for HP Premium sheets such as Glossy Paper, Premium
Inkjet Paper, and Transparencies.
■
Print Quality – Use to select the level of print quality.
■
Grayscale Printing – Use this setting when you want to print color documents in shades of gray for
better photocopying results.
■
ColorSmart II – Use the manual ColorSmart II setting when you want to manually adjust color
intensity and halftoning methods instead of letting HP’s ColorSmart II technology do it automatically.
■
Flip Horizontal – Use to reverse or flip the printed image. (Not available with Windows NT.)
■
Ordered Printing – Use to reverse the print order of your document. (Not available with Windows NT.)
■
Two-Sided Printing – Use to print on both sides of your paper. (Not available with Windows NT.)
NOTE
To get to HP’s print settings dialog box, see the topic “Change Print Settings” on the “How
Do I?” tab in the HP DeskJet 890C Toolbox.
Section 1 – Printing Basics
9
WW US eng. Manual
21.07.1997 03.29 pm
Page 10
Sharing Your Printer on a Network
If you work in a networked environment, you can connect the HP DeskJet 890C printer to your
network. The networked printer can be connected either to a personal computer (locally shared)
or attached directly to the network via an external print server (network-connect).
Locally Shared
In the locally shared configuration, the printer is connected directly to the parallel port of a
selected computer on the network. The printer can then be shared by other users on the network
through a Windows network printer connection.
The advantages of a locally shared printer are relatively easy installation and low cost since no
additional hardware or software is required.
The disadvantages of a locally shared printer involve performance, printer status information and
location. Depending on priority settings and number of users on the network, the host computer
may slow down while handling print jobs and print jobs may be delayed for other users.
Additionally, only the user of the host computer, can receive paper and print cartridge-related
status messages. Locally shared printers must also be situated near the host computer which may
not be convenient for all users on the network. Finally, if the host computer is turned off or
rebooted, print jobs may be lost or not printed.
10 Section 1 – Printing Basics
WW US eng. Manual
21.07.1997 03.29 pm
Page 11
Network-Connect
In this configuration, the printer connects to the network via direct attachment to an external
print server such as an HP JetDirect EX Plus, 150X, or EX Plus3. This configuration provides
increased performance, location-flexibility and better printer status information.
As shown in the table below, newer versions of HP JetDirect EX Plus, 150X, and EX Plus3 print
servers provide optimum printer-related status messages. If you have an older print server, you
may want to upgrade the firmware (flash memory). To determine the firmware version and
upgrade information for your HP JetDirect EX Plus and EX Plus3 print server, refer to your HP
JetDirect Software Installation guide. The HP JetDirect 150X was not designed to provide this
upgrade capability.
HP JetDirect EX Plus,
150X, or EX Plus3
print server
NOTE
JetDirect EX Plus
J2591A
JetDirect 150X
J2592A
JetDirect EX Plus3
J2593A, J2594A
Limited Status
Information
Yes
Firmware prior to E.05.00
–
Yes
Firmware prior to D.05.00
Complete Status
Information
Yes
Firmware E.05.00 or later
Yes
All Firmware versions
Yes
Firmware D.05.00or later
For additional information about installation and set-up of HP JetDirect print servers,
see your HP JetDirect hardware and software Installation Guides.
Section 1 – Printing Basics 11
WW US eng. Manual
21.07.1997 03.29 pm
Page 12
Setting up your Printer on a Network
Whatever configuration you are using to connect your printer to a network, you will need to install
the HP DeskJet 890C Toolbox and Driver software on each computer that will be printing to the
HP DeskJet 890C printer.
Windows 3.1 - Locally Shared
Not supported in Windows 3.1 by the Operating System
Windows 3.1 - Network Connect
Setup the printer and make the cable connections to your print server and network.
1 Begin installing the driver by executing setup.exe, either on the "Printer Software CD," "Installation
Disk 1," or where your network administrator has installed it.
2 When prompted for the printer name and port, choose "HP DeskJet 890C Printer" and either
"None" or the Port (LPT1:) for the port that you wish to redirect to the printer. Click OK .
3 Continue installation until complete, then restart Windows.
4 Select Printers from the Windows Control Panel, click on the HP DeskJet 890C icon, then click Connect.
5 Choose the port to which the printer is connected (for example LPT3)
6 Click Network… then select the network path for the printer. To set up the printer as a permanent
network printer on your system, click the Permanent box, and then click Connect.
Windows for WorkGroups 3.11 - Locally Shared
At the Server (where the printer is directly connected to the computer)
Setup the printer, make the cable connections to your computer, and follow the procedures for
installing the printer software as outlined in the Setup Card.
1 Launch "Print Manager" found in the "Main" program group
2 Click on the HP DeskJet 890C printer, choose Printer, and Share this printer as…
3 Follow the dialogs to complete the sharing of your printer.
At the Client (who wants to connect to the shared printer)
Follow the same steps as shown for Windows 3.1 - Network Connect.
Windows for WorkGroups 3.11 - Network Connect
Follow the same steps as shown for Windows 3.1 - Network Connect.
Windows 95 - Locally Shared
At the Server (where the printer is directly connected to the computer)
◆ Setup the printer, make the cable connections to your computer, and follow the
procedures to install the printer software as outlined in the Setup Card.
◆
Share the printer. For more information on sharing the printer, refer to
"Sharing your printer with other people" in Windows 95 Help.
At the Client (who wants to connect to the shared printer)
Begin installing the printer software at the clients computer with one of these methods:
◆
Execute setup.exe, either on the "Printer Software CD," "Installation Disk 1," or wherever your
network administrator has installed it.
◆
Use the Add Printer wizard, select Network Printer, choose Browse to find the Shared Printer and
then select Have Disk… to install the printer software.
12 Section 1 – Printing Basics
WW US eng. Manual
21.07.1997 03.29 pm
Page 13
◆
Drag a document onto a network printer icon.
◆
Drag a network printer icon into the Printers Folder.
◆
Double-click a network printer icon.
◆
Right-click a network printer icon and select Install.
Windows 95 - Network Connect
◆ Setup the printer and make the cable connections to your print server and network.
◆
Begin installing the printer software at the clients computer with one of the methods outlined
above in Locally Shared, but browse to find the DeskJet 890C that is configured and connected for
a HP JetDirect print server.
Windows NT 4.0
To install the printer software onto a Windows NT 4.0 system, the user MUST have Administrator
privileges on the computer he or she is installing on.
Windows NT 4.0 - Locally Shared
At the Server (where the printer is directly connected to the computer)
◆ Setup the printer, make the cable connections to your computer, and follow the procedures to
install the printer software as outlined in the Setup Card.
◆
Share the printer. For more information on sharing the printer, refer to "Sharing printers" and "To
share your printer with other people" in Windows NT Help.
At the Client (who wants to connect to the shared printer)
1 Install the printer software at the client's computer as if for direct connect. The printer
software must exist on each client's PC in order for network printing to succeed. Select the
HP DeskJet 890C and any LPT port when installing.
2 Follow one of these methods to select the printer at the "server":
◆ Select
the HP DeskJet 890C in the Printers Folder, right click the mouse and select Properties.
Go to the Ports tab, select Add Port, highlight Local Port, select New Port and type in the name
of the server followed by the name of the printer, such as \\ComputerName\\PrinterName.
◆ Or,
from the Start menu, select Run… type in the name of the server, and when the folder shows
up on the computer, drag the printer icon into the Printers Folder. Unfortunately, this will create
another HP DeskJet 890C printer icon in your Printers Folder but you will be set up to use the
printer at the server.
Windows NT 4.0 - Network Connect
At the NT 4.0 Server (where the print jobs will be spooled)
Setup the printer and make the cable connections to your computer as outlined in the Setup Card.
Follow the procedures to install the printer software for a LPTx port.
◆
Select the HP DeskJet 890C in the Printers Folder, right click the mouse and select Properties.
Go to the Ports tab, select Add Port, and configure the type of Port Monitor you wish to use for this
Network Printer, such as LPR Port or HP JetDirect Port.
◆
Be sure to set up this printer so that it is "shared".
At the Client (who wants to connect to the shared network printer)
◆ Follow the same steps as shown for Locally Shared at the Client.
Section 1 – Printing Basics 13
WW US eng. Manual
21.07.1997 03.29 pm
Page 14
Printing from DOS Software Programs
When printing from DOS, there are two different ways you can adjust print settings when you are
preparing to print a document: The HP DeskJet Control Panel for DOS and DOS printer drivers.
HP DeskJet Control Panel for DOS
DOS users have access to many printer features through specific DOS printer drivers; however,
many software manufacturers do not develop printer drivers for their software programs. The HP
DeskJet 800 Series printers provide their own DOS software Control Panel for improved printer
control when DOS printer drivers are not available or when certain print settings are not available
through DOS software programs.
To install the HP DeskJet Control Panel for DOS
Before you install the Control Panel, make sure you have performed all setup procedures given on
the setup card, and make sure that both the computer and the printer are turned on.
1 Insert Installation Disk 3 into your computer’s floppy disk drive.
2 At the DOS prompt C:\>, type your computer’s floppy disk drive letter, for example A:\, and then
type INSTALL and press enter.
3 Follow the instructions on your computer screen.
NOTE
If you receive a message that the installation of the Control Panel was unsuccessful, reinstall the
Control Panel. If the installation is again unsuccessful, or if the Control Panel software is damaged
or missing, contact your authorized HP dealer.
Using the HP DeskJet Control Panel for DOS
To open the Control Panel, type DJCP at the DOS prompt C:\>.
Use the Control Panel to select print settings that may not be available from some DOS programs.
Duplicate print settings that are selected from a DOS software program may override print
settings selected in the Control Panel.
NOTE
See the file README2.TXT for more information about the Control Panel.
In Windows 95, the README2.TXT file is in the C:\WINDOWS\SYSTEM directory.
In Windows 3.1, the README2.TXT file is in the C:\DESKJET directory.
14 Section 1 – Printing Basics
WW US eng. Manual
21.07.1997 03.29 pm
Page 15
To clean the print cartridges
Clean the print cartridges when you notice that lines or dots are missing from your printed text
and graphics.
1 At the DOS prompt, type DJCP, and then press enter. The Control Panel appears
2 Select Clean Print Cartridge, and then follow the instructions on your computer screen
NOTE
Do not clean the print cartridge unnecessarily, as this wastes ink and shortens the print cartridge
life. If you suspect that dried ink is clogging the print cartridge, refer to the Troubleshooting
section of your user’s guide.
To align the print cartridges
Your HP DeskJet 890C will provide the best possible print quality with the cartridges aligned.
You should align the print cartridges whenever a cartridge is installed. This ensures that black
and color inks will align when printed together on the same text, line, or graphic.
1 At the DOS prompt, type DJCP, and then press enter. The Control Panel appears
2 Select Align Print Cartridge, and then follow the instructions on your computer screen.
DOS Printer Drivers
Printer drivers are supplied by the manufacturers of DOS software programs. The following table
lists some commonly used DOS software programs and their recommended printer drivers. If you
do not use any of these programs, contact the manufacturer of the software program you are
using to obtain a compatible printer driver.
DOS Software Program
Version
Recommended Printer Driver
WordPerfect
5.1, 5.1+, 6x
HP DeskJet 600, 660C or 850C
Harvard Graphics
3.0
HP DeskJet 540
Lotus 1-2-3
2x, 3x, 4.0
HP DeskJet 540
MS Word
5.5, 6.0
HP DeskJet 560C
Section 1 – Printing Basics 15
WW US eng. Manual
21.07.1997 03.29 pm
Page 16
Troubleshooting
No page came out of the printer
■
Be Patient – Complex documents with many fonts, graphics, and/or color photos take longer to begin
printing. If the power light is blinking, the printer is processing information.
■
Check the power – Make sure the power cord is connected firmly to the printer and to a working outlet
and that the printer is turned on. The power light on the front panel of the printer should be lit.
■
Check the paper – Make sure paper is loaded correctly in the bottom (IN) tray and that the paper is not
jammed in the printer. See page 18 to clear paper jam.
■
Check the print cartridges – Make sure that both the black and color print cartridges are properly
installed and that the top cover of the printer is closed.
■
Try printing a “sample page” – Turn the printer off, then back on. Press and release the “resume”
button. If the sample page prints, the problem is not with the printer itself.
■
Check the interface cable – Make sure that a high quality bi-directional interface cable is connected properly
to both the printer and the computer. (IEEE-1284 Compliant Parallel Interface Cable is recommended.)
■
Check the printer setup – Make sure your HP DeskJet printer is selected as the current or default
printer. (See “Selecting Your Printer”, pg. 8.)
A blank page came out of the printer
■
Check the print cartridges for tape – New print cartridges are packaged with a protective plastic tape
covering the ink nozzles. Make sure this tape is removed from both print cartridges.
■
Check for an empty print cartridge – If you are printing black text and a blank page came out, your black
print cartridge may be empty. Replace the black print cartridge.
■
Check the printer setup – Make sure your HP DeskJet printer is selected as the current or default
printer. (See “Selecting Your Printer”, pg. 8.)
Placement of the text or graphics is wrong
■
The paper size or orientation settings may be incorrect – Make sure the paper size and page orientation
(portrait vs. landscape) selected in the software program match the settings in the HP print settings
dialog box. (See “Change Print Settings” on the “How Do I?” tab in the HP DeskJet 890C Toolbox.)
■
The black and color print cartridges may need to be aligned – Print cartridges need to be aligned whenever one has been removed or replaced, or if the black ink and color ink do not seem to line up properly with
each other on the page. (See the “Printer Services” tab in the HP DeskJet 890C Toolbox for instructions.)
■
The Paper may not be loaded correctly – If everything on the page is slanted or skewed, make sure the
paper width and length adjusters fit snugly against the left and bottom edges of the paper stack, and that
there is no more than a 5/8” (16mm) stack of paper in the IN tray
■
The margin settings may be wrong – If text or graphics are cut off at the edges of the page, make sure
the margin settings for the document do not exceed the printable area of your HP DeskJet printer. (See
“Minimum Margins” in the “Specifications” section of this user’s guide.)
16 Section 2 – Support
WW US eng. Manual
21.07.1997 03.29 pm
Page 17
Print quality is poor
■
The print quality setting may need to be changed – While the EconoFast setting prints faster and uses less
ink, it may cause text to appear faded or colors to be dull. Select Normal or Best Print Quality in the HP print
settings dialog box. (See “Change Print Settings” on the “How Do I?” tab in the HP DeskJet 890C Toolbox.)
■
A print cartridge may be low on ink or clogged – If print quality deteriorates, click on the Printer Services
tab in the HP DeskJet 890C Toolbox, and select Clean Print Cartridges. Follow the instructions on the
screen. If print quality doesn’t improve, a cartridge may be low on ink, and will need to be replaced.
■
The paper type setting may be incorrect – When printing on transparencies or other special paper types,
select the corresponding paper type in the HP print settings dialog box. (See “Print on a variety of paper
types…” on the “How Do I” tab in the HP DeskJet 890C Toolbox.)
■
The paper may not be suitable for use with your HP DeskJet printer – Paper that is too thin or has a slick
surface may not feed properly. Paper that is heavily textured does not accept ink well. Use HP Premium
Papers or test other paper types before purchasing large quantities. (See “Recommended Media Weight
and Sizes” in the “Printer Specifications” section of this user’s guide.)
Something on the page is missing or incorrect
■
The margin settings may be wrong – If text or graphics are cut off at the edges of the page, make sure
the margin settings for the document do not exceed the printable area of your HP DeskJet printer.
(See “Minimum Margins” in the “Printer Specifications” section of this user’s guide.)
■
Cable connection may be poor or cable may be bad – If meaningless characters are printing, make sure
you are using a bi-directional cable and that the cable is firmly connected to both your printer and
computer. To test the cable, click the Printer Services tab in the HP DeskJet 890C Toolbox, and select
“Test printer communication.”
■
ColorSmart print settings may be wrong – If colors are printing in shades of gray, “Print in Grayscale”
is probably selected in the HP print settings dialog box. Also, the “Automatic” ColorSmart selection will
give the best color representation.
■
The wrong printer may be selected – Make sure your HP DeskJet printer is selected as the current or default
printer. (See “Selecting Your Printer”, pg. 8.)
Section 2 – Support 17
WW US eng. Manual
21.07.1997 03.29 pm
Page 18
Paper is Jammed in the printer
■
Clear the paper jam – Perform the following steps to clear a paper jam:
1 Remove all paper from the IN tray.
2 Remove the IN/OUT tray using the tray removal latch found underneath the IN/OUT tray.
3 Open the top cover.
4 Press and hold down the resume
button to feed the paper out.
5 If necessary, release the resume
opposite direction.
button and press it again to feed the paper in the
6 After removing all jammed paper, turn off the printer and replace the IN/OUT tray.
7 Close the top cover.
8 Place paper in the IN tray and press the power
18 Section 2 – Support
button to turn on the printer.
WW US eng. Manual
21.07.1997 03.29 pm
Page 19
The printer is not picking up paper
■
Clean the paper pick rollers – Paper dust, ink, or other substances occasionally build up on the paper
pick rollers. When this happens, the printer tries to pick up a piece of paper but stops in the middle of the
print job, and the Resume light begins flashing. If this begins to happen frequently, clean the rollers by
following these steps:
1 Open the printer’s top cover and remove all paper from the IN tray.
2 Remove the IN tray by squeezing the release levers on the underside of the IN tray.
3 Hold a slightly dampened foam rubber swab lightly against each paper pick roller while you press
and hold down the Resume
button. Release the Resume button and repeat this step.
NOTE
Each time you press and release the Resume button, the rollers reverse the direction they turn.
4 Re-insert the IN tray and reload the stack of paper.
5 Close the printer’s top cover.
Section 2 – Support 19
WW US eng. Manual
21.07.1997 03.29 pm
Page 20
Customer Support
If you encounter a printing problem that you cannot solve using the information in this guide, or
by using the HP DeskJet 890C Toolbox, you can obtain assistance from one or more of the
following HP support services.
HP FIRST Fax
Use your fax machine to get help 24 hours a day, seven days a week. Call (800) 333-1917 to access HP
FIRST Fax, which gives you troubleshooting tips and detailed support information on using your printer
with the most common software programs.You may access this service from any touch tone phone
and request up to three documents per call. These documents will be faxed to you within minutes.
Support Center Help
The HP Support Center staff will answer questions about setting up and using your printer with
the most widely available software programs. Agents are also available to assist with hardware
repair information. Hours of operation in the U.S. are Monday–Friday, 6 am to 10 pm (MST),
and Saturday, 9 am to 4 pm (MST).
During the Printer Warranty
This service is free during the first 90 days of your printer warranty, however, your long distance
phone charges still apply. Please be at your computer when you call.
For the support center in the U.S., call (208) 323-2551. In Canada, call (905) 206-4383 or (800) 268-1221.
If your printer needs repair during the warranty period, Hewlett-Packard offers a free Express
Exchange program for customers in the U.S. and Canada. A refurbished (like new) printer can be delivered on the next business day, while the damaged printer is returned using a pre-paid shipping label.
The HP customer Support Center agent can make the necessary arrangements.
HP also offers a variety of service contract options to complement the standard warranty. Call
(800) 633-3600 (U.S.A.) or (800) 268-1221 (Canada).
After the Warranty Period
For quick questions in the United States only, call (900) 555-1500 ($2.50 per minute). Charges
begin only when you are connected with a technician.
For calls from Canada, or for calls in the U.S. that you anticipate will be longer than ten minutes
in length, call (800) 999-1148. The fee is $25 per call, charged to your Visa or Master Card. (Prices
subject to change without notice).
20 Section 2 – Support
WW US eng. Manual
21.07.1997 03.29 pm
Page 21
Extended Coverage Options
If you would like to extend your printer coverage beyond the one year factory warranty, you have
the following options:
■
Consult your reseller to obtain extended coverage.
■
If your reseller does not offer service contracts, please call Hewlett-Packard directly and ask about
our service agreement offerings. In the U.S. call 1-800-446-0522; in Canada call 1-800-268-1221.
For service agreements outside the U.S. and Canada, contact your local HP Sales Office.
Updating Printer Software by Mail
HP’s Distribution Center provides Windows printer drivers and printer driver updates for the cost of
the disks plus shipping. Order by calling (970) 339-7009, Monday through Saturday, 24 hours per day.
Electronic Information Services
Internet
Access HP’s World-Wide Web site at http://www.hp.com for the latest support information,
including updated world-wide support phone numbers and driver update information.
HP Download Service
For convenient access to HP printer drivers, product information, and troubleshooting hints, call
(208) 344-1691. Set your communications software to N, 8, 1. Help is available 24 hours per day,
7 days a week.
CompuServe
CompuServe is an electronic information and communication service run by an independent
company. The “GO” word to place you in the HP Forum is HP. From the HP Forum, you can
choose a specific forum to leave messages, ask (or answer) questions about HP products, or
download drivers, software application notes, or utilities for HP products.
America Online
America Online is another electronic information and communication service run by an independent company. To access the HP Forum, select Keyword from the Go To menu, type HP and press
enter. This will load the HP “Home Page” directly to your computer screen. From the HP Forum,
you can ask or answer questions about HP products, or you can download drivers, software application notes, or utilities for HP products.
Section 2 – Support 21
WW US eng. Manual
21.07.1997 03.29 pm
Page 22
For Customers in Latin America
For technical questions about setting up or using your printer, call one of the following numbers.
This service is free during the warranty of your printer; however, your long distance phone
charges still apply.
Argentina . . . . . . . . . . . . . . . . . . . . . . . .541781-4061/69
Brazil . . . . . . . . . . . . . . . . . . . . . . . . . . . .55 11 709-1444
Mexico D.F. . . . . . . . . . . . . . . . . . . . . . . . . . . .326 46 00
Mexico, Guadalajara . . . . . . . . . . . . . . . . . . .669 95 00
Mexico, Monterey . . . . . . . . . . . . . . . . . . . . .378 42 40
Venezuela . . . . . . . . . . . . . . . . . . . . . . . . .58 2 239 5664
For Customers Elsewhere in the World
If you encounter a printing problem that you cannot solve using the information in this guide, or
by using the HP DeskJet 890C Toolbox, please consult the HP Customer Support Guide that was
included in the box with your printer. This guide provides complete service, support, and repair
information that will enable you to obtain the assistance you need via telephone, fax, or the
internet. In countries that do not have a HP Support Center, contact your local dealer or nearest
HP Sales and Support Office for instructions on returning your printer for service and repair.
22 Section 2 – Support
WW US eng. Manual
21.07.1997 03.29 pm
Page 23
Ordering Parts and Accessories
Replaceable Parts
Power Cords
U.S.A., Canada, Mexico, Taiwan, Arabic Countries
Europe (except U.K.), Jordan, Lebanon, N. Africa, Russia
U.K.
South Africa, India
Australia, New Zealand, mainland China
Switzerland
Denmark
Korea
HP DeskJet 890C Printer User’s Guide Kits
US English User’s Guide Kit
European English User’s Guide Kit
Asian English User’s Guide Kit
Arabic User’s Guide Kit
Simplified Chinese User’s Guide Kit
Traditional Chinese User’s Guide Kit
Czech User’s Guide Kit
Danish User’s Guide Kit
Dutch User’s Guide Kit
Finnish User’s Guide Kit
French User’s Guide Kit
German User’s Guide Kit
Greek User’s Guide Kit
Hebrew User’s Guide Kit
Hungarian User’s Guide Kit
Italian User’s Guide Kit
Korean User’s Guide Kit
Norwegian User’s Guide Kit
Polish User’s Guide Kit
Portuguese User’s Guide Kit
Russian User’s Guide Kit
Spanish User’s Guide Kit
Swedish User’s Guide Kit
Thai User’s Guide Kit
Turkish User’s Guide Kit
In/Out Tray Assembly
Service Station Assembly
Base Foot Assembly (4 ea.)
HP Reorder Number
8120-6836
8120-6174
8120-6173
8120-6180
8120-6175
8120-6179
8120-6178
8120-6785
C5876-60042
C5876-60029
C5876-60087
C5876-60019
C5876-60041
C5876-60038
C5876-60020
C5876-60021
C5876-60022
C5876-60023
C5876-60024
C5876-60025
C5876-60026
C5876-60027
C5876-60028
C5876-60030
C5876-60040
C5876-60031
C5876-60032
C5876-60033
C5876-60034
C5876-60035
C5876-60036
C5876-60037
C5876-60039
C4602-67902
C4602-67901
C2162-60098
Section 2 – Support 23
WW US eng. Manual
21.07.1997 03.29 pm
Page 24
Accessories
HP Reorder Number
Windows/DOS I/O Interface Cables
HP IEEE-1284 Compliant Parallel Interface Cable (with one 1284-A connector
for the computer port and one 1284-B connector for the printer port)
2-meter length
3-meter length
Print Cartridges
Black Inkjet Print Cartridge
Color Inkjet Print Cartridge
Media
HP Premium InkJet Paper (U.S. Letter, 200 sheets)
HP Premium InkJet Paper (European A4, 200 sheets)
HP Premium Heavyweight InkJet Paper (U.S. Letter, 100 sheets)
HP Premium Heavyweight InkJet Paper (European A4, 100 sheets)
HP Premium Photo Paper (U.S. Letter, 20 sheets)
HP Premium Photo Paper (European A4, 20 sheets)
HP Premium Photo Paper (Asian A4, 20 sheets)
HP Deluxe Photo Paper (U.S. Letter, 20 sheets)
HP Deluxe Photo Paper (European A4, 20 sheets)
HP Deluxe Photo Paper (Asian A4, 20 sheets)
HP Premium Transparency Film (U.S. letter, 50 sheets)
HP Premium Transparency Film (U.S. letter, 20 sheets)
HP Premium Transparency Film (European A4, 50 sheets)
HP Premium Transparency Film (European A4, 20 sheets)
C2950A
C2951A
51645A
C1823A
51634Y
51634Z
C1852A
C1853A
C6039A
C6040A
C6043A
C6055A
C6057A
C6056A
C3834A
C3828A
C3835A
C3832A
Ordering Information
To order printer parts or accessories, call your nearest HP dealer. If your dealer does not have
the parts or accessories you need, call HP DIRECT for fast shipping service.
Within the U.S.: 1 (800) 538-8787
To order replaceable parts within the U.S.:
1 (800) 227-8164. For information on HP Service
Agreements within the U.S.: (800) 835-4747
(Monday–Friday, 7:30 am to 12 noon PST
and 1:00 pm to 4:00 pm PST)
Canada: (800) 387-3154, (905) 206-4725,
Fax: (905) 206-3485/-3739,
Hewlett-Packard (Canada) Ltd., 5150 Spectrum
Way, Mississauga, Ontario L4W 5G1
Toronto: (416) 671-8383
Europe/Africa/Middle East: (31) 20/547 999
Hewlett-Packard S.A., Central Mailing
Department, PO. Box 529, 1180 AA Amstelveen,
The Netherlands
Australia/ New Zealand: (03) 895-2895
China Resources Bldg., 26 Harbour Road,
Wanchai, Hong Kong
Latin America Headquarters: (305) 267-4220,
Fax: (305) 267-4247, 5200 Blue Lagoon Drive,
Suite 950, Miami, FL 33126
24 Section 2 – Support
Argentina: (54 1) 787-7100, Fax: (54 1) 787-7213,
Hewlett-Packard Argentina, Montañeses 2150,
1428 Buenos Aires, Argentina
Brazil: (55 11) 7296-4991, Fax: (55 11) 7296-4967,
Edisa-HP SA, R. Aruana 125, Tambore, Barueri
Sãu Paulo, Brazil
Chile: (56 2) 203-3233, Fax: (56 2) 203-3234,
Hewlett-Packard de Chile SA, Av. Andres Bello
2777, Oficina 1302, Las Condes, Santiago, Chile
Mexico: (52 5) 258-4600, Fax: (52 5) 258-4362,
Hewlett-Packard de México, S.A. de C.V.
Prol. Reforma #700, Colonia Lomas de Santa Fe,
01210 México, D.F.
Venezuela: (58 2) 239-4244/239-4133,
Fax: (58 2) 207-8014, Hewlett-Packard de
Venezuela, C.A., Tercera Transversal de Los Ruices
Norte, Edificio Segre, Caracas 1071, Venezuela
Apartado Postal 50933, Caracas 1050
Elsewhere in the World
Hewlett-Packard Company, Intercontinental
Headquarters, 3495 Deer Creek Road, Palo Alto,
CA 94304, U.S.A.
WW US eng. Manual
21.07.1997 03.29 pm
Page 25
Specifications
Minimum Margins
Paper
Size
U.S. Letter 8.5 x 11 in. (216 x 279 mm)
Right/Left
0.25 in. (6.4 mm)
Top
0.04 in. (1.0 mm)
Bottom
0.46 in. (11.7 mm)
U.S. Legal 8.5 x 14 in. (216 x 356 mm)
0.25 in. (6.4 mm)
0.04 in. (1.0 mm)
0.46 in. (11.7 mm)
Executive 7.25 x 10.5 in. (184 x 267 mm)
0.25 in. (6.4 mm)
0.04 in. (1.0 mm)
0.46 in. (11.7 mm)
A4 size 8.27 x 11.7 in. (210 x 297 mm)
0.13 in. (3.4 mm)
0.04 in. (1.0 mm)
0.46 in. (11.7 mm)
A5 size 5.8 x 8.3 in. (148 x 210 mm)
0.13 in. (3.4 mm)
0.04 in. (1.0 mm)
0.46 in. (11.7 mm)
Size
Right/Left
Top
Bottom
U.S. Card 4 x 6 in. (102 x 152 mm)
0.125 in. (3.2 mm)
0.04 in. (1.0 mm)
0.46 in. (11.7 mm)
U.S. Card 5 x 8 in. (127 x 203 mm)
0.125 in. (3.2 mm)
0.04 in. (1.0 mm)
0.46 in. (11.7 mm)
A6 Card 4.13 x 5.83 in. (105 x 148 mm)
0.125 in. (3.2 mm)
0.04 in. (1.0 mm)
0.46 in. (11.7 mm)
Size
Right
Left
Top/Bottom
#10 4.125 x 9.5 in. (104.8 x 241.3 mm)
0.04 in. (1.0 mm)
0.87 in. (22.0 mm)
0.125 in. (3.2 mm)
DL 4.33 x 8.66 in. (110 x 220 mm)
0.04 in. (1.0 mm)
0.87 in. (22.0 mm)
0.125 in. (3.2 mm)
C6 4.49 x 6.38 in. (114 x 162 mm)
0.04 in. (1.0 mm)
0.87 in. (22.0 mm)
0.125 in. (3.2 mm)
Size
Right/left
Top
Bottom
Custom ranging from 3.94 in. (w)
to 14 in (h) (from 100 to 356 mm)
0.13 in. (3.4 mm)
0.04 in. (1.0 mm)
0.46 in. (11.7 mm)
Cards
Envelopes
Custom
Section 3 – Specifications 25
WW US eng. Manual
21.07.1997 03.29 pm
Page 26
Printer Specifications
Print Method
Built-in (internal) Scalable Fonts
Plain paper drop-on-demand thermal inkjet printing
Arial, Courier, Letter Gothic, CG Times, Univers,
Symbol, Times New Roman, Wingdings
Black Text Print Speed*
Best: 4 pages per minute
Normal: 7 pages per minute
EconoFast: 9 pages per minute
Scalable TrueType Fonts for Microsoft Windows
HP PCL Level 3
(Available through FontSmart on Printer Software CD)
Albertus, Albertus Extra Bold, Antique Olive, Antique
Olive Compact, Arial, Arial Narrow, Arial Black, PL
Benguiat Frisky, Bertram, Bodoni, Bodoni Black, Book
Antiqua, ITC Bookman Old Style, Century Gothic,
Century Schoolbook, Challenge Extrabold, Clarendon,
Clarendon Condensed Bold, Clarendon Extra Bold,
Coronet, Corsiva, Courier, Garamond, Gill Sans, Gill
Sans Light, Gill Sans Condensed, Gill Sans Extra Bold,
Gloworm, CG Goudy Oldstyle, CG Goudy Oldstyle Extra
Bold, Graphite Light, Graphos, Letter Gothic, Lucida
Casual, Lucida Casual Italic, Marigold, Metrostyle,
Metrostyle Extended, Milestones, Nadianne Bold, Old
English, CG Omega, Ozzie Black, Party, CG Poster
Bodoni, Pompeii Capitals, Signet Roundhand, Sorts,
Strider, Symbol, Theatre Antione, CG Times, Times New
Roman, Univers, Univers Condensed, Univers Light
Condensed, Univers Extended, Wingdings
Character Sets
Recommended Media Weight
PC-8, PC-8 Danish/Norwegian, PC Turkish, PC-850, PC852, Roman-8, ECMA-94 Latin 1 (ISO 8859/1), ECMA-94
Latin 2 (ISO 8859/2), ECMA - 128 Latin 5 (ISO 8859/5),
United Kingdom (ISO 4), ANSI ASCII (ISO 6), Swedish
(ISO 11), Italian (ISO 15), Spanish (ISO 17), German
(ISO 21), Danish/Norwegian (ISO 60), French (ISO 69),
Legal, Wingdings, Symbol.
Windows 3.1: Latin 1, Latin 2, Latin 5.
Cyrillic/Arabic optional ROM: C4602A-002
Hebrew/Greek optional ROM: C4602A-003
Paper: 60 to 135 g/m2 (16 to 36 lb)
Envelopes: 75 to 90 g/m2 (20 to 24 lb)
Cards: 110 to 200 g/m2 (110 lb index max.; 8.5 pt
max. thickness)
Color Print Speed*
Best: 1 page per minute
Normal: 1.5 pages per minute
Econofast: 5 pages per minute
Black Print Quality
Up to 600 dpi**
Color Print Quality
Up to Photo REt II
DOS (graphics)
Full-page 75, 150, 300 dpi
Printer Command Language
Software Compatibility
Windows 3.1, Windows ‘95, Windows NT 4.0 (Windows
NT 3.51 supported with Microsoft driver).
DOS 3.3 and above.
26 Section 3 – Specifications
* Approximate figures. Exact speed will vary depending on the system
configuration, software program, and document complexity.
** Measured in addressable raster points per inch.
WW US eng. Manual
21.07.1997 03.29 pm
Page 27
Media Size
Printer Memory
U.S. letter 216 x 279 mm (8.5 x 11 in.)
U.S. legal 216 x 356 mm (8.5 x 14 in.)
U.S. transparency 216 x 279 mm (8.5 x 11 in.)
U.S. glossy 216 x 279 mm (8.5 x 11 in.)
U.S. Special 216 x 279 mm (8.5 x 11 in.)
U.S.Executive 184 x 267 mm (7.25 x 10.5 in.)
U.S. No. 10 Envelope 105 x241 mm (4.12 x 9.5 in)
Index card 102 x 152 mm (4 x 6 in.)
Index card 127 x 203 mm (5 x 8 in.)
European A4 210 x 297 mm
European A4 transparency 210 x 297 mm
European A4 glossy 210 x 297 mm
European A4 Special 210 x 297 mm
European A5 148 x 210 mm
European DL envelope 220 x 110 mm
European C6 envelope 114 x 162 mm
European A6 card 105 x 148.5 mm
Custom size: Width 100 to 216 mm (3.94 to 8.5 in.);
Length 148 to 356 mm (5.79 to 14 in.)
Avery Inkjet Labels
0.5MB of built-in RAM
32 Kbyte receive buffer
Media Handling (Built-In Feeders)
Duty Cycle
Sheets: up to 150 sheets
Single sheet: only one sheet
Multiple envelopes: up to 15 envelopes
Cards: up to 30 cards
OUT tray capacity: up to 50 sheets
Labels: up to 25 sheets
3000 total black pages per month max.
500 total color pages per month
Buttons/Lights
Resume and Power
DOS/Windows I/O Interface
Centronics parallel, IEEE 1284 compliant with 1284-B
receptacle
(ECP, Compatibility Mode, Nibble Mode)
Dimensions
444 mm (17.5 in.) W
226 mm (8.9 in.) H
396 mm (15.6 in.) D
Weight
6.5 kg (14.3 lbs).
Power Requirements
Input Voltage: 100 to 240 VAC±10%
50/60 Hz ±3 Hz
Power consumption
1 watt maximum when off
5.25 watts maximum non-printing
48 watts maximum printing
Reliability
20,000 hours MTBF
2000 hours power-on and 12,000 printed pages per year
Operating Environment
Operating temperature range:
5˚ to 40˚C (41˚F to 104˚F)
Humidity: 15 to 80% RH non-condensing
Recommended operating conditions for best print
quality: 15˚ to 35˚C (59˚F to 95˚F), 20 to 80% RH noncondensing
Storage temperature: -40˚ to 60˚C (-40˚F to 140˚F)
Noise Levels per ISO 9296:
Sound Power, LwAd:
Sound Pressure, LpAm:
Bystander position
Best Mode
6.0 B(A) max.
47 dB(A)
Normal Mode
6.3 B(A)
50 dB(A)
Section 3 – Specifications 27
WW US eng. Manual
21.07.1997 03.29 pm
Page 28
Additional Symbol Sets and Fonts
For some languages additional symbol sets and fonts are included with the HP DeskJet 890C
printer on a separate disk. This “Regional Font Support” disk contains custom files for use with
the HP DeskJet Control panel for DOS, allowing access to special character sets.
Supported Languages
You only need to install the one file that supports your particular language. If you are uncertain
which language is included in your printer, check the serial number label on the back of the
printer for one of the following codes:
■
ARB = Arabic
■
CYR = Cyrillic
■
GRK = Greek
■
HBR = Hebrew
■
THA = Thai
Installing a Special Symbol or Font
To install the appropriate character set file on your computer:
1 First install the printer software as described in the setup card.
2 Put the Regional Font Support disk into your computer’s floppy disk drive.
3 From the DOS prompt on your hard disk drive (usually the C:\ drive), type the drive designator for
your floppy drive, followed by “DIR”, then press the Enter key to display the subdirectories on the
Regional Font Support disk. For example, type:
C:\> A:\DIR
and then press the Enter key.
4 Copy the appropriate SYMSETS.DAT file from the subdirectory for the language of your printer to
your \DESKJET directory. For example, to copy the file for the Cyrillic language, type:
C:\>copy A:\CYRILLIC\SYMSETS.DAT C:\DESKJET
and then press the Enter key.
5 Remove the Regional Font Disk from the floppy drive when the copying process is completed.
28 Section 3 – Specifications
WW US eng. Manual
21.07.1997 03.29 pm
Page 29
Regulatory Notice
FCC Statement (USA)
The United States Federal Communications Commission (in 47 CFR 15.105) has specified that the
following notice be brought to the attention of users of this product:
This equipment has been tested and found to comply with the limits for a Class B digital device,
pursuant to part 15 of the FCC Rules. These limits are designed to provide reasonable protection
against harmful interference in a residential installation. This equipment generates, uses, and can
radiate radio frequency energy and, if not installed and used in accordance with the instructions,
may cause harmful interference to radio communications. However, there is no guarantee that
interference will not occur in a particular installation. If this equipment does cause harmful interference to radio or television reception, which can be determined by turning the equipment off
and on, the user is encouraged to try and correct the interferences by one or more of the following
measures:
■
Reorient or relocate the receiving antenna.
■
Increase the separation between the equipment and the receiver.
■
Connect the equipment into an outlet on a circuit different from that to which the receiver
is connected.
■
Consult the dealer or an experienced radio/TV technician for help.
Use of a shielded cable is required to comply with Class B limits of Part 15 of FCC Rules.
Pursuant to Part 15.21 of the FCC Rules, any changes or modifications to this equipment not
expressly approved by Hewlett-Packard Company may cause harmful interference and void the
FCC authorization to operate this equipment.
LED Indicator Statement
The display LEDs meet the requirements
of EN 60825-1.
Section 3 – Specifications 29
WW US eng. Manual
21.07.1997 03.29 pm
Page 30
Declaration of Conformity
according to ISO/IEC Guide 22 and EN 45014
Manufacturer’s Name:
Hewlett-Packard Company
Manufacturer’s Address:
Hewlett-Packard Co.
Vancouver Printer Division
18110 S.E. 34th Street
Vancouver, WA 98683
Hewlett-Packard Singapore (PTE) Ltd.
Asia Hardcopy Manufacturing Operation
20 Gul Way
Singapore 629196
Hewlett-Packard Espanola, S.A.
Barcelona Division
Avenida Graells, 501
08190 Sant Cugat del Valles
Barcelona, Spain
declares, that the product(s):
Product Name:
DeskJet Printers
Model Number(s):
C4602A, C4603A, C5876A, C5877A
Product Options:
All
conforms to the following Product Specifications:
Safety:
IEC 950 : 1991 Second Edition +A1 +A2 +A3/EN 60950 : 1992 +A1 +A2 +A3
IEC 825-1 : 1993/EN 60825-1 : 1994 Class 1 for LEDs
EMC:
EN55022 : 1994 Class B/CISPR 22 : 1993 Class B
EN 50082-1 : 1992
IEC 801-2 : 1991 Second Edition/prEN 55024-2 : 1992 : 4 kV CD, 8 kV AD
IEC 801-3 : 1984/prEN 55024-3 : 1991 - 3 V/m
IEC 801-4 : 1988/prEN 55024-4 : 1993 : 0.5 kV Signal Lines, 1 kV Power Lines
IEC 1000-3-2 : 1995/EN 61000-3-2 : 1995*
IEC 1000-3-3 : 1994/EN 61000-3-3 : 1995
Supplementary Information:
The products herewith comply with the requirements of the Low Voltage Directive 73/23/EEC and
the EMC Directive 89/336/EEC and carry the CE marking accordingly.The products were tested in
a typical configuration.
*Products have less than 75 Watts active input power.
Vancouver, WA., April 9, 1997
Janet Hoppe
Customer Assurance Manager
European Contact: Your local Hewlett-Packard Sales and Service Office or Hewlett-Packard
GmbH, Department ZQ/ Standards Europe, Herrenberger Straße 130,
D-7030 Böeblingen FAX: +49-7031-143143
30 Section 3 – Specifications