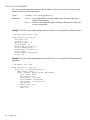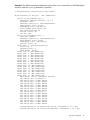
1
HP 6G Virtual SAS Manager User Guide
Abstract
This guide provides information about using the HP Virtual SAS Manager application to configure and manage device zoning
through HP 6Gb SAS BL switches. Both the Graphical User Interface (GUI) and Command Line Interface (CLI) are detailed.
HP Part Number: 634040-002
Published: September 2011
Edition: 2
© Copyright 2011 Hewlett-Packard Development Company, L.P.
Confidential computer software. Valid license from HP required for possession, use or copying. Consistent with FAR 12.211 and 12.212, Commercial
Computer Software, Computer Software Documentation, and Technical Data for Commercial Items are licensed to the U.S. Government under
vendor's standard commercial license.
The information contained herein is subject to change without notice. The only warranties for HP products and services are set forth in the express
warranty statements accompanying such products and services. Nothing herein should be construed as constituting an additional warranty. HP shall
not be liable for technical or editorial errors or omissions contained herein.
Acknowledgements
Microsoft®, Windows®, Windows® XP, Windows® NT, Windows® Vista, Windows® 7, Windows® 2003, and Windows® 2008 are U.S.
registered trademarks of Microsoft Corporation.
Revision History
Revision #2
September 2011
Added support for zoned SAS storage enclosures and some additional new features and enhancements
Revision # 1
Initial publication
April 2011
Contents
I Basic information and concepts.....................................................................6
1 About this document and 6G solutions......................................................8
About this document.............................................................................................................8
About solutions using the HP 6Gb SAS BL Switch.....................................................................8
2 Zone group concepts and device mappings...............................................9
Zone group concepts............................................................................................................9
Device mappings.................................................................................................................9
II VSM GUI.................................................................................................11
3 Getting started.....................................................................................14
Accessing the VSM GUI.....................................................................................................14
Page description................................................................................................................15
System status information....................................................................................................16
Switch status states........................................................................................................16
Online help.......................................................................................................................17
Performing tasks.................................................................................................................17
Configuring the switch (key steps).........................................................................................17
Configuring P2000 G3 SAS MSA shared SAS storage enclosures (overview).............................19
Configuring MDS600 or D2600/D2700 zoned SAS storage enclosures (overview)....................20
4 Tasks in the VSM Zoning tab..................................................................21
More Information task.........................................................................................................22
Topology Map task............................................................................................................22
Create Zone Group task.....................................................................................................23
Creating switch-port zone groups....................................................................................23
Creating drive-bay zone groups......................................................................................25
Delete Zone Groups task.....................................................................................................26
Delete task........................................................................................................................27
Modify task.......................................................................................................................27
Clear Configuration task.....................................................................................................28
Advanced Settings task.......................................................................................................28
Split Port task....................................................................................................................29
Merge Sub-Ports task..........................................................................................................29
Create Single Port Zone Group task......................................................................................29
Replicate Zoning Configuration task.....................................................................................30
Modify Zone Access task....................................................................................................30
Create and Assign Zone Group task.....................................................................................31
Creating and assigning switch-port zone groups................................................................31
Creating and assigning drive-bay zone groups.................................................................33
5 Tasks in the VSM Maintain tab...............................................................35
Capture Configuration task..................................................................................................36
Input Configuration task......................................................................................................36
Update SAS Switch Firmware task........................................................................................36
Prerequisites.................................................................................................................36
Obtaining new firmware................................................................................................37
Updating HP 6Gb SAS BL Switch firmware in single-domain deployments.............................38
Updating HP 6Gb SAS BL Switch firmware in dual-domain deployments...............................39
Reset Hardware task...........................................................................................................41
Reset Software task............................................................................................................41
Update Storage Enclosure Firmware task...............................................................................41
Contents
3
Prerequisites.................................................................................................................42
Obtaining new firmware................................................................................................42
Procedures...................................................................................................................43
Reset Storage Enclosure task................................................................................................44
Network Settings task.........................................................................................................45
SNMP Settings task............................................................................................................45
SNMP Test Trap task..........................................................................................................45
Force VSM Active task........................................................................................................46
VSM Event Log task............................................................................................................46
Clear VSM Event Log task...................................................................................................47
Diagnostic Log task............................................................................................................47
Unit ID Light task................................................................................................................47
Replicate Zoning Configuration task.....................................................................................47
6 Troubleshooting....................................................................................49
Moving zone groups..........................................................................................................49
Moving zone groups—zoned SAS storage enclosures........................................................49
Moving zone groups—shared SAS storage enclosures........................................................50
III VSM CLI.................................................................................................51
7 Getting started.....................................................................................53
Accessing the VSM CLI.......................................................................................................53
Command syntax...............................................................................................................55
Example command........................................................................................................55
Target overview............................................................................................................55
Command listing...........................................................................................................56
Parameter overview.......................................................................................................57
Executing commands..........................................................................................................58
Keyboard shortcuts and keyword abbreviations.................................................................58
8 Getting help........................................................................................59
The help command............................................................................................................59
The show command...........................................................................................................60
9 Performing common tasks......................................................................62
Enabling or disabling multi-initiator mode and port splitting.....................................................63
Creating zone groups.........................................................................................................64
Creating a switch-port zone group...................................................................................65
Creating a drive-bay zone group.....................................................................................67
Assigning a zone group to a server device bay......................................................................69
Capturing the configuration.................................................................................................71
Inputting or restoring the configuration..................................................................................72
Flashing switch firmware.....................................................................................................73
Flashing storage enclosure firmware.....................................................................................75
Resetting the VSM software, the switch or attached storage enclosures......................................76
10 Creating and executing CLI scripts.........................................................77
IV Support and other resources.....................................................................78
11 Support and other resources.................................................................80
Contacting HP...................................................................................................................80
Subscription service.......................................................................................................80
Related information............................................................................................................80
HP websites..................................................................................................................80
Prerequisites......................................................................................................................81
Typographic conventions.....................................................................................................81
4
Contents
HP product documentation survey........................................................................................82
Index.........................................................................................................83
Contents
5
Part I Basic information and concepts
HP Virtual SAS Manager (VSM) is the software application used to configure HP SAS BL Switches, including
tasks such as creating and managing hardware-based zone groups. These zone groups allocate resources
for device load balancing purposes and for selectively allowing access to data. For planning purposes,
zone groups and assignments can be pre-configured, even if server bays or drive bays are not yet populated.
Embedded in the SAS BL Switch firmware, VSM can be deployed in two operating modes: a graphical user
interface (GUI) and a command line interface (CLI).
•
Graphical User Interface (GUI)—For information on the VSM GUI, see “VSM GUI” (page 11).
•
Command Line Interface (CLI)—For information on the VSM CLI, see “VSM CLI” (page 51).
Contents
1 About this document and 6G solutions..........................................................8
About this document.................................................................................................................8
About solutions using the HP 6Gb SAS BL Switch..........................................................................8
2 Zone group concepts and device mappings...................................................9
Zone group concepts................................................................................................................9
Device mappings......................................................................................................................9
Contents
7
1 About this document and 6G solutions
About this document
•
This document assumes that all associated devices are physically installed and all required
software components are installed on the servers. For hardware compatibility information,
supported operating system versions, and supported Internet browser versions, see the SAS
switch QuickSpecs. Review the QuickSpecs and verify that supported versions are installed
on the devices.
•
Examples in this document use dual HP 6Gb BL Switches installed in an HP BladeSystem
c7000 enclosure.
•
For information about installing and cabling the switch, see the following user documents,
available on the 6Gb SAS BL Switch page of the HP Manuals website http://www.hp.com/
support/manuals:
•
◦
HP 6Gb SAS BL Installation Instructions
◦
HP 6Gb SAS BL User Guide
◦
HP BladeSystem Deployment Guide for Solutions with 6Gb SAS BL Switches and External
SAS Storage Enclosures
Information is located as follows in this guide:
◦
Example procedures: “Configuring P2000 G3 SAS MSA shared SAS storage enclosures
(overview)” (page 19).
◦
Example procedures: “Configuring MDS600 or D2600/D2700 zoned SAS storage
enclosures (overview)” (page 20).
◦
Field details: “Tasks in the VSM Zoning tab” (page 21)
◦
Field details: “Tasks in the VSM Maintain tab” (page 35)
About solutions using the HP 6Gb SAS BL Switch
8
•
In dual-domain environments with two switches installed in the same interconnect bay row of
the HP BladeSystem c-Class enclosure, both switches can process I/O, but the VSM utility can
be active on only one of the switches. Switch status (Active or Passive) is shown in the VSM
navigation tree. If you log in to the switch with the passive VSM and want to make any zoning
configuration changes, you must exit VSM for that switch and log back in to the switch with
the active VSM.
•
Zoning is created and managed through the VSM, but the storage is configured, formatted,
and partitioned using software utilities such as the HP Array Configuration Utility (ACU), HP
Storage Management Utility (SMU), and Microsoft Disk Manager.
About this document and 6G solutions
2 Zone group concepts and device mappings
Zone group concepts
Zone groups allocate resources for device load balancing purposes and for selectively allowing
access to data. For planning purposes, zone groups and assignments can be pre-configured, even
if servers or disk drives are not yet installed.
Types of zone groups:
•
Switch port zone groups—Group together one or more ports on the SAS BL Switch. Server
device bays assigned this type of zone group have access to the storage enclosures or tape
devices connected to the ports included in the zone. This type of zone group is for shared
SAS devices. The P2000 G3 SAS MSA and HP MSL2024, MSL4048, and MSL8096 Tape
Libraries and 1/8 G2 Tape Autoloader are examples of shared SAS devices. All LUNs in the
controller enclosure are accessible to the assigned servers, unless controlled through the storage
management utility for the controller enclosure and all tape drives in a tape device are
accessible to any server that has access to the zone group.
•
Drive bay zone groups—Group together drive bays from one or more MDS600 drawers or
D2000 disk enclosures. Server device bays assigned this type of zone group have exclusive
access to the drive bays included in the zone group, as if the drives are directly connected to
those servers. This type of zone group is for zoned SAS storage enclosures. The MDS600 and
D2600/D2700 enclosures are examples of zoned SAS storage.
As shown in the following table, configuration (zoning type) procedures are the same for shared
SAS storage enclosures and tape devices, but differ for zoned SAS storage enclosures:
Type of connected external device
Zoning type
Shared SAS storage enclosures (P2000 G3 SAS MSA)
Switch port
Zoned SAS storage enclosures (MDS600 and D2600/D2700)
Drive bay
Tape devices
Switch port
Device mappings
IMPORTANT: Depending on the BladeSystem c-Class enclosure model, server type, mezzanine
slot used, and BladeSystem server device bay, the SAS BL Switch must be installed in specific
BladeSystem interconnect bay row. The following tables show the interdependencies of components
in an HP BladeSystem c-Class solution that includes SAS BL Switch connected to external SAS
storage enclosures.
Device mappings for the c3000 BladeSystem enclosure:
BladeSystem c-Class
enclosure model
Server type
Mezzanine slot
nl
BladeSystem c-Class
interconnect bay
nl
Half height
2
2
Full height
3
c3000
2
Full height
Double wide
(BL680c G7)
nl
nl
3/4
3
4
7
Zone group concepts
9
Device mappings for the c7000 BladeSystem enclosure:
BladeSystem c-Class
enclosure model
Server type
Mezzanine slot
nl
BladeSystem c-Class
interconnect bay
nl
1
3/4
2
5/6/7/8
1
3/4
2
5/6/7/8
3
5/6/7/8
1
3/4
2
5/6/7/8
3
5/6/7/8
4
5/6/7/8
5
3/4
7
5/6/7/8
Half height
Full height
c7000
Full height
Double wide
(BL680c G7)
nl
nl
10
Zone group concepts and device mappings
Part II VSM GUI
Contents
3 Getting started.........................................................................................14
Accessing the VSM GUI..........................................................................................................14
Page description.....................................................................................................................15
System status information.........................................................................................................16
Switch status states.............................................................................................................16
Online help...........................................................................................................................17
Performing tasks.....................................................................................................................17
Configuring the switch (key steps).............................................................................................17
Configuring P2000 G3 SAS MSA shared SAS storage enclosures (overview)..................................19
Configuring MDS600 or D2600/D2700 zoned SAS storage enclosures (overview).........................20
4 Tasks in the VSM Zoning tab......................................................................21
More Information task.............................................................................................................22
Topology Map task.................................................................................................................22
Create Zone Group task..........................................................................................................23
Creating switch-port zone groups.........................................................................................23
Creating drive-bay zone groups...........................................................................................25
Delete Zone Groups task.........................................................................................................26
Delete task.............................................................................................................................27
Modify task...........................................................................................................................27
Clear Configuration task..........................................................................................................28
Advanced Settings task...........................................................................................................28
Split Port task.........................................................................................................................29
Merge Sub-Ports task...............................................................................................................29
Create Single Port Zone Group task..........................................................................................29
Replicate Zoning Configuration task..........................................................................................30
Modify Zone Access task.........................................................................................................30
Create and Assign Zone Group task.........................................................................................31
Creating and assigning switch-port zone groups....................................................................31
Creating and assigning drive-bay zone groups......................................................................33
5 Tasks in the VSM Maintain tab...................................................................35
Capture Configuration task......................................................................................................36
Input Configuration task...........................................................................................................36
Update SAS Switch Firmware task.............................................................................................36
Prerequisites......................................................................................................................36
Obtaining new firmware.....................................................................................................37
Updating HP 6Gb SAS BL Switch firmware in single-domain deployments.................................38
Updating HP 6Gb SAS BL Switch firmware in dual-domain deployments...................................39
Reset Hardware task...............................................................................................................41
Reset Software task.................................................................................................................41
Update Storage Enclosure Firmware task....................................................................................41
Prerequisites......................................................................................................................42
Obtaining new firmware.....................................................................................................42
Procedures........................................................................................................................43
Reset Storage Enclosure task....................................................................................................44
Network Settings task..............................................................................................................45
SNMP Settings task.................................................................................................................45
SNMP Test Trap task...............................................................................................................45
Force VSM Active task.............................................................................................................46
VSM Event Log task................................................................................................................46
Clear VSM Event Log task........................................................................................................47
12
Contents
Diagnostic Log task.................................................................................................................47
Unit ID Light task....................................................................................................................47
Replicate Zoning Configuration task..........................................................................................47
6 Troubleshooting........................................................................................49
Moving zone groups...............................................................................................................49
Moving zone groups—zoned SAS storage enclosures.............................................................49
Moving zone groups—shared SAS storage enclosures............................................................50
Contents
13
3 Getting started
Accessing the VSM GUI
VSM is accessed through the Onboard Administrator (OA) application of the BladeSystem c-Class
enclosure in which the switch is installed. (For the minimum supported OA version, see the 6Gb
SAS BL Switch QuickSpecs.)
NOTE: To navigate directly to the VSM for a SAS switch, open the browser and enter the OA
IP address or hostname followed by the interconnect variable. For example:
https://10.10.1.254/interconnectX/ or https://hostname/interconnectX/,
where X specifies the interconnect bay number.
1.
Install and connect the HP BladeSystem c-Class enclosure and the servers, controllers, switches,
external storage enclosures, and other devices associated with your BladeSystem c-Class
enclosure solution. These procedures are detailed in the user documents for each device.
For hardware compatibility information, supported operating system versions, and supported
Internet browser versions, see the SAS BL Switch QuickSpecs. Review the QuickSpecs and
verify that supported versions are installed on the devices.
2.
Log in to Onboard Administrator for the BladeSystem c-Class enclosure.
a. Obtain and record the IP address or hostname assigned to the BladeSystem c-Class
enclosure OA module. (The IP address or hostname may be recorded on worksheets
provided with your system installation instructions.)
b. From a server or workstation with access to the system, open a browser and enter the
OA address or hostname.
For example: https://10.10.1.254 or https://hostname
c.
3.
Enter an OA username and password with administrative privileges, and then wait a few
moments for OA to open.
In the OA Systems and Devices tree, expand Interconnect Bays, select the HP 6Gb SAS BL
Switch to manage, and click Management Console.
After a few moments, the VSM GUI is displayed.
14
Getting started
NOTE: In dual-domain switch configurations with two switches in the same interconnect bay row
of the HP BladeSystem c-Class enclosure, both switches can process I/O, but the VSM utility can
be active on only one of the switches. Switch management status (Active or Passive) is shown in
the VSM navigation tree (not the OA navigation tree). If you log in to the switch with the passive
VSM and want to make any zoning configuration changes, you must exit VSM for that switch and
log back in to the switch with the active VSM.
Page description
Each time the VSM is accessed, the “VSM Overview” page opens automatically, displaying a brief
summary about the SAS BL switches, zone groups, blade ports (server bays), and storage enclosures
included in the solution.
The VSM GUI page is divided as follows:
1. Zoning and Maintain tabs
5. VSM firmware version
2. System status summary
6. Task selection buttons and data input fields
3. Systems and devices navigation tree
7. VSM CLI IP address
4. VSM GUI URL (OA IP address with c-Class enclosure interconnect bay number appended)
Page description
15
System status information
A summary of system status information is displayed in the System Status section of the page.
Critical—System is not operating properly
Warning—Service is needed
Informational—Helpful information
Status alert details may be viewed in the following different ways:
•
To view all status messages: In the System Status section near the top-left of the VSM page,
click View Status Alerts.
•
To view status messages for a specific device: In the navigation tree, select the device, and
then click View Status Alerts.
•
To view a specific message: Click the icon or message, whether it is in the navigation tree,
an informational display, or elsewhere.
Included in the System Status section of the VSM display, the Refresh option updates the information
in the navigation tree.
NOTE: If a hardware change has been made since the Systems and Devices navigation tree was
last refreshed, a notification message is displayed within this System Status section. When this
message is displayed, click Refresh to update the display.
Switch status states
Next to each switch in the Systems And Devices navigation tree, one of the following status values
may be displayed:
Degraded
Displayed in dual-domain switch deployments. The partner switch is present
but is not communicating. For example, if one switch experiences a failure,
the status of the still-functioning partner switch may be Degraded.
16
Mismatch
Displayed in dual-domain switch deployments, this is displayed when the
system detects different firmware versions installed on the paired switches.
This is also displayed when data such as zone records, enclosure serial
number, or bay number do not match.
Not Configured
Displayed in single-switch deployments. This is displayed next to a
newly-installed switch.
Not Redundant
Displayed in single-switch deployments. The switch is fully operational and
Active. For example, if one switch experiences a failure, the status of the
still-functioning partner switch may be Not Redundant.
Unknown
Displayed in both single-switch and dual-domain switch deployments. This
is displayed when the current state can not be determined.
VSM Active
Displayed in dual-domain switch deployments. The switch is fully operational
and Active.
VSM Passive
Displayed in dual-domain switch deployments. This is displayed next to
one of the switches in a pair, while the VSM Active is displayed next to the
partner switch. This switch may automatically become VSM Degraded or
Not Redundant if the partner switch experiences a failure.
Getting started
Online help
Extensive online help is available. At any time, click the Help icon in the top right of the page. The
following image is an example display of the online help.
Performing tasks
To perform any task in the VSM, observe the following key steps:
1. Select a tab at the top-left of the page.
2. Select a system component in the navigation tree on the left side of the page.
3. Select a task from the list on the right side of the page.
NOTE: If a task is listed, but cannot be selected, system status conditions are not acceptable
for that task to be performed. When this occurs, the cause is listed, so corrective action can
be taken.
4.
5.
Enter the requested information.
Click Save Changes.
Configuring the switch (key steps)
After physically installing the switch (or switches) in the BladeSystem c-Class enclosure and cabling
them to external SAS storage enclosures, do the following to configure the switches and the storage:
1. Go to the Maintain tab to configure switch parameters. Key tasks include:
a. Enter network settings.
b. Enter SNMP settings.
c. Update switch firmware (if needed).
d. Update storage enclosure firmware (if needed).
Online help
17
2.
Go to the Zoning tab to create and assign zone groups. Key tasks include:
a. Set the multi-initiator mode and, if multiple tape devices are included in the solution,
enable port-splitting mode (optional).
b. Create the zone groups.
c.
3.
•
For deployments with shared SAS storage enclosures and tape libraries, create
switch-port zone groups.
•
For deployments with zoned SAS storage enclosures, create drive-bay zone groups.
Assign zone groups to servers.
Go to the Maintain tab to capture the configuration for safekeeping. HP strongly recommends
this step, especially in single-domain configurations.
Configuration information is located as follows in this guide:
18
•
Example procedures: “Configuring P2000 G3 SAS MSA shared SAS storage enclosures
(overview)” (page 19).
•
Example procedures: “Configuring MDS600 or D2600/D2700 zoned SAS storage enclosures
(overview)” (page 20).
•
Field details: “Tasks in the VSM Zoning tab” (page 21)
•
Field details: “Tasks in the VSM Maintain tab” (page 35)
Getting started
Configuring P2000 G3 SAS MSA shared SAS storage enclosures
(overview)
Configuring shared SAS storage enclosures includes the following tasks, performed in sequence:
1. Enable Multi-initiator Mode. (“Advanced Settings task” (page 28))
2. Optional: Enable Port-splitting Mode if multiple tape autoloaders or libraries are included in
the solution. (“Advanced Settings task” (page 28))
3. Create one or more switch-port zone groups. (“Create Zone Group task” (page 23))
4.
5.
6.
•
Unused switch ports can be included in a zone group.
•
Until a server device bay is assigned a zone group, it cannot access the storage.
Assign each zone group to each server device bay that needs access to the storage enclosures
associated with that zone group. (“Modify Zone Access task” (page 30))
•
All available zone groups are displayed.
•
After a zone group has been assigned to a server device bay, its status changes from
“unassigned” to “assigned”.
Capture the configuration for safekeeping. “Capture Configuration task” (page 36))
Configure disk drives in the storage enclosure into logical storage units (LUNs) using the
management utility supported by the storage enclosure. Access to the LUNs is controlled
through mappings or other presentation methods, which grant specific server device bays to
specific LUNs.
Helpful hints
•
The HP P2000 G3 SAS MSA Array is an example of a shared SAS storage enclosure.
•
The shared SAS storage enclosure includes a RAID array controller. A RAID controller is
installed on the server, but not used for its RAID configuration capabilities.
•
Use switch-port zone groups with shared SAS storage enclosures. The entire storage enclosure
connected to that switch port is visible to all server device bays granted access to the zone
group that includes that switch port.
•
Each server device bay that needs access to the external storage must be assigned a zone
group.
•
◦
A server device bay can be assigned multiple zone groups.
◦
A switch-port zone group can be assigned to more than one server device bay.
◦
Unpopulated server device bays can be assigned a zone group.
Disks in the enclosure are configured into logical storage units (LUNs) using one of the servers
(or a designated management server) with access to the storage enclosure. Access to the LUNs
is controlled through mappings or other presentation methods, which grant specific server
device bays to specific LUNs.
Configuring P2000 G3 SAS MSA shared SAS storage enclosures (overview)
19
Configuring MDS600 or D2600/D2700 zoned SAS storage enclosures
(overview)
Configuring zoned SAS storage enclosure includes the following tasks, performed in sequence:
1. Disable Multi-initiator Mode. (“Advanced Settings task” (page 28))
NOTE: If tape autoloaders/libraries or shared SAS storage enclosures are also connected
to the switch and multiple server device bays will need access to the same switch-port zone
groups, Multi-initiator Mode must be Enabled.
2.
3.
4.
5.
6.
Optional: Enable Port-splitting Mode if multiple tape autoloaders or libraries are included in
the solution. (“Advanced Settings task” (page 28))
Create one or more drive-bay zone groups. (“Create Zone Group task” (page 23))
•
Unpopulated drive bays can be included in a zone group.
•
Until a server device bay is assigned a zone group, it cannot access the storage.
Assign each zone group to the device server bay that needs access to the storage associated
with that zone group. (“Modify Zone Access task” (page 30))
•
If the Multi-initiator mode is disabled, only unassigned (available) zone groups are
displayed; if a zone group has already been assigned to a server device bay, it is not
displayed.
•
After a zone group has been assigned to a server device bay, its status changes from
“unassigned” to “assigned”.
Capture the configuration for safekeeping. “Capture Configuration task” (page 36))
Configure disk drives in the storage enclosure into logical storage units (LUNs) using the
management utility supported by the storage enclosure.
Helpful hints
•
MDS600 and D2600/D2700 Disk Enclosures are examples of zoned SAS storage enclosures.
•
A RAID controller is installed in the server and is used for its RAID configuration capabilities.
The zoned SAS storage enclosure does not includes a RAID array controller.
•
Use drive-bay zone groups to configure zoned SAS enclosures, so that the group of drive bays
is presented to the server device bay as if it was directly connected to that server device bay.
•
Each server device bay that needs access to the external storage must be assigned a zone
group.
•
20
◦
A server device bay can be assigned multiple zone groups.
◦
A drive-bay zone group can be assigned to only one server device bay.
◦
Unpopulated enclosure server device bays can be assigned zone groups.
The disks in the enclosure are configured into logical storage units (LUNs) using host based
configuration utilities (such as ACU or ACU CLI) running on the server with access to the zone
group containing the drive bays.
Getting started
4 Tasks in the VSM Zoning tab
After selecting a component in the navigation tree, a unique task list for that component is displayed.
The following table lists the tasks for each system component.
System component
Available tasks
Where documented
Blade Enclosure
More Information
“More Information task” (page 22)
Topology Map
“Topology Map task” (page 22)
Create Zone Group
“Create Zone Group task” (page 23)
Delete Zone Group
“Delete Zone Groups task” (page 26)
More Information
“More Information task” (page 22)
Topology Map
“Topology Map task” (page 22)
Delete
“Delete task” (page 27)
Modify
“Modify task” (page 27)
Zone Groups
A specifc zone group
HP 6Gb SAS Blade Switch Clear Configuration
(VSM Active)
Advanced Settings
SAS Switch Ports
A specific switch port
Storage Enclosures
“Clear Configuration task” (page 28)
“Advanced Settings task” (page 28)
More Information
“More Information task” (page 22)
Topology Map
“Topology Map task” (page 22)
More Information
“More Information task” (page 22)
Topology Map
“Topology Map task” (page 22)
Split Port
“Split Port task” (page 29)
Merge Sub-Ports
“Merge Sub-Ports task” (page 29)
Create Single Port Zone
Group
“Create Single Port Zone Group task” (page 29)
More Information
“More Information task” (page 22)
Topology Map
“Topology Map task” (page 22)
More Information
“More Information task” (page 22)
Topology Map
“Topology Map task” (page 22)
HP MDS600 Disk System Replicate Zoning
or HP D2600/D2700 Disk Configuration
Enclosure
More Information
“Replicate Zoning Configuration task” (page 30)
“More Information task” (page 22)
Topology Map
“Topology Map task” (page 22)
HP 6G SAS Blade Switch
(VSM Passive)
More Information
“More Information task” (page 22)
Topology Map
“Topology Map task” (page 22)
Blade Ports
More Information
“More Information task” (page 22)
Topology Map
“Topology Map task” (page 22)
Create and Assign Zone
Group
“Create and Assign Zone Group task” (page 31)
Modify Zone Access
“Modify Zone Access task” (page 30)
A specific blade port
21
System component
Available tasks
Where documented
More Information
“More Information task” (page 22)
Topology Map
“Topology Map task” (page 22)
More Information task
To view detailed information about a device, select the device in the navigation tree and click
More Information.
Helpful hints:
•
The More Information task is available for each component in the navigation tree, in both the
Zoning and the Maintain tabs.
•
If status alerts exist for the device, they are included in the displayed information.
Topology Map task
To display an illustrated view of the solution, select any device in the navigation tree, and click
Topology Map. The topology map shows both physical and logical relationships between
components in the solution.
22
Cabling or zoning information when
component is selected
Component
Basic information
c-Class enclosure
Name
c-Class enclosure device bay port
Status (online, offline, or empty)
Assigned zone group, switch ports and
cabling path to the storage enclosure,
and, if expanded for zoned SAS
storage enclosures, individual drives
Zone group
Name and status (assigned or
unassigned status, and offline or
online)
Assigned zone group, switch ports and
cabling path to the storage enclosure,
and, if expanded for zoned SAS
storage enclosures, individual drives
Switch
c-Class interconnect bay and VSM
status (active or passive)
Switch ports and cabling path to the
storage enclosure
Switch port
Port number
Cabling path to the storage enclosure
External SAS storage enclosure
Enclosure model number
Assigned zone group, switch ports and
cabling path to the storage enclosure,
and, if expanded for zoned SAS
storage enclosures, individual drives
included in the zone group
Drives
Drive bay number and status (empty
or drive details)
Assigned zone group, switch ports and
cabling path to the storage enclosure,
and, if expanded for zoned SAS
storage enclosures, individual drives
included in the zone group
Tasks in the VSM Zoning tab
—
Helpful hints:
•
To activate shading to more clearly show device relationships, click a device in the map.
•
To see what types of drives are installed in external storage enclosures, click the Drives
drop-down arrow for that enclosure.
Create Zone Group task
Zone groups allocate resources for device load balancing purposes and for selectively allowing
access to data.
You can create the following types of zone groups:
•
Switch port zone groups—Group together one or more ports on the SAS BL Switch. Server
device bays assigned this type of zone group have access to the storage enclosures or tape
devices connected to the ports included in the zone. This type of zone group is for shared
SAS devices. The P2000 G3 SAS MSA and HP MSL2024, MSL4048, and MSL8096 Tape
Libraries and 1/8 G2 Tape Autoloader are examples of shared SAS devices. All LUNs in the
controller enclosure are accessible to the assigned servers, unless controlled through the storage
management utility for the controller enclosure and all tape drives in a tape device are
accessible to any server that has access to the zone group. For more information, see “Creating
switch-port zone groups” (page 23).
•
Drive-bay zone groups—Group together drive bays from one or more MDS600 drawers or
D2000 disk enclosures. Server device bays assigned this type of zone group have exclusive
access to the drive bays included in the zone group, as if the drives are directly connected to
those servers. This type of zone group is for zoned SAS storage enclosures. The MDS600 and
D2600/D2700 enclosures are examples of zoned SAS storage. For more information, see
“Creating drive-bay zone groups” (page 25). (For future use.)
Creating switch-port zone groups
To create switch-port zone groups, select Zone Groups in the navigation tree, and then click the
Create Zone Group task button.
Create Zone Group task
23
Select the following parameters:
Name
Type a name to assign to the zone group (must be unique, up to 16 characters,
with no spaces).
Zoning Mode
Select Switch Port.
Switch ports
In the grid representing the switches, select the ports to be included in the
zone group.
To select a switch port, click an available (white) port. (The port status is
automatically updated, changing the color from white to blue.) To clear a
selection, click the selected (blue) port. (The port status is automatically updated,
changing the color from blue to white).
•
White=Selectable—Not yet assigned to a zone group and can be added
to this zone group.
•
Blue=Selected—Selected in this session or already a member of this zone
group.
•
Gray=Not Selectable—Assigned to a different zone group or attached to
storage enclosures without port-based zoning capabilities. Can not be
selected.
Helpful hints:
24
•
To expand or contract the display for each switch, click the arrow at the far right of the display.
•
In addition to the mouse, the tab, arrow keys, and space bar can be used to select or clear
ports from the zone group.
•
Information about the switch port is included in the display. If the port is connected to a device,
information about the device is displayed. If a tape device is connected to a switch port,
information is shown only for the first tape drive.
•
In dual-domain switch environments, select ports on both switches, to provide access through
both switches in the pair.
•
Switch ports without attached storage enclosures can be assigned to a zone group. This allows
you to pre-configure the zone groups and connect additional storage enclosures at a later
time.
Tasks in the VSM Zoning tab
•
•
The following words may be displayed in the navigation tree by the zone group:
◦
Pending Save—until the configuration is saved.
◦
Unassigned—until a server device bay is granted access to the zone group.
To assign this zone group to a server device bay, select the server device bay in the navigation
tree and click Modify Zone Access. For more information, see “Modify Zone Access task”
(page 30)
Creating drive-bay zone groups
IMPORTANT:
The maximum supported number of drive bay zone groups is 104.
To create drive-bay zone groups, select Zone Groups in the navigation tree, and then click Create
Zone Group.
Select the following parameters:
Name
Type a name to assign to the zone group (must be unique, up to 16 characters,
with no spaces). HP recommends that the zone group name include the bay
number or name of the server that needs access the zone group. An effective
naming strategy will help manage the assignment of drive-bay zone groups to
servers.
Zoning Mode
Select Drive Bay.
Drive bays
In the grid representing the storage enclosures, select the disk drive bays to be
included in the zone group.
To select a drive bay, click an available (white) drive bay. (The bay status is
automatically updated, changing the color from white to blue.) To clear a
Create Zone Group task
25
selection, click the selected (blue) drive bay. (The bay status is automatically
updated, changing the color from blue to white).
•
White=Selectable—Not yet assigned to a zone group and can be added
to this zone group.
•
Blue=Selected—Selected in this session or already a member of this zone
group.
•
Gray=Not Selectable—Assigned to a different zone group or attached to
storage enclosures without port-based zoning capabilities. Can not be
selected.
Helpful hints:
•
To expand or contract the display for each storage enclosure, click the arrow at the far right
of the display.
•
In addition to the mouse, the tab, arrow keys, and space bar can be used to select or clear
drives from the zone group.
•
Information about the drive bay is shown in the display. For example, if the bay is populated
with a disk drive, information about the disk drive type is presented.
•
Empty drive bays can be assigned to a zone group. This allows you to set up zone groups
for the storage enclosures and populate the bays with disk drives at a later time.
•
A drive bay can belong to only one zone group.
•
When selecting drive bays to be included in a zone group, consider your plans for creating
logical units (LUNs) from those drives.
•
The following words may be displayed in the navigation tree by the zone group:
•
◦
Pending Save—until the configuration is saved.
◦
Unassigned—until a server device bay is granted access to the zone group.
To assign this zone group to a server device bay, select the blade port in the navigation tree
and click Modify Zone Access. For more information, see “Modify Zone Access task” (page 30)
Delete Zone Groups task
IMPORTANT: When using zoned SAS storage enclosures, before deleting a zone group, logical
units associated with disk drives in that zone group must be deleted. If a deleted zone group has
disk drives in bays that are configured as part of a logical unit, there may be I/O problems and
the controller may send error messages to the system logs about an illegal drive movement.
To delete one or more existing zone groups, select Zone Groups in the navigation tree, and then
click Delete Zone Groups. After a moment, all existing zone groups are displayed. Select the zone
groups to delete and then click OK.
After the zone group is deleted, the drive bays or ports associated with the deleted zone group
will be available for selection and inclusion in a different or new zone group.
Helpful hints
26
•
To delete ALL zone groups, use the Clear Configuration option. For more information, see
“Clear Configuration task” (page 28).
•
This task becomes visible only after one or more zone groups have been created.
Tasks in the VSM Zoning tab
Delete task
IMPORTANT: When using zoned SAS storage enclosures, before deleting a zone group, logical
units associated with disk drives in that zone group must be deleted. If a deleted zone group has
disk drives in bays that are configured as part of a logical unit, there may be I/O problems and
the controller may send error messages to the system logs about an illegal drive movement.
To delete an existing zone group, select a specific zone group to delete, and then click Delete.
After the zone group is deleted, the drive bays or ports associated with the deleted zone group
will be available for selection and inclusion in a different or new zone group.
Helpful hints
•
To delete ALL zone groups, use the Clear Configuration option. For more information, see
“Clear Configuration task” (page 28).
Modify task
IMPORTANT: When using zoned SAS storage enclosures, before deleting disk drives from a
zone group, logical units associated with disk drives in that zone group must be deleted. If the
zone group has disk drives in bays that are configured as part of a logical unit, there may be I/O
problems and the controller may send error messages to the system logs about an illegal drive
movement.
To make changes to an existing zone group, including changing the zone group name, and adding
or removing disk drives or ports, select a specific zone group in the navigation tree, and then click
Modify.
Available parameters:
Name
Type the new name for the zone group (must be unique, up to 16 characters, no
spaces).
Zoning Mode
Select Switch Port or Drive Bay to set the zoning mode.
Switch ports
Depending on the type of zone group, select the ports or drive bays to add or
remove them from the zone group. To add an item to the zone group, click an
available (white) item. (The status is automatically updated, changing the color
from white to blue.) To remove an item from the zone group, click the already
included (blue) item. (The status is automatically updated, changing the color
from blue to white).
nl
Drive bays
•
White=Selectable—Not yet assigned to a zone group and can be added to
this zone group.
•
Blue=Selected—Selected in this session or already a member of this zone
group.
•
Gray=Not Selectable—Assigned to a different zone group or attached to
storage enclosures without port-based zoning capabilities. Can not be
selected.
Helpful hints
•
To expand or contract the display, click the arrow at the far right of the display.
•
For zoned SAS storage enclosures, if populated drive bays are added to a zone group, they
are now available for configuration and use with the array configuration utility.
Delete task
27
Clear Configuration task
To delete all user-defined zone groups and server device bay assignments, select the active switch
in the navigation tree, and then click Clear Configuration.
IMPORTANT: If external SAS storage enclosures are connected, before clearing the configuration,
logical units associated with enclosures connected to the switch must be deleted. If a deleted zone
group has disk drives in bays that are configured as part of a logical unit, there may be I/O
problems and the controller may send error messages to the system logs about an illegal drive
movement.
Helpful hints:
•
To clear information about a single zone group, use the Delete option. For more information,
see “Delete task” (page 27).
Advanced Settings task
To enter these parameters, select the active switch in the navigation tree, and then click Advanced
Settings.
WARNING! Enable Multi-initiator Mode only after confirming that is it supported for use by the
storage enclosures in your solution. Enabling this mode when not supported by the devices may
result in undefined behavior.
Available parameters:
Multi-initiator
Mode
Port Splitting
Mode
28
Controls whether more than one BladeSystem device bay can be assigned the
same zone group.
•
Enabled—Allows a zone group to be assigned to multiple BladeSystem server
device bays. Multi-initiator mode should be enabled when shared SAS
storage enclosures, such as the P2000 G3 MSA are connected to the switch.
Enabling more than one initiator (server) to access the same storage enclosure
(zone group) is a key principle of the shared storage concept.
•
Disabled—(Default) Restricts a zone group to be assigned to only one
BladeSystem server device bay. Multi-initiator mode should be disabled when
zoned SAS storage enclosures, such as the MDS600 or D2600/D2700 are
connected to the switch. Permitting only one server to access the drives in a
zone group means that those drives will be treated as if they are directly
attached to that server.
Controls whether 6Gb SAS BL Switch ports can be divided into sub-ports.
•
Enabled—Allows a switch port to be divided into two or four separate
sub-ports. When combined with a special cable, port splitting allows you to
connect more tape devices to the switch.
•
Disabled—(Default)
Tasks in the VSM Zoning tab
Helpful hints:
•
In dual-domain switch configurations (two switches installed in the same interconnect bay row
of the HP BladeSystem c-Class enclosure), a change to these settings on the active management
switch is automatically propagated to the passive switch.
•
When a P2000 G3 SAS MSA storage enclosure, tape autoloader, or library is included in
the solution with MDS600 or D2600/D2700 storage enclosures:
◦
Multi-initiator mode should be enabled, so that multiple severs can be assigned the zone
group that includes the P2000 G3 SAS MSA or tape device.
◦
Use caution when assigning drive bay zone groups, to prevent them from being assigned
to more than one server.
◦
Consider enabling port-splitting mode, so that multiple tape devices can be connected to
a single switch port.
Split Port task
To divide a switch port into two or four sub-ports, expand the display for the switch in the navigation
tree, select a specific switch port, and then click Split Port.
IMPORTANT:
Port splitting is supported for use with tape devices only.
Available parameters:
Port Splitting
Mode
Controls how many sub-ports will be created from the switch port.
•
4 sub-ports, 1 phys each—(Default) The sub-ports are labeled A, B, C, and
D.
•
2 sub-ports, 2 phys each—The sub-ports are labeled A and B.
Helpful hints
•
Special cables are required when using this feature.
Merge Sub-Ports task
To merge a previously-split switch port from sub-ports back into a single port, expand the display
for the switch in the navigation tree, select a specific switch port, and then click Merge Sub-Ports.
A verification prompt is displayed, requiring confirmation for the action.
Create Single Port Zone Group task
To create a switch-port zone group that includes this one switch port only, expand the display for
the switch in the navigation tree, select a specific switch port, and then click Create Single Port
Zone Group.
Available parameters:
Name
Type a name to assign to the zone group (must be unique, up to 16 characters,
with no spaces).
Split Port task
29
Helpful hints
•
Switch ports without attached storage enclosures can be assigned to a zone group. This allows
you to pre-configure the zone groups and connect additional storage enclosures at a later
time.
•
The following words may be displayed in the navigation tree by the zone group:
◦
Pending Save—until the configuration is saved.
◦
Unassigned—until a server device bay is granted access to the zone group.
Replicate Zoning Configuration task
To rapidly replicate zoning configuration settings from a failed external SAS storage enclosure
onto its replacement, select the newly-installed replacement enclosure in the navigation tree, and
then click Replicate Zoning Configuration.
IMPORTANT:
enclosure.
The replacement storage enclosure must be the same model as the old, failed
Helpful hints
To replicate the configuration settings, do the following:
1. Disconnect the failed storage enclosure from the switch.
2. Connect the replacement storage enclosure to the switch. The replacement storage enclosure
must be the same model as the original one, with no existing zoning configuration information.
3. In the VSM, select the old-failed storage enclosure in the navigation tree, and then click
Replicate Zoning Configuration. The enclosure will be labelled as offline.
4. In the drop-down menu, select the replacement storage enclosure.
Modify Zone Access task
For each server device bay, to grant or remove access to a zone group, expand Blade Ports in
the navigation tree and select a specific server device bay. Then click Modify Zone Access. This
task is displayed only if zone groups have already been created (“Create Zone Group task”
(page 23).)
From the displayed list of zone groups, check or clear the zone groups that this server device bay
can access.
Helpful hints
•
•
•
30
The zone groups that are displayed will differ depending on the Multi-initiator mode setting:
◦
If Multi-initiator mode is Enabled, all zone groups are displayed, allowing multiple server
device bays to be assigned the same zone group (used for configurations that include
shared SAS storage enclosures or tape devices).
◦
If the multi-initiator mode is Disabled, only unassigned zone groups are displayed,
permitting a zone group to be assigned to only one server device bay. If a zone group
is already assigned to a different server device bay, it is not displayed.
The status of each zone group is included in the display:
◦
Assigned—Already assigned to one server device bay.
◦
Assigned Multiple—Already assigned to more than one server device bay.
◦
Unassigned—Not yet assigned to a server device bay.
In mixed environments that include zoned SAS storage enclosures and shared SAS storage
enclosures or tape devices, use the displayed status information and keep detailed records of
Tasks in the VSM Zoning tab
the drive-bay zone groups and their assignments. This will help prevent accidentally assigning
drive-bay zone groups to multiple servers or to servers that are not associated with the switch
ports used by the zone group.
•
In a c7000 BladeSystem enclosure, when using a full-height blade with the P711m/P712m
controller installed in mezzanine slot 3, the zone group must be assigned to the subsumed
server device bay to allow the server to access the storage.
•
Server device bays cannot access the zone group until assigned that zone group.
•
Until the configuration is saved, the words Pending Save are displayed in the navigation
tree next to the zone. After the configuration is saved, the word Assigned is displayed.
Create and Assign Zone Group task
Zone groups allocate resources for device load balancing purposes and for selectively allowing
access to data. By first selecting the c-Class enclosure Blade Port, this task allows you to select
perform the Create Zone Group and Modify Zone Access tasks in one step.
You can create the following types of zone groups:
•
Switch-port zone groups—Group together one or more ports on the SAS BL Switch. Server
device bays assigned this type of zone group have access to the storage enclosures or tape
devices connected to the ports included in the zone. This type of zone group is for shared
SAS devices. The P2000 G3 SAS MSA and HP MSL2024, MSL4048, and MSL8096 Tape
Libraries and 1/8 G2 Tape Autoloader are examples of shared SAS devices. All LUNs in the
controller enclosure are accessible to the assigned servers, unless controlled through the storage
management utility for the controller enclosure and all tape drives in a tape device are
accessible to any server that has access to the zone group. For more information, see “Creating
and assigning switch-port zone groups” (page 31).
•
Drive-bay zone groups—Group together drive bays from one or more MDS600 drawers or
D2000 disk enclosures. Server device bays assigned this type of zone group have exclusive
access to the drive bays included in the zone group, as if the drives are directly connected to
those servers. This type of zone group is for zoned SAS storage enclosures. The MDS600 and
D2600/D2700 enclosures are examples of zoned SAS storage. For more information, see
“Creating and assigning drive-bay zone groups” (page 33).
Creating and assigning switch-port zone groups
To create and assign a switch-port zone group, expand the display for the active switch in the
navigation tree, select a specific Blade Port, and then click the Create and Assign Zone Group task
button.
Select the following parameters:
Name
Type a name to assign to the zone group (must be unique, up to 16 characters,
with no spaces).
Zoning Mode
Select Switch Port.
Create and Assign Zone Group task
31
Switch ports
In the grid representing the switches, select the ports to be included in the
zone group.
To select a switch port, click an available (white) port. (The port status is
automatically updated, changing the color from white to blue.) To clear a
selection, click the selected (blue) port. (The port status is automatically updated,
changing the color from blue to white).
•
White=Selectable—Not yet assigned to a zone group and can be added
to this zone group.
•
Blue=Selected—Selected in this session or already a member of this zone
group.
•
Gray=Not Selectable—Assigned to a different zone group or attached to
storage enclosures without port-based zoning capabilities. Can not be
selected.
Helpful hints:
32
•
To expand or contract the display for each switch, click the arrow at the far right of the display.
•
In addition to the mouse, the tab, arrow keys, and space bar can be used to select or clear
ports from the zone group.
•
Information about the switch port is included in the display. If the port is connected to a device,
information about the device is displayed. If a tape device is connected to a switch port,
information is shown only for the first tape drive.
•
In dual-domain switch environments, select ports on both switches, to provide access through
both switches in the pair.
•
Switch ports without attached storage enclosures can be assigned to a zone group. This allows
you to pre-configure the zone groups and connect additional storage enclosures at a later
time.
•
The following words may be displayed in the navigation tree by the zone group:
◦
Pending Save—until the configuration is saved.
◦
Unassigned—until a server device bay is granted access to the zone group.
Tasks in the VSM Zoning tab
Creating and assigning drive-bay zone groups
IMPORTANT:
The maximum supported number of drive bay zone groups is 104.
To create drive-bay zone groups, expand the display for the active switch in the navigation tree,
select a specific Blade Port, and then click the Create and Assign Zone Group task button. .
Select the following parameters:
Name
Type a name to assign to the zone group (must be unique, up to 16 characters,
with no spaces). HP recommends that the zone group name include the bay
number or name of the server that needs access the zone group. An effective
naming strategy will help manage the assignment of drive-bay zone groups to
servers.
Zoning Mode
Select Drive Bay.
Drive bays
In the grid representing the storage enclosures, select the disk drive bays to be
included in the zone group.
To select a drive bay, click an available (white) drive bay. (The bay status is
automatically updated, changing the color from white to blue.) To clear a
selection, click the selected (blue) drive bay. (The bay status is automatically
updated, changing the color from blue to white).
•
White=Selectable—Not yet assigned to a zone group and can be added
to this zone group.
Create and Assign Zone Group task
33
•
Blue=Selected—Selected in this session or already a member of this zone
group.
•
Gray=Not Selectable—Assigned to a different zone group or attached to
storage enclosures without port-based zoning capabilities. Can not be
selected.
Helpful hints:
34
•
To expand or contract the display for each storage enclosure, click the arrow at the far right
of the display.
•
In addition to the mouse, the tab, arrow keys, and space bar can be used to select or clear
drives from the zone group.
•
Information about the drive bay is shown in the display. For example, if the bay is populated
with a disk drive, information about the disk drive type is presented.
•
Empty drive bays can be assigned to a zone group. This allows you to set up zone groups
for the storage enclosures and populate the bays with disk drives at a later time.
•
A drive bay can belong to only one zone group.
•
When selecting drive bays to be included in a zone group, consider your plans for creating
logical units (LUNs) from those drives.
•
The following words may be displayed in the navigation tree by the zone group:
◦
Pending Save—until the configuration is saved.
◦
Unassigned—until a server device bay is granted access to the zone group.
Tasks in the VSM Zoning tab
5 Tasks in the VSM Maintain tab
After selecting a device in the navigation tree, a task list for that device is displayed.
NOTE: If a task is listed, but cannot be selected, system status conditions are not acceptable for
that task to be performed. When this occurs, the cause is listed, so corrective action can be taken.
The following table lists the available tasks.
System component
Available tasks
HP 6Gb SAS Blade Switch Capture Configuration
(VSM Active)
Input Configuration
Where documented
“Capture Configuration task” (page 36)
“Input Configuration task” (page 36)
Update SAS Switch
Firmware
“Update SAS Switch Firmware task” (page 36)
Reset Hardware
“Reset Hardware task” (page 41)
Reset Software
“Reset Software task” (page 41)
Update Storage Enclosure “Update Storage Enclosure Firmware task” (page 41)
Firmware
Reset Storage Enclosure
“Reset Storage Enclosure task” (page 44)
Network Settings
“Network Settings task” (page 45)
SNMP Settings
“SNMP Settings task” (page 45)
SNMP Test Trap
“SNMP Test Trap task” (page 45)
Force VSM Active
“Force VSM Active task” (page 46)
VSM Event Log
“VSM Event Log task” (page 46)
Clear VSM Event Log
“Clear VSM Event Log task” (page 47)
Diagnostic Log
“Diagnostic Log task” (page 47)
More Information
Topology Map
Storage Enclosure
Unit ID Light
“Unit ID Light task” (page 47)
Replicate Zoning
Configuration
“Replicate Zoning Configuration task” (page 47)
Update Storage Enclosure “Update Storage Enclosure Firmware task” (page 41)
Firmware
Reset Storage Enclosure
“Reset Storage Enclosure task” (page 44)
More Information
Topology Map
HP 6Gb SAS Blade Switch More Information
(VSM Passive)
Topology Map
35
The following tasks are common to most components and not described in this section. For more
information about these tasks, refer to previous sections of this document:
Task
Documentation location
More Information
“More Information task” (page 22)
Topology Map
“Topology Map task” (page 22)
View Status Alerts
“System status information” (page 16)
Capture Configuration task
After initially configuring the switch or after making changes to an existing configuration, HP
strongly recommends backing up the configuration for safekeeping.
To capture the configuration, select the active switch in the navigation tree, and then click Capture
Configuration.
Available parameters:
Download
Select this option to open a Save as window to navigate to the desired directory on
the system in which to place the configuration file.
The default filename is capture.cfg.
Print
Select this option to open a separate internet browser window to save or print the
file using the browser's features.
Input Configuration task
To restore a previously saved configuration of a switch, select the active switch in the navigation
tree, and then click Input Configuration.
Available parameters:
Configuration file . . . Browse
Navigate to the location of the saved configuration file. The
default filename is capture.cfg.
Clear the existing configuration
Select this check-box to erase all existing configuration
before executing the input command settings before installing the settings from the saved
configuration file.
Update SAS Switch Firmware task
Firmware is pre-installed in the factory, but an updated, alternative, or preferred version may be
available. To install new firmware on the SAS BL Switch, consider the following:
•
“Prerequisites” (page 36)
•
“Obtaining new firmware” (page 37)
•
“Updating HP 6Gb SAS BL Switch firmware in single-domain deployments” (page 38)
•
“Updating HP 6Gb SAS BL Switch firmware in dual-domain deployments” (page 39)
Prerequisites
•
36
Before updating switch firmware:
◦
Schedule a time for the installation. Because firmware updates require that the switch be
restarted, firmware must be installed during a scheduled maintenance window.
◦
Review system requirements and other information in the firmware release notes, device
QuickSpecs, and other user documents.
Tasks in the VSM Maintain tab
•
◦
Back up the configuration for safekeeping.
◦
Refresh the VSM display to ensure displayed information is current.
After updating firmware:
◦
Check the status of all solution devices for unexpected issues and correct as needed.
IMPORTANT: When two SAS BL Switches are installed in the same interconnect bay row of a
BladeSystem c-Class enclosure, they must run the same firmware version.
Obtaining new firmware
Two types of firmware packages are available for download:
•
Smart Component—used when performing offline updates using the HP Smart Update Firmware
DVD ISO.
•
Image file—used with the VSM update process.
Firmware can be obtained from several HP websites, including:
•
HP BladeSystem Firmware Maintenance:
http://h18004.www1.hp.com/products/blades/components/c-class.html (Smart Components
only)
nl
This BladeSystem site provides tested, compatible sets of firmware for components included
in BladeSystem solutions and is designed to help manage firmware inter-dependencies between
HP BladeSystem c-Class components.
Select the Compatibility tab and use the provided table to view version information and
download firmware for individual components.
•
HP Support Download drivers and software:
http://www.hp.com/support/downloads (Smart Components and Image files)
nl
This Support site includes download pages for all HP products.
To locate the HP 6Gb SAS BL Switch page, select bladesystem>BladeSystem Interconnects>HP
6Gb SAS BL Switch.
•
HP Support: http://www.hp.com/support (Smart Components and Image files)
The Technical Support home page is the gateway to a variety of support strategies (for all HP
products), including driver, software, and firmware downloads, troubleshooting information,
support forums, support agreements, warranty information, and replacement parts.
After selecting your region and language, select Download drivers and software (and firmware)
and enter 6Gb SAS BL Switch in the provided box to navigate to the 6Gb SAS BL Switch
page.
Update SAS Switch Firmware task
37
NOTE:
In the HP Support websites:
◦
If you are not yet registered, click Register with the Business Support Center now to receive
email notifications about firmware or hardware, driver and support alerts, advisories,
and notifications. This alert notification system is a one-way broadcasting method to
distribute important notices about HP products.
◦
Before clicking the Download button, click the title in the Description column to access
important information about the update. Be sure to read information in the following tabs:
–
Click the Description tab for a brief overview about the download.
–
Click the Release Notes tab for detailed information about the download, including
version information, compatibility information, a summary of changes, important
notes, service considerations, and installation precautions.
Updating HP 6Gb SAS BL Switch firmware in single-domain deployments
The following describes updating HP 6Gb SAS BL Switch firmware using the VSM GUI. For
information about updating HP 6Gb SAS BL Switch firmware using the VSM CLI, see the HP 6G
Virtual SAS Manager User Guide. For information about using the Smart Update Firmware DVD
ISO, see the HP BladeSystem website:http://h18004.www1.hp.com/products/blades/components/
c-class.html.
IMPORTANT:
1.
2.
3.
4.
38
A service maintenance window must be opened when updating switch firmware.
Obtain the HP 6Gb SAS BL Switch firmware file from the HP Support Downloads page: http://
www.hp.com/support/downloads. Be sure to obtain the .img firmware file; Smart Component
firmware updating methods are not used when updating firmware using the VSM.
From the workstation with access to both the firmware file and the BladeSystem c-Class
enclosure, access the VSM for the switch.
Click the refresh icon to ensure that you are viewing the most recent status information. Correct
any issues before proceeding.
In the VSM, select the Maintain tab, and then click Update SAS Switch Firmware.
Tasks in the VSM Maintain tab
5.
6.
Click Browse and navigate to the location of the previously-obtained firmware file. When
downgrading to an older version of firmware than what is currently installed on the switch,
check Force Downgrade.
Click OK to begin the update.
IMPORTANT: Do not interfere with or cancel the flashing process. Interrupting the flashing
process may corrupt the firmware.
7.
8.
Wait for a completion message to display.
Open the maintenance window for restarting the switch:
a. Stop host traffic to all storage enclosures connected to the switch.
b. Power off all servers that map to this switch. For help ensuring that the correct served are
powered off, see mappings table for your c-Class enclosure model in “Device mappings”
(page 9) and in Onboard Administrator, expand the navigation tree for the SAS BL
Switch and then click Port Mapping. For the selected switch, the display shows each port
of the switch, the server blade it is mapped to, and the WWN of the P711m/P712m
mezzanine port.
9.
Restart the switch. From the VSM Maintain tab, select the switch that was just updated, and
then click Reset Hardware. When prompted, click OK.
During the reset process, you are automatically logged out of VSM.
10.
11.
12.
13.
Wait a few minutes for the switch to reset.
Clear all temporary Internet files from the browser cache.
Log back in to VSM and confirm that the firmware installed successfully with no issues.
Close the maintenance window:
a. Power on the server blades.
b. Resume I/O.
Updating HP 6Gb SAS BL Switch firmware in dual-domain deployments
The following describes updating HP 6Gb SAS BL Switch firmware using the VSM GUI. For
information about updating HP 6Gb SAS BL Switch firmware using the VSM CLI, see the HP 6G
Virtual SAS Manager User Guide. For information about using the Smart Update Firmware DVD
ISO, see the HP BladeSystem website:http://h18004.www1.hp.com/products/blades/components/
c-class.html.
IMPORTANT:
1.
2.
3.
4.
A service maintenance window must be opened when updating switch firmware.
Obtain the latest HP 6Gb SAS BL Switch firmware file from the HP Support Downloads page:
http://www.hp.com/support/downloads. Be sure to obtain the .img firmware file; Smart
Component firmware updating methods are not used when updating firmware using the VSM.
From the workstation with access to both the firmware file and the BladeSystem c-Class
enclosure, access the VSM for the switch.
Click the refresh icon to ensure that you are viewing the most recent status information and
correct any issues before proceeding.
In the VSM, select the Maintain tab, and then click Update SAS Switch Firmware.
Update SAS Switch Firmware task
39
5.
Click Browse and navigate to the location of the previously-obtained firmware file.
•
When downgrading to a version of firmware that is older than what is currently installed
on the switch, select Force Downgrade.
•
To update paired switches at the same time, select Update both Active and Passive
switches.
NOTE: By default, the Update both Active and Passive switches is selected. HP strongly
recommends accepting this default, so that the chance of a firmware mis-match is reduced.
6.
Click OK to begin the update.
IMPORTANT: Do not interfere with or cancel the flashing process. Interrupting the flashing
process may corrupt the firmware.
7.
8.
Wait for a completion message to display.
Open the maintenance window for restarting the switches:
a. Stop host traffic to all storage enclosures connected to the switches.
b. Power off all servers that map to these switches. For help ensuring that the correct served
are powered off, see mappings table for your c-Class enclosure model in “Device
mappings” (page 9) and in Onboard Administrator, expand the navigation tree for the
SAS BL Switch and then click Port Mapping. For the selected switch, the display shows
each port of the switch, the server blade it is mapped to, and the WWN of the
P711m/P712m mezzanine port.
9.
Restart the switches. From the VSM Maintain tab, select the active switch that was just updated,
and then click Reset Hardware. Select Both switches at the same time. When prompted, click
OK.
IMPORTANT: Reset both switches at the same time only when a system maintenance window
is open and all system traffic is halted.
During the reset process, you are automatically logged out of VSM.
10. Wait a few minutes for the switch to reset.
40
Tasks in the VSM Maintain tab
11. Clear all temporary Internet files from the browser cache.
12. Log back in to VSM and confirm that the firmware installed successfully with no issues.
13. If Update both Active and Passive switches was not selected, repeat steps 2–12 to update
firmware and then reset the additional switch
14. Close the maintenance window:
a. Power on the server blades.
b. Resume I/O.
Reset Hardware task
IMPORTANT: This task disrupts host I/O to the storage enclosures. Open a maintenance window
before resetting devices.
To restart the switch, expand the display for the active switch in the navigation tree. Click Reset
Hardware.
Available parameters:
Local switch only
(Default) Restarts the selected switch.
Both switches at the same time
Restarts the paired switches.
IMPORTANT: Reset both switches at the same time only
when a system maintenance window is open and all system
traffic is halted.
Helpful hints
•
This task is required after updating switch firmware.
•
Before resetting a switch, make sure that all I/O to the switch is halted, and, if possible, power
down all hosts that map to the switch, restarting them after the switch completes the reset.
•
During the reset process, you are automatically logged out of VSM.
•
After resetting the switch, clear the browser cache.
Reset Software task
To restart the VSM software utility, expand the display for the active switch in the navigation tree,
and then click Reset Software.
Helpful hints
•
This task is required when updating switch network settings.
Update Storage Enclosure Firmware task
Use this task to install new firmware on MDS600 or D2600/D2700 storage enclosures that are
directly connected to the SAS BL Switch. Firmware is pre-installed in the factory, but an updated,
alternative, or preferred version may be available.
In dual-domain deployments, if the secondary I/O module is cabled to the second switch in the
BladeSystem c-Class interconnect bay row, the primary I/O module is updated first, and then
replicated to the additional I/O modules in the enclosure.
After selecting this task, the currently-installed firmware version of each external storage enclosure
connected to the SAS BL Switch is displayed.
Reset Hardware task
41
NOTE:
If the Update Storage Enclosures task is not selectable, consider the following:
•
Only supported storage enclosures can be updated.
•
All server blades that map to the storage enclosure must be powered off.
•
If the switch status is a value other than Active or Not Redundant, firmware updates are not
allowed.
•
If the VSM GUI or VSM CLI is already processing a firmware update on a switch or storage
enclosure, this task request cannot be processed.
Prerequisites
•
•
Before updating storage enclosure firmware:
◦
Schedule a time for the installation. Because firmware updates require that the storage
enclosure be restarted, firmware must be installed during a maintenance window.
◦
Review system requirements and other information in the firmware release notes, device
QuickSpecs, and other user documents.
◦
Refresh the display in the VSM GUI or issue the rescan command in the VSM CLI, to
ensure displayed information is up-to-date. Correct any issues.
After updating firmware:
◦
Check the status of the all solution devices for unexpected issues. Correct any issues.
Obtaining new firmware
1.
2.
From a workstation with access to the Internet, go to the Hewlett Packard Technical Support
website http://www.hp.com/support.
Select your region and language and navigate to the page for the device.
NOTE: If you are not yet registered, click Register with the Business Support Center now to
receive email notifications about firmware or hardware, driver and support alerts, advisories,
and notifications. This alert notification system is a one-way broadcasting method used to
distribute important notices about HP devices.
3.
4.
5.
Click Download drivers and software and select your product from the displayed list.
Select your language and operating system.
Before clicking the Download button, click the title in the Description column to access important
information about the update. Be sure to read information in the following tabs:
•
Click the Description tab for a brief overview about the download.
•
Click the Release Notes tab for detailed information about the download, including version
information, compatibility information, a summary of changes, important notes, service
considerations, and installation precautions.
NOTE: Firmware files are provided in both Smart Component and Image file formats; but
the Image file format must be used when the storage enclosures is connected to a BladeSystem
solution.
6.
42
After reviewing available information about the update, click Download and follow the
on-screen instructions to save the download bundle to a temporary directory on the server.
Tasks in the VSM Maintain tab
Procedures
1.
2.
3.
Obtain the latest firmware files and save to a temporary location on the host that has network
access to the device you want to update. For more information, see “Obtaining new firmware”
(page 42).
Open the maintenance window for the update:
a. Stop host traffic to the storage enclosures being updated.
b. Power off all servers with access to the storage enclosures.
From the workstation with access to both the firmware file and the BladeSystem c-Class
enclosure, access the VSM.
NOTE: Click the refresh icon to ensure that you are viewing the most recent status information.
Correct any issues before proceeding.
4.
In VSM, select the Maintain tab, and then select either the active switch or the storage enclosure
to update. Then, click Update Storage Enclosure Firmware.
5.
6.
7.
Expand the Reset enclosures after update drop-down box and select an option.
Click Browse and navigate to the location of the previously-obtained firmware file.
If different types of storage enclosures are connected to the switch, expand the Enclosure
product type drop-down box and select an option.
8. In the Storage Enclosure section near the bottom of the display, check each enclosure to
update.
9. Click OK to begin the update.
10. Wait for a completion message to display.
IMPORTANT: Do not interfere with or cancel the flashing process. Interrupting the flashing
process may corrupt the firmware. This process may take up to 15 minutes.
11. If Reset enclosures after update was not selected, reset the storage enclosures now. From the
VSM Maintain tab, select the enclosure that was just updated, and then click Reset Storage
Enclosure. For more information, see “Reset Storage Enclosure task” (page 44).
12. Wait a few minutes for the storage enclosures to reset.
Update Storage Enclosure Firmware task
43
13. Clear all temporary Internet files from the browser cache. For example, in Microsoft Internet
Explorer 6, select Tools>Internet Options. In the Temporary Internet files section of the window,
click Delete Files....
14. Log back in to VSM and confirm that the firmware installed successfully with no issues.
15. Close the maintenance window:
a. Power on the server blades.
b. Resume I/O.
NOTE: In single-domain configurations with two switches installed in the same interconnect bay
row of the BladeSystem c-Class enclosure, if storage enclosures connected to the passive switch
are not updated at the same time as the storage enclosures connected to the active switch, log out
of the VSM of the active switch. Log into the VSM of the passive switch and use the outlined
procedures to update the storage enclosures connected to the passive switch.
Reset Storage Enclosure task
Use this option to restart one or more storage enclosures connected to the switch.
NOTE:
If the Reset Storage Enclosure task can not be selected, consider the following:
•
Storage enclosure model—Only supported storage enclosures can be reset.
•
Switch status—If the status is a value other than Active or Not Redundant, resetting the storage
enclosures is not allowed. Also, if the switch is in the process of a firmware update, that
process must complete and the switch return to an operational state before any storage
enclosures can be reset.
•
Server blade status—All server blades in the c-Class enclosure with access to this storage
enclosure must be powered off to perform this task.
1.
Open a maintenance window:
a. Stop host traffic to the storage enclosures being updated.
b. Power off all servers with access to the storage enclosures.
2.
Access the VSM.
NOTE: Click the refresh icon to ensure that you are viewing the most recent status information.
Correct any issues before proceeding.
3.
4.
5.
6.
7.
8.
44
Select the Maintain tab, and then select either the active switch or the storage enclosure to
update. Then, click Reset Storage Enclosure Firmware.
In the Storage Enclosure section near the bottom of the display, check each enclosure to
update.
Click OK.
Wait a few minutes for the storage enclosures to reset.
Log back in to VSM and confirm that the firmware installed successfully with no issues.
Close the maintenance window:
a. Power on the server blades.
b. Resume I/O.
Tasks in the VSM Maintain tab
Helpful hints
•
Before resetting a storage enclosure, make sure that all I/O to the storage enclosure is halted.
Power down all hosts with access to the storage enclosure and restart them after the reset is
completed.
•
This task is required after updating storage enclosure firmware.
•
After the reset is complete, click the refresh icon to ensure that you are viewing the most recent
status information. Confirm that the status of the storage enclosure is acceptable. Correct any
issues as needed.
Network Settings task
To enter or modify information about the external network, select the active switch in the navigation
tree, and then click Network Settings.
Available parameters:
Host Name
16 character user-defined name for the switch. Can be any combination of
numbers, letters, or special characters, but can not include spaces. In OA, this
is referred to as the User Assigned Name of the switch.
IP
Configuration
Internet Protocol (IP) address configuration options include:
•
DHCP – Automatic—The switch is assigned an IP address automatically from
a Dynamic Host Configuration Protocol (DHCP) server on the network.
•
Manual—The IP address must be assigned manually.
NOTE: When the Manual option is selected, the display changes and
fields are provided for entering the IP Address, Subnet Mask, Gateway,
Primary DNS Server, and Secondary DNS server.
SNMP Settings task
To enable, disable, and configure SNMP alerts, select the active switch in the navigation tree, and
then click SNMP Settings.
Available parameters:
Disabled
Do not allow SNMP alerts.
Enabled
(Default) Allow SNMP alerts.
When Enabled, the fields are provided for entering the System Location, System
Contact, Read Community, and Alert Community information.
SNMP Test Trap task
To test connectivity to the SNMP server, select the active switch in the navigation tree, and then
click SNMP Test Trap.
NOTE: This task is enabled only when SNMP service is enabled. For more information, see
“SNMP Settings task” (page 45).
Network Settings task
45
Force VSM Active task
To force a switch to be the active switch from which configuration changes can be entered, select
the switch in the navigation tree, and then click Force VSM Active.
•
In dual-switch configurations, this changes the switch status to VSM Active.
•
In single-switch configurations, this changes the switch status to Not Redundant.
Helpful hints:
•
Switch status must be one of the following to use this feature: Mismatch, VSM Passive, or Not
Configured.
•
Firmware on both switches must be the same version.
VSM Event Log task
To view a log of switch and connected storage enclosure events, select the active switch in the
navigation tree, and then click VSM System Log.
The event log contains details of events, including hardware changes, user login activity, and CLI
output (for example, the output of the flashing operation.)
Entries are recorded for switch and storage enclosure events.
Device
Examples of logged events
6Gb SAS BL Switch
Firmware updates, hardware resets, redundancy and other status
changes
MDS600 and D2600/D2700 storage enclosures Enclosure additions and removals, firmware updates, hardware
resets, drive additions and removals, fan, power supply, I/O
module, and other component status changes and warnings, and
environmental status changes
P2000 G3 SAS MSA storage enclosures
46
Tasks in the VSM Maintain tab
Enclosure additions and removals
Available parameters:
Download
Select this option to open a Save as window to navigate to the desired directory
on the host system in which to place the event log file.
NOTE:
Print
The default filename is eventlog.zip.
Select this option to open a separate internet browser window to save or print
the file using the browser's features.
Clear VSM Event Log task
To erase all entries in the current event log for the active switch, select the active switch in the
navigation tree, and then click Clear VSM Event Log. The event log contains details of events that
have happened, including hardware changes in the switch or in storage enclosures, user login
activity, and CLI output (for example, the output of the flashing operation.)
Diagnostic Log task
To create a .zip file that contains a detailed diagnostic log for the selected switch, select the active
switch in the navigation tree, and then click Diagnostic Log. The diagnostic log is a collection of
files that technicians and HP service personnel can use to diagnose issues.
NOTE:
The default filename is diagslog.zip.
The following information is included an a diagnostic log:
•
The event log
•
Topology information
•
System information
•
SAS routing tables
•
Storage enclosure troubleshooting information (switch port, storage enclosure, time, event,
description)
Unit ID Light task
To turn on or off the storage enclosure Unit ID (UID) light, select the storage enclosure in the
navigation tree, and then click Unit ID Light.
Available parameters:
Light
Expand the drop-down box and select one of the following options:
•
On
•
Off
Replicate Zoning Configuration task
To replicate zoning configuration settings from an old, failed external SAS storage enclosure onto
its replacement, select the newly-installed replacement enclosure in the navigation tree, and then
click Replicate Zoning Configuration.
This task is also available in the Zoning tab.
IMPORTANT:
enclosure.
The replacement storage enclosure must be the same model as the old, failed
Clear VSM Event Log task
47
Helpful hints
To replicate the configuration settings, do the following:
1. Disconnect the failed storage enclosure from the switch.
2. Connect the replacement storage enclosure to the switch. The replacement storage enclosure
must be the same model as the original one, with no existing zoning configuration information.
3. In the VSM, select the old-failed storage enclosure in the navigation tree, and then click
Replicate Zoning Configuration. The enclosure will be labelled as offline.
4. In the drop-down menu, select the replacement storage enclosure.
48
Tasks in the VSM Maintain tab
6 Troubleshooting
Moving zone groups
In some circumstances you may need to move zone groups from one server (origin) to a different
server (destination). For example:
•
Server or other device failure requiring movement of zone groups to a different server
•
Server profile move
Moving zone groups—zoned SAS storage enclosures
When using zoned SAS storage enclosures, do the following to move zone groups from one server
(original server device bay) to a different server (destination server device bay):
1. Open Virtual SAS Manager (VSM).
2. Identify all zone group assignments for the original server device bay.
a. In the navigation tree, select the original server device bay and click Modify Zone Access.
b.
3.
4.
5.
Zone groups assigned to the server device bay are displayed, indicated with a check.
•
All available, unassigned zone groups are displayed, but without a check.
Record the names of all zone groups assigned to the original server device bay (zone
groups with checks).
Stop all I/O associated with those zone groups and servers. Then, power off all of the
associated servers.
In the VSM navigation tree, select the original server device bay and click Modify Zone Access.
Clear the check next to each zone group to remove access to the zone group. Click Save
Changes when done.
Assign the zone groups to the destination server device bay.
a. In the navigation tree, select the destination server device bay and click Modify Zone
Access.
b.
6.
7.
•
•
If the server device bay has any zone groups assigned, they are displayed.
•
In addition, all available, unassigned zone groups are displayed, including the zone
groups made available in step 2.
Check each zone group that needs to be assigned to this destination server device bay.
Click Save Changes when done.
Power on each server and resume I/O.
Capture the configuration for safekeeping. (Strongly recommended)
Moving zone groups
49
Moving zone groups—shared SAS storage enclosures
When using shared SAS storage enclosures, do the following to move zone groups from one server
(original server device bay) to a different server (destination server device bay):
1. Open Virtual SAS Manager (VSM).
2. Identify all zone group assignments for the original server device bay.
a. In the navigation tree, select the original server device bay and click Modify Zone Access.
b.
3.
5.
6.
7.
50
•
All available, unassigned zone groups are displayed, but without a check.
Record the names of all zone groups assigned to the original server device bay (zone
groups with checks).
•
Zone groups assigned to that server device bay are displayed, indicated with a
check.
•
All available, unassigned zone groups are displayed, but without a check.
Record the names of all zone groups assigned to the destination server device bay (zone
groups with checks).
Determine if further action is needed.
•
If the destination server device bay is already assigned access to the zone groups identified
in step 2, no changes are necessary.
•
If the destination server device bay is not assigned access to the zone groups identified
in step 2, proceed to step 5.
Stop all I/O associated with those zone groups and servers. Then, power off all of the
associated servers.
In the VSM navigation tree, select the original server device bay and click Modify Zone Access.
Clear the check next to each zone group to remove access to the zone group. Click Save
Changes when done.
Assign the zone groups to the destination server device bay.
a. In the navigation tree, select the destination server device bay and click Modify Zone
Access.
b.
8.
9.
Zone groups assigned to that server device bay are displayed, indicated with a
check.
Determine if the destination server device bay already has access to the same zone groups
as the original server device bay.
a. In the navigation tree, select the destination server device bay and click Modify Zone
Access.
b.
4.
•
•
If the server device bay has any zone groups assigned, they are displayed.
•
In addition, all available, unassigned zone groups are displayed, including the zone
groups made available in step 2.
Check each zone group that needs to be assigned to this server device bay. Click Save
Changes when done.
Power on each server and resume I/O.
Capture the configuration for safekeeping. (Strongly recommended)
Troubleshooting
Part III VSM CLI
Contents
7 Getting started.........................................................................................53
Accessing the VSM CLI............................................................................................................53
Command syntax....................................................................................................................55
Example command............................................................................................................55
Target overview.................................................................................................................55
Command listing...............................................................................................................56
Parameter overview............................................................................................................57
Executing commands..............................................................................................................58
Keyboard shortcuts and keyword abbreviations......................................................................58
8 Getting help............................................................................................59
The help command.................................................................................................................59
The show command................................................................................................................60
9 Performing common tasks..........................................................................62
Enabling or disabling multi-initiator mode and port splitting.........................................................63
Creating zone groups.............................................................................................................64
Creating a switch-port zone group.......................................................................................65
Creating a drive-bay zone group.........................................................................................67
Assigning a zone group to a server device bay..........................................................................69
Capturing the configuration.....................................................................................................71
Inputting or restoring the configuration.......................................................................................72
Flashing switch firmware..........................................................................................................73
Flashing storage enclosure firmware..........................................................................................75
Resetting the VSM software, the switch or attached storage enclosures...........................................76
10 Creating and executing CLI scripts............................................................77
52
Contents
7 Getting started
The VSM Command Line Interface (CLI) is an interactive command console that provides instant
feedback and is functionally equivalent to the VSM graphical user interface (GUI).
Commands are entered at a command prompt (=>) and must follow a specific, preset syntax. After
a command is entered and executed, the returned results are instantly displayed on the CLI console.
NOTE: If a command is entered, but status conditions are not acceptable for that task to be
performed, the cause is returned in the error message display, so corrective action can be taken.
Accessing the VSM CLI
A Secure Shell (SSH) connection provides secure access to the VSM CLI over a network, because
data transmitted through SSH is encrypted. Before using SSH, you must download and install an
SSH connection utility.
NOTE:
utility.
1.
The following procedure demonstrates accessing the VSM CLI using the PuTTY connection
Obtain and record the switch IP address for VSM CLI access.
Try one of the following methods to obtain the switch VSM CLI IP address:
•
The VSM CLI IP address may be recorded on worksheets provided with your system
installation instructions.
•
The VSM CLI IP address is displayed in the VSM GUI.
From a server or workstation with access to the system, open your web browser and enter
the OA IP address or hostname followed by the interconnect variable.
For example: https://10.10.1.2/interconnectX/
Where 10.10.1.2 represents the OA IP address and X specifies the enclosure interconnect
bay number of the switch. In the VSM GUI, the VSM CLI IP address is displayed at the
far-right side of the VSM page banner, in the SSH/SNMP Address: XXX.XXX.XXX.XXX,
where XXX.XXX.XXX.XXX is the VSM CLI IP address.
•
Access the webpage ipaddr.htm to display the VSM CLI IP address.
From a server or workstation with access to the system, open your web browser and enter
the OA IP address or hostname followed by the interconnect variable and ipaddr.htm.
For example: https://10.10.1.2/interconnectX/ipaddr.htm
Where 10.10.1.2 represents the OA IP address, X specifies the enclosure interconnect
bay number of the switch, and ipaddr.htm is the name of the program. The VSM CLI
access IP address for the switch is displayed.
2.
If necessary, install an SSH connection utility.
Accessing the VSM CLI
53
3.
Launch an SSH utility on a PC that can access the same LAN as the BladeSystem c-Class
enclosure. The following example illustrates using the PuTTY utility.
a.
b.
c.
4.
Enter the VSM CLI IP addresses in the Host Name (or IP address) field.
Verify that the SSH radio button is selected.
Click Open. The SSH shell opens.
When prompted, enter an OA username and password with administrative privileges.
After a successful log in, the HP Virtual SAS Manager CLI banner is displayed, with firmware
version information included in the display. The VSM CLI prompt is displayed and ready for
input.
The following example shows the display after initially accessing the VSM CLI. In this example,
the OA username is “Administrator”.
login as: Administrator
[email protected]'s password:
HP 6G Virtual SAS Manager CLI 2.0.1.0 (Switch 5, Active OK)
Rescanning — this may take a few minutes ...
Rescan complete
=>
54
Getting started
Command syntax
A typical VSM CLI command string consists of three variables: a target device, a command, and
one or more clarifying parameters. The syntax of a VSM CLI command line is as follows:
<TARGET> command [parameter=OPTION_A|OPTION_B] [parameter]
The following conventions apply to all VSM CLI command strings:
•
A basic command string includes identifying information about the target, along with a
command word and clarifying parameters, if required or desired.
•
Commands are not case sensitive.
•
Some target names can be abbreviated.
•
The VSM CLI does not support line-continuation characters. If all characters of a command
cannot fit on one line of the VSM CLI, the command wraps to the next line on the screen. The
maximum command length is 255 characters.
Example command
The following example shows the use of target, command, and parameter variables in a VSM CLI
command string to update network settings on a switch:
switch location=local network hostname=XXX dhcp=off
[ipaddr=XXX.XXX.XXX.XXX] [subnetmask=XXX.XXX.XXX.XXX]
[gateway=XXX.XXX.XXX.XXX]
Target:
switch location=local
Command:
network
Required parameter:
hostname=XXX
Required parameter:
dhcp=<OFF|ON>
Optional parameter:
ipaddr=XXX.XXX.XXX.XXX
Optional parameter:
subnetmask=XXX.XXX.XXX.XXX
Optional parameter:
gateway=XXX.XXX.XXX.XXX
Target overview
The target variable provides the path to the device you want to configure. The device can be a
c-Class BladeSystem enclosure, an enclosure device bay, an enclosure interconnect bay, an external
storage enclosure, or a zone group.
Syntax for the target portion of a command is as follows:
Device
Target syntax
Supported parameters
bladeenclosure
location
<all|local>
bladeenclosure
chassisname
<chassis_name>
bladeenclosure
serial number
<serial_number>
Device bay in a BladeSystem enclosure
bladeport id
<all|#>
Switch in a BladeSystem enclosure
switch location
<all|#|local|remote|wwid>
switch enclosureid
<wwid>
port id
<all|#>
c-Class BladeSystem enclosure
Switch port
Command syntax
55
Device
Target syntax
Supported parameters
External storage enclosure connected to a
SAS switch blade
storageenclosure
portbox
<all|##:##>
storageenclosure
enclosureid
<all|#>
Storage enclosure drive bay (must be
storageenclosurebay
preceeded by a blade enclosure or switch portboxbay
target)
<all|##:##>
Zone group (must be preceeded by a blade zonegroup name
enclosure or switch target)
<all|#>
Example target entries in a command string:
=> bladeenclosure chassisname=ABC
=> bladeport id=6
=> switch location=local
=> storageenclosure portbox=51:1
Command listing
The command variable instructs the system to perform a task. The following commands are
supported:
56
Command syntax
Command description
add
Add an entry to an existing configuration element.
advance
Enable or disable advanced settings, such as the multi-initiator mode and
port-splitting.
capture
Back up the switch configuration for safekeeping.
clear
Clear the current zoning configuration.
clearsnmp
Clear all SNMP parameters and disable SNMP services.
clearupdate
Discard configuration changes made by commands entered since the last
startupdate command.
clearvsmeventlog
Clear all entries in the VSM event log.
create
Create new configuration elements.
delete
Remove configuration elements.
diagnosticlog
Create a zip file with detailed diagnostic logs for the switch.
diags
Run diagnostic tests on the system.
flash
Update switch or storage enclosure firmware.
forceactive
Force the switch to active (from passive)
help
Display all supported VSM CLI commands or a detailed description of a specified
command.
input
Restore a previously backed up configuration on the switch.
merge
Merge a previously-split switch port from sub-ports back into a single port.
modify
Update configuration elements.
network
Enter network settings.
Getting started
Command syntax
Command description
replicate
Replicate zoning configuration settings from an old, failed external SAS storage
enclosure onto its newly-connected replacement.
rescan
Update system status.
reset
Restart the switch VSM software. This command is used after flashing firmware (on
switches or attached storage enclosures) or updating network settings.
retrysave
Retry the saveupdate command.
saveupdate
Process (commit) all commands entered since the last startupdate command.
shorthand
Display available keyword abbreviations.
show
Display detailed information about a configuration element or all configuration
elements in a table.
showadvance
Display advanced settings, such as the multi-initiator mode.
shownetwork
Display current network settings.
showsnmp
Display current SNMP settings.
showsyslog
Displays the system log.
snmp
Update SNMP settings.
split
Split ports on the 6Gb SAS BL Switch into multiple sub-ports.
startupdate
Initialize the execution process for transaction-based commands.
testtrap
Generate a test SNMP trap.
vsmeventlog
Create a zip file with a summary log of events for the switch.
For more information about the syntax or how to use these commands, use the VSM CLI help
command. For more information about the help command, “The help command” (page 59).
Parameter overview
Most commands require a parameter to clarify the action. Some parameters are optional and, if
not entered for a command, the default value is used.
The specific parameters and values that are valid for a given command depend on the target to
which you apply the command. To determine the valid parameters for a particular command, use
the help command. For more information about the help command, see “The help command”
(page 59).
Command syntax
57
Executing commands
Configuration changes are made on a transaction basis. To prevent conflict with another
administrator making changes through a different VSM GUI or CLI session, you must indicate when
you are starting, saving, or clearing your changes by using the following commands:
<TARGET> startupdate
<TARGET> saveupdate
<TARGET> clearupdate
•
Before entering add, create, delete, or modify commands, enter startupdate to start
the transaction.
•
After entering the add, create, delete, or modify commands, enter saveupdate to
commit the transaction.
Keyboard shortcuts and keyword abbreviations
When using the VSM CLI, the following keystrokes have special functions:
Keyboard key
Arrow key
Function
Ctrl+B
Left arrow
Moves the cursor back one character
Ctrl+F
Right arrow
Moves the cursor forward one character
Ctrl+P
Up arrow
Recalls the previous command in the command
buffer
Commonly used keywords in the VSM CLI have acceptable abbreviations:
58
Keyword
Abbreviation
bladeport
bp
bladeenclosure
be
chassisname
ch
enclosureid
eid
location
loc
serialnumber
sn
storageenclosure
se
storageenclosurebay
seb
switch
sw
zonegroup
zg
hardware
hard
software
soft
Getting started
8 Getting help
The help and the show commands provide detailed information about system devices and how
to use VSM CLI commands to perform configuration tasks.
The help command
The help command displays information about a VSM CLI command, including a definition,
required syntax, available parameters, the number of characters for a command option value, or
a list of allowed/disallowed characters. If help is followed by a command or a command with
parameters, the display is limited to information about that specific command.
Syntax
help [command] [parameter]
Example: The following example displays the results when help is entered with the create
command.
=> help create
The following documentation pertains to your search:
Syntax:
TARGET create type=zg name=NAME [seb=PORT:BOX:BAY] [switchport=PORT]
The create command is used to create a zone group. Using the create command
with the local switch as target creates an unassigned zone group, while
using the blade port target will assign the zone group to the blade port
target.
The type parameter specifies the device type that is being created. Zone
group is the only device type supported in this release.
You may only specify either the storageenclosurebays or the switchport
parameter when creating a zone group. Please consult the product
documentation to determine what type of zoning your storage enclosures
support.
The storageenclosurebays (seb) parameter specifies the physical drives to be
used for creating a bay based zonegroup.
The switchport parameter specifies the ports to be used for creating a port
based zonegroup.
Multiple storage enclosure bays or switchports can be specified by using a
comma to separate them. Enter '?' as the parameter value to query all
possible values.
The target must be a switch or blade port and the redundancy state of the
switch must be active or not redundant.
Examples:
switch location=local create type=zg name=BladeBayZone1
seb=41:2:22,41:2:23,41:2:24
switch loc=local create type=zg name=BladyBayZone2 seb=51:1:1-51:1:35
switch loc=local create type=zg name=BladeSwitchPortZone1 switchport=31
switch loc=local create type=zg name=BayZone1 seb=?
bladeport id=1 create type=zg name=Zonegroup1 seb=71:1:1-71:1:4 (Zonegroup1
is created and assigned to blade port 1)
The help command
59
The show command
The show command displays information about a device. Use this command to view the current
status of a device and its configuration.
Syntax
<TARGET> show [config] [detail]
Parameters
config
Forces the display to include configuration information about the
specified target device.
detail
Forces a more detailed display, including information for other items
such as zone groups.
Example 1: The following example displays the results of the show command for a blade enclosure.
=> bladeenclosure local show
Blade Enclosure at R20_top
Rack Name: R20
Version: 1.00
Blade Bay Count: 16
Fan Bay Count: 10
Power Supply Bay Count: 6
Thermal Sensor Count: 3
Interconnect Bay Count: 8
OA Bay Count: 2
Serial Number: USE104690F
Status: OK
Example 2: The following example displays the results of the show command for a blade enclosure
device bay.
=> bladeport id=1 show
Blade Enclosure at R20_top
Blade Port: 1 (ProLiant BL460c G6)
Zone Groups: Ports_1
Blade: ProLiant BL460c G6(SN: MXQ93100UL)
Type: Server Blade
Manufacturer: HP
Part Number: 507784-B21
Serial Number: MXQ93100UL
ROM Version: I24 06/20/2009
CPU Count: 2
Memory [MB]: 6144
NIC Count: 5
Power: On
60
Getting help
Example 3: The following example displays the results of the show command for an HP BladeSystem
enclosure when the config parameter is specified.
=> bladeenclosure location=local show config
Blade Enclosure at R20_top
(SN: USE104690F)
Switch in Interconnect Bay: 5
Management Software Version: 2.0.1.0
Location: Local
Enclosure Logical ID: 500143801018C420
Zone Manager State: Ready
Redundancy State: VSM Active
Reset Needed after flash: No
SEP Flash deferred: No
Overall Status: OK
UID LED: OFF
Switch in Interconnect Bay: 6
Location: Remote
Enclosure Logical ID: 500143801018C378
Zone Manager State: Ready
Redundancy State: VSM Passive
Overall Status: OK
Blade Port: 1 (ProLiant BL460c G6)
Device Bay: 1
Mezzanine Slot: 2
Zone Groups: Ports_1
Blade Port: 2 (Not Connected)
Blade Port: 3 (Not Connected)
Blade Port: 4 (Not Connected)
Blade Port: 5 (Not Connected)
Blade Port: 6 (Not Connected)
Blade Port: 7 (Not Connected)
Blade Port: 8 (Not Connected)
Blade Port: 9 (Not Connected)
Blade Port: 10 (Not Connected)
Blade Port: 11 (Not Connected)
Blade Port: 12 (Not Connected)
Blade Port: 13 (Not Connected)
Blade Port: 14 (Not Connected)
Blade Port: 15 (Not Connected)
Blade Port: 16 (Not Connected)
Zone Group: Ports_1 (Assigned, Offline)
SAS Switch Port: 51(Ports_1)
SAS Switch Port: 52(Not Zoned)
SAS Switch Port: 53(Not Zoned)
SAS Switch Port: 54(Not Zoned)
SAS Switch Port: 55(Not Zoned)
SAS Switch Port: 56(Not Zoned)
SAS Switch Port: 57(Not Zoned)
SAS Switch Port: 58(Not Zoned)
SAS Switch Port: 61(Ports_1)
SAS Switch Port: 62(Not Zoned)
SAS Switch Port: 63(Not Zoned)
SAS Switch Port: 64(Not Zoned)
SAS Switch Port: 65(Not Zoned)
SAS Switch Port: 66(Not Zoned)
SAS Switch Port: 67(Not Zoned)
SAS Switch Port: 68(Not Zoned)
Storage Enclosure: HP MDS600 Disk System, PortBox=51:1,61:1 (OK)
Storage Enclosure: HP D2600 Disk Enclosure, PortBox=52:1,62:1 (OK)
The show command
61
9 Performing common tasks
Example commands and system responses shown in this section are provided only as a general
reference and may differ from the commands used and system responses in your environment. For
more information on the available options for each command, see VSM CLI online help.
Examples are provided for the following common tasks:
62
•
“Enabling or disabling multi-initiator mode and port splitting” (page 63)
•
“Creating zone groups” (page 64)
•
“Assigning a zone group to a server device bay” (page 69)
•
“Capturing the configuration” (page 71)
•
“Inputting or restoring the configuration” (page 72)
•
“Flashing switch firmware” (page 73)
•
“Flashing storage enclosure firmware” (page 75)
•
“Resetting the VSM software, the switch or attached storage enclosures” (page 76)
Performing common tasks
Enabling or disabling multi-initiator mode and port splitting
The advance command controls two advanced parameters:
•
Multi-initiator mode—Controls whether multiple initiators (server device bays) can access the
same zone group. When this option is selected, a zone group can be assigned to multiple
BladeSystem server device bays. Multi-initiator mode should be enabled when shared SAS
devices, such as the P2000 G3 MSA and tape devices are connected to the switch. Enabling
more than one initiator (server) to access the same zone group is a key principle of the shared
storage concept.
•
Port splitting mode—Controls whether ports on the 6Gb SAS BL Switch can be divided into
sub-ports. When this option is selected, a switch port can be divided into two or four separate
sub-ports. When combined with a special cable, port splitting allows you to connect more
tape devices to the switch.
Syntax
<TARGET> advance [multi=<on|off>] [portsplit=on|off]
Parameters
multi=on
Use when shared SAS storage enclosures or tape
autoloader or libraries are connected to the switch. When
this option is selected, a zone group can be assigned to
multiple server device bays.
multi=off
(Default) Use when zoned SAS storage enclosures only are
connected to the switch. When this option is selected, a
zone group can be assigned to only one server device bay.
portsplit=on
If desired, use when tape autoloader or libraries are
connected to the switch. When this option is selected, switch
ports may be divided into sub-ports. When special cables
are used, one physical switch port can connect to as many
as four tape devices. To specify which port to split and how
many sub-ports to create, use the split command. For
more information, see online help.
portsplit=off
(Default)
Example 1: This example shows how to enable multi-initiator mode:
=> switch loc=local startupdate
Success
=> switch loc=local advance multi=on
Success
=> switch loc=local saveupdate
Success
Example 2: This example shows how to disable multi-initiator mode:
=> switch loc=local startupdate
Success
=> switch loc=local advance multi=off
Success
=> switch loc=local saveupdate
Success
Enabling or disabling multi-initiator mode and port splitting
63
Creating zone groups
Zone groups allocate resources for device load balancing purposes and for selectively allowing
access to data.
You can create the following types of zone groups:
64
•
Switch-port zone groups—Group together one or more ports on the SAS BL Switch. Server
device bays assigned this type of zone group have access to the storage enclosures or tape
devices connected to the ports included in the zone. This type of zone group is for shared
SAS devices. The P2000 G3 SAS MSA and HP MSL2024, MSL4048, and MSL8096 Tape
Libraries and 1/8 G2 Tape Autoloader are examples of shared SAS devices. All LUNs in the
controller enclosure are accessible to the assigned servers, unless controlled through the storage
management utility for the controller enclosure and all tape drives in a tape device are
accessible to any server that has access to the zone group. For more information, see “Creating
a switch-port zone group” (page 65).
•
Drive-bay zone groups—Group together drive bays from one or more MDS600 drawers or
D2000 disk enclosures. Server device bays assigned this type of zone group have exclusive
access to the drive bays included in the zone group, as if the drives are directly connected to
those servers. This type of zone group is for zoned SAS storage enclosures. The MDS600 and
D2600/D2700 enclosures are examples of zoned SAS storage. For more information, see
“Creating a drive-bay zone group” (page 67). (For future use.)
Syntax
<TARGET> create type=zg name=<name> [switchport=<port>]
[seb=<port:box:bay>]
Parameters
switchport=<port>
Use when shared SAS storage enclosures, tape
autoloader, or libraries are connected to the switch.
When using this parameter, enter the switch ports
to include in the zone groups. When more than one
switch port is to be included, separate the entries
with a comma.
seb=<port:box:bay>
Use when zoned SAS storage enclosures only are
connected to the switch. When using this parameter,
enter the drive bay information. When more than
one drive bay is to be included, separate the entries
with a comma.
Performing common tasks
Creating a switch-port zone group
Used with shared SAS storage enclosures or tape autoloaders or libraries, switch port zone groups
are comprised of one or more SAS ports on the switch. Server device bays assigned this type of
zone group have access to the array enclosures or tape devices connected to the ports included
in the zone group. Access to specific LUNs in the array enclosures must be controlled through the
storage management utility for the array enclosure.
NOTE:
•
Creating a switch-port zone group for a switch port connected to a zoned SAS storage
enclosure such as the MDS600 or D2700 enclosure, is not allowed. Zoned SAS storage
enclosures can only be included in drive-bay zone groups.
•
When a tape autoloader or library is included in the solution, do the following:
◦
Create a switch-port zone group for the port connected to the tape device.
◦
Create switch-port zone groups for ports connected to shared SAS storage enclosures.
Before creating a zone group, ensure that all storage enclosures are physically connected to the
switch and ready for use.
1. [Optional] Verify the status of the switch and switch ports. Use the show command to determine
which switch ports are available.
The display of this example is abbreviated, retaining key details. The display shows information
for the switch installed in interconnect bay 5, that none of the switch ports are already included
in a zone group, and that a P2000 G3 SAS MSA shared SAS storage enclosure is connected
to switch port 4.
=> switch loc=local port all show detail
Blade Enclosure At BottomC7000
Switch: Local (VSM Active)
Blade Switch Port: 54(Not Zoned)
Port Number: 1
Zoning Status: OK
Presence: Present
Attached Device Type: SAS Controller
Product ID: P2000 G3 SAS
Attached Device Firmware Version: T230
Enclosure Logical ID: 500C0FFDAC0A5000
LED Status: Green
.
.
Blade Switch Port: 58(Not Zoned)
Port Number: 8
Zoning Status: OK
Presence: Absent
LED Status: Off
2.
Create the zone group.
This example shows how to create a zone group named “Ports_1” that includes ports 4 on
switches in interconnect bays 5 and 6.
=> switch loc=local startupdate
Success
=> switch loc=local create type=zg name=Ports_1 switchport=54,64
Success
=> switch loc=local saveupdate
Creating zone groups
65
Success
NOTE: Entering a range of port numbers is not supported. Each port must be entered,
separated by a comma.
3.
[Optional] Verify that the zone group was created as intended.
For example, use one of the following commands:
=> switch loc=local port all show detail
=> switch loc=local zg OpenZone show
The display of this example is abbreviated, retaining key details. The display shows information
for the switch installed in interconnect bay 5, and that port 4 is included in zone group named
Ports_1.
=> switch loc=local port all show detail
Blade Enclosure At BottomC7000
Switch: Local (VSM Active)
Blade Switch Port: 54(Ports_1)
Port Number: 1
Zoning Status: OK
Presence: Present
Attached Device Type: SAS Controller
Product ID: P2000 G3 SAS
Attached Device Firmware Version: T230
Enclosure Logical ID: 500C0FFDAC0A5000
LED Status: Green
Zone Group: Ports_1
Blade Switch Port: 55(Not Zoned)
Port Number: 2
Zoning Status: OK
Presence: Absent
LED Status: Off
.
.
.
66
Performing common tasks
Creating a drive-bay zone group
Used with zoned SAS storage enclosures such as the MDS600 and D2600/D2700, drive-bay
zone groups group together disk drive bays, which can be chosen from one or more MDS600
drawer or D2000 disk enclosures. Server device bays assigned this type of zone group have
access to the disk drive bays included in the zone, as if they were directly connected to those
servers.
Before creating a zone group, ensure that all storage enclosures are physically connected to the
switch and ready for use.
NOTE:
•
1.
When a tape autoloader or library is included in the solution, do the following:
◦
Create a switch-port zone group for the port connected to the tape device.
◦
Create switch-port zone groups for ports connected to shared SAS storage enclosures.
◦
Create drive-bay zone groups for drive bays in zoned SAS storage enclosure.
◦
Carefully record the zone group names, included disk drives, and server device bay
assignments to prevent accidentally assigning the same drive-bay zone group to more
than one server device bay.
[Optional] Verify that the external storage enclosure is detected by the system. Use the show
command to determine which drive bays are available.
NOTE:
•
The seb parameter specifies that you want to show “storage enclosure bay” information
•
When the detail variable is included in the command, information about the drive bay,
such as disk drive type, is displayed.
The display of the following example is abbreviated, retaining key details. Drive bays 1
through 7 are already included in a zone group named zone1 and drive bays 29 through
35 are unassigned.
=> switch loc=local seb all show detail
Blade Enclosure At BottomC7000
Switch: Local (VSM Active)
Storage Enclosure: HP MDS600 Disk System, PortBox=51:1,61:1 (OK)
Bay: 1, 51:1:1, 1.5G SATA HDD(750GB, 7.2K RPM, HPGA
), Zoning OK ,
Zone Group: zone1
Bay: 2, 51:1:2, Empty, Zoning OK, Zone Group: zone1
Bay: 3, 51:1:3, Empty, Zoning OK, Zone Group: zone1
Bay: 4, 51:1:4, Empty, Zoning OK, Zone Group: zone1
Bay: 5, 51:1:5, Empty, Zoning OK, Zone Group: zone1
Bay: 6, 51:1:6, Empty, Zoning OK, Zone Group: zone1
Bay: 7, 51:1:7, Empty, Zoning OK, Zone Group: zone1
Bay: 8, 51:1:8, 3G SAS HDD(1TB, 7.2K RPM, HPD4), Zoning OK
Bay: 9, 51:1:9, 3G SAS HDD(73GB, 15K RPM, HPD7), Zoning OK
.
.
Bay: 29, 51:1:29, 3G SAS HDD(73GB, 15K RPM, HPD7), Zoning OK
Bay: 30, 51:1:30, 3G SAS HDD(73GB, 15K RPM, HPD7), Zoning OK
Bay: 31, 51:1:31, Empty, Zoning OK
Bay: 32, 51:1:32, Empty, Zoning OK
Bay: 33, 51:1:33, 3G SAS HDD(73GB, 15K RPM, HPD7), Zoning OK
Bay: 34, 51:1:34, 3G SAS HDD(73GB, 15K RPM, HPD7), Zoning OK
Bay: 35, 51:1:35, 3G SAS HDD(73GB, 15K RPM, HPD7), Zoning OK
Creating zone groups
67
2.
Create the zone group.
This example shows how to create a zone group named zone5, using drive bays 29 through
35 on an MDS600 storage enclosure connected to port 1 of a switch in interconnect bay 5.
=> switch loc=local startupdate
Success
=> switch loc=local create type=zg name=zone5 seb=51:1:29,51:1:30,51:1:31,
51:1:32,51:1:33,51:1:34,51:1:35
Success
=> switch loc=local saveupdate
Success
3.
[Optional] Verify that the zone group was created as intended.
For example, use one of the following commands:
=> switch loc=local seb all show detail
=> switch loc=local zg zone5 show
The display of this example is abbreviated, retaining key details. Drive bays 29 through 35
are now included in the zone group zone5.
=> switch loc=local seb all show detail
Blade Enclosure At BottomC7000
Switch: Local (VSM Active)
Storage Enclosure: HP MDS600 Disk System, PortBox=51:1,61:1 (OK)
Bay: 1, 51:1:1, 1.5G SATA HDD(750GB, 7.2K RPM, HPGA
), Zoning OK,
Zone Group: zone1
Bay: 2, 51:1:2, Empty, Zoning OK, Zone Group: zone1
Bay: 3, 51:1:3, Empty, Zoning OK, Zone Group: zone1
Bay: 4, 51:1:4, Empty, Zoning OK, Zone Group: zone1
Bay: 5, 51:1:5, Empty, Zoning OK, Zone Group: zone1
Bay: 6, 51:1:6, Empty, Zoning OK, Zone Group: zone1
Bay: 7, 51:1:7, Empty, Zoning OK, Zone Group: zone1
.
.
Bay: 29, 51:1:29, 3G SAS HDD(73GB, 15K RPM, HPD7), Zoning OK, Zone
Group: zone5
Bay: 30, 51:1:30, 3G SAS HDD(73GB, 15K RPM, HPD7), Zoning OK, Zone Group: zone5
Bay: 31, 51:1:31, Empty, Zoning OK, Zone Group: zone5
Bay: 32, 51:1:32, Empty, Zoning OK, Zone Group: zone5
Bay: 33, 51:1:33, 3G SAS HDD(73GB, 15K RPM, HPD7), Zoning OK, Zone Group: zone5
Bay: 34, 51:1:34, 3G SAS HDD(73GB, 15K RPM, HPD7), Zoning OK, Zone Group: zone5
Bay: 35, 51:1:35, 3G SAS HDD(73GB, 15K RPM, HPD7), Zoning OK, Zone Group: zone5
68
Performing common tasks
Assigning a zone group to a server device bay
Server device bays cannot access external storage connected to the switch until assigned a zone
group.
IMPORTANT:
•
For an existing zone group, when changing the assignment to move the zone group to a
different server device bay, you must first stop all associated I/O with the zone group and
power off the server blades. After completing the assignments and saving all changes in the
VSM, restart the servers and resume I/O.
Syntax
<TARGET> add [zg=<name>]
Parameters
zg=<name>
The exact name of the zone group to assign to the target blade
bay.
NOTE: The following example demonstrates assigning a switch-port zone group to a server.
When assigning a drive-bay zone group to a server, the display differs, but underlying principles
remain the same.
1.
[Optional] Verify the status of the enclosure server device bays. Use the show command to
display all configured zone groups.
As shown in this example, information for the zone group, Ports_1, created in “Creating a
switch-port zone group” (page 65), and information for the zone group created in “Creating
a drive-bay zone group” (page 67) is displayed. As shown, Ports_1 and zone5 have not yet
been assigned to a server.
=> switch loc=local zg all show detail
Blade Enclosure At BottomC7000
Switch: Local (VSM Active)
Zone Group: Ports_1 (Unassigned)
Zoned Blade Switch Port: 54
Zoned Blade Switch Port: 64
Storage Connection Status: Online
Overall Status: OK
Zone Group: zone5 (Unassigned)
Connected Expander: Expander 1
Zoned Storage Enclosure Bay: 51:1:29
Zoned Storage Enclosure Bay: 51:1:30
Zoned Storage Enclosure Bay: 51:1:31
Zoned Storage Enclosure Bay: 51:1:32
Zoned Storage Enclosure Bay: 51:1:33
Zoned Storage Enclosure Bay: 51:1:34
Zoned Storage Enclosure Bay: 51:1:35
Storage Connection Status: Online
Overall Status: OK
2.
-
Occupied
Occupied
Empty
Empty
Occupied
Occupied
Occupied
Assign the zone group to the server device bay.
This example shows how to assign the zone group “Ports_1” created in “Creating a switch-port
zone group” (page 65) to BladeSystem device server bay 1.
=> switch loc=local startupdate
Success
=> bladeport id=1 add zg=Ports_1
Success
=> switch loc=local saveupdate
Assigning a zone group to a server device bay
69
Success
This example shows how to assign the zone group, zone5, created in “Creating a drive-bay
zone group” (page 67) to BladeSystem device server bay 5.
=> switch loc=local startupdate
Success
=> bladeport id=5 add zg=zone5
Success
=> switch loc=local saveupdate
Success
3.
[Optional] Verify that the zone group was assigned as intended.
For example, use one of the following commands:
=> bladeport all show detail
=> switch loc=local zg all show detail
This example shows that zone group “Ports_1” created in “Creating a switch-port zone group”
(page 65) is now assigned to BladeSystem server device bay 1, and “zone5”, created in
“Creating a drive-bay zone group” (page 67) is now assigned to BladeSystem server device
bay 5
=> switch loc=local zg all show detail
Blade Enclosure At BottomC7000
Switch: Local (VSM Active)
Zone Group: Ports_1 (Assigned, Offline)
Zoned Blade Switch Port: 54
Zoned Blade Switch Port: 64
Assigned Blade Port: 1
Server Connection Status: Offline
Storage Connection Status: Online
Overall Status: OK
Zone Group: zone5 (Assigned, Offline)
Connected Expander: Expander 1
Zoned Storage Enclosure Bay: 51:1:29
Zoned Storage Enclosure Bay: 51:1:30
Zoned Storage Enclosure Bay: 51:1:31
Zoned Storage Enclosure Bay: 51:1:32
Zoned Storage Enclosure Bay: 51:1:33
Zoned Storage Enclosure Bay: 51:1:34
Zoned Storage Enclosure Bay: 51:1:35
Assigned Blade Port: 5
Server Connection Status: Offline
Storage Connection Status: Online
Overall Status: Offline
70
Performing common tasks
-
Occupied
Occupied
Empty
Empty
Occupied
Occupied
Occupied
Capturing the configuration
After initially configuring the switch or after making changes to an existing configuration, HP
strongly recommends backing up the configuration for safekeeping.
NOTE: The configuration can be backed up to an FTP server or temporarily saved to the switch
and then transferred to a different location using a secure copy tool. Example secure copy tools
include pscp.exe for Windows and scp for Linux.
Syntax
<TARGET> capture [file=<filename.cfg>] [ftp
ipaddr=<xxx.xxx.xxx.xxx>] [user=<ftp_username>]
[password=<ftp_password>]
Example 1: This example demonstrates backing up the configuration to an FTP server.
=> switch loc=local capture file=filename.cfg ftp ipaddr=111.222.333.444
Example 2: This example demonstrates capturing the configuration to a temporary location on the
switch and then copying to a Windows system.
1. Enter the following to create a file named filename.cfg. The file will automatically be
saved in the /var/image directory on the switch:
=> switch loc=local capture file=filename.cfg
2.
Enter the following to copy the filename.cfg file from the /var/image directory on the
switch to a folder on the server:
In Windows environments, enter a command similar to the following:
pscp -scp [email protected]:/var/image/filename.cfg c:\backup
In Linux environments, enter a command similar to the following:
scp [email protected]:/var/image/filename.cfg /home/userXXX/.
Capturing the configuration
71
Inputting or restoring the configuration
To restore a previously saved configuration of a switch, use the following command description:
NOTE: A configuration can be installed on a switch directly from an FTP server or by using a
secure copy tool to temporarily save the configuration to the switch and then install it. Example
secure copy tools include pscp.exe for Windows and scp for Linux.
Syntax
<target> input [file=<filename.cfg>] [ftp ipaddr=<xxx.xxx.xxx.xxx>]
[user=<ftp_username>] [password=<ftp_password>]
Example 1: This example demonstrates inputting a configuration that was previously captured on
an FTP server.
=> switch loc=local input file=filename.cfg ftp ipaddr=111.222.333.444
Example 2: This example demonstrates inputting a configuration that was previously captured and
saved to the server.
1. Enter the following to copy the configuration file filename.cfg from the server to the /var/
image directory on the switch:
In Windows environments, enter a command similar to the following:
pscp -scp c:\backup\filename.cfg [email protected]:/var/image/config.cfg
In Linux environments, enter a command similar to the following:
scp /home/userXXX/filename.cfg [email protected]:/var/image/.
2.
From the VSM CLI prompt, enter the following to install the configuration on the switch.
=> switch loc=local input file=filename.cfg
72
Performing common tasks
Flashing switch firmware
To update firmware on a switch, use the following command description:
Syntax
•
•
<TARGET> flash [file=<file_location/filename.img>]
[username=<user>] [password=<password>] [forced]
Before updating switch firmware:
◦
Schedule a time for the installation. Because firmware updates require that the switch be
restarted, firmware must be installed during a scheduled maintenance window.
◦
Review system requirements and other information in the firmware release notes, device
QuickSpecs, and other user documents.
◦
Back up the configuration for safekeeping.
◦
Issue the rescan command to ensure displayed information is current. Correct any issues
before proceeding.
After updating firmware:
◦
Check the status of all solution devices for unexpected issues. Correct any issues.
IMPORTANT: When two SAS BL Switches are installed in the same interconnect bay row of a
BladeSystem c-Class enclosure, they must run the same firmware version.
Example 1: This example demonstrates locating the file filename.img on the X.X.X.X FTP server
and then flashing the firmware onto the switch.
1. From the VSM CLI prompt, enter the following command to locate the file on the FTP server
and flash the firmware onto the switch:
=> switch loc=local flash file=ftp://X.X.X.X/filename.img
2.
When the update is complete, reset the switch. Recommended procedures vary for
single-domain and dual-domain environments. For information on resetting switches, see
“Resetting the VSM software, the switch or attached storage enclosures” (page 76).
Example 2: This example demonstrates moving the firmware file to the required /var/image local
directory on the switch and then flashing the firmware onto the switch.
1. Enter the following to copy the firmware file filename.img from the server to the /var/
image directory on the switch:
•
In Windows environments, when using the pscp utility, enter a command similar to the
following:
pscp -scp c:\backup\filename.img [email protected]:/var/image/filename.img
where c:\backup\filename.img is the location of the image on the local Windows
host, Administrator is the user name, and 111.222.333.444: is the IP address of
the switch.
•
In Linux environments, when using the scp utility, enter a command similar to the following:
scp /home/userXXX/filename.img [email protected]:/var/image/.
where /home/userXXX/filename.img is the location of the image on the local Linux
host, Administrator is the user name, and 111.222.333.444: is the IP address of
the switch.
2.
From the VSM CLI prompt, enter the following command to locate the file on the local drive
and flash the firmware onto the switch:
Flashing switch firmware
73
=> switch loc=local flash file=filename.img
3.
When the update is complete, reset the switch. Recommended procedures vary for
single-domain and dual-domain environments. For information on resetting switches, see
“Resetting the VSM software, the switch or attached storage enclosures” (page 76).
Example 3: This example demonstrates updating firmware on both switches at the same time.
1. From the VSM CLI prompt, enter the following command to locate the file on the FTP server
and flash the firmware onto the switch:
=> switch all flash file=ftp://X.X.X.X/filename.img
2.
74
When the update is complete, reset the switch. Recommended procedures vary for
single-domain and dual-domain environments. For information on resetting switches, see
“Resetting the VSM software, the switch or attached storage enclosures” (page 76).
Performing common tasks
Flashing storage enclosure firmware
To update firmware on an attached zoned SAS storage enclosure such as the MDS600, D2600,
or D2700, use the following command description:
Syntax
•
•
<TARGET> flash [file=<file_location/filename>] [username=<user>]
[password=<password>] [forced]
Before updating firmware:
◦
Schedule a time for the installation. Because firmware updates require that the storage
enclosure be restarted, firmware must be installed during a maintenance window.
◦
Review system requirements and other information in the firmware release notes, device
QuickSpecs, and other user documents.
◦
Issue the rescan command to ensure displayed information is current. Correct any issues
before proceeding.
After updating firmware:
◦
Check the status of all solution devices for unexpected issues. Correct any issues.
Example: This example demonstrates locating the file StorageEnclosureImage.fuf on the
X.X.X.X FTP server and flashing the firmware onto the storage enclosures connected to ports 3 and
4 of the switch in interconnect bay 7.
1. From the VSM CLI prompt, enter the following command to locate the file on the FTP server
and flash the firmware onto the specified storage enclosures:
=> switch loc=local se portbox=73:1,74:1 flash file=ftp://X.X.X.X/StorageEnclosureImage.fuf
2.
Then, enter the following command to reset the storage enclosure:
=> switch loc=local se portbox=73:1,74:1 reset hardware forced
NOTE: If the flash or reset command do not execute successfully or display an error message,
consider the following:
•
Only supported storage enclosures can be updated.
•
All server blades that map to this storage enclosure must be powered off.
•
If the switch status is a value other than Active or Not Redundant, firmware updates are not
allowed.
•
If the VSM GUI or VSM CLI is already processing a firmware update on a switch or storage
enclosure, this task request cannot be processed.
Issue the rescan command to ensure displayed information is up-to-date. Correct any issues before
proceeding.
Flashing storage enclosure firmware
75
Resetting the VSM software, the switch or attached storage enclosures
IMPORTANT: This task disrupts host I/O to the storage enclosures. Open a maintenance window
before resetting devices.
To restart the VSM software, or the switch or an attached zoned SAS storage enclosure such as
the MDS600, D2600, or D2700, use the following command description:
Syntax
<TARGET> reset [hardware|software] [type=parallel] [forced]
Example 1: This example demonstrates restarting the switch:
=> switch loc=local reset hardware
Example 2: This example demonstrates resetting both switches at the same time (dual-domain
environments):
=> switch all reset hardware type=parallel
IMPORTANT: Reset both switches at the same time only when a system maintenance window is
open and all system traffic is halted.
Example 3: This example demonstrates restarting the VSM application on the switch (required after
updating switch network settings):
=> switch loc=local reset software
Example 4: This example demonstrates restarting storage enclosures connected to ports 3 and 4
of the switch in BladeSystem interconnect bay 5:
=> storageenclosure portbox=53:1,54:1 reset hardware
Example 5: This example demonstrates restarting all storage enclosures connected to the switch:
=> storageenclosure all reset hardware
NOTE: If the reset command does not execute successfully or displays an error message,
consider the following:
•
Storage enclosure model—Only supported storage enclosures can be reset.
•
Switch status—If the status is a value other than Active or Not Redundant, resetting the storage
enclosure is not allowed.
•
Server blade status—All server blades in the c-Class enclosure with access to the storage
enclosure being reset must be powered off to perform this task.
•
VSM activity—If the VSM GUI or VSM CLI is already processing a firmware update on a
switch or storage enclosure, this command request cannot be processed.
Issue the rescan command to ensure displayed information is up-to-date. Correct any issues before
proceeding.
76
Performing common tasks
10 Creating and executing CLI scripts
If desired, create and execute scripts to automatically perform a task or series of tasks. CLI scripting
varies depending on operating systems, but the information provided in this section describes using
the Plink SSH utility in a Windows environment.
Creating and executing a script in a Windows environment includes the following steps:
1. Create a .txt file with each command to execute, using exact command syntax.
2. Create a .bat file with the information required to execute the .txt file.
3. Open the SSH utility, such as Plink.
4. At the user-designated time, execute the .bat file from the DOS console.
Example: This example illustrates flashing VSM firmware:
Scenario:
•
The firmware file has already been obtained and saved to an FTP server located at
192.168.1.1
•
The working folder on the Windows host is c:\flashvsm
•
An SSH connection utility, such as Plink and PuTTY, has already been obtained and installed
on the Windows host that can access the same LAN as the HP BladeSystem c-Class enclosure.
Procedure:
1. Create the .txt file (in this example: vsmupgrade.txt):
switch loc=local flash file=ftp://192.168.1.1/vsm.img
switch loc=local reset hard forced
2.
forced
Create the .bat file (in this example: autoflashing.bat):
c:\flashvsm\plink -ssh-l Administrator -pw hpinvent 192.168.1.1 -m vsmupgrade.txt
where plink is the scripting utility, Administrator is the VSM user name; hpinvent is
the user password; 192.168.1.1 is the VSM CLI IP address; and vsmupgrade.txt is the
script .txt file of commands.
3.
Execute the .bat file to run its embedded commands:
C:\flashvsm\autoflashing.bat
77
Part IV Support and other resources
Contents
11 Support and other resources.....................................................................80
Contacting HP........................................................................................................................80
Subscription service............................................................................................................80
Related information.................................................................................................................80
HP websites......................................................................................................................80
Prerequisites...........................................................................................................................81
Typographic conventions.........................................................................................................81
HP product documentation survey.............................................................................................82
Contents
79
11 Support and other resources
Contacting HP
For worldwide technical support information, see the HP support website:
http://www.hp.com/support
Before contacting HP, collect the following information:
•
Product model names and numbers
•
Technical support registration number (if applicable)
•
Product serial numbers
•
Error messages
•
Operating system type and revision level
•
Detailed questions
Subscription service
HP recommends that you register your product at the Subscriber's Choice for Business website:
http://www.hp.com/go/e-updates
After registering, you will receive e-mail notification of product enhancements, new driver versions,
firmware updates, and other product resources.
Related information
The following documents [and websites] provide related information:
•
HP 6Gb SAS BL Installation Instructions
•
HP 6Gb SAS BL User Guide
•
HP BladeSystem Deployment Guide for Solutions with 6Gb SAS BL Switches and External SAS
Storage Enclosures
You can find these and other documents on the Manuals page of the HP Business Support Center
website: http://www.hp.com/support/manuals. In the BladeSystem section, click BladeSystem
Enclosures, BladeSystem Interconnects, BladeSystem Server Blades, or BladeSystem Adapters and
Mezzanines and then select your product.
HP websites
For additional information, see the following HP websites:
80
•
http://www.hp.com
•
http://www.hp.com/service_locator
•
http://www.hp.com/support
•
http://www.hp.com/support/manuals
•
http://www.hp.com/support/downloads
•
http://www.hp.com/go/bladesystem
•
http://www.hp.com/go/storage
Support and other resources
Prerequisites
Prerequisites for using this product include:
•
Physically installing the BladeSystem c-Class enclosure and any servers, SAS controllers, SAS
switch blades, and storage blades.
•
Physically installing the external SAS storage enclosures.
•
Connecting all cables using a supported cabling scheme.
For information about these tasks, see the BladeSystem and device user documents. See also the
HP BladeSystem Deployment Guide for Solutions with 6Gb SAS BL Switches and External SAS
Storage Enclosures.
You can find this and other documents on the Manuals page of the HP Business Support Center
website: http://www.hp.com/support/manuals. In the BladeSystem section, click BladeSystem
Enclosures, BladeSystem Interconnects, BladeSystem Server Blades, or BladeSystem Adapters and
Mezzanines and then select your product.
Typographic conventions
Convention
Element
Blue text: Typographic conventions
Cross-reference links and e-mail addresses
Blue, underlined text: http://www.hp.com
Website addresses
Bold text
• Keys that are pressed
• Text typed into a GUI element, such as a box
• GUI elements that are clicked or selected, such as menu
and list items, buttons, tabs, and check boxes
Italic text
Text emphasis
Monospace text
• File and directory names
• System output
• Code
• Commands, their arguments, and argument values
Monospace, italic text
• Code variables
• Command variables
Monospace, bold text
WARNING!
CAUTION:
IMPORTANT:
NOTE:
TIP:
Emphasized monospace text
Indicates that failure to follow directions could result in bodily harm or death.
Indicates that failure to follow directions could result in damage to equipment or data.
Provides clarifying information or specific instructions.
Provides additional information.
Provides helpful hints and shortcuts.
Prerequisites
81
HP product documentation survey
Are you the person who installs, maintains, or uses this HP storage product? If so, we would like
to know more about your experience using the product documentation. If not, please pass this
notice to the person who is responsible for these activities.
Our goal is to provide you with documentation that makes our storage hardware and software
products easy to install, operate, and maintain. Your feedback is invaluable in letting us know how
we can improve your experience with HP documentation.
Please take 10 minutes to visit the following web site and complete our online survey. This will
provide us with valuable information that we will use to improve your experience in the future.
http://www.hp.com/support/storagedocsurvey
Thank you for your time and your investment in HP storage products.
82
Support and other resources
Index
A
accessing the CLI, 53
accessing the VSM GUI, 14
advance CLI command, 63
Advanced Settings GUI task, 28
assigning zone group to server
CLI, 69
GUI, 30
C
capture CLI command, 71
Capture Configuration GUI task, 36
Clear Configuration GUI task, 28
Clear VSM Event Log task, 47
clearupdate CLI command, 58
Command Line Interface (CLI)
accessing, 53
advance command, 63
assigning zone group to server, 69
capture CLI command, 71
capturing the configuration, 71
command syntax, 55
command variable, described, 56
create type=zg command, 65, 68
Create Zone Group task, 64
creating a drive-bay port zone group, 67
creating a switch-port zone group, 65
example CLI command , 55
flash command, 73, 75
flashing enclosure firmware, 75
help command, 59
input command, 72
keyword abbreviations, 58
overview of, 53
parameter variable, described, 57
reset command, 76
saveupdate command, described, 58
setup, 53
show command, 60
special keystrokes, 58
startupdate command, 58
target variable, 55
command syntax in the CLI, 55
command variable, described, 56
commands, in the CLI
advance, 63
basic types of, 58
capture, 71
clearupdate, 58
create type=zg, 65, 68
flash, 73, 75
help, 59
input, 72
reset, 76
saveupdate, 58
show, 60
commands, in theCLI
startupdate, 58
configuring
storage, 8
contacting HP, 80
conventions
document, 81
text symbols, 81
Create and Assign Zone Group GUI task, 31
Create Single Port Zone Group GUI task, 29
create type=zg CLI command, 65, 68
Create Zone Group CLI command, 64
Create Zone Group GUI task, 23
creating a drive-bay port zone group
CLI, 67
creating a switch-port zone group
CLI, 65
D
Delete GUI task, 27
Delete Zone Groups GUI task, 26
Diagnostic Log task, 47
document
conventions, 81
prerequisites, 81
related information, 80
documentation
HP website, 80
providing feedback, 82
E
environments
zoned SAS storage enclosures, 20
example configuration
shared SAS storage enclosures, 19
zoned SAS storage enclosures, 20
F
firmware
obtaining, 37, 42
prerequisites for updating, 36, 42, 73, 75
flash CLI command, 73, 75
G
getting started, 6
Graphical User Interface (GUI), 14
Advanced Settings task, 28
Capture Configuration task, 36
Clear Configuration task, 28
Create and Assign Zone Group task, 31
Create Single Port Zone Group task, 29
Create Zone Group task, 23
Delete task, 27
Delete Zone Groups task, 26
Input Configuration task, 36
83
Maintain tab, 35
Merge Sub-Ports task, 29
Modify task, 27
Modify Zone Access task, 30
More Information command, 22
Multi-initiator task, 28
Network Settings task, 45
Replicate Zoning Configuration task, 30, 47
Reset Hardware task, 41
Reset Management Software task, 41
Reset Storage Enclosure task, 44
SNMP Settings task, 45
Split Port task, 28, 29
Update Storage Enclosure Firmware task, 43
Zoning tab, 21
H
help
obtaining, 80
help CLI command, 59
HP
technical support, 80
I
input CLI command, 72
Input Configuration GUI task, 36
introduction, 6
L
logging on to VSM GUI, 14
M
Maintain GUI tab
available tasks, 35
Merge Sub-Ports GUI task, 29
Modify GUI task, 27
Modify Zone Access GUI task, 30
More Information GUI task, 22
moving zone groups, 49
Multi-initiator GUI task, 28
N
navigation tree of GUI, 15
Network Settings GUI task, 45
O
obtaining firmware, 37, 42
online help
CLI, 59
GUI, 17
P
page description, 15
parameter variable, described, 57
prerequisites, 81
PuTTY utility, 53
R
related documentation, 80
84
Index
Replicate Zoning Configuration GUI task, 30, 47
reset CLI command, 76
Reset Hardware GUI task, 41
Reset Management Software GUI task, 41
Reset Storage Enclosure GUI task, 44
S
saveupdate command, 58
Secure Shell (SSH) connection
Command Line Interface (CLI), 53
setup
Command Line Interface (CLI), 53
shared SAS storage enclosures
configuration example, 19
show CLI command, 60
SNMP Settings GUI task, 45
SNMP Test Trap task, 45
Split Port GUI task, 28, 29
startupdate CLI command, 58
status alerts, 16
status states, 16
storage configuration, 8
storage enclosures
direct-connect, 20
Subscriber's Choice, HP, 80
symbols in text, 81
system status section of GUI, 15
systems and devices section of GUI, 15
T
tabs section of GUI, 15
target variable, descrived, 55
tasks
Clear VSM Event Log, 47
Diagnostic Log, 47
performing tasks in the GUI, 17
SNMP Test Trap, 45
VSM Event Log, 46
tasks section of GUI, 15
tasks, in the CLI
Create Zone Group, 64
tasks, in the GUI
Advanced Settings, 28
Capture Configuration, 36
Clear Configuration, 28
Create and Assign Zone Group, 31
Create Single Port Zone Group, 29
Create Zone Group, 23
Delete, 27
Delete Zone Groups, 26
in Maintain tab, 35
in the Zoning tab, 21
Input Configuration, 36
Merge Sub-Ports, 29
Modify, 27
Modify Zone Access, 30
More Information, 22
Multi-initiator, 28
Network Settings, 45
Replicate Zoning Configuration, 30, 47
Reset Hardware, 41
Reset Management Software, 41
Reset storage enclosures, 44
SNMP Settings, 45
Split Port, 28, 29
Topology Map, 22
Update Storage Enclosure Firmware, 43
technical support
HP, 80
service locator website, 80
text symbols, 81
Topology Map GUI task, 22
typographic conventions, 81
U
Update Storage Enclosure Firmware GUI task, 43
V
VSM Event Log task, 46
W
websites
HP , 80
HP Subscriber's Choice for Business, 80
product manuals, 80
Z
zoned SAS storage enclosures, 20
zoned SAS storate
configuration example, 20
Zoning tab, in the GUI
available tasks, 21
85