Transcript
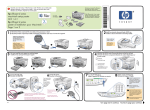
The automatic document
feeder tray and the twosided printing accessory
may be included.
hp 510/610 digital copier series
setup poster
*C7296-90281*
*C7296-90281*
C7296-90281
1
2
Install the two-sided printing accessory
(hp 610 digital copier only)
a.
3
Install the automatic document feeder (ADF) tray
(hp 610 digital copier only)
You must install the main paper tray and
load plain white paper
Make sure the tray
snaps into place.
b.
3
3
2
5
4
Back view of unit
4
5
Connect the power
6
Turn the hp digital copier on
Set the country and language
ABC
GHI
DEF
JKL
3
PQRS
1
Look at the display. Use the arrow keys to scroll through the language list. Enter
the code for your language on the keypad, and then confirm your selection. If you
make a mistake, see the reference guide.
2
Enter the code for your country, and then confirm your selection.
3 1 .5
310 V
0m
A
1
2
1
2
Lift the door (beneath the front
panel) until it locks into place.
Release the gray print carriage
latch, and then lift the print carriage
to access the printhead carriage.
3
a.
a.
a.
Unwrap and remove the tape from
each printhead.
Do not touch the copper contacts.
Install each of the four printheads. Match
the color on the top of the printhead to the
color on the printhead carriage.
4
5
Move the print carriage latch
down and make sure the loops
catch the hooks. Snap the latch
into place.
a.
b.
Make sure you
remove any
packaging from
inside the unit.
gray print
carriage latch
b.
Push the printhead handles down.
b.
Do not touch the
copper contacts.
b.
For future reference: Do
not remove printheads
until you are ready to
replace them.
Do not touch
the tower.
8
Insert ink cartridges
1
Unwrap the ink
cartridges. Hold
each cartridge
away from you, as
you remove the
tape. Do not touch
the copper
contacts.
2
Hold the ink
cartridge away from
clothing. Ink may
Insert the black ink
cartridge into the left
side of the print
carriage. Insert the tricolor ink cartridge on
the right side. Make
sure the cartridges are
seated.
Close the door.
a.
b.
9
Align the printheads
Press the Enter button to begin
alignment. After a page prints with
checkmarks, alignment is complete.
If page is blank, see the reference
guide for troubleshooting. Discard or
recycle this page.
Leave the unit on for an additional ten
minutes to finish charging. You may
continue to the next step.
10
Try your new hp digital copier
Look in the reference
guide for information on
how to get started using
your hp digital copier.
www.hp.com/go/copiers
Insert the printheads
Copyright Hewlett-Packard Company 2002
Printed in the United States,
Mexico, Germany, and Singapore.
7