1
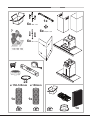
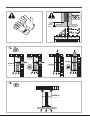
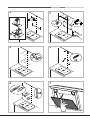
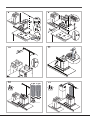
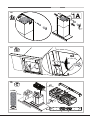
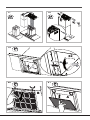
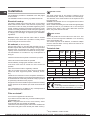
HXQB9.8LTI
English
Operating Instructions
COOKER HOOD
Contents
Pl
ea
08 se
to 44 ph
ac 8 o
gu tiv 24 ne
ar ate 24 us
an y 2 on
te ou 4
e r
Operating Instructions,1
Warnings,8
Installation,10
TBOX-GLASS controls,11
Maintenance and care,13
Troubleshooting,14
After Sales Service,16
Guarantee,17
1x
6x Ø 8 x 40
6x Ø 3,5 x 9,5
6x Ø 5 x 45
2
3
4
5
2x
ø 150-125mm ø 150mm
1x
1x
1x
2
min.
32 cm
1A
Ø120mm
Ø120mm
Ø150mm
Ø120
Ø150mm
Ø150
Ø120
Ø150
1B
Ø150mm
3
2
3
=
=
x6
=
55
0m
65 m
0
=
m
m
4
5
Ø 8 mm
x6
7
5
m
m
6
4
x6
x2
8
9
1
2
x2
3
10
11
x2
12
ø 120 ø 150
13
5
14
15
x2
ø 3,5 x 9,5
16
x2
ø 3,5 x 9,5
ø 150
6
17
18
19
x2
ø 3,5 x 9,5
20
21
B
A
7
Warnings
! Keep this manual for reference. If you
sell, transfer or move the unit to another
location, make sure to keep the manual
with the product.
! Read the instructions carefully - they
contain important installation, user and
safety information.
! Do not tamper with the electrical or
mechanical equipment of the product or
its exhaust ducts.
General safety information
• The distance between the cookware
support surface on top of the cooking
appliance and the lowest part of the
cooker hood must be at least:
65 cm if the hood is installed over a gas
cooktop
55 cm if the hood is installed over an
electric cooktop.
If the installation instruction manual for
thegascookingappliancespecifiesa
greater distance, this measurement
should be taken into account.
• Before cleaning or servicing the unit,
disconnect it from the mains by pulling
the power plug or disconnecting the
main circuit breaker.
• Alwayswearworkgloveswheninstalling
and servicing the unit.
• It is not intended for use by children
or persons with sensory or mental
disability and lack of experience or
familiarity, except under the supervision
or instruction of a person responsible
for their safety.
• Makesurechildrendonotplaywiththe
unit.
• Never operate the unit without its
greasefilterinstalled!
• NEVER use the hood as a support,
unless expressly instructed to do so.
• Theroommustbeadequatelyventilated
if the hood is used at the same time with
other equipment burning gas or other
fuels.
• Extractedairmustnotbeconveyedinto
a duct used for exhausting combustion
fumes from gas or other fuel-fired
• The cooker hood comes with anchor
equipment.
plugs which are suitable for use with
most walls/ceilings.
• Observeallregulationsinrelationtoair
However,youmustcontactaqualified
extraction.
technician to check the suitability of the
materials in relation to the type of wall/ • NEVERcookfoodwithanopenflame
ceiling, which must be strong enough
under the hood; open flames will
to support the weight of the unit.
damagethefiltersandmaycausefires.
Neverdothis.
• Caution! Do not hook the unit up to
its electrical power supply until the • Alwayssupervisefryingtomakesure
installation has been completed.
theheatedoildoesnotcatchfire.
8
• Strictly observe all local regulations
in relation to the technical and safety
measures to be employed in fumes
extraction.
• Clean the product frequently, inside
andout(ATLEASTONCEAMONTH,
and in observance of the maintenance
instruction given in this manual).
• Failuretoobservethehoodcleaningand
filtercleaning/replacementinstructions
canresultinfires.
• Never use the hood without its bulbs
properly installed - electrocution hazard.
• Themanufacturerisnotliableforany
inconvenience,damageorfirecaused
by the unit as a result of failure to
observe the instructions given in this
manual.
• Caution!Theunit'saccessiblepartscan
get very hot when used with cooking
equipment.
9
GB
Installation
The installation procedure is illustrated in the first pages
of this manual.
Theinstallationmustbedonebyaqualifiedtechnician.
Electrical hook up
The mains voltage must match that given on the ratings
label inside the hood itself. If the hood has a power plug,
connect the hood to an easily accessible regulatory power
socket. If it does not (direct connection to the mains), or the
socket is not easily accessible, install a two-pole regulatory
switch to enable total disconnection from the mains in case
of category III overvoltage, as required by the installation
regulations.
Caution! Always check that the mains cable is hooked
up properly and check that it operates correctly before
reconnecting the hood to the mains.
Air exhaust (for ducted units)
Connect the hood to a duct and wall exhaust hole of a
diameterequaltothatoftheairoutletflange.Usingasmaller
diameter tube and exhaust hole reduces the extraction
capacity of the hood and also increases its running noise.
The manufacturer is not liable for any consequences of
doing so.
Ducted version
The hood purifies the air and expels it outdoors via an
exhaustduct(dia.150mm)connectedtoitsoutletflange.
The diameter of the exhaust tube must be equal to that of
theoutletflange.
Caution! The exhaust duct is not supplied and must be
purchased separately.
When routed horizontally, the tube must be angled slightly
upwards (around 10°) to enable the air to be conveyed
outdoors more easily. If the hood is fitted with charcoal
filters,theymustfirstberemoved.
Filter version
Thehoodpurifiestheairandreturnsittotheroom.This
version of the hood requires installation of an accessory
activecharcoalfilterunit.
Thisversionrequiresanairdeflector,areductionadapter
and the charcoal filter/s. The top tube must have its air
outlet slots uppermost.
Technical data
Model
Height
(cm)
Width
(cm)
Depth
(cm)
dia. of
exhaust tube
(cm)
TBOX-GLASS 60cm
61-82
59.8
50
15/12
TBOX-GLASS 90cm
61-82
89.9
50
15/12
! Avoid suddenly changing the diameter of the duct.
Model code
Bulb (V)
Bulb draw (W) Total draw (W)
! The duct must have as smooth an inner surface as
possible.
HXQB9.8LTI
Led
!Usetheshortestductrequiredtoachievethepurpose.
!Useaductwithasfewbendsaspossible
! The duct must be made of regulatory material.
! Do not connect the hood to flues carrying combustion
fumes from other equipment (boilers, chimneys, stoves,
etc.).
! Observe the instructions of the competent authorities in
relation to the air exhaust. The air being exhausted may not
be exhausted into a wall cavity unless the cavity in question
isspecificallyintendedforthispurpose.
!Equiptheroomwithairintakestopreventthehoodcreating
suction pressure in the interior (this must not exceed 0.04
mbar).
! The manufacturer is not liable for any consequences of
failure to observe these instructions.
2x3
256
Potenza
Tensione
Alogena 25 W
2 x 25 W
230V
G9
L40xØ14
Alogena 20 W
2 x 20 W
12V
G4
L30xØ10
LED *
Attacco
Dimensioni
RiskGroup1accordingtoStandardEN62471
The hoods are conforming to the following EC
Directives:
•“Lowvoltage”Directive2006/95/EC(12-12-2006)
•“EMC”Directive2004/108/EC(15-12-2004)
Filter or ducted?
! Your hood is supplied as a ducted unit.
Ifyouwishtouseitasafilterunit,youmustinstalltheproper
ACCESSORYKIT.
Note: If supplied with the hood, the accessory active
charcoalfilterunitmayalreadybeinstalled.
Instructions for transforming the hood from the ducted to the
filterversionaregiveninthismanual(see“Filterversion”).
* Only available in certain models
PLEASE PHONE US TO REGISTER YOUR APPLIANCE AND ACTIVATE YOUR PARTS GUARANTEE ON 08448 24 24 24
10
TBOX-GLASS controls
Models with Touch control glass (basic)
HXQB9.8LTI
T1 T2 T3 T4
Hood off
The hood can be turned off manually by pressing the T1
button (ON/OFF). If the timer is set, the hood turns off
automatically when the set time runs out.
GB
Models with Touch control glass + display
(medium)
(Only available in certain models)
T5 T6 T7 T8
T1 motor ON/OFF
Whenthebuttonispressedwiththehoodoff,thefirstspeed
is set. When the button is pressed during operation, the
hoodswitchesOFF.
T1 T2 T3
T4 T5 T6
T2 Speed 1
When the button is pressed the hood switches from the
previous status to speed 1.
T1 motor ON/OFF
Whenthebuttonispressedwiththehoodoff,thefirstspeed
is set. When the button is pressed during operation, the
hoodswitchesOFF.
T3 Speed 2
When the button is pressed the hood switches from the
previous status to speed 2.
T2 Speed –
When the button is pressed the hood switches to the
previous speed.
T4 Speed 3
When the button is pressed the hood switches from the
previous status to speed 3.
T3 Speed +
If the hood is set to speed 3, the intensive speed activates
when this button is pressed
The setting is limited by time; when it elapses the hood goes
back to the speed set previously.
T5 Booster
When the button is pressed the hood switches from the
previous status to intense speed. The setting is limited by
time; when the time elapses the hood goes back to the speed
set previously; when a speed button is pressed (T2, T3 or
T4), the selected speed is set as you leave the booster mode.
T6 Timer
By pressing T6 once, a timer setting can be associated to each
speed, after which the hood turns OFF automatically. The timer
can be set for manual speeds only and not for the booster.
T7 Antigrease and odour filter signal
The antigrease (A) and odour (B) filters need cleaning/
replacing after a certain number of hours of use (the latter
forfilteringhoodsonly).
The time for cleaning/replacement is signalled by the
flashingofthecolouredLEDassociatedtothefilter(white
forantigreasefilters,redforodourfilter).
The LED is turned off by pressing the T7 button after
cleaning/replacingthefilters.
T8 lights ON/OFF
It turns the work lights of the hood on and off.
Hood configuration
The configuration menuisaccessedwiththeproductoff
by pressing T5 and T6 for 6 seconds. T7 turns on at this
point to indicate the type of installation through two colours
oftheLED:whiteforextractorinstallation(default),redfor
filteringinstallation.Theinstallationtypecanbechanged
by pressing T7 cyclically with the consequent alternation
oftheLEDcolours.
T4 Timer “–”
Set a time to turn OFF the hood with the timer; if the timer
is set and the speed is subsequently changed by pressing
T2, T3 or T4, the timer is deactivated.
Press T4 to decrease the timer by 5 minutes.
T5 Timer “+”
Whenthebuttonispressedforthefirsttime,thetimerisset
to 5 minutes; this value is increased by 5 additional minutes
every time the button is pressed after that.
T6 lights ON/OFF
It turns the work lights of the hood on and off
I1 D1
I2
D2
I5
I4
D1: DGT Speed
D2: Assembly of 2 DGT Time
I1:GreaseFilterIndicator
I2:CarbonFilterIndicator
I4: Menu Indicator
I5: Timer Indicator
PLEASE PHONE US TO REGISTER YOUR APPLIANCE AND ACTIVATE YOUR PARTS GUARANTEE ON 08448 24 24 24
11
GB
Antigrease and odour filter signal
Theantigrease(A)and/orodour(B)filtersneedcleaning/
replacing after a certain number of hours of use (the latter
forfilteringhoodsonly).
The indicator light I1onindicatesthattheantigreasefilter
is saturated, while the indicator light I2 on indicates that the
odourfilterissaturated(forhoodsinfilteringmodeonly).
Press T5 + T4 for 3 seconds with the hood on to reset the
counter.
Hood type setting
Thehoodcanbesettotheventilation(default)orfiltering
mode. To change the setting proceed as follows:
• withthehoodOFF, the menu is accessed by pressing the
T4 e T5 buttons for a prolonged time; this is signalled by
a sound emitted by the hood and by the I4 icon lighting
up and the writing C1-0 appearing on the display;
• usethebuttonsT4 and T5togothroughthemenu.Use
T4 to go through the various menu items (C1, C2, C3,
C4, etc) and T5 to select them (0, 1 or 0, 1, 2);
• tosetthehoodtype,accessthemenu,selecttheitem
C6 with T4 and set the value 0 with T5 to set the hood
onventilationmodeor1forthefilteringmode.PressT1
at the end.
Hood off
The hood can be turned off manually by pressing the T1
button (ON/OFF). If the hood stays on in manual mode, it
turnsoffautomaticallyafteracertain“safety”time.Ifthe
timer is set, the hood turns off automatically when the set
time runs out.
Models with Touch control glass + display (high)
(Only available in certain models)
T1 T2 T3 T4
T5 T6 T7 T8
T1 motor ON/OFF
Whenthebuttonispressedwiththehoodoff,thefirstspeed
is set. When the button is pressed during operation, the
hoodswitchesOFF.
T2 Speed –
When the button is pressed the hood switches to the
previous speed.
T3 Speed +
When the button is pressed the hood switches to the next speed.
If the hood is off, speed 1 is set when pressing this button.
T4 Booster
When the button is pressed, the hood switches from the
previousstatustotheintensivespeed;theletter“b”willflash
slowly on the display. The setting has a limited timeframe;
when the time elapses the hood goes back to the speed set
previously; when a speed button is pressed (T2, T3 or T4),
the selected speed is set as you leave the booster mode.
T5 AUTO
Press the T5 button to activate the automatic mode, which
turns the hood on based on the steam level detected. While
in normal operation the sensor regulates the motor speed
within the admitted values (0,1,2,3 or booster). The hood
switches from automatic to manual mode when the Booster
or Speed button is pressed.
The sensor needs calibrating before use; for more
information please refer to paragraph “Calibration
procedure”
T6 Timer “–”
With the timer, a time can be set, after which the hood
turns OFF; if the timer is set and the speed is subsequently
changed by pressing T2, T3 or T4, the timer is deactivated.
Press the T6 button to decrease the previously set value
by 5 minutes.
T7 Timer “+”
Whenthebuttonispressedforthefirsttime,thetimerisset
to 5 minutes; this value is increased by 5 additional minutes
every time the button is pressed after that.
T8 lights ON/OFF
It turns the work lights of the hood on and off.
I1 D1
I2
D2
I5
I4
D1: DGT Speed
D2: Assembly of 2 DGT Time
I1:GreaseFilterIndicator
I2:CarbonFilterIndicator
I4: Menu Indicator
I5: Timer Indicator
Antigrease and odour filter signal
The antigrease (A) and odour (B) filters need cleaning/
replacing after a certain number of hours of use (the latter
forfilteringhoodsonly).
The indicator light I1 on indicates that the grease filter is
saturated, while the indicator light I2 on indicates that the odour/
carbonfilterissaturated(forhoodsinfilteringmodeonly).
Press T5 + T6 for 3 seconds with the hood on to reset the
counter.
Automatic sensor calibration procedure
- Calibration: the calibration procedure must be carried
out in a clean environment to be effective; therefore, the
hob must be off during the calibration.
During the calibration procedure the AUTO button is on
and the AUTOwritingflashesonthedisplay.
The sensor calibration may be automatic or manual
(“uponrequest”).Inbothcasesthecalibrationlasts:
• about1minuteforgashobs;
• about13minutesforinductionandelectrichobs.
- Automatic calibration: occurs when the hood is power
suppliedorafterselectingtheplanfromtheconfiguration
menu.
PLEASE PHONE US TO REGISTER YOUR APPLIANCE AND ACTIVATE YOUR PARTS GUARANTEE ON 08448 24 24 24
12
- Manual calibration: (or upon request) is set in the
configurationmenu.Thisprocedureisadvised,andmay
be started, in case of malfunctioning of the sensor (which,
for example, may occur in case of blackout while cooking
or after a long time since the use).
Forthemanualcalibration,proceedwiththestepsbelow:
• withthehoodOFF or in standby, the menu is accessed
by pressing the T6 and T7 buttons for a prolonged
time; this is signalled by a sound emitted by the hood
and by the I4 icon lighting up and the writing C1-0
appearing on the display;
• usethebuttonsT6 and T7 to go through the menu.
UseT6 to go through the various menu items (C1, C2,
C3, C4, etc) and T7 to select them (0, 1 or 0, 1, 2);
• forthemanualcalibration,accessthemenu,select
item C4 with T6 and set value 1 with T7. Then press
T1 and wait for the time suggested for the calibration.
Selecting the hob type: the type of hob (electric, induction,
gas) present under the hood is select upon installation. A
complete automatic calibration procedure is carried out
immediately after selecting the hob.
Important: do not force the calibration “upon request”
after selecting the hob as this activates automatically.
To select the hob, proceed as follows:
• withthehoodOFF or in standby, the menu is accessed by
pressing the T6 and T7 buttons for a prolonged time; this is
signalled by a sound emitted by the hood and by the I4 icon
lighting up and the writing C1-0 appearing on the display;
• usethebuttonsT6 and T7togothroughthemenu.Use
T6 to go through the various menu items (C1, C2, C3,
C4, etc) and T7 to select them (0, 1 or 0, 1, 2);
• toselectthehob,accessthemenu,selectitemC3 with
T6 and set the value with T7 to 0 if you have a gas hob,
1 if you have a radiant hob and 2 if you have an induction
hob. Press T1 to leave the menu mode and wait the time
needed for the sensor calibration.
Hood type setting
Thehoodcanbesetintheventilation(default)andfiltering
operating mode. To change the type proceed as follows:
• withthehoodOFF or in standby, the menu is accessed by
pressing the T4 and T5 buttons for a prolonged time; this is
signalled by a sound emitted by the hood and by the I4 icon
lighting up and the writing C1-0 appearing on the display;
• usethebuttonsT4 and T5togothroughthemenu.Use
T4 to go through the various menu items (C1, C2, C3,
C4, etc) and T5 to select them (0, 1 or 0, 1, 2);
• to set the hood type, access the menu, select the item
C6 with T4 and set the value 0 with T5 to set the hood on
ventilation mode or 1forthefilteringmode.ThenpressT1.
Hood off
The hood can be turned off manually by pressing the T1 button
(ON/OFF). If the hood stays on in manual mode, it turns off
automaticallyafteracertain“safety”time.Ifthetimerisset,
the hood turns off automatically when the set time runs out.
The Automatic mode activates after 10 minutes from the
sensor turning off the hood motor.
Configuration table
Regulation
Meaning
code
C1
C2
C3
C4
C5
C5
C6
GB
Explanation
It resets the grease
filtertimer
Itresetstheodourfilter
Odourfiltertimer
timer
It changes the hob type
fortheAUTOsensor.It
Hob type
may be gas, electric or
induction
It calibrates the sensor.
If item 1 is select, the
sensor carried out the
Sensor calibration
calibration the next
time the hood is turned
on
Ifmute,noFBaudiois
Audio levels
emitted (not even when
turningON)
Ventilation/Filtering
Hood type
(Ventilationbydefault)
It resets the DGT menu
Reset to Factory
values to default values
default
(including installation)
Greasefiltertimer
General notes
If the display buttons become locked, unplug and plug
in again the hood from the mains before contacting the
Assistance Service.
Maintenance and care
Caution! Before cleaning or servicing the unit,
disconnect it from the mains by pulling the power plug
or disconnecting the main circuit breaker.
First cleaning
• Removetheprotectivefilm
• Cleanwithadampspongeandalittleneutralsoap
• Rinseoffwithadampcloth
• Drywithasoftcloth;ifthehoodisstainlesssteel,dry
alongthemetal'sgrain
Periodic cleaning
The hood must be cleaned frequently (at least as often as
youservicethegreasefilter),insideandout.Useadamp
cloth and a neutral liquid detergent with lukewarm water.
Do not use abrasive or corrosive products.
Warning:Failuretoobservethehoodcleaningandfilter
cleaning/replacementinstructionscanresultinfires.Follow
the instructions carefully. The manufacturer is not liable for
anydamagetothemotororfirescausedbyincorrectcare
or failure to follow the above instructions.
PLEASE PHONE US TO REGISTER YOUR APPLIANCE AND ACTIVATE YOUR PARTS GUARANTEE ON 08448 24 24 24
13
GB
Servicing the grease filter (A)
The grease filter retains the
particles of grease produced
during cooking; it must be
cleaned at least once a month
with a non-aggressive
A
detergent, either by hand or
with a low temperature, short
dishwasher cycle.
To extract the grease filter,
pull the spring loaded handle.
If washed in a dishwasher, the metal filter may change
colour, but this does not affect its performance.
Servicing the charcoal filter (B)
The charcoal filter retains unpleasant cooking odours.
Thefiltersaturatesafteravariabletime,dependingonthe
typeofcookingandhowoftenthegreasefilteriscleaned.
The cartridge must be replaced at least once every twenty
months.
ThisfiltercanNOTbewashedorregenerated
Disassembly: Remove the
activated-carbon filter by
B pressing the two front levers
which secure it to the hood.
Assembly: Secure the
activated-carbonfilterfirstin
the back using the hood's
metal tabs and then in the
front by pressing the two
levers.
B
Replacing the bulbs
Disconnect the unit from the mains and remove the grease
filter.
Caution! Make sure the bulbs are cool before touching
them.
1.Extracttheguardbyprising
itoutwithasmallflathead
screwdriver or something
similar.
2. Replace the faulty bulb.
Use only bulbs of the
same type (for details,
see the technical data in
the following manual).
3.Refittheguard(pushitin).
Replacing the lights LED *
The hood is fitted with a lighting system based on LED
technology.TheLEDsensureoptimallighting,longerlife
and lower consumption compared with traditional lights. To
replace them please contact the assistance service.
Electrical cable
If the power cable is damaged, it can be replaced by the
manufacturer or his technical service, to prevent any
attendant risks.
SCRAPPING
TheunitismarkedforconformitywithEuropeanDirective
2012/19/EC, Waste Electrical and Electronic Equipment
(WEEE). By ensuring that the unit is scrapped properly,
the user contributes to safeguarding the environment and
public health.
symbol on the product or on its accompanying
The
documents indicates that the product may not be treated
as domestic waste but must be handed over to a sorting
centre for electrical and electronic waste. Dispose of it
in accordance with local waste disposal regulations. For
further information on the handling, recovery and recycling
of this product, contact the local authority, domestic waste
disposal service or the reseller from whom you purchased it
Troubleshooting
If something does not work, make the following simple
checks before contacting Technical Service:
If the hood does not operate:
Checkthat:
• theunitispoweredup.
• aspeedhasbeenset.
If the hood is not working effectively:
Checkthat:
• the selected motor speed is sufficient to handle the
amount of smoke and steam being produced.
• thekitchenisadequatelyventilatedfortheunittotake
air in.
• thecharcoalfilterisnotexhausted(filterversion).
If the hood turns off during normal operation:
Checkthat:
• theunitispoweredup.
• thecircuitbreakerhasnottripped.
In case of faulty operation, before contacting Technical
service,firstdisconnectthemachinefromthemainsforat
least 5 seconds by pulling its plug, then reconnect it. If the
fault persist, contact Technical Service.
* Only available in certain models
PLEASE PHONE US TO REGISTER YOUR APPLIANCE AND ACTIVATE YOUR PARTS GUARANTEE ON 08448 24 24 24
14
GB
PLEASE PHONE US TO REGISTER YOUR APPLIANCE AND ACTIVATE YOUR PARTS GUARANTEE ON 08448 24 24 24
15
GB
After Sales Service
No one is better placed to care for your Hotpoint appliance during the course of its working life than us – the
manufacturer.
Essential Contact Information
Hotpoint Service
We are the largest service team in the country offering you access to 400 skilled telephone advisors and 1000
fully qualified engineers on call to ensure you receive fast, reliable, local service.
UK: 08448 224 224
Republic of Ireland: 0818 313 413
www.hotpointservice.co.uk
Please note: Our advisors will require the following information:
Model number:
Serial number:
Parts and Accessories
We supply a full range of genuine replacement parts as well as accessory products that protect and hygienically
clean your appliance to keep it looking good and functioning efficiently throughout its life.
UK: 08448 225 225
Republic of Ireland: 0818 313 413
www.hotpointservice.co.uk
Appliance Registration
We want to give you additional benefits of Hotpoint ownership. To activate your free 5 year parts guarantee you
must register your appliance with us.
UK: 08448 24 24 24
Republic of Ireland: 01 230 0800
www.hotpointservice.co.uk
Indesit Company UK Ltd. Morley Way, Peterborough, PE2 9JB
Indesit Company Unit 49 Airways Industrial Estate, Dublin 17
Recycling and Disposal Information
As part of Hotpoint’s continued commitment to helping the environment, Hotpoint reserves the right to use
quality, recycled components to keep down customer costs and minimise material wastage.
Please dispose of packaging and old appliances carefully. To minimise the risk of injury to children, remove the
door, plug, and cut the mains cable off flush with the appliance. Dispose of these parts separately to ensure that
the appliance can no longer be plugged into mains socket, and the door cannot be locked shut.
PLEASE PHONE US TO REGISTER YOUR APPLIANCE AND ACTIVATE YOUR PARTS GUARANTEE ON 08448 24 24 24
16
Guarantee
GB
12 months Parts and Labour Guarantee
Your appliance has the benefit of our manufacturer’s guarantee, which covers the cost of breakdown repairs for
twelve months from the date of purchase.
This gives you the reassurance that if, within that time, your appliance is proven to be defective because of either
workmanship or materials, we will, at our discretion, either repair or replace the appliance at no cost to you.
This guarantee is subject to the following conditions:
The appliance has been installed and operated correctly and in accordance with our operating and
maintenance instructions.
The appliance is used only on the electricity or gas supply printed on the rating plate.
The appliance has been used for normal domestic purposes only.
The appliance has not been altered, serviced, maintained, dismantled, or otherwise interfered with by
any person not authorised by us.
Any repair work must be undertaken by us or our appointed agent.
Any parts removed during repair work or any appliance that is replaced become our property.
The appliance is used in the United Kingdom or Republic of Ireland.
The guarantee does not cover:
-
Damage resulting from transportation, improper use, neglect or interference or as a result of improper
installation
Replacement of any consumable item or accessory. These included but not limited to: plugs, cables,
batteries, light bulbs, fluorescent tubes and starters, covers and filters.
Replacement of any removable parts made of glass or plastic.
THIS GUARANTEE WILL NOT APPLY IF THE APPLIANCE HAS BEEN USED IN COMMERCIAL OR NONDOMESTIC PREMISES.
5 Year Parts Guarantee
Hotpoint also offers you a free 5 year parts guarantee. This additional guarantee is conditional on you registering
your appliance with us and the parts being fitted by one of our authorised engineers. There will be a charge for
our engineer’s time. To activate the extra parts warranty on your appliance, simply call our registration line on
08448 24 24 24 (Republic of Ireland 01 230 0800)
Extended Guarantees
We offer a selection of protection plans that enable you to fully cover yourself against the expense of repair bills
for the life of your policy. To find the ideal plan for you please call our advice line on 08448 226 226 (Republic of
Ireland 01 230 0233).
Free Helpdesk Service
We have a dedicated team who can provide free advice and assistance with your appliance if you experience
any technical difficulties within the first 90 days of ownership. Simply call our Hotpoint Service Hotline on 08448
224 224 (Republic of Ireland 0818 313 413) for telephone assistance, or, where necessary, to arrange for an
engineer to call.
PLEASE PHONE US TO REGISTER YOUR APPLIANCE AND ACTIVATE YOUR PARTS GUARANTEE ON 08448 24 24 24
17
GB
PLEASE PHONE US TO REGISTER YOUR APPLIANCE AND ACTIVATE YOUR PARTS GUARANTEE ON 08448 24 24 24
18
GB
PLEASE PHONE US TO REGISTER YOUR APPLIANCE AND ACTIVATE YOUR PARTS GUARANTEE ON 08448 24 24 24
19
195107500.01
03/2013 - XEROX FABRIANO
GB
PLEASE PHONE US TO REGISTER YOUR APPLIANCE AND ACTIVATE YOUR PARTS GUARANTEE ON 08448 24 24 24
20