1
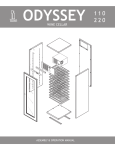
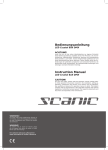
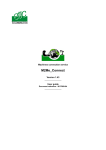
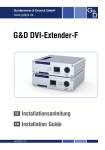
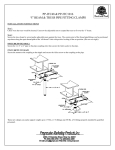
Instructions for Installation and Use
Built-In Gas Oven
SY23
To the User:
You must read the instructions prior to installing and using the appliance and
then retain them for future reference.
DECLARATION OF CE COMPLIANCE
GB
This appliance is in compliance with the following European Directives:
93/68 : General regulations
90/396 : Concerning gas appliances
2006/95/CE : Concerning low tensions
89/336/CEE : Electromagnetic compatibility
CE Regulation n° 1935/2004 :
this appliance is suitable to come in contact with food products.
INSTRUCTIONS FOR THE USER
This manual is an integral part of the appliance.
It is necessary to keep it for the life cycle of the oven and to read it carefully for the
installation, use, maintenance, cleaning and handling of the appliance.
Unplug the appliance before undertaking any sort of intervention on it.
Attention: earth connection is required by law.
During oven operation, keep children away.
During operation the oven becomes very hot.
Do not touch heating elements on the inside.
Do not use steam cleaners to clean the oven.
Do not use the appliance to heat the room.
The manufacturer will not be held liable if accident prevention measures are not observed.
The manufacturer will not be held liable for damage to persons or property due to poor or
lacking maintenance of the appliance.
The manufacturer reserves the right to make any changes to the product which are felt to
be useful or necessary without any advance notice.
Packaging materials (sheets, polystyrene) may be hazardous to children (danger of
suffocation). Keep packaging materials out of the reach of children.
The appliance is designed for adult users who are familiar with these instructions.
Children are often not able to recognize the risks involved with the use of the appliance.
Please supervise properly and do not let children play with the appliance.
Heat is generated during cooking; the door of the appliance may get very hot, specially if
it is made of glass. There is the risk of burns; do not touch and keep children away.
The physically impaired must be assisted by capable adults.
Do not carry out any modifications, tampering or repair attempts, especially with tools
such as screwdrivers on the inside or outside of the appliance.
Repair work, especially on the electrical parts, must be performed only by specialized
personnel.
1
GB
Improper repair work can cause serious accidents, damage the appliance and equipment as
well as impair proper operation.
Appliances repaired in technical service centres must undergo routine tests, especially a
continuity test of the earth circuit.
THIS PRODUCT WAS DESIGNED FOR HOME USE.
THE MANUFACTURER WILL NOT BE HELD LIABLE FOR DAMAGE TO
PERSONS OR PROPERTY CAUSED BY IMPROPER INSTALLATION, OR BY
IMPROPER, WRONG OR SENSELESS USE.
WARNING: IN CASE OF DISASSEMBLY, MAINTENANCE AND CLEANING OF
THE APPLIANCE, BE CAREFUL SOME PARTS COULD BE SHARP.
PLEASE USE SUITABLE PREVENTION AND PROTECTION EQUIPMENT
(GLOVES, ECT.).
In case of a failure in operation or an indispensable repair job, ask for the intervention of
the customer technical service centre.
If the oven shows visible signs of damage, do not use it.
Unplug it and contact the customer technical service centre.
The oven must be unplugged as soon as an operating problem is discovered.
Make sure the power cord of the appliance is not crushed by the oven door as this may
damage the electrical insulation.
If the power cord has been damaged, it must be replaced by the technical service centre in
order to avoid the creation of hazardous situations.
Before closing the oven door, make sure there are no foreign bodies or pets inside the
oven.
Do not place heat-sensitive or flammable materials in the oven such as detergents, oven
sprays, and so on.
The oven gets extremely hot during operation.
The oven remains hot for a long time, even after it has been turned off, and cools off only
very slowly until reaching room temperature. Wait for a suitable period of time before
carrying out work such as cleaning.
When opening the oven door, steam and water droplets may come out.
If the oven contains steam, it is not advisable to insert the hands.
Superheated grease and oil may easily catch fire.
Never use water in an attempt to extinguish burning grease or oil (there is the danger of
explosion). Suffocate the fire with wet cloths.
The rack, the plates and the cooking containers become extremely hot.
Use insulated glove or pot holders.
When using and maintaining the oven, be careful not to get fingers caught in the door
hinges to avoid crushing or other injuries.
This is specially important when children are around.
Leave the door open only in an ajar position.
If the door is open there is the hazard of tripping or crushing the fingers.
Do not sit or lean on the door and do not use it as a work surface.
2
GB
All work on the appliances must be carried out by qualified personnel.
For maintenance, moving, installation and cleaning of the appliance use suitable
prevention and protection equipment (gloves, etc.).
Lifting and moving of appliances weighing more than 25 kg must be carried out using
proper equipment, or by two persons, in order to avoid risks or injuries.
Preparation of the oven and pre-use
Attention: the oven must be unplugged from the electrical mains. Before using the oven,
carefully clean the interior, the racks and the drip pan with non-abrasive soap and
lukewarm water. Insert the racks and the drip pan into their respective runners. When this
operation is complete, plug the oven into the electrical mains and bring it up to maximum
temperature for at least 20 minutes in order to eliminate any residual grease, oil or resins
from manufacturing which may cause unpleasant odours during cooking; then ventilate
the room.
After completing this simple operation, the oven is ready to cook for the first time.
3
GB
INSTRUCTIONS FOR INSTALLATION
It is important that all installation procedures be performed by a qualified
technician.
After unpacking the oven to connect it, rest it on its base without damaging it.
Do not lift the oven by the door handle, but hold it at the sides.
Do not lift the oven by the gas connection.
Make sure that the appliance has not been damaged during transport.
Oven dimensions and kitchen unit dimensions are shown in the opposite
figure.
Kitchen units in contact with the oven must be heat resistant:
min. 75°C above ambient temperature during periods of operation.
House the oven in the unit cavity, lifting it at the sides and making sure
that the supply cable is not trapped.
for correct ventilation, follow the ventilation opening directions shown
in the figure.
secure the oven to the kitchen unit with the screws.
Note: to allow for proper ventilation, we recommend that you leave an
opening of at least 560 x 30 mm or an equivalent area in the lower section
of the housing.
Also provide for at least 5 mm clearance between the top of the oven and
the lower edge of the worktop: this gap must never be closed by strips
or unit reinforcing pieces.
When the oven is installed, make sure that the sides do not touch the front
edges of the unit or the adjacent drawers and doors.
4
INSTALLATION SCHEME
It is fundamental to ensure a proper air circulation to the back side
of the appliance; the cut-out dimensions must be observed.
If needed, there can be larger cut-outs than what indicated.
GB
5
GB
INSTALLATION
Installation location
In order for the gas unit to work properly it is essential that the air necessary for burning
the gas flows into the area naturally.
The installer must follow the safety norms for the country of installation.
The flow of air into the area must come directly through openings made in the exterior
walls.
These openings must have a free passage section of at least 100 cm² (one or more
openings can be made).
Products of combustion must be exhausted through a hood connected to a fume flue
or directly outside.
In the event that it is not possible to install the hood, it is necessary to use an electric
ventilation fan installed in the outside wall or window of the area so long as there is
an opening for air to enter the area in conformity with current law.
This electric ventilation fan must have a flow capacity sufficient to guarantee that
3 to 5 times the volume of air in the room is exchanged every hour.
ELECTRICAL CONNECTION
Attention: do not connect to the power supply before you have finished connecting
the oven and cooktop.
Make sure that installation and hook-up are performed by a qualified technician
in accordance with the manufacturer's instructions and in compliance with local
regulations. The installer is responsible for the correct electrical connection and for
the observance of the safety rules.
The oven must be connected to the electricity supply by means of an all-pole disconnect
switch with minimum contact gap of 3 mm.
The appliance must be earthed by law.
Do not use multiple sockets or extensions.
After the oven has been installed, the electrical components must be inaccessible.
Make sure that the voltage stated on the appliance rating plate is the same as the
voltage in your home. The rating plate is on the lower front edge of the oven (visible
with the door open).
If the power supply cable needs replacing, make sure that it is replaced with a cable
similar to the one provided by the Manufacturer (H05 RR-F type) and that installation
is performed by the Service Center or a qualified technician.
The appliance is equipped with the cable for the electrical connection without plug.
6
GB
The wires in the mains supply lead are coloured in accordance with the following code:
Green and Yellow - Earth
Blue - Neutral
Brown – Live
The connection must be made as follows:
The wire coloured Green and Yellow must be connected to the
terminal marked ‘E’ or the earth symbol A or coloured green or green and yellow.
The wire coloured Blue must be connected to the terminal marked
‘N’ or coloured blue or black.
The wire coloured Brown must be connected to the terminal marked ‘L’ or coloured
brown or red.
NOTE: The terminals marked ‘SUPPLY’ are for the mains supply
wires and the terminations marked ‘LOAD’ are for the appliance
wires. The electrical outlet is to be positioned in an easily
accessible position adjacent to the appliance. In the event that it is
necessary to replace the mains lead, the replacement must conform
to the specification listed in the Technical Data ensuring the correct
colour code connection and that all screws are tightened sufficiently.
7
GB
CONNECTION TO THE GAS SUPPLY
The supply system must be compliant with the current standards in the country of
use. The type of gas for which the oven has been regulated is indicated on the serial
number plate located on one of the side edges of the cavity (visible with the door
open) and on the packaging. Before carrying out the connection, the oven must be
adapted to the type of gas that will be used.
Link the male cylindrical threaded pipe-fitting ½"G, which is placed on the back
side of the appliance to the supply, by using a non-flexible metallic pipe and pipefittings which are compliant with the current standards.
Otherwise you can use a flexible metallic pipe entirely fixed to the wall and pipefittings which are compliant with the current standards; the length of the pipe cannot
be over 2000 mm, in compliance with the current standards.
Check that the pipe cannot come in contact with movable parts that could damage it.
Place the seal (fig. 1) between the pipe-fitting and the pipe. The seal is provided
with the appliance.
Important: to conenct the appliance to a LPG supply, place a pressure regulator
which is compliant with the current standards between the pipe and the gas tank.
Attention: when finished, check that there are no gas leaks.
Use soap and water or special liquids to make sure that there are no gas leaks.
DO NOT USE OPEN FLAMES WHEN SEARCHING FOR GAS LEAKS.
Warning: the use of a rubber flexible hose fastened with hose clamps is prohibited
because it cannot be inspected.
Fig. 1
Gas pipe
______
______
8
Seal
______
Ramp (pipe-fitting)
GB
Adapting to the gas in use
It is possible to use other types of gas by adapting the burner adjustment as follows:
Make sure that the oven is not connected to the electric power supply.
Open the oven door completely and remove the oven bottom unscrewing the screws.
Remove the burner by unscrewing its screw, then unscrew the injector and replace it.
Reassemble the burner in the oven and the oven bottom.
Changing the grill burner injector (fig. 2-3)
Make sure that the oven is not connected to the electric power supply.
Open the oven door completely.
Remove the grill burner by unscrewing its screws, then unscrew the injector
and replace it.
Reassemble the burner.
Fig. 2
Fig. 3
9
GB
Adjusting the minimum
The oven thermostat is equipped with a by-pass for the minimum.
When the type of gas is changed, this adjustment must be adapted as follows:
-if there is a glass front panel, it has to be removed by unscrewing the two
fixing screws (fig. 4a).
-if there is a metal front panel, the adjustment can be done through the
opening, which is on the left side of the knobs (fig. 4b).
Light the oven and let it burn at the maximum temperature for at least 30 minutes.
Turn the thermostat knob to the minimum and adjust the by-pass to the minimum
so that you achieve a reduced by stable flame. Perform this operation with the oven
door closed. Use a flat-head screwdriver on the by-pass screw. It is sufficient
to loosen the screw several turns to adjust the minimum when changing from liquid
gas to natural gas.
Important: once adjusted the burner, check that the minimum flame is maintained,
testing it by repeatedly opening and closing the oven door. If the flame goes out,
adapt the by-pass adjustment.
Complete the operations (replacing the injector, adjusting the air and minimum),
turn off the oven and apply the new data plate (which shows the type of gas being used)
replacing the previous one and apply seals using sealing wax or similar.
Fig. 4a
10
Fig. 4b
GB
BEFORE USING THE OVEN
These instructions are only valid for the destination countries whose identification
symbols are shown on the back cover of the appliance instruction booklet.
To make the most of your new oven, read the users instructions carefully and keep
them on hand for consulting in the future.
Remove the cardboard protection and the protective plastic film.
Remove the accessories from the oven and heat it at the maximum temperature setting
for about 30 minutes to eliminate the bad smell of protective grease and insulating
materials. Keep the window open during this operation.
Make sure that the electrical wires of other electrical appliances near the cooktop or
the oven do not come into contact with hot parts and do not become entrapped in
the oven door.
Your oven is equipped with a fan designed to cool internal parts of the cabinet and
the oven components. The fan creates a gentle flow of air, which comes out the
steam vent located below the control panel. The cooling system starts working
immediately while it can stop immediately after the oven is switched off or from
10 to 30 minutes later (depending on the oven temperatures). In the event of
malfunction of the cooling fan, do not use the oven. Contact the after-sales Service.
In case of interruption of the electricity supply, do not use the appliance;
if it happens during the use of the appliance, switch off the appliance and do not use it.
It is possible for the inside of the glass in the oven door to cloud up during cooking.
Do not rest heavy weights on the door because these could damage the oven cavity
and the hinges.
Do not obstruct cooling openings or slots or the fume exhaust.
If turning the oven burner knob becomes difficult, contact the After Sales Service
for replacement.
11
GB
SWITCHING THE GAS OVEN ON
The oven has an electronic ignition.
The oven is switched on with the DOOR OPEN as follows:
press the thermostat knob slightly and turn it anticlockwise to max position;
press it again right in to trigger the electric ignition.
Please note that the electric ignition does not have to be pressed more than
15 seconds. If the burner does not start in 15 seconds, keep the oven door open
and wait for at least 1 minute before trying again the electric ignition.
Note: when doing the electric ignition for the first time, it is quite normal
having to try many times the electric ignition, because of the air inside the gas pipe.
Once started the flame of the burner, keep pressed the knob for 10 seconds so as
the thermocouple warms up deactivating the safety valve, which otherwise would
block the gas flow.
Keeping the door closed, check that the oven burner has ignited; if not, repeat
the operation. Always check perfect operation of the burner with the door closed.
During oven operation
Keeping the door closed, check the correct working of the cooling fan.
If the cooling fan doesn't start operate in this way:
1 Check there has been no interruption in the electricity supply; if so, stop cooking,
switch off the oven and wait for the electricity to come.
2 If there has not been any interruption in the electricity supply, do not use the oven
and call the After-sales Service.
If the oven door is opened during cooking operations, the cooling fan stops in order
to prevent burning heat in the direction of the user.
Once the door has been closed, the cooling fan starts again; if this not happens, check
again the points 1 and 2.
12
GB
SWITCHING THE GAS GRILL ON
The grill has an electronic ignition.
To switch the gas grill on, proceed as follows:
open the oven door;
press the knob slightly and turn it clockwise to the end, to the grill position;
the cooling fan starts;
press the knob right in to trigger the electric ignition.
Please note that the electric ignition does not have to be pressed more than
15 seconds. If the burner does not start in 15 seconds, keep the oven door open
and wait for at least 1 minute before trying again the electric ignition.
Note: when doing the electric ignition for the first time, it is quite normal
having to try many times the electric ignition, because of the air inside the gas pipe.
During grill operation:
The oven door must be kept open and the knob protection fitted.
Keeping the door open, check the correct working of the cooling fan.
If the cooling fan doesn't start, operate in this way:
1 Check there has been no interruption in the electricity supply; if so, stop cooking,
switch off the grill and wait for the electricity to come.
2 If there has not been any interruption in the electricity supply, do not use the oven
and call the After-sales Service.
WARNING:
The accessible parts of the oven can be very hot when using the grill:
keep away the children.
Always use oven gloves when moving food in or out of the oven cavity.
OVEN LIGHT
The oven light turns on when turning the knob clockwise.
13
GB
ELECTRONIC CLOCK
The electronic clock has more than one function:
- Displaying the time of day
- Switching off the oven with the timer
Setting the time of day
- Press button A
- Set the right time using button B o C. The function is activated
7 seconds after your last action.
Setting summer and winter time
- Keep button A pressed for 4 seconds
- The display of the hours starts flashing
- Set the right hour using button B or C
Setting the timer
- To activate the timer, press button C again and keep it pressed until the right
baking time is reached; the maximum is 10 hours.
- The countdown time is visible in the display. The bell simbol (A) lights up.
- Press button A and the current time will be displayed for 6 seconds.
Deactivating the ti mer
- Keep button B pressed
- The timer counts backwards and stops automatically at 0
Sound signal
- After the baking time has ended and the oven has been switched off, the clock
gives a sound signal for 7 minutes.
- Switch the sound signal off using button A.
Adjusting the signal
If no function has been activated, you can adjust the signal using button B.
you can choose from 3 different signals.
14
GB
CLEANING THE APPLIANCE
Always allow the appliance to cool down before cleaning to avoid
a burn injury.
Do not use caustic or abrasive agents, coarse wire wool or hard
tools as these can damage the surface finishes.
Normally, wiping with a soft cloth dampened with hot detergent is
sufficient, but for stubborn marks the following is recommended:
VITREOUS ENAMEL PARTS
Use only a cleaner that is recommended for this type of material –
avoid chloride-based products such as bleach.
DOOR GLASS
Do not use any abrasive medium that could cause damage.
Remember that if the surface of the glass panel becomes scratched,
this could lead to a dangerous failure.
To facilitate cleaning, the door glass can be lifted out after
removing the fixing screws.
When refitting, make sure that the glass is correctly seated in the
door recess and the correct way round.
Care must be taken when cleaning between the door glasses, and
inside the inner frame as some of the edges maybe sharp due to
the manufacturing process.
15
GB
REMOVING THE OVEN DOOR
To facilitate cleaning inside the oven, the door can be removed
as follows:
Hinges “A” are provided with two movable bolts “B”.
When bolt “B” is raised, the hinge is released from its housing.
Having done this, the door must be lifted upwards and removed,
sliding it towards the outside; grip the sides of the door near the
hinges when performing these operations.
To refit the door, firstly slide the hinges into their slots and
open the door fully.
Remember to rotate the two movable bolts B used to hook
the two hinges before closing the door. (Fig.5).
WARNING
x
x
16
Take care not to dislodge
the hinge lock system when
removing the door as the
hinge mechanism has a
strong spring system!
Do not immerse the door in
water at any time.
Fig.5
GB
CLEANING THE SIDE GUIDES (fig. 2)
(fig. 6)
The appliance can be equipped with side guides which have
to be fixed on the oven sides.
Slide oven shelves and trays on side guides.
The side guides can be removed by a light downwards pressure
on device A.
3XOO
3XVK
Fig. 6
(fig.7)
REPLACING THE OVEN LIGHT (fig.
3)
(Not covered by the appliance
warranty)
Disconnect the appliance from the
electricity supply, remove the oven
door (as described previously) as
well as the oven shelves.
Remove the protective glass lightcover by twisting anti-clockwise.
Unscrew the old bulb and discard
safely, replace with the type
specified in the Technical Data and
refit the cover.
Fig. 7
NOTE – The glass cover may be tight and may therefore
require a tight grip to release.
17
GB
INSTRUCTIONS FOR INSTALLING KNOB GUARD
OPEN OVEN DOOR
INSTALL KNOB GUARD
IN SLOTS OF FRONT
FASTEN KNOB GUARD ONTO FRONT
BY MOVING IT TO THE RIGHT
MAKE SURE THE KNOB GUARD IS ATTACHED
BY PULLING IT OUTWARDS
CLOSE OVEN DOOR
ATTENTION:
During operation the knob guard gets very hot.
Use kitchen gloves.
18
GB
This appliance is marked according to the European directive
2002/96/EC on Waste electrical and Electronic Equipment (WEEE).
By ensuring this product is disposed of correctly, you will help
prevent potential negative consequences for the environment and
human health, which could otherwise be caused by inappropriate
waste handling of this product.
The symbol
on the product, or on the documents
accompanying the product, indicates that this appliance may not
be treated as household waste. Instead it shall be handed over to
the applicable collection point for the recycling of electrical and
electronic equipment.
Disposal must be carried out in accordance with local environmental
regulations for waste disposal.
For more detailed information about treatment, recovery and
recycling of this product, please contact your local city office,
your household waste disposal service or the shop where you
purchased the product.
19
Cod. 12300081940