1
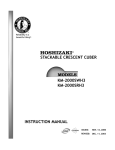
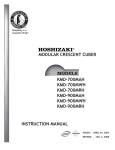
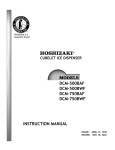
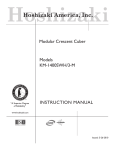
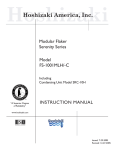
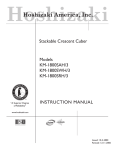
Reliability is a
beautiful thingTM
CUBELET ICE DISPENSER
DCM-270BAH-OS
INSTRUCTION MANUAL
ISSUED:
REVISED:
SEPT. 2, 2003
DEC. 10, 2003
IMPORTANT
Only qualified service technicians should attempt to install, service or maintain
this ice dispenser. No installation, service or maintenance should be undertaken
until the technician has thoroughly read this Instruction Manual. Likewise, the
owner/manager should not proceed to operate the ice dispenser until the installer
has instructed them on its proper operation.
HOSHIZAKI provides this manual primarily to assist qualified service technicians in the
installation, maintenance and service of the ice dispenser.
Should the reader have any questions or concerns which have not been satisfactorily
addressed, please call or write to the HOSHIZAKI Technical Support Department for
assistance.
HOSHIZAKI AMERICA, INC.
618 Highway 74 South
Peachtree City, GA 30269
Attn: HOSHIZAKI Technical Support Department
Phone: 1-800-233-1940 Technical Service
(770) 487-2331
Fax: (770) 487-3360
NOTE: To expedite assistance, all correspondence/communication MUST include the
following information:
• Model Number
• Serial Number
• Complete and detailed explanation of the problem
2
• Please review this manual. It should be read carefully before the ice dispenser is
installed and operated. Only qualified service technicians should install, service and
maintain the ice dispenser. This manual should be made available to the
technician prior to installation, maintenance or service.
• Keep this manual with the ice dispenser for later reference.
CONTENTS
PAGE
I. SPECIFICATIONS .................................................................................................... 4
1. NAMEPLATE RATING ............................................................................................. 4
2. DIMENSIONS/CONNECTIONS ............................................................................... 5
II. GENERAL INFORMATION ...................................................................................... 6
1. CONSTRUCTION .................................................................................................... 6
2. OPERATION - How it works ..................................................................................... 7
III. INSTALLATION AND OPERATING INSTRUCTIONS ............................................ 8
1. CHECKS BEFORE INSTALLATION ........................................................................ 8
2. HOW TO REMOVE PANELS ................................................................................... 8
3. LOCATION ............................................................................................................... 9
4. ELECTRICAL CONNECTION .................................................................................. 9
5. WATER SUPPLY AND DRAIN CONNECTIONS ................................................... 10
6. FINAL CHECK LIST ............................................................................................... 11
7. START UP.............................................................................................................. 12
8. PREPARING THE ICE DISPENSER FOR LONG STORAGE ............................... 13
IV. CLEANING AND MAINTENANCE INSTRUCTIONS ........................................... 15
1. CLEANING INSTRUCTIONS ................................................................................. 15
[a] CLEANING PROCEDURE ................................................................................ 15
[b] SANITIZING PROCEDURE .............................................................................. 17
2. EFFICIENT USE OF CUBELET ICE ..................................................................... 19
3. MAINTENANCE ..................................................................................................... 20
3
I. SPECIFICATIONS
1. NAMEPLATE RATING
MODEL NUMBER
AC SUPPLY VOLTAGE
DCM-270BAH-OS
115/60/1
AMPERES
8.5 AMPS
DESIGN PRESSURE
HI-427PSI LO-230PSI
REFRIGERANT 404A
14.8 oz.
MOTOR-COMPRESSOR THERMALLY PROTECTED
SERIAL NUMBER
See the Nameplate for electrical and refrigeration
specifications. This Nameplate is located on the
upper left hand side of the Rear Panel.
We reserve the right to make changes in specifications and design without prior notice.
4
2. DIMENSIONS/CONNECTIONS
SIDE VIEW
TOP VIEW
FRONT VIEW
SIDE VIEW
Unit: mm. (inch)
5
II. GENERAL INFORMATION
1. CONSTRUCTION
The Hoshizaki Cubelet Ice Dispenser, model DCM-270BAH-OS includes Water Supply,
Freezer, Condensing, Storage, Dispensing and Control Assemblies.
Fig. 1
Note: *Adjustable Legs
Minimum height - 4"
Maximum height - 5.3"
Do not adjust exceeding the above recommendation.
6
2. OPERATION - How it works
Water flows from the potable water source through the Water Supply Line Shut-off Valve,
enters at the Water Inlet fitting and into the Water Reservoir. The Water Reservoir functions
to maintain a constant water level inside the Freezer Assembly. Water from the Water
Reservoir enters at the bottom of the Freezer. Heat is removed by the refrigeration process
and ice forms inside the Freezer.
A stainless steel Auger, located inside the Freezer, is direct-driven by the Gear Motor, and
the rotating Auger carries the ice upward to the end of the Auger, where excess water is
pressed out of the ice, as the ice is extruded and broken into cubelet ice (compressed ice)
and then pushed out into the Storage Bin.
Moving the Power Switch on the bottom left of the Middle Front Panel, to the “ON” position
starts the automatic and continuous icemaking process. When the Ice Storage Bin is filled
with ice, the Bin Control Switch will shut off the icemaking process. As the ice is removed
from the Storage Bin, the Bin Control Switch resets automatically and restarts the icemaking
process.
The Agitator in the Storage Bin keeps the ice from clustering so that the ice can move easily
through the Spout.
7
III. INSTALLATION AND OPERATING INSTRUCTIONS
1. CHECKS BEFORE INSTALLATION
IMPORTANT
1. Remove shipping carton, tape(s) and packing. If packing material is left in
the ice dispenser, it will not work properly.
2. Ensure all components, fasteners and thumbscrews are securely in place.
1) Be careful not to damage the panels when installing the ice dispenser.
2) Remove the package containing accessories.
3) Check that a 1A and a 0.5A spare fuse for the Transformer are provided in the small vinyl
bag.
4) Check that refrigerant lines do not rub or touch lines or other surfaces, and that the fan
blade moves freely.
5) Check that the compressor is snug on all mounting pads.
6) See the Nameplate on the upper left hand side of the Rear Main Panel, and check that
your voltage supplied corresponds with the voltage specified on the Nameplate.
2. HOW TO REMOVE PANELS - See Fig. 2
a) Front Panel .............. Remove the screw.
Lift up and off.
b
d
c
b) Top Panel ................ Pull toward you and
lift off.
a
c) Rear Panel ............... Remove the screws
and pull off.
d) Side Panels................Remove the screws
and pull off.
e) Apron Panel...............Remove the screws
and pull off.
8
d
e
Fig. 2
3. LOCATION
WARNING
This ice dispenser is not intended for outdoor use. Normal operating ambient
temperature should be within +45°F to +100°F; normal operating water
temperature should be within +45°F to +90°F. Operation of the ice dispenser,
for extended periods, outside of these normal temperature ranges may affect
production capacity.
IMPORTANT
Sunlight, direct and indirect, can have an effect on the operation of the
dispense sensors. If a problem is noticed, the machine should be moved out
of direct sunlight and/or farther away from any outside windows.
For best operating results:
• Ice dispenser should not be located next to ovens, grills or other high heat producing
equipment.
• Location should provide a firm foundation for the equipment. Level the ice dispenser from
side-to-side and front-to-rear
• Allow 6" clearance at rear and left side, 10" at right side and 20" at top for proper air
circulation and ease of maintenance and/or service should they be required.
• Avoid a site where dripping is not allowed.
4. ELECTRICAL CONNECTION
• This ice dispenser must have a separate power supply or receptacle of proper capacity.
See the Nameplate.
9
5. WATER SUPPLY AND DRAIN CONNECTIONS - See Fig. 3
• When the water supply is off, or if the pressure is below 10 PSIG, the protection circuit stops
the operation of the ice dispenser. Wait until the proper water pressure is reached.
• Water supply inlet is 1/2" female pipe thread (FPT).
• A water supply line shut-off valve and drain valve should be installed.
• Water supply pressure should be a minimum of 10 PSIG and a maximum of 113 PSIG.
If the pressure exceeds 113 PSIG, use a pressure reducing valve.
• Drain outlet is 3/4" male pipe thread (MPT).
• The drains must have 1/4" fall per foot on horizontal runs to get a good flow.
• Keep more than a 2" air gap between drain pipe ends or hose ends and a sink or the like.
• A plumbing permit and services of a licensed plumber may be required in some areas.
Fig. 3
10
6. FINAL CHECK LIST
1) Is the ice dispenser level?
2) Is the ice dispenser in a site where the ambient temperature is within +45°F to +100°F
all year around?
3) Is there at least 6" clearance at rear and left side, 10" at right side and 20" at top for
maintenance or service?
4) Have all shipping carton, tapes and packing been removed from the ice dispenser?
5) Are all components, fasteners and thumbscrews securely in place?
6) Have all electrical and piping connections been made?
7) Has the power supply voltage been checked or tested against the nameplate rating?
8) Are the Water Supply Line Shut-off Valve and Drain Valve installed? Has the water
supply pressure been checked to ensure a minimum of 10 PSIG and a maximum of 113
PSIG?
9) Have the compressor hold-down bolts and refrigerant lines been checked against
vibration and possible failure?
10) Has the Bin Control Switch been checked for correct operation? Lift the disk on the
bottom of the Storage Bin Cover. The Compressor should stop 90 sec. later, and the
Gear Motor 150 sec. later.
11) Has the end user been given the instruction manual, and instructed on how to operate
the ice dispenser and the importance of the recommended periodic maintenance?
12) Has the end user been given the name and telephone number of an authorized service
agent?
13) Has the warranty tag been filled out and forwarded to the factory for warranty
registration?
11
7. START UP
WARNING
1. All parts are factory-adjusted. Improper adjustments may result in failure.
2. If the unit is turned off, wait for at least 3 minutes before restarting the ice
dispenser to prevent damage to the Compressor.
1) Clean the Storage Bin.
2) Open the Water Supply Line Shut-off Valve.
3) Plug in and move the Power Switch, located on the left bottom of the Middle Front Frame,
to the “ON” position.
4) Move the Ice Making Switch, located on the Control Box, to the “ICE” position.
5) Check that water flows into the Reservoir and the Freezer Assembly:
• Water flows into the Reservoir through the Water Valve.
• Water flows into the Freezer bottom through the Feeder Tubing.
• The Float Switch trips to close the Water Valve.
6) Check the water supply and drain connections for water leaks.
7) After the Water Valve closed, the Gear Motor starts first, and then the Compressor starts
in approximately 60 sec. An automatic and continuous icemaking process starts.
8) In a few minutes, cubelet ice is extruded into the Storage Bin.
9) Check if there is any abnormal noise from the Compressor, the Fan Motor or the Gear
Motor after 30 minutes of running.
10) Activate the Sensor labeled “ICE” and the Solenoid Shutter Valve opens to dispense
ice.
12
8. PREPARING THE ICE DISPENSER FOR LONG STORAGE
IMPORTANT
When shutting off the ice dispenser for an extended time, drain out all water
from the water line and remove the ice from the Storage Bin. The Storage Bin
should be cleaned and dried. Drain the ice dispenser to prevent damage to
the water supply line at sub-freezing temperatures, using air or carbon
dioxide. Shut off the ice dispenser until the proper ambient temperature is
resumed.
1) Close the Water Supply Line Shut-off Valve.
2) Move the Ice Making Switch, located on the Control Box, to the “FLUSH” position.
3) Activate the Sensor for ice dispensing, and remove all ice from the Storage Bin.
4) Wait until all water is drained out into Drain Pan and then turn Power Switch to the “OFF”
Position.
5) Unplug the ice dispenser.
13
IMPORTANT
Before operating the dispenser next time, check that the Drain Valve is closed,
and open the Water Supply Line Shut-off Valve.
Note: When shutting off the ice dispenser at sub-freezing temperatures, run the ice
dispenser, with the Water Supply Line Shut-off Valve closed, and blow out the water
inlet line, by using air pressure. See Fig. 4.
Fig. 4
14
IV. CLEANING AND MAINTENANCE INSTRUCTIONS
IMPORTANT
Ensure all components, fasteners and thumbscrews are securely in place after
any maintenance or cleaning is done to the equipment.
1. CLEANING INSTRUCTIONS
WARNING
1. HOSHIZAKI recommends cleaning this unit at least twice a year. More
frequent cleaning, however, may be required in some existing water
conditions.
2. To prevent injury to individuals and damage to the ice dispenser, do not use
ammonia type cleaners.
3. Always wear liquid-proof gloves for safe handling of the cleaning and
sanitizing solutions. This will prevent irritation from the solution contacting
the skin.
[a] CLEANING PROCEDURE
1) Close the Water Supply Line Shut-off Valve.
2) Dilute approximately 6 fl. oz. of the recommended cleaner Hoshizaki “Scale Away” or
“LIME-A-WAY,” (Economics Laboratory, Inc.) with 1 gal. of water.
3) Move the Ice Making Switch, located on the Control Box, to the “FLUSH” position.
4) Press the Ice Push Button and remove all ice from the Storage Bin.
5) After all water has drained out of Drain Pan, turn Power Switch to the “OFF” position.
6) Remove the Spouts (A) and (B) by removing the Thumbscrew, sliding the Spouts
backward and then pulling them down. See Fig. 5.
7) Pull out Spout (A) from Spout (B).
8) Remove the Top Panel and Storage Bin Cover. See Fig. 6.
15
Thumbscrew
Fig. 5
Fig. 6
16
9) Remove the Agitator and Drip Ring. Wipe, using a clean cloth containing the cleaning
solution. See Fig. 6.
10) Pour the cleaning solution carefully into the Reservoir through the opening in the center
of the Storage Bin up to the overflow level. (Overflowed solution can be seen in the
Drain Pan.)
11) While waiting for 10 minutes to start icemaking process, wipe the Bin Liner and the Drip
Plate using a clean cloth containing the cleaning solution.
12) Replace the Drip Ring and Agitator in their correct positions.
13) Move the Ice Making Switch and the Power Switch to the “ON” position. Place the
Storage Bin Cover in position, and start the automatic icemaking process. Run the ice
dispenser until it stops automatically.
14) Move the Ice Making Switch to the “FLUSH” position and wait for the flush process to
begin (60 seconds).
15) Pour clean warm water carefully onto the Bin Liner, Agitator, Drip Ring and into the
Reservoir through the opening in the center of the Storage Bin to melt the ice and rinse
out the cleaning solution.
16) After water has drained out of Drain Pan, turn Power Switch to the “OFF” position.
17) Wipe the Storage Bin Cover and Spouts (A) and (B) using a clean cloth containing the
cleaning solution.
18) Rinse the wiped parts with water. Be careful not to wet the Bin Control Switch on the
Storage Bin Cover.
CAUTION
Do not use ice produced with cleaning or sanitizing solutions. Be sure none
remains in the Storage Bin.
[b] SANITIZING PROCEDURE - Following Cleaning Procedure
1) Dilute approximately 1.5 fl. oz. of a 5.25% Sodium Hypochlorite solution (Chlorine Bleach)
with 3 gal. of water.
2) Pour the sanitizing solution carefully into the Reservoir through the opening in the center
of the Storage Bin up to the overflow level.
17
3) Wait for 10 minutes to start icemaking process. Move the Ice Making Switch to the “ON”
position, and start automatic icemaking process. Run the ice dispenser until it stops
automatically.
4) Move the Ice Making Switch to the “FLUSH” position.
5) Wipe the Bin Liner and the Drip Plate using a clean cloth containing the sanitizing solution.
6) Pour clean warm water carefully onto the Bin Liner and into the Reservoir through the
opening in the center of the Storage Bin to melt the ice and rinse out the sanitizing
solution. Be careful not to wet the Bin Control Switch on the Storage Bin Cover.
7) Remove the Bin Control Switch from the Storage Bin Cover and immerse the Storage
Bin Cover, Agitator, Drip Ring and Spouts (A) and (B) in the sanitizing solution.
8) Rinse the sanitized parts with water.
9) Place the rinsed parts in position. Re-attach the Bin Control Switch to the Storage Bin
Cover.
10) Move the Ice Making Switch to the “ON” position, open the Water Supply Line Shut-off
Valve and start the icemaking process. Run the ice dispenser for about 30 minutes.
11) Move the Ice Making Switch to the “FLUSH” position and let all water drain out through
the Drain Pan.
12) Press the Ice Push Button, and remove all ice from the Storage Bin.
13) Place the Top Panel in position.
14) Move the Ice Making Switch to the “ON” position.
2. EFFICIENT USE OF CUBELET ICE
1) When soggy ice is produced, keep removing it until good ice is produced. When the
ice in the Storage Bin is not used for a long time it may melt in the bin, becoming
somewhat soggy.
2) The agitator will turn slightly every 90 minutes to keep ice from melting together.
3) Within 50 to 60 minutes after the Ice Making Switch is turned on, the Storage Bin will
be filled with ice and peak performance will be reached.
18
3. MAINTENANCE
IMPORTANT
This ice dispenser must be maintained individually, referring to the instruction manual and labels provided with the ice dispenser.
1) Stainless Steel Exterior
To prevent corrosion, wipe the exterior occasionally with a clean and soft cloth. Use
a damp cloth containing a neutral cleaner to wipe off oil or dirt build up.
2) Air Filter - See Fig. 7
A plastic mesh air filter removes dirt or dust from the air, and keeps the Condenser from
getting clogged. As the filter gets clogged, the ice dispenser’s performance will be
reduced. Check the filter at least twice a month. When clogged, use warm water and
a neutral cleaner to wash the filter.
3) Condenser
Check the Condenser once a year, and clean if required by using a brush or vacuum
cleaner. More frequent cleaning may be required depending on the location of the ice
dispenser.
Fig. 7
19
HOSHIZAKI
HOSHIZAKI AMERICA, INC.
618 HIGHWAY 74 SOUTH
PEACHTREE CITY, GA 30269
U.S.A.
PHONE: 770-487-2331
91A2AC10A