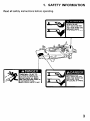
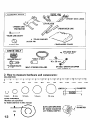
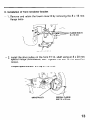
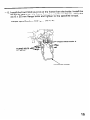
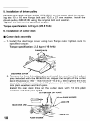
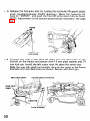
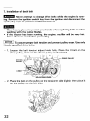
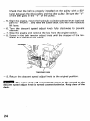
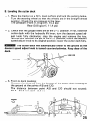
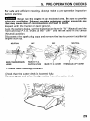
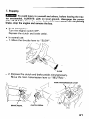
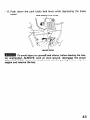
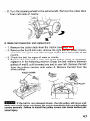
1
Thank
you for purchasing
a Honda
attachment
for your tractor.
This manual covers the assembly, operation and maintenance
of the Honda mid-mount
rotary mower for the H5518 tractor, type A2 (Two Wheel
Drive Model) and A4 (Four Wheel Drive Model).
Read this manual and the Owner’s Manual for the Honda H5518 Tractor
before you operate the rotary mower.
Honda Motor Co., Ltd. reserves the right to make changes
without notice and without incurring any obligation.
at any time
No part of this publication
permission.
may be reproduced
without
written
This manual should be considered a permanent part of the rotary mower
and should remain with the rotary mower when sold.
READ THIS OWNER’S
MANUAL
CAREFULLY.
these symbols and any instructions
that follow:
m
-Indicates
serious
not followed.
Pay special
attention
injury or death WILL result if instructions
to
are
--Indicates
a strong possibility that serious injury or death could
result if instructions
are not followed.
m-
Indicates a possibility
tions are not followed.
m
NOTE:
that
minor injury can result
-Indicates
that equipment or property
structions
are not followed.
Gives
helpful
damage
if instruc-
can result if in-
information.
Honda tractors
are designed
to give safe and dependable
service if
operated according to instructions.
Operating this tractor requires special
effort on your part to ensure your safety and the safety of others.
m
Using this product for a purpose not intended may cause injury
or property damage. Read and understand
this Owner’s
Manual before
operating this tractor.
If a problem should arise, or if you have any questions
consult an authorized
Honda tractor dealer.
HONDA
MOTOR
CO.,
LTD.
1991,
ALL RIGHTS
about your tractor,
RESERVED
1
CONTENTS
1. SAFETY
2. SERIAL
INFORMATION
NUMBER
3. COMPONENT
.......................................................
.................................................................
IDENTIFICATION
.............................................
3
9
10
4. INSTALLING
MOWER
..........................................................
1. Loose parts ....................................................................
.........................
2. How to measure hardware and components
3. Installation of front tensioner bracket ..................................
4. Installation of lift link ........................................................
5. Installation of driven pulley ................................................
6. Installation of cutter deck ..................................................
7. Installation of deck belt .....................................................
8. Leveling the cutter deck ....................................................
9. Adjustment
of cutter deck lift link .......................................
11
11
12
13
16
18
18
22
25
27
....................................................
5. PRE-OPERATION
CHECKS
...........................................
1. Cutter deck cleaning (exterior)
2. Deck drive belt ................................................................
...............................................................
3. Blade condition
29
29
30
30
.......................................................................
6. OPERATION
1. Adjusting cutting height ....................................................
................................................
2. Descent speed adjustment
.........................................................................
3. Starting
4. Two and four wheel drive (A4 Type only) .............................
.........................................................................
5. Mowing
..............................................................
6. Cutting patterns
........................................................................
7. Stopping
33
33
34
34
37
38
39
41
..................................................................
7. MAINTENANCE
1. Maintenance
schedule ......................................................
..............................................
2. Deck drive belt replacement
3. Cutter deck removal .........................................................
.................................
4. Blade belt inspection and replacement
........................................................
5. Cutter deck cleaning
.....................................................
6. Cutter deck installation
...............................
7. Blade bolt tightness/Blade
replacement
8. Fastener tightness/Lubrication
points ..................................
44
44
45
46
47
48
48
49
51
8. STORAGE
..........................................................................
...........................................................
9. TROUBLESHOOTING
10. SPECIFICATIONS
11. WARRANTY
2
................................................................
SERVICE
..........................................................
52
53
55
56
1. SAFETY
Read all safety
instructions
before
INFORMATION
operating.
DISCHARGE GUARD
WHILE BLADE IS TURNING.
\
=&!j!!!J
DISCHARGE GUARD
WHILE BLADE IS TURNING.
3
SAFETY
INFORMATION
For your safety
precautions:
Operator
and the safety
of others,
pay special
attention
to these
Responsibility
Keep the tractor in good operating condition.
Operating
a tractor in
poor, or questionable
condition could result in serious injury.
Be sure all safety devices are in working order and warning labels are in
place, these items are installed for your safety.
Know how to stop the engine and attachments
quickly in case of
emergency.
Understand
the use of all controls.
Allowing anyone to operate this tractor without proper instruction may
result in injury.
Allowing
passengers
to ride on the tractor or any of its attachments
may cause the tractor to tip over.
Wear sturdy, full coverage footwear. Operating this tractor barefoot, or
with open toe shoes or sandals increases your risk of injury.
Dress sensibly. Loose clothing may get caught in moving parts, increasing your risk of injury.
Be alert. Operating this tractor when you are tired, ill or under the influence of alcohol or drugs may result in serious injury.
Keep all persons and pets away from the operating area.
Child Safety
Serious injury or death can occur if a child falls off the tractor or runs into
the tractor’s path and is run over by the machine.
l
Allowing
children
to ride as passengers
on the tractor
can be
dangerous.
l
Keep children indoors and supervised
at all times when any outdoor
power equipment
is being used nearby. Young children move quickly
and are attracted to the tractor and the operating activity especially if
they have been given rides before.
l
Never assume that children will remain where you last saw them. Be
alert, and turn the machine off if children enter the area. Use extreme
care when backing up, and when approaching
corners, shrubs, trees,
and other obstructions
that might hide children from sight.
l
Children should never be allowed to operate the tractor, even under
adult supervision.
Fire and Burn Hazard
.
Gasoline is extremely flammable,
and gasoline vapor can explode.
Use extreme care when handling gasoline. Keep gasoline out of reach of
children.
l
Refuel in a well ventilated
area with the engine stopped.
l
Allowed the engine to cool before refueling. Fuel vapor or spilled fuel
may ignite.
l
The accumulation
of dry grass and leaves around the engine, the exhaust system,
or on top of the cutter deck (especially
around the
pulleys) may ignite.
l
It is illegal in some areas to operate an engine without a USDA qualified
spark arrester. Periodic maintenance
is required to keep it functioning
as designed.
The engine and exhaust system become very hot during operation and remain hot for a while after stopping. Contact with hot engine components
can cause burn injuries and can ignite some materials.
l
Avoid touching a hot engine or exhaust system.
l
Allow the engine to cool before performing maintenance
or storing the
tractor indoors.
Carbon
Monoxide
Poisoning
Hazard
Exhaust contains poisonous carbon monoxide,
a colorless and odorless
gas. Breathing exhaust can cause loss of consciousness
and may lead to
death.
l
If you run the engine in an area that is confined, or even partially enclosed, the air you breathe could contain a dangerous amount of exhaust
gas. To keep exhaust gas from building up, provide adequate ventilation.
Blade Hazard
The cutting blades are sharp, and they turn at high speed. Accidental contact can cause serious injury.
l
Keep your hands and feet away from the mower deck while the engine
is running.
l
Stop the engine, disengage the Power Take Off (P.T.O.)
clutch and
remove the key before inspection or maintenance
of the deck or blades.
l
Disconnect
the spark plug caps to prevent any possibility of accidental
starting.
Wear heavy gloves to protect your hands from the blades
when cleaning out the mower deck, or when inspecting or replacing the
blades.
5
Thrown
Object
Hazard
Objects hit by the blades can be thrown from the tractor with great force,
and may cause serious injury.
l
Before mowing,
clear the mowing area of sticks, stones, dog bones,
and other litter and loose objects. Mow only in daylight, or in well-lit
areas at night, so you can see and avoid objects in the grass.
l
Before operating the tractor, be sure the side discharge guard is down,
or that the optional grass catcher bags and discharge chute are in place.
l
Disengage the Power Take Off (P.T.O.1 lever to stop the blades before
crossing a gravel driveway or any other area with loose stones.
l
Always inspect the mower for damage after striking a foreign object.
Repair or replace any damaged parts before continued use.
l
Broken pieces thrown from a worn or damaged blade can cause serious
injury. Always inspect the blades before using the tractor.
Operation
l
l
l
l
.
.
.
.
l
.
6
Be sure to fasten the seat belt whenever
driving the tractor with the
Rollover Protective
Structure
(ROPS) attached.
Use of either device
(seat belt or ROPS) without the other will increase the chance of injury
in a rollover.
Adjust the seat belt so that it is not slack.
Be sure that the main Transmission
lever is in “Neutral”
the front and
rear P.T.O. levers are in the “OFF” position before starting the engine.
Operate the tractor and its attachments
at low speed until you become
familiar with all of its operating characteristics
and controls.
Do not operate the tractor or its attachments
without ensuring the area
in front and behind is clear of people and.pets.
Sudden stops of the tractor while driving at high speed or sudden startup with the steering wheels turned fully in one direction, could cause
the tractor to overturn.
This tractor utilizes Four Wheel Steering (4WS) for a tighter turning circle and greater
mobility
than tractors
with conventional
steering.
However, the feel of 4WS is slightly different from other tractors. Practice driving in a wide, safe area.
Never operate the tractor or its attachments
when visibility is diminished by darkness or bad weather; you ability to see obstacles will become
impaired.
Watch out for rocks, roots, holes and other obstacles that may cause
the Tractor to overturn.
It is illegal to operate this tractor on public streets, roads, or highways.
.
l
l
To avoid injury to yourself and others, before leaving the Tractor unattended, ALWAYS,
- park on level ground.
- disengage the power take-off.
- lower the attachment(s).
- Lock the parking brake.
- stop the engine.
- and remove the key.
Be sure to follow the instructions
below whenever
applying the differential lock.
- Be sure that the main transmission
lever is set in 4th gear or lower,
and reduce engine speed before applying the differential
lock.
- Do not apply while turning the tractor.
Use the lock only when driving straight ahead.
- Do not rest your foot on the lock pedal while the lock is not in use.
- Never apply while driving on a paved surface.
Operation
l
l
l
l
l
l
l
l
l
on Slopes
This tractor and its attachments
are intended for use on relatively flat
terrain.
When operating the tractor on a slope, always drive up and down the
face of the grade. Turning or driving across the face of a slope may
cause the tractor to overturn.
If you find it necessary to park on a grade, be sure to lock the parking
brake and securely block the wheels.
To avoid loss of control or overturning,
always reduce speed and exercise extreme caution when operating on sloping or uneven surfaces.
Attempting
to change gears while operating the tractor on a slope may
adversely affect vehicle stability and control and severe personal injury
could result.
Avoid
rapidly backing down,
or rapidly accelerating
up a sloping
surface.
To avoid loss of control or overturning,
do not turn or stop on sloping
surfaces.
When descending a slope, disengaging the clutch or shifting to neutral
can cause a loss of control that may result in severe personal injury.
Do not operate the tractor near the edge of a ditch or an embankment,
slipping off the edge could lead to severe personal injury and equipment
damage.
7
MAINTENANCE
l
l
l
l
l
l
l
SAFETY
Before
performing
maintenance/inspection,
read the
instructions
thoroughly.
Before cleaning, inspecting or servicing the tractor, be sure to
- Turn off and lower any attachments.
- Stop the engine and remove the key.
- Remove the spark plug caps.
If you hit an object, stop the engine and inspect the Tractor and its attachments.
Fix any damage before you resume operation.
Operating the tractor with damaged, worn or broken parts may result in
severe personal injury.
oil and other combustible
materials
can
Leaves,
grass clippings,
become a fire hazard. Be sure the body, engine and drive mechanism
areas are kept clean.
All nuts, bolts and fasteners must be tight.
Do
not
change
the
engine
governor
settings
or the
engine
may
be
damaged.
STORAGE
l
l
l
8
SAFETY
To avoid the possibility of fire, allow the engine and exhaust system to
cool before storing the tractor in an enclosed space or near combustible
materials.
When storing the tractor, be sure to apply the parking brake and remove
the ignition switch key.
Drain all gasoline from the carburetor and fuel tank, and disconnect the
battery ground cable.
2.
SERIAL NUMBER
The serial number are used to identify your rotary mower
quired by the dealer when ordering replacement
parts.
The MM46
serial number
is located
The MK4618
serial number
sioner bracket.
Record the number
MM46
MK4618
and may be re-
on the right side of the deck.
is located
on the right side of the front ten-
here for your reference.
Serial number:
Serial number:
MM46
MK4616
SERIAL
SERIAL
NUMBER
N
9
3.
COMPONENT
IDENTIFICATION
GAUGE
WHEELS
ANTI-SCALP
BLADES
10
ROLLERS
4.
l
l
INSTALLING
MOWER
The rotary mower should be installed by an authorized
Honda dealer
unless the owner
has proper tools and feels he is mechanically
qualified.
To prevent accidental
start-up,
remove the ignition switch key, and
disconnect
the spark plug caps before installing the mower.
Install with the tractor on level ground.
Lock the parking brake, set the transmission
lever in “N”
front and rear P.T.O. levers in the “OFF” positions.
1. Loose parts
Before assembling the
parts.
0 Indicates the loose
0 Indicates the loose
* Indicates the loose
rotary
mower,
parts furnished
parts furnished
parts furnished
check for any missing
with
with
with
DECK LIFT ROD
WASHER
LINK
OLEFT
ARM
OLOCK
N’J’
OSPJT
PIN
OLlFT
OLIFARM-
CUTTER
DECK LIFT
ARM
ORIGHT
PIN
LIFT ARM
~
OPLAIN
] FRONT
or damaged
LINK SHAFT
@ OPLAIN
OLIFT
and the
H5518 Tractor.
MM46Kl
Rotary mower.
MK4618
Tensioner kit.
OLIFT
QCUTTER
(Neutral)
WASHER
TENSIONER
BRACKET
]
*FRONT
P.T.O. ASSEMBLY
(Front Tensioner bracket)
NSIONER
UARD
SPRING
l2-TENSIONER
BRACKET
FLANGE BOLTS 8 x 16 mm
(Shouldered)
e
e
&
8
.e
e
0
Q
OFRONT
HITCH
PIVOT
A
ODRIVE
PULLEY
QG-FLANGE
t
BOLTS
8 x 25 mm
P
81 -SPECIAL FLANGE BOLT
8 x 20 mm (Shouldered)
( CUTTER
DEC
ONT
DECK LINKS
PROTECTOR
*REAR
LINK SHAFT
ODISCHARGE
lLlNCH PIN
B
“DRIVEN
‘DRIVE
PULLEY
COVER
QFLANGE
8xl6mm
BOLT
V-BELT
OF
1
0
l
FLANGE
BOLTS
*BELT
2. How to measure
STOPPER
hardware
DV-BELT
DRIVEN STOPPER
(Belt Stopper A)
COLLARS
and components:
MILLIMETERS
~~~~,~~~~,~~~,,IIII~IIII~““~““~“”~”’l~”’l~l’ll~Illl~llll~llll~llll~illl~llli~llll~llll~l~ll~llll~llll~llll~llll~llll~llll~
I
5mm
8mm
12 mm
14 mm
16 mm
PLAIN WASHERS
Washers are specified
by inside diameter in this manual.
NUTS ARE SPECIFIED
BY INSIDE DIAMETER
(AT THREAD DEPTH)
12
INSIDE
DIAMETER
3. Installation
-
of front tensioner
bracket
1. Remove and retain the lower
flange bolts.
cover
6 by removing
the 8 x 16 mm
FLANGE
8xl6mm
LOWEk
-
COVER
B
2. Install the drive pulley on the front P.T.O.
special flange (shouldered)
bolt. Tighten
torque.
Torque
specification:
2.2
DRIVE
BOLTS
shaft using an 8 x 20 mm
the bolt to the specified
kg-m (16 ft-lb)
&JLLEY
SPEClAi
FLANGE
BOLT 8 x 20 mm
13
-
3. Position the front tensioner
bracket on the frame and install using
two of the bolts removed in Step 1 and the two shouldered tensioner
bracket bolts, Tighten the bolts to the specified torque while holding
the front tensioner
bracket firmly against the frame. Retain the remaining four bolts.
Torque
specification:
2.2
kg-m (‘I6 ft-lb)
TENSIONER
BRACKET
FLANGE BOLTS 8 x 16 mm
(Shouldered)
FLANGE
8xl6mm
BOLTS
FRONT
TENSIONER
-4
Insert the end of the tensioner spring into the hole in the tensioner
arm. Hook the other end into the frame tab as shown.
14
BRACKET
-
5. Install the front hitch pivot A on the frame from the inside. Install the
tensioner guard on the frame from the outside as shown, using the
six 8 x 25 mm flange bolts and tighten to the specified torque.
Torque
specification:
2.2
kg-m (16 ft-lbl
FRONT
FLANGE
8x25mm
HITCH
PIVOT
A
BOLTS
\
TENSIONER
GUARD
15
4. Installation
-
of lift link
1. Pump grease through the grease fitting to lubricate the lift arm shaft.
Insert the lift arm shaft through the bracket on the main frame from
the left side. Adjust the length of the deck lift rod to 370-372
mm
(14.614.6 in), then tighten the nut securely. Install the deck lift
rod in the hole in the lift arm bracket. Place the plain washer over the
end of the deck lift rod and insert the lock pin through the end.
Recommended
Grease:
Multipurpose
I
PLAIN
WASHER
LOCK
PIN
DECK
LIFT ROD
/
LEFT LIFT ARM
-
Grease
I
’
LIFT ARM
SHAFT
\
GREASE
FITTING
2. Slide the right lift arm onto the end of the lift arm shaft. Install the lift
arm pin through the lift arm shaft and secure with the lock pin.
LIFT ARM
PIN
RIGHT
LIFT ARM
SHAFT
LOCK
16
PIN
LIFT ARM
-
3. Loosen the six 8 x 20 mm Flange bolts fastening the right and left
link pivots. Slide the lift link shaft through the holes in the pivots as
shown. Retighten the 8 x 20 mm flange bolts securely.
Recommended
Grease:
Multipurpose
Grease
LIFT LINK
SHAFT
-
4. Lubricate the lift arm pin with grease, then insert the threaded end of
the lift arm pin through the front link arm and install the lock nut on
the end of the pivot. Tighten the lock nut securely.
Slide the lift link assembly onto the lift link shaft on the frame, and
the lift arm pin through the hole in the lift link rod, simultaneously.
Insert the end of the deck lift rod through the hole in the lift link
assembly.
Install the plain washer over the end of the deck lift rod
and insert the lock pin through the end as shown. Install plain washer
over lift link shaft and insert the shaft pin through the end of the lift
link shaft and secure with the lock pin. Install the plain washer over
the end of the lift arm pin. Insert the split pin through the end of the
lift arm pin and bend the legs away from each other.
LOCK NUT
\
LINK SHAFT
17
5. Installation
of driven
pulley
Remove and retain driven pulley (MM46Kl)
on the cutter deck by removing the 10 x 16 mm flange bolt and 10.5 x 27 mm washer. Install the
driven pulley (MK4618)
using the original bolt and washer.
Tighten the bolt to the specified torque.
Torque
specification:
6. Installation
H Cutter
-
4.0
of cutter
kg-m (28.9
ft-lb)
deck
deck assembly
1. Install the discharge
specified torque:
Torque
specification:
cover
2.2
using two
flange
nuts;
tighten
nuts to
kg-m (16 ft-lb)
FLANGE
NUTS
DISCHARGE
-
2. Remove the front link adjust pins and install the new front link adjust
pins included with the MK4618
kit. Adjust the length of the cutter
deck lift plates to 150152 mm (5.9-6.0
in.), then tighten the nuts
securely. Install the cutter deck lift plates on the cutter deck with 14
mm plain washers and linch pins.
Install the rear deck links on the cutter deck with 14 mm plain
washers and lock pins (gold).
CUTTER
DECK LIFT PLATE
4 mm PLAIN WASHER
REAR DECK
18
LINK
PLAIN WASHER
n Cutter deck installation
-
1. Connect the spark plug caps to the spark plugs and insert the ignition
key in the ignition switch.
Check that the hydraulic lift lever is in
NEUTRAL. Start the engine and move the hydraulic cylinder selector
lever (optional part) to the “FRONT”
position. Raise the lift arm fully
with the hydraulic lift lever.
HYDRAULIC
LIFT LEVER
HYDRAtiLlC
CYLINDER
SELECTOR LEVER
(OPTIONAL
PART)
Turn the descent speed adjust knob fully clockwise.
Stop the engine and remove the key from the engine
disconnect
the spark plug caps.
-
switch
and
2. Turn the steering wheel to the extreme left. Position the cutter deck
under the tractor from the right side; return the steering wheel to
straight-ahead
position.
19
-
3. Release the hydraulic lock by turning the hydraulic lift speed adjust
knob counterclockwise
(FAST direction).
Move the hydraulic lift
lever to “DOWN”,
and push the front lift arms down fully by hand.
NOTE: Adjustment
of the descent speed maybe necessary, see page
34.
HYDdAULlC
LIFT LEVER
-
4. Connect the right cutter deck lift plate and rear deck links to the
bracket on the tractor and secure with 14 mm plain washer and 14
mm lock pin. Install the left cutter deck lift plate the same way.
Slide the rear link shaft horizontally
through the holes in the frame
brackets and rear deck links as shown. Secure with linch pin.
REAR LINK SHAFT
CUTTER
DECK LIFT PLATE
PLAIN’WASHER
20
-
5. Remove the front link adjust pins and install the new front link adjust
pins included with the MK4618
kit. Adjust the length of the front
deck link to 300-302
mm (1 1.8- 11.9 in.), then tighten the lock
nut securely. Connect a front deck link to the right side of the cutter
deck and to the right bracket on the tractor. Secure with 14 mm plain
washers and linch pins.
NOTE: To ease installation
of the front deck link on the tractor
bracket, raise the front of the deck slightly with your hand.
Align the hole in the right bracket of the front link protector with the
pin at the center of the right front deck link, and secure with the 12
mm lock pin (gold). Attach the left bracket of the front link protector
to the left front deck link and secure in the same way.
Connect the left front deck link to the left side of the tractor, then to
the cutter deck. Secure in place with two 14 mm plain washers and
two linch pins.
(P
0
14 mm PLAIN WASHER
I
LINCH
LINCH
PIN
PIN
12 mm PLAIN WASHER
FRONT
FRONT
DECK LINKS
LINK PROTECTOR
12 mm LOCK PIN
21
7. Installation
of deck belt
m
Never attempt to change drive belts while the engine is running. Remove the ignition switch key from the ignition and disconnect the
spark plug caps to prevent accidental start up.
l
l
Wear heavy gloves to protect your hands when replacing belts or when
working with the cutter blades.
If the tractor has been running, the engine, muffler will be very hot.
Allow them to cool before proceeding.
) NOTICE
Honda
-
] T o assure
specified
proper belt tension
drive belts.
and prevent
pulley wear.
1. Loosen the belt tension adjust knob fully. Place the V-belt
drive pulley, then on the driven pulley as illustrated.
DRIVE
Use only
on the
PULLEY
DRIVEN
PULLEY
V-BELT
ADJUSTING
-
KNOB
2. Place the belt on the pulley on the tensioner
on the pulley on the left side.
22
side (right); then place it
-
3. Position the V belt driven stopper (belt stopper A) on the frame and
install using 10 x 20 mm flange bolt and 8 x 16 mm flange bolt.
Tighten the bolt to the specified torque.
Torque specifications:
10 mm flange bolt:
4.0 kg-m (29 ft-lb)
8 mm flange bolt:
2.2 kg-m (16 ft-lb)
V-BELT DRIVEN
(BELT STOPPER
-
STOPPER
A)
FLANGE
BOLT
4. Install the belt stopper collars and 8 x 45 mm flange bolts on each
side of the frame. Tighten the bolt to the specified torque.
Torque
specification:
BELT STOPPER
2.2
kg-m (16 ft-lb)
COLLAR
8x45mm
FLANGE
BOLT
23
Check that the belt is properly installed on the pulley with a 90’
twist between the drive pulley and the idler pulley. Be sure the “V”
of the belt goes in the “V” of the pulley.
-
-
5. Start the engine, move the hydraulic cylinder selector lever (optional
part) to “FRONT”,
and raise the cutter deck fully with the hydraulic
lift lever.
6. Turn the descent
speed adjust knob fully clockwise
to prevent
descent.
7. Stop the engine and remove the key from the engine switch.
8. Screw in the belt tension adjust knob until the stopper of the tensioner arm contacts the frame.
STOP
TENSIONER
-
9. Return
m
descent
deck.
24
the descent
The cutter
speed adjust
r
speed
ARM
adjust knob to the original
position.
deck will automatically
lower to the ground as the
knob is turned counte&lockwise.
Keep clear of the
8. Leveling
the cutter
deck
-
1. Place the tractor on a firm, level surface and lock the parking brake.
Turn the steering wheel so that the wheels are in the straight-ahead
position. Check the air pressure in the tires.
Tire pressure: Front (1 .O kg/cm*, 14.2 psi)
Rear (0.8 kg/cm*, 11.4 psi)
-
2. Check that the gauge rollers are at the 2-l/2” position. If not, raise the
cutter deck with the hydraulic lift lever; turn the descent speed adjust knob fully clockwise;
stop the engine and remove the key;
remove and relocate the pin to the 2-l/2” position; return the descent
speed adjust knob to its original position; lower the cutter deck fully.
m
descent
deck.
The cutter
speed adjust
deck will automatically
lower to the ground as the
knob is turned counterclockwise.
Keep clear of the
LINK PIN
LOCK PIN
-
3. Front-to-back
leveling:
Measure the distance from the bottom of the cutter deck housing to
the ground at the points A/B and C/D.
The distance
between
point A/B and C/D should not exceed:
59.5-63.5
mm (2.3-2.5
in)
FRONT
A,8dc,D
-
4. To adjust, remove the linch pin from the right and left link adjust
pins. Loosen the adjust pin lock nuts and turn the pins an equal
number of full turns: out lowers the front clearance; in raises the
clearance.
FRf-lNT
nFf!K
I INK
\r-
I
ADJUST
LINCH
26
PIN
PIN
9. Adjustment
of cutter
deck lift link
n Cutter deck lift plate
-
-
1. Place the tractor on a firm, level surface. Apply and lock the parking
brake.
2. Start the engine, move the hydraulic cylinder selector lever (optional
and raise the cutter deck fully with the hydraulic
part) to “FRONT”,
lift lever.
3. Turn the descent speed adjust knob fully clockwise.
4. Stop the engine, and remove the key from the ignition switch.
5. Adjust the deck lift plates until the height of the cutter deck is equal
on both sides..
-
Turn
the
cutter
deck adjust
knob
counterclockwise.
-
-
Use the hydraulic lift lever to lower the cutter deck.
Adjust the cutter deck lift plates by loosening the lock nuts and
turning the adjust pins as needed.
6. After the height of the cutter deck is equal on both sides, raise the
cutter deck and turn the cutter deck descent adjust knob clockwise.
7. If the height of the cutter deck is less than 115 mm (4.5 in.), adjust
with the cutter deck lift rod adjust pins until the height is from 115 to
118 mm (4.5 to 4.7 in.).
LOCK NUT
ADJUST
upa.
LINCH
PIN
PIN
27
W Cutter deck lift rod
- 1. The cutter deck lift rod can be adjusted in the same manner as the
cutter deck plate (step-5).
After adjustment,
tighten the lock nuts and lock the adjust pins
securely.
- 2. Do not adjust the cutter deck lift rod less than 367 mm (14.5 in.) for
the first time. If the height of the cutter deck is below 115 mm (4.5
in.) with the cutter deck lift rod being 367 mm (14.5 in.), then adjust
the height with the cutter deck lift plates.
- 3. Adjust the cutter deck lift plates if the cutter deck fails to reach the
desired height.
If it still fails to reach the desired height, then adjust the length of the
cutter deck lift rod.
n Lift link rod
Check that the distance
between
the end of the rod and the bottom
washer is 40 mm (1.6 in.). To adjust, loosen the lock nut and turn the adretighten the lock nut securely.
just nut. After adjustment,
ROD STOPPER
DAMPER
ADJUST
28
NUT
LOCK NUT
SPRING
PIN
5.
For safe and efficient
before starting:
mowing,
PRE-OPERATION
always
make
CHECKS
a pre-operation
inspection
m
Never run the engine in an enclosed area. Be sure to provide
adequate ventilation.
Exhaust contains poisonous carbon monoxide gas
that may cause loss of consciousness
and lead to death.
Inspect with the tractor on level ground.
Lock the parking brake, set the transmission
lever in “N” (Neutral) and the
front and rear P.T.O. levers in the “OFF” and the lift lever in the center
(Neutral) position.
Disconnect
the spark plug caps and remove the key to prevent accidental
engine start-up.
NEUTRAL
MAIN TRANSMISSION
LEVER
1. Cutter
CLUTCH
deck cleaning
NEUTRAL
OFF
OFF
LEVER
REAR P.T.O.
LEVER
HYDRAULIC
LIFT LEVER
(exterior)
Check that the cutter deck is lowered fully.
Remove grass and other foreign matter from the cutter
deck.
29
2. Deck drive belt
m
disconnect
To avoid severe personal injury remove the ignition
the spark plug caps to prevent accidental starting.
key and
Lower the cutter deck fully, remove the ignition key and disconnect the
spark plug caps. Visually inspect the drive belt for wear, cracks or other
faults. If the drive belt is faulty, follow the replacement procedure described on page 45.
BELT
3. Blade condition
Before
-
-
m
l
l
l
each use, check
each cutter
blade, for damage
or abnormal
wear.
1. Start the engine and move the hydraulic cylinder selector lever (optional part) to “FRONT”,
and raise the cutter deck fully with the
hydraulic
lift lever. Turn the descent
speed adjust knob fully
clockwise
to prevent descent. Do not overtighten
the knob.
2. Push the hydraulic lift lever toward “DOWN”
to be sure that the cutter deck is locked in the fully raised position. Return the lift lever to
“NEUTRAL”
and then stop the engine, remove the ignition key and
disconnect
the spark plug caps.
To avoid severe personal injury:
Remove the ignition key and disconnect the spark plug caps to prevent
accidental
starting.
Wear heavy gloves to protect your hands from the cutter blades.
Place a block under the cutter deck to prevent
it from lowering
unexpectedly.
30
-
3. Inspect each of the blades for cracks, bending or signs of wear. The
right and center blades can be seen through the discharge opening
on the right side of the cutter deck. The left blade can be seen from
under the left front edge of the cutter deck. Turn the blades 1 80° to
inspect opposite side.
DISCHARGE
RIGHT
COVER
BLADE
LEFT BLADE
31
If any of the blades shows signs of damage or excessive wear, a more
thorough inspection is necessary (see page 36 for cutter deck removal). A
dull blade can be sharpened, but a blade that is worn out, bent, cracked or
otherwise
damaged
must be replaced.
If a blade needs sharpening
or
replacement,
take the cutter deck to your authorized Honda tractor dealer.
Or if you have the proper tools, you can remove and install the blade
yourself.
.-s
BENT
‘x
CRACKED
Severe personal injury can result if a piece of blade breaks off and is
thrown from under the cutter deck.
l
Never operate the tractor with a worn or damaged blade.
l
Never operate the tractor with a blade that is cracked or notched at the
base of its upturned rear edge.
1 NOTICE
l
l
-
1
Use a genuine Honda replacement
blade, or equivalent.
To reduce the possibility of weakening the blade, or causing imbalance
or poor cutting performance,
sharpening
should be performed
by an
authorized
Honda tractor dealer.
4. When you have completed the blade inspection,
speed adjust knob to its original position.
m
descent
deck.
32
The cutter
speed adjust
return the descent
deck will automatically
lower to the ground as the
knob is turned counterclockwise.
Keep clear of the
6.
OPERATION
m
Never run the engine in an enclosed area. Be sure to provide
adequate ventilation.
Exhaust contains poisonous carbon monoxide gas
that may cause loss of consciousness
and lead to death.
1. Adjusting
m
height.
-
-
-
-
cutting
height
Be sure all moving parts have stopped before adjusting
Contacting
moving parts can cause injury.
cutting
1. Park the tractor on a level surface and set the parking brake.
2. Make sure the main transmission
lever is in “NEUTRAL”,
both the
front and rear P.T.O. levers are “OFF” and the lift lever is in the
center (Neutral) position.
3. Start the engine, move the hydraulic cylinder selector lever (optional
part) to “FRONT”
and raise the cutter deck fully with the hydraulic
lift lever.
4. Turn the descent speed adjust knob fully clockwise.
5. Push the hydraulic lift lever toward “DOWN”
to be sure that the cutter deck is locked in the fully raised position. Return the lift lever to
“NEUTRAL”
and then stop the engine and remove the ignition key.
6. Remove the lock pin and the link pin from the gauge wheel and set
the wheel for the-desired
cutting height.
LOCK PIN
-
7. Insert the link pin in the gauge wheel shaft and secure it with the lock
pin.
8. Repeat the adjustment
procedure for the other gauge wheel.
NOTE:
Both gauge
wheels
must be set to the same height.
33
2. Descent
speed adjustment
Adjust the descent speed of the cutter deck by turning the descent speed
adjust knob. Adjustment
is normal if it takes 1-2
seconds for the cutter
deck to lower from the highest position to the ground.
Turning the knob clockwise toward “SLOW”
will decrease the speed, and
turning it counterclockwise
toward FAST will increase the speed.
/
DESCENT
NOTE:
Uneven
mowing
SPEED ADJUST
may result
KNOB
if the descent
speed is too slow.
3. Starting
-
1. Start the engine. Depress the clutch pedal and place the main and
auxiliary transmission
levers in the desired gear range for mowing.
MAIN
TRANSMISSION
LEVER
I
CLUTCH
PEDAL
AUXILIARY
34
TRANSMISSION
LEVER
-
2. Lower the cutter
full throttle.
deck and increase
THROTTLE
-
3. Depress
engine
speed.
mow
at
LEVER
the brake pedal and release the parking
PARKING
Always
brake lock lever.
BRAKE LOCK LEVER
BRAKE PEDAL
35
-
4. Move the front P.T.O.
rotate.
FRONT
36
P.T.O.
LEVER
lever to “ON”.
The cutter
blades will start to
4. Two
and Four Wheel
Drive
(A4 Type only)
Two and four wheel drive can be selected by operating the two-and fourwheel drive select lever.
Prior to shifting, set the steering wheel in the straight-ahead
position, bring the tractor to a complete stop and depress the clutch pedal fully.
NOTE: If difficulty
is encountered
in shifting the lever, re-engage the
gears by driving the tractor a short distance in FORWARD with the clutch
engaged.
In 4-wheel
drive, the front wheels will operate with a greater
traction when rounding corners, causing the lawn to be stripped off the
ground by the wheels.
TWO AND FOUR WHEEL
SELECT LEVER
DRIVE
L\\
\\
We recommend
that you select the two wheel drive and the four wheel
drive according to the terrain and conditions.
2-WHEEL DRIVE . . . . . . . . Mowing and transport (when extra traction is not
required).
4-WHEEL DRIVE . . . . . . . Towing,
Operation
on slope or soft ground,
Operation
with attachment
installed
(Especially
when powerful driving force and braking force are
required).
1 NOTICE
l
l
l
]
To prevent damage to the transmission
mechanism, bring the tractor to
a full stop before operating the shift lever.
Driving in 4-WHEEL DRIVE range or with the differential locked on paved surface could cause premature wear on the tires, it could also impair
fuel economy.
When driving in four wheel drive, you have 4-wheel
braking. When
shifted into two wheel drive you have 2-wheel braking (rear only).
37
5. Mowing
Before operating this tractor you should read and understand
INFORMATION
on pages 3-8.
l
l
l
l
l
the SAFETY
Rotating blades and thrown objects can cause severe personal injury.
Always stop the engine before clearing the discharge cover.
Unseen hazards may cause loss of control or damage to the tractor.
Look for and avoid rocks, roots, holes, and hidden hazards in the
terrain.
Operating the tractor near the edge of a ditch or an embankment
could
cause it to tip or roll over.
Certain maneuvers
can cause the tractor to tip or roll over on sloping
surfaces; avoid sharp turns, rapid acceleration,
and sudden stops.
Also, avoid backing down slopes.
Decomposing
grass creates heat, and may become a fire hazard.
Always empty the grass bags before storing the tractor.
When mowing tall grass, make a first pass with the deck fully raised (4
inch position) this will help to expose any hidden obstacles. When you are
sure that the area is completely cleared, mow again at the desired height.
w
If the tractor should accidentally get caught on an unseen object
(rock, root, hole, etc.), do not attempt to ride over the obstruction
or turn
the steering wheel to free the mower. These actions can damage the
steering mechanism
or the deck.
MOWING
TIPS
1. Mow at full throttle to give a neat appearance to the lawn. The lawn
may not be trimmed uniformly at medium or low engine speeds.
2. Observe the following when mowing:
4th gear
Heavy cutting or trimming
5/6th gear
Normal cutting
7th gear
Light cutting or transportation
Use only for transportation
8th gear
3. Do not allow the grass to grow too long before cutting or trimming. Also
allow the lawn to dry thoroughly
before you use the mower. To cut a
thick or lush lawn, mow at low speed or cut twice.
4. Always turn counterclockwise
at low ground speed when cutting close
to trees, posts, sprinkers, walls, etc.
5. You may cut the lawn too short when the lawn is thick or wet, and/or
the ground is soft, due to sinking of the gauge wheels.
6. Increase the cutting height if the lawn is spindly, and the surface
uneven.
38
6. Cutting
patterns
These cutting
surface.
l
patterns
are
only
recommended
a flat,
level
lawn
In a small area
First make 2 or 3 turns in a clockwise direction;
continue cutting in the reverse direction.
l
for
then turn around and
In a large area
The first round of cuts is the key to making a neat finish. First, make 2
or 3 turns in a clockwise direction. As you reach the center of the area,
turn to the right and continue cutting in the reverse direction until you
have finished the upper half of the area. Cut the grass in the remaining
half in a counterclockwise
direction.
39
Mowing
If your
several
unsquare
areas
mowing area is not square or four-sided,
blocks so you can mow in a neat mowing
Overlapping
divide the area into
pattern.
on straightaways.
Be sure that each mowing lane overlaps sufficiently.
overlap width is between 4-6
in., or approximately
the mower’s front tires.
The recommended
the width of one of
1st
Overlapping
in curves
and turns
4-6”
When cutting in curves and turns, shift to a slower speed and be sure to
overlap the previous cut by 50%, or approximately
half the width of the
mower.
40
7. Stopping
m
To avoid injury to yourself and others, before leaving the tractor unattended,
ALWAYS:
park on level ground, disengage
the power
take-off (P.T.O.),
lower the cutter deck, shift into neutral, set the parking
brake, stop the engine and remove the key.
l
In an emergency:
Turn the engine switch OFF.
Depress the clutch and brake pedal.
l
In normal use:
1. Move the throttle
-
-
lever to “SLOW”,
2. Depress the clutch and brake pedals simultaneously.
Move the main transmission
lever to “NEUTRAL”.
BRAKE PEDAL
-
3. Shift the ,front and rear P.T.O.
levers to the “OFF”
position.
OFF
FRONT
-
P.T.O.
4. Lower
CLUTCH
LEVER
any attachment
HYDRAULIC
-
5. Turn the engine
key.
switch
ENGINE
42
REAR P.i.0.
to the ground
LEVER
with the hydraulic
lift lever.
LIFT LEVER
(ignition
SWITCH
switch)
KEY
to “OFF’ ’ and remove
the
-
6. Push down
pedal.
the
park brake
lock lever
PARK BRAK:
while
depressing
the
brake
LOCK LEVER
BRAKE PEDAL
m
To avoid injury to yourself and others, before leaving the tractor unattended,
ALWAYS:
p&k on level ground, disengage the power
take-off (P.T.O.),
lower the attachment,
set the parking brake, stop the
engine and remove the key.
43
7.
MAINTENANCE
Periodic maintenance
and adjustment are necessary to keep the tractor in
Service
and inspect
according
to the
good
operating
condition.
MAINTENANCE
SHCEDULE.
To avoid carbon monoxide poisoning, shut off the engine before performing any maintenance.
If you run the engine in an area that is confined,
or even partially enclosed, the air you breathe will contain a dangerous
amount of exhaust gas. If the engine must be run for any reason, be
sure the area is well-ventilated.
To avoid serious burns, allow the engine to cool before performing
maintenance.
Shut the engine off and set the parking brake before performing any
maintenance.
To prevent accidental
start-up,
remove the ignition switch key and
disconnect
the spark plug caps.
The tractor should be serviced by an authorized HONDA tractor dealer
unless the owner has proper tools and service data and is mechanically
qualified.
1 NOTICE
1 u se only
genuine
Honda
parts
or
maintenance
or repair. Replacement
parts which
quality may damage your tractor.
IGNITION
1. Maintenance
SWITCH
SPARK
KEY
their
equivalent
for
are not of equivalent
PLUG CAPS
schedule
I
REGULAR SERVICE PERIOD
ITEM
Perform at every indicated month
or operating hour interval, whichever
comes first.
EACH USE
FIRST
-a , ,-a
L” t-II33
EVERY
50 HRS
RFFFR
-. -.
TO
PAGE
29
Cutter deck (Exterior)
Clean
0
Deck drive belt
Check
0
Blade condition
Check
0
Blade bolt tightness
Check
Blade belt
Check
0
47
Cutter deck (Inside)
Clean
0
48
I
30
30
O(l)
O(1)
49
(1 I These items should be serviced by an authorized Honda tractor dealer, unless the owner has proper tools and is
mechanically proficient.
44
2. Deck drive belt replacement
Set the gauge wheel to the 1 l/2 position (See page 33).
To replace the drive belt, observe the following.
- 1. Lower the cutter deck and remove belt stopper A, belt stopper
lars and 8 x 45 mm flange bolts from each side of the frame.
FLANGE
col-
BOLT
BELT STOPPER
8 x 45 mm FLA
(V-BELT
-
DRIVEN
STOPPER)
2. Loosen the belt tension adjust knob f
pulley and remove it from the pulleys starting
posite side.
with the one on the op-
BELT TENSION
ADJUST
KNOB
-
3. Remove
the belt from the cutter
deck driven
pulley.
-
4. Installation
sequence
is essentially
the reverse order of removal.
Check that the belt is fully seated in the pulleys. After installing the
cutter deck belt, check the belt slack as described in page 30. 45
3. Cutter
-
-
deck removal
1. Start the engine and move the hydraulic cylinder selector lever (optional part) to the “FRONT”
position. Raise the cutter deck by using
hydraulic lift lever.
2. Stop the engine and remove the engine switch key.
3. Set the gauge wheel to the 1 l/2 position (See page 33).
4. Lower the cutter deck; turn off the engine, remove the ignition key
and disconnect
the spark plug caps.
m
To avoid severe personal injury remove the ignition key
and disconnect
the spark plug caps to prevent accidental starting.
-
5. Remove the cutter deck drive belt from the pulleys. (See page 45).
6. Disconnect
the front deck links by removing 14 mm plain washers
and linch pins on each side of the cutter deck.
LINCH
PINS
LINCH
PIN
14 mm PLAIN WASHER
T DECK LINKS
-
7. Disconnect the cutter deck lift plates and rear deck links by removing
the 14 mm lock pins, washers and linch pin from the cutter deck.
REAR LINK SHAFT
REAR DECK
46
CUTTER
DECK
LIFT PLATE
LOCK
PIN
PLAIN
WASHER
LINKS
-
8. Turn the steering wheel to the extreme
from right side of tractor.
4. Blade belt inspection
-
-
left. Remove
the cutter deck
and replacement
1. Remove the cutter deck from the tractor (see page 46).
2. Remove the five 8 mm nuts, remove the right and left pulley covers,
and clean any grass and other foreign matter from the inside of the
covers.
3. Check the belt for signs of wear or cracks.
4. Replace the belt with a new one if the belt is worn or damaged,
replace it in the following manner: Grasp the belt midway between
pulleys A and B, pull it toward you and to your left. Remove the belt
from the pulleys starting with pulley A. Remove the belt from the
other pulleys.
PULLEY
COVER
PULLEY
A
PULLEY
B
m
If the belt is not released slowly, the idle pulley will move suddenly and could injure your hand. Be sure to install the right and left pulley
covers securely. Failure to install the pulley covers can cause serious personal injury.
47
5. Cutter
deck cleaning
m
To prevent
ing the cutter deck.
-
-
injuries,
be sure to wear heavy gloves when
clean-
1. Remove the cutter deck from the tractor (see page 46).
2. Remove the five 8 mm nuts, and remove the right and left pulley
covers.
3. Remove grass and other foreign matter from inside the covers.
4. Turn the cutter deck upside down, and clean off accumulated
grass
and other debris.
5. Reinstall
6. Cutter
To install,
the belt covers,
and install the cutter
deck on the tractor.
deck installation
reverse
the removal
procedure.
NOTE: Before atempting to install the cutter deck, lower the lift arm and
then push it with your hand to be sure it is all the way down.
48
7. Blade bolt tightness/Blade
replacement.
m
To avoid severe personal injury, remove the ignition key and
disconnect
the spark plug caps to prevent accidental starting; and wear
heavy gloves to protect your hands from the cutter blade.
n Blade bolt tightness
-
1.
2.
3.
4.
Remove the cutter deck from the tractor (see page 46).
Turn the cutter deck upside down.
Clean dirt and grass from the blade and the inside of the cutter deck.
Hold the blade firmly, check that the blade bolt is properly tightened.
Blade bolt torque:
6.0
kg-m (43 ft-lb)
TORQUE
WRENCH
n Blade removal
m
-
Use genuine
Honda
replacement
blades or equivalent.
1. Hold the blade firmly, and remove the blade bolt and the washer.
2. Remove the blade and blade holder.
BLADE
BOLT
BLADE
HOLDER
49
n Blade installation
-
1. Clean dirt and grass from the blade, blade holder, and the inside of
the cutter deck.
2. Install the blade holder, blade, washer, and blade bolt.
-
1 NOTICE
]
l
Be sure the blade is properly aligned with the blade holder before
tightening
the blade bolt. Do not allow the blade to overlap the edge of
the holder.
l
Install the washer with the side marked “INSIDE”
facing the blade.
The blade bolt and washer are specially designed for this application
and must not be replaced with any other bolt or washer.
l
-
3. Hold the blade firmly,
6.0 kg-m (43 ft-lb).
50
and tighten
the blade bolt to a torque
value of
8. Fasteners
l
l
tightness/Lubrication
points
Check all nuts, bolts and fasteners and tighten securely
Check and apply grease where noted.
Recommended
Grease: SAE Multipurpose
Grease
if necessary.
GREASE
FITTING
51
8.
STORAGE
1. Remove the cutter deck from the tractor.
2. Turn the cutter deck upside down. Clean the underside of the deck with
water, and dry thoroughly.
3. For longer service and greater efficiency,
keep the underside of the
mower
housing
clean and free of accumulated
grass clippings
by
washing it down with a hose after use and/or cleaning it with a wire
brush and scraper. Remove any rust and apply a rust-resistant
paint.
Cleaning and rust prevention
are especially important before seasonal
storage.
(lw
as h’Ing the deck directly after use can cause premature bearing wear. Allow the deck to cool before washing,
then run the deck to
remove any excess moisture.
52
9.
Poor finishing/appearance.
1. Tractor speed too fast
2. Grass accumulation
inside deck.
)
)
Tires improperly inflated
Mower not level
Wrong cutter deck heightEngine speed too low
Blades do not rotate or stop.
1. Blade drive belt worn or
broken
2. P.T.O. lever cable faulty
out of adjustment
3. Faulty P.T.O. clutch or
worn disk
Clogged
cutter
chute.
1. Wrong blade
deck
(see
-
or-
Replace
p.47)
with
new
See your authorized
tractor dealer.
) See your authorized
tractor dealer.
belt
(see
HONDA
HONDA
discharge
2. Deck too low
3. Engine overloaded
4. Lawn wet or watered.
5. Lawn too tall
6. Engine
Shift to lower speed.
Clean
deck
underside
11.48)
* Have the blade sharpened
or
replace it.
) Check tire inflation.
) Check cutter deck mounting.
Change to proper height.
) Run at full throttle.
3. Dull blade
4.
5.
6.
7.
TROUBLESHOOTING
speed too low
)
Use genuine
Honda blade or
equivalent.
) Raise deck and adjust deck
height properly.
) Operate
at full throttle.
Use
lower speed range. Set cutter
deck
higher
than
desired
height for first pass, then cut
to desired height on second
pass.
) Allow to dry before cutting.
) Set cutter deck higher than
desired height for first pass,
then cut to desired height on
second pass.
* Run at Full throttle.
53
Deep cut
1. Cutting height too low
2. Tractor speed too high
3. Uneven surface
4. Rough and uneven surface
-Adjust
Excessive vibration
1. Unbalanced
blades
2. Drive/blade
belt damaged
3. Pulley (s) damaged or out of alignment
) Increase to proper height.
e Lower to proper speed.
) Change cutting pattern.
with
height
adjuster
(see page 33).
e Adjust balance.
w Replace.
See your authorized
tractor dealer.
Honda
Engine speed drops excessively
under loads.
) Run at full throttle.
1. Engine speed too low
) Lower to proper speed range.
2. Tractor speed too fast
3. Pebbles or other foreign matter Remove.
are stuck in cutter deck.
54
10.
MODEL
description
SPECIFICATIONS
MID-MOUNT
products
Overall
length
880
Overall
width
1,520
mm (59.8
Cutting
width
1,168
mm (46 in)
Weight
code
ROTARY
Power
MOWER
mm (34.6
60 kg (132
Cutting
height
l-1/2
Number
of blades
3
in)
in)
lb)
to 4 in
Blade length
393
Blade spindle speed
Left and center
3,895
rpm
Right
4,290
rpm
Gauge
wheel
1
RAB
mm (15.5
(2) 150
in)
mm (5.9
Deck
lifting/lowering
Hydraulic
Deck
mounting
4-pint
in) Diameter
linkage
55
11.
Owner
WARRANTY
SERVICE
Satisfaction
Your satisfaction
and goodwill are important to your dealer and to us. All
Honda warranty details are explained in the Distributor’s
Limited Warranty. Normally, any problems concerning the product will be handled by your
dealer’s service department.
If you have a warranty problem that has not
been handled to your satisfaction,
we suggest you take the following
action:
l
Discuss your problem with a member of dealership management.
Often
complaints
can be quickly resolved at that level. If the problem has
already been reviewed with the Service Manager, contact the owner of
the dealership or the General Manager.
l
If your problem
still has not been resolved
to your satisfaction,
contact:
American Honda Motor Co., Inc.
P.O. Box 100021
Duluth, Georgia 30 136-942 1
Telephone:
(404) 497-6400
We will need the following
-
information
Your name, address, and telephone
Product model and serial number
Date of Purchase
Dealer name and address
Nature of problem
in order to assist you:
number
After reviewing
all the facts involved, you will be advised of what action
can be taken. Please bear in mind that your problem will likely be resolved
at the dealership,
using the dealer’s facilities, equipment,
and personnel,
so it is very important that your initial contact be with the dealer.
Your purchase of a Honda product is greatly appreciated
by both your
dealer and American Honda Motor Co., Inc. We want to assist you in every
way possible to assure your complete satisfaction
with your purchase.
56
Current customer service contact information:
United States, Puerto Rico, and U.S. Virgin Islands:
Honda Power Equipment dealership personnel are trained professionals. They should
be able to answer any question you may have. If you encounter a problem that your
dealer does not solve to your satisfaction, please discuss it with the dealership's
management. The Service Manager or General Manager can help. Almost all problems
are solved in this way.
If you are dissatisfied with the decision made by the dealership's management, contact
the Honda Power Equipment Customer Relations Office. You can write:
American Honda Motor Co., Inc.
Power Equipment Division
Customer Relations Office
4900 Marconi Drive
Alpharetta, GA 30005-8847
Or telephone: (770) 497-6400 M-F, 8:30 am - 7:00 pm EST
When you write or call, please provide the following information:
•
Model and serial numbers
•
Name of the dealer who sold the Honda power equipment to you
•
Name and address of the dealer who services your equipment
•
Date of purchase
•
Your name, address, and telephone number
•
A detailed description of the problem